Brand the web portal
Applies to:
SQL Server 2016 (13.x) Reporting Services and later
Power BI Report Server
Learn how to customize your SQL Server Reporting Services (SSRS) or Power BI Report Server web portal to match your business’s branding. By using an uploaded brand package, you can change colors, logos, and other styling elements on your web portal. A brand package consists of three items that you package as a zip file. The following sections describe the items in the brand package and provide examples of the contents.
Prerequisites
- SQL Server Reporting Services (SSRS) or Power BI Report Server installed and configured.
- Access to the Reporting Services Web Portal.
- Connection to a report server database.
Create the brand package
To create the brand package, you can use create files from scratch or download samples from the GitHub site.
If you start from scratch, start by creating each file and naming the files in your brand package as follows:
metadata.xmlcolors.jsonlogo.png(optional file)
The zip file can be named anything you like.
If you choose to use a sample branding package, download the zip file and extract the files so that you can edit them according to your needs.
Define brand metadata (metadata.xml)
The metadata.xml file specifies the name of the brand package, and references the colors.json and logo.png files.
To change the name of your brand package, change the name attribute of the SystemResourcePackage element.
<?xml version="1.0" encoding="utf-8"?>
<SystemResourcePackage xmlns="http://schemas.microsoft.com/sqlserver/reporting/2016/01/systemresourcepackagemetadata"
    type="UniversalBrand"
    version="2.0.2"
    name="Multicolored example brand"
    >
</SystemResourcePackage>
You can include a logo in your brand package. This item is contained in the Contents element.
The following example doesn't include a logo file:
<?xml version="1.0" encoding="utf-8"?>
<SystemResourcePackage xmlns="http://schemas.microsoft.com/sqlserver/reporting/2016/01/systemresourcepackagemetadata"
    type="UniversalBrand"
    version="2.0.2"
    name="Multicolored example brand"
    >
    <Contents>
        <Item key="colors" path="colors.json" />
    </Contents>
</SystemResourcePackage>
The following example includes a logo file:
<?xml version="1.0" encoding="utf-8"?>
<SystemResourcePackage xmlns="http://schemas.microsoft.com/sqlserver/reporting/2016/01/systemresourcepackagemetadata"
    type="UniversalBrand"
    version="2.0.2"
    name="Multicolored example brand"
    >
    <Contents>
        <Item key="colors" path="colors.json" />
        <Item key="logo" path="logo.png" />
    </Contents>
</SystemResourcePackage>
Define the color scheme (colors.json)
The colors.json file defines the color scheme for your brand package. When you upload the brand package, the server extracts the name/value pairs from this file and merges them with the primary LESS stylesheet, brand.less. It processes the stylesheet, and serves the resulting CSS file to the client. All colors in the stylesheet follow the six-character hexadecimal representation of a color.
Here’s an example of the colors.json file:
{
    "name": "Multicolored example brand",
    "version": "1.0",
    "interface": {
        "primary": "#009900",
        "primaryContrast": "#ffffff",
        "secondary": "#042200",
        "neutralPrimary": "#d8edff",
        "neutralSecondary": "#e9d8eb",
        "danger": "#ff0000",
        "success": "#00ff00",
        "warning": "#ff8800"
    },
    "theme": {
        "dataPoints": ["#0072c6", "#f68c1f", "#269657"],
        "good": "#85ba00",
        "bad": "#e90000",
        "neutral": "#edb327"
    }
}
How LESS variables work
The LESS stylesheet contains blocks that reference predefined LESS variables. The following example shows how the stylesheet uses LESS variables:
/* primary buttons */
.btn-primary {
    color:@primaryButtonColor;
    background-color:@primaryButtonBg;
}
While this syntax resembles CSS, the color values prefixed with the @ symbol are unique to LESS. The colors.json file sets these variables.
For example, the colors.json file might include following values:
"primary":"#009900",
"primaryContrast":"#ffffff"
When processed, the LESS variables map to the corresponding values in the colors.json file. The resulting CSS looks like the following example:
.btn-primary {
    color: #ffffff;
    background-color: #009900;
}
All of the primary buttons then render dark green with white text.
Objects in colors.json
The colors.json file includes two main objects:
- Interface: Properties specific to the web portal.
- Theme: Properties specific to the mobile reports that you create.
The interface object is broken down into the following properties:
| Section | Description |
|---|---|
| Primary | Button and hover colors. |
| Secondary | Title bar, search bar, left hand menu (if displayed), and text color for those items. |
| Neutral Primary | Home and report area backgrounds. |
| Neutral Secondary | Text box and folder options backgrounds, and the settings menu. |
| Neutral Tertiary | Site settings backgrounds. |
| Danger/Warning/Success messages | Colors for those messages. |
| KPI | Controls the colors for a good (1), neutral (0), neutral (-1), and none. |
The theme object is broken down into the following properties:
| Section | Description |
|---|---|
| Data Points | Colors for data points in charts and visualizations. |
| Good/Bad/Neutral | Colors indicating status. |
| Background | Overall background color. |
| Foreground | Overall foreground color. |
| Map Base | Base color for maps. |
| Panel Background/Foreground/Accent | Colors for panels. |
| Table Accents | Accent colors for tables. |
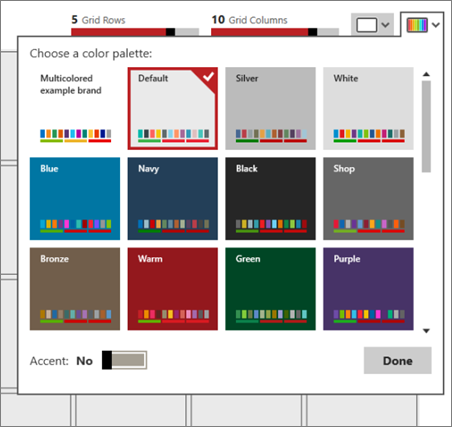
The first time you connect to a server with a Mobile Report Publisher that has a brand package deployed, the publisher adds the theme to the list of available themes.

You can then use that theme for any mobile reports that you create, even if they aren't for the same server that you have the theme deployed on.
Use a logo (logo.png)
If you include a logo with your brand package, it appears in the web portal in place of the name you originally set for the web portal.
Make sure the logo is in the PNG file format. The file dimensions scale once uploaded to the server. The logo scales to approximately 290 x 60 pixels.
Apply the brand package to the web portal
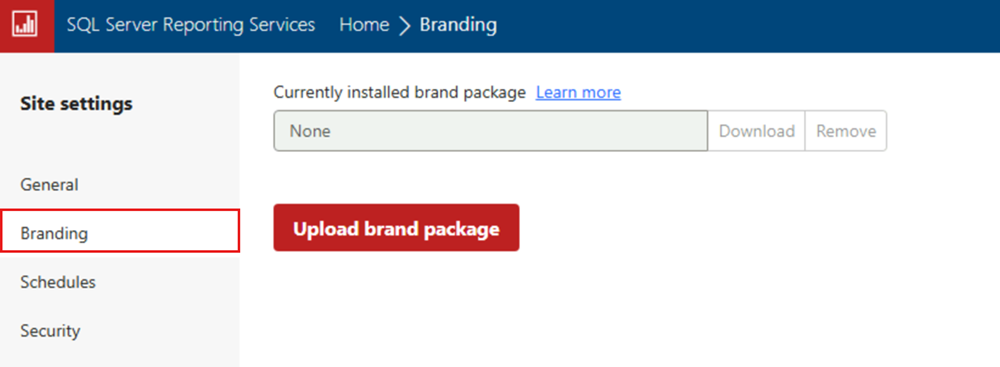
Access the web portal.
Select the gear icon in the upper right, and then choose Site Settings.

Select Branding.

Currently installed brand package either displays the name of the uploaded package, or it displays None.
Select Upload brand package. The brand package uploads to the report server and the web portal renders the updated branding immediately.
Download or remove the brand package
If you see a brand package listed in the Currently installed brand package box, you can choose to download or remove the package. You might want to download the package if you want to make adjustments to the existing package and apply those changes. If you remove the package, the web portal resets to the default brand immediately. Choose either Download or Remove depending on the action you want to take.
More questions? Try asking the Reporting Services forum.