Integration Services (SSIS) Projects and Solutions
Applies to:
SQL Server
SSIS Integration Runtime in Azure Data Factory
SQL Server provides SQL Server Data Tools (SSDT) for the development of Integration Services packages.
Integration Services packages reside in projects. To create and work with Integration Services projects, you must install SQL Server Data Tools. For more information, see Install Integration Services.
When you create a new Integration Services project in SQL Server Data Tools (SSDT), the New Project dialog box includes an Integration Services Project template. This project template creates a new project that contains a single package.
Projects and solutions
Projects are stored in solutions. You can create a solution first and then add an Integration Services project to the solution. If no solution exists, SQL Server Data Tools (SSDT) automatically creates one for you when you first create the project. A solution can contain multiple projects of different types.
Tip
By default, when you create a new project in SQL Server Data Tools, the solution is not shown in Solution Explorer pane. To change this default behavior, on the Tools menus, select Options. In the Options dialog box, expand Projects and Solutions, and then select General. On the General page, select Always show solution.
Solutions contain projects
A solution is a container that groups and manages the projects that you use when you develop end-to-end business solutions. A solution lets you handle multiple projects as one unit and to bring together one or more related projects that contribute to a business solution.
Solutions can include different types of projects. If you want to use SSIS Designer to create an Integration Services package, you work in an Integration Services project in a solution provided by SQL Server Data Tools (SSDT).
When you create a new solution, SQL Server Data Tools (SSDT) adds a solution folder to Solution Explorer. The solution folder contains these types of files:
.sln: contains information about the solution configuration and lists the projects in the solution..suo: contains information about your preferences for working with the solution.
While SQL Server Data Tools (SSDT) automatically creates a solution when you create a new project, you can also create a blank solution, and then add projects later.
Integration Services projects contain packages
A project is a container in which you develop Integration Services packages.
In SQL Server Data Tools (SSDT), an Integration Services project stores and groups the files that are related to the package. For example, a project includes the files that are required to create a specific extract, transfer, and load (ETL) solution.
Before you create an Integration Services project, you should become familiar with the basic contents of this kind of project. After you understand what a project contains, you can begin creating and working with an Integration Services project.
Folders in Integration Services projects
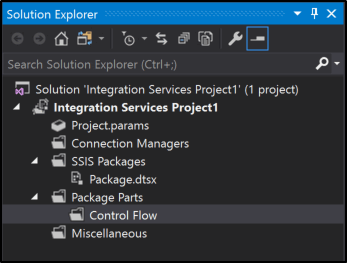
The following image shows the folders in an Integration Services project in SQL Server Data Tools (SSDT).

The following table describes the folders that appear in an Integration Services project.
| Folder | Description |
|---|---|
| Connection Managers | Contains Project Connection Managers. For more information, see Integration Services (SSIS) Connections. |
| SSIS Packages | Contains packages. For more information, see Integration Services (SSIS) Packages. |
| Package Parts | Contains Package Parts that can be reused or imported. For more information, see Reuse Control Flow across Packages by Using Control Flow Package Parts |
| Miscellaneous | Contains files other than package files. |
Files in Integration Services projects
When you add a new or an existing Integration Services project to a solution, SQL Server Data Tools (SSDT) creates project files. Project files include:
.dtproj: contains information about project configurations and items such as packages.*.dtproj.user: contains information about your preferences for working with the project.*.database: contains information that SQL Server Data Tools (SSDT) requires to open the Integration Services project.Project.params: contains information about the Project parameters.
Version targeting in Integration Services projects
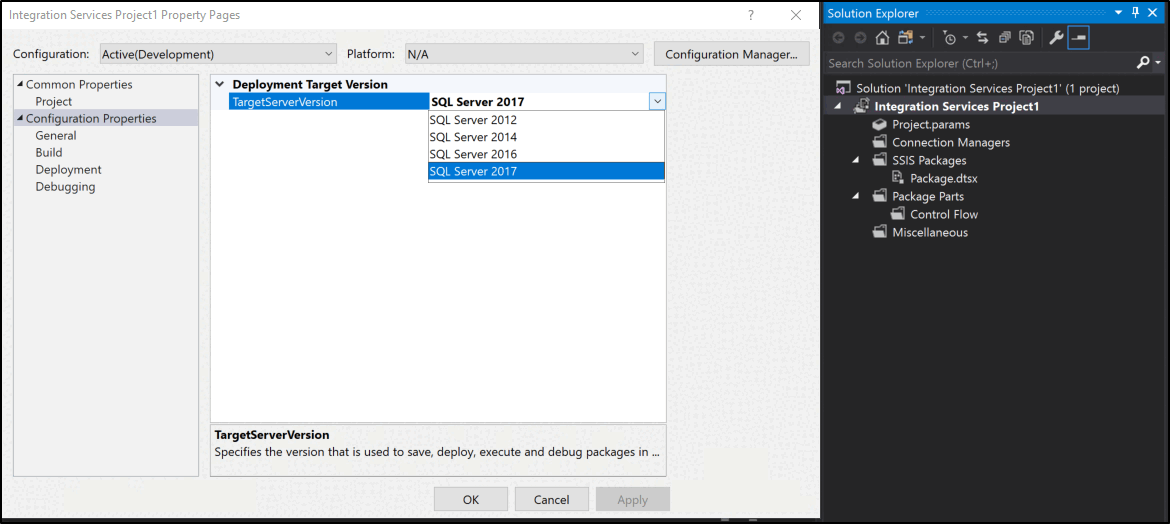
In SQL Server Data Tools (SSDT), you can create, maintain, and run packages that target specific versions of SQL Server.
In Solution Explorer, right-click on an Integration Services project and select Properties to open the property pages for the project. On the General tab of Configuration Properties, select the TargetServerVersion property, and then choose the version you want.
Create a new Integration Services project
Open SQL Server Data Tools (SSDT).
On the File menu, point to New, and then select Project.
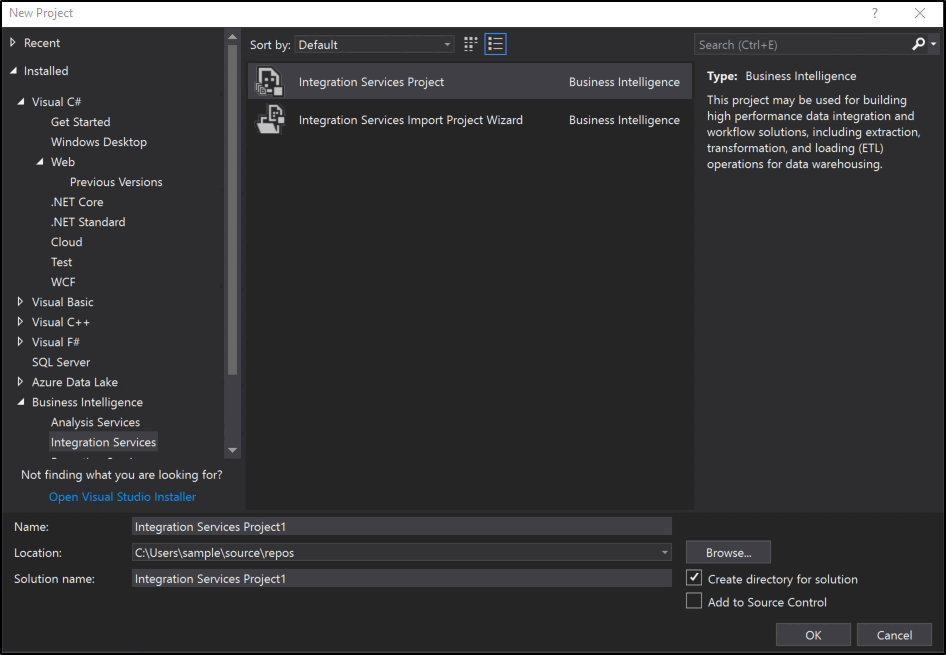
In the New Project dialog box, select Business Intelligence, and then select the Integration Services Project template.
The Integration Services Project template creates an Integration Services project that contains a single, empty package.
(Optional) Edit the project name and the location.
The solution name is automatically updated to match the project name.
To create a separate folder for the solution file, select the default option, specifically Create directory for solution.
If source control software is installed on the computer, select Add to source control to associate the project with source control.
If the source control software is Microsoft Visual SourceSafe, the Visual SourceSafe Login dialog box opens. In Visual SourceSafe Login, provide a user name, a password, and the name of the Microsoft Visual SourceSafe database. Select Browse to locate the database.
Note
To view and change the selected source control plug-in and to configure the source control environment, select Options on the Tools menu, and then expand the Source Control node.
Select OK to add the solution to Solution Explorer and add the project to the solution.
Import an existing project with the Import Project Wizard
In Visual Studio, select New > Project on the File menu.
In the Installed Templates area of the New Project window, expand Business Intelligence, and select Integration Services.
Select Integration Services Import Project Wizard from the project types list.
Type a name for the new project to be created in the Name text box.
Type the path or location for the project in the Location text box, or select Browse to select one.
Type a name for the solution in the Solution name text box.
Select OK to launch the Integration Services Import Project Wizard dialog box.
Select Next to switch to the Select Source page.
If you're importing from an
.ispacfile, type the path including file name in the Path text box. Select Browse to navigate to the folder where you want the solution to be stored and type file name in the File name text box, and select Open.If you're importing from an Integration Services Catalog, type the database instance name in the Server name text box or select Browse and select the database instance that contains the catalog.
Select Browse next to Path text box, expand folder in the catalog, select the project you want to import, and select OK.
Select Next to switch to the Review page.
Review the information and select Import to create a project based on the existing project you selected.
Optional: select Save Report to save the results to a file
Select Close to close the Integration Services Import Project Wizard dialog box.
Add a project to a solution
When you add a project, you can have Integration Services create a new, blank project, or you can add a project that you have already created for a different solution. You can only add a project to an existing solution when the solution is visible in SQL Server Data Tools (SSDT).
Add a new project to a solution
In SQL Server Data Tools (SSDT), open the solution to which you want to add a new Integration Services project, and either:
- Right-click the solution, select Add, and then select New Project.
or
- On the File menu, point to Add, and then select New Project.
In the Add New Project dialog box, select Integration Services Project in the Templates pane.
Optionally, edit the project name and location.
Select OK.
Add an existing project to a solution
In SQL Server Data Tools (SSDT), open the solution to which you want to add an existing Integration Services project, and do one of the following:
Right-click the solution, point to Add, and then select Existing Project.
On the File menu, select Add, and then select Existing Project.
In the Add Existing Project dialog box, browse to locate the project you want to add, and then select Open.
The project is added to the solution folder in Solution Explorer.
Remove a project from a solution
You can only remove a project from a solution when the solution is visible in SQL Server Data Tools (SSDT). After the solution is visible, you can remove all except one project. As soon as only one project remains, SQL Server Data Tools (SSDT) no longer displays the solution folder. You can't remove the last project.
In SQL Server Data Tools (SSDT), open the solution from which you want to remove an Integration Services project.
In Solution Explorer, right-click the project, and then select Unload Project.
Select OK to confirm the removal.
Add an item to a project
In SQL Server Data Tools (SSDT), open the solution that contains the Integration Services project to which you want to add an item.
In Solution Explorer, right-click the project, point to Add, and do one of the following:
Select New Item, and then select a template from the Templates pane in the Add New Item dialog box.
Select Existing Item, browse in the Add Existing Item dialog box to locate the item you want to add to the project, and then select Add.
The new item appears in the appropriate folder in Solution Explorer.
Copy project items
You can copy objects within an Integration Services project or between Integration Services projects. You can also copy objects between the other types of SQL Server Data Tools (SSDT) projects, Reporting Services and Analysis Services. To copy between projects, the project must be part of the same SQL Server Data Tools (SSDT) solution.
In SQL Server Data Tools (SSDT), open the Integration Services project or solution that you want to work with.
Expand the project and item folder to copy from.
Right-click the item and select Copy.
Right-click the Integration Services project to copy to and select Paste.
The items are automatically copied to the correct folder. If you copy items to the Integration Services project that aren't packages, the items are copied to the Miscellaneous folder.

