Add and edit user profile properties in SharePoint
If your organization uses the cloud identity model, your user accounts are stored in Microsoft Entra ID and you can manage most user profile info in the Microsoft 365 admin center. For info, see Edit or change a user in Microsoft 365. You can also manage user profiles (including adding user pictures and defining user managers) in the Microsoft Entra admin center. For info, see Add or change profile information for a user in Microsoft Entra ID. If you need to create custom user profile properties, such as languages spoken, emergency contact info, or sales account, you can use user properties in SharePoint. Note that these properties are NOT synced back to Microsoft Entra ID.
Add a property for a user profile
- Go to More features in the new SharePoint admin center, and sign in with an account that has admin permissions for your organization.
Note
If you have Office 365 operated by 21Vianet (China), sign in to the Microsoft 365 admin center, then browse to the SharePoint admin center and open the More features page.
Under User profiles, select Open.
Under People, select Manage User Properties.

Select New Property.
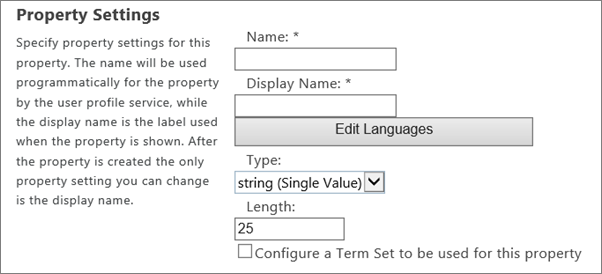
In the Name box, enter a unique name for the property.

In the Display Name box, enter the profile property name that will be displayed to all users. (This name doesn't have to be unique.)
In the Type list, select the data type for the property.
Note
If you select string (Multi Value), the property will be permanently set as a multi-valued property. You can't change this setting after you select OK. You can only delete the property and add it again as a new single-value property.
If you selected binary, HTML, or string, use the Length box to enter the maximum number of characters allowed for property values.
If you selected string and want to associate the profile property with a managed metadata term set, select Configure a Term Set to be used for this property. Then select a term set from the list.
Make sure Default User Profile Subtype is selected so the default user profile subtype is associated with this user profile property.
In the Description box, enter the instructions or information that is displayed to users about this profile property.
In the Policy Settings section, select the policy setting and default privacy setting that you want for this property. Select the User can override box to enable users to override these settings.
If you want users to be able to change this profile information for themselves, select Allow users to edit values for this property.
In the Display Settings section, specify whether and how the property will be viewed by users.
In the Search Settings section, select Alias if the property is the equivalent of a user's name. For example, you might do this if you create a property for a "Stage name" and want searches for all documents by John Kane to return the same results as searches for the user's real name. Select the Indexed if you want searches to return all the user profiles matching that property. For example, if you have a property for "University," a search for that value would return all alumni from that university.
Note
The Alias check box is available only if you set the Default Privacy Setting > Everyone.
Select OK.
Edit or delete a property you added
- Go to More features in the new SharePoint admin center, and sign in with an account that has admin permissions for your organization.
Note
If you have Office 365 operated by 21Vianet (China), sign in to the Microsoft 365 admin center, then browse to the SharePoint admin center and open the More features page.
Select User profiles, and then select Open. Under People, choose Manage User Properties.

In the Property Name column, select the profile property that you want to change, and then select Edit or Delete.
Edit the elements you want to change.
Note
Some elements of profile properties, such as the Type element, are unavailable because they can't be edited. To define these elements, create a new property. The exception is the Source Data Connection property. It's predefined in SharePoint and can't be changed.
When you're done, select OK.
Synchronize custom properties
Custom properties from Active Directory or Microsoft Entra ID aren't synchronized with SharePoint. For info about bulk updating custom user profile properties by using PowerShell, see Call the import API from PowerShell.
Need more help?
![]() If you have technical questions about this topic, you might find it helpful to post them on the SharePoint discussion forum. It's a great resource for finding others who have worked with similar issues or who have encountered the same situation.
If you have technical questions about this topic, you might find it helpful to post them on the SharePoint discussion forum. It's a great resource for finding others who have worked with similar issues or who have encountered the same situation.