Text Input in Xamarin.iOS
Accepting user text input is accomplished with the UITextField for single-line inputs and UITextView for multi-line editable text. You can drag either of these controls onto a screen and double-click to set the initial text.
The screenshots below show the icons for these controls, located in the Toolbox Pad in Visual Studio for Mac:
Once you have named the outlet and saved the Storyboard file, Visual Studio for Mac will update the .designer.cs partial class and you can add C# code that references the control to your class file. Each control has its own unique properties and events that can be accessed in your C# code.
UITextField
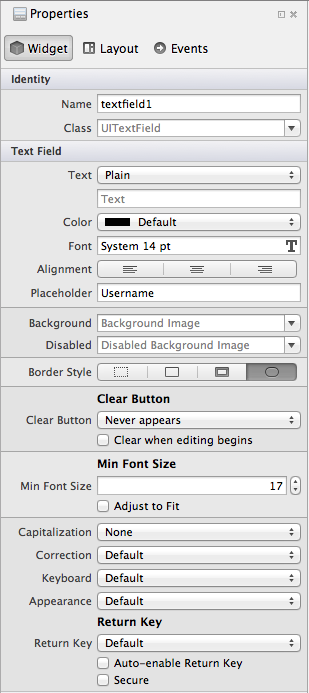
The UITextField control is most often used to accept a single line of text input such as a username or password. Some of the options available for customizing the control are shown here:
These controls are explained below:
- Placeholder – This is optional. If set, it is displayed when the text field is empty, usually to explain to the user what input is expected.
- Clear Button – This controls when the standard clear button (the grey circle with (X)) appears in the text field, as a way for the user to clear text quickly. It can be permanently hidden, permanently visible, or shown, depending on whether or not the field is being edited.
- Min Font Size and Adjust to Fit – Allows the font size to be adjusted automatically to fit longer text and prevent truncation, but limited to no smaller than the specified size.
- Capitalization – Whether to automatically capitalize words, sentences or all input.
- Correction – Whether spell checking and suggestions are enabled.
- Keyboard – Controls the keyboard style displayed for the input, and therefore what keys are available on the keyboard. This includes Number Pad, Phone Pad, Email, URL along with other options.
- Appearance – Controls the appearance style of the keyboard and will be either dark or light themed.
- Return Key – Change the label on the Return key to better reflect what action will be taken. Supported values include Go, Join, Next, Route, Done, and Search.
- Secure – Identifies whether the input is masked (such as for a Password input).
If a UITextField called textfield1 has been added to a screen with the designer, you can set or change its properties in C# as follows:
textfield1.Placeholder = "type email here...";
textfield1.KeyboardType = UIKeyboardType.EmailAddress;
textfield1.ReturnKeyType = UIReturnKeyType.Send;
textfield1.MinimumFontSize = 17f;
textfield1.AdjustsFontSizeToFitWidth = true;
Xamarin.iOS provides enumerations where appropriate to make it easy to select the settings you want, such as the UIKeyboardType and UIReturnKeyType in the above code snippet.
Display Text Programmatically
If you don’t want to design your screen with the designer or if you wish to dynamically add some text at runtime, you can create and display a UITextField programmatically in the ViewDidLoad method of a view controller like this:
var frame = new CGRect(10, 10, 300, 40);
textfield1 = new UITextField(frame);
View.Add(textfield1);
UITextView
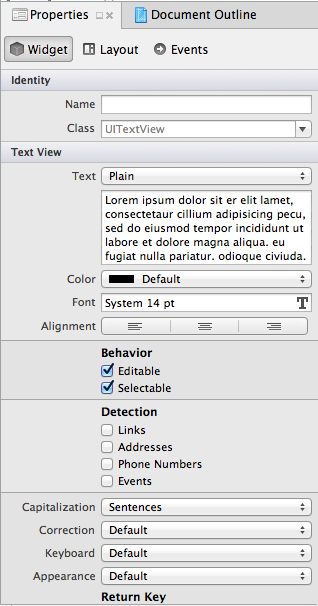
The UITextView control can be used to display read-only text or to accept multiple-line text input. It has many of the same options as the UITextField (such as Capitalization, Correction, etc).
Specific properties include:
- Behavior – Whether the text is editable or read-only.
- Detection – Detects and converts the inputted data into clickable elements such as phone numbers that can trigger a call, addresses that become links to Maps, URLs that open in Safari or dates and times that become events in Calendar.
If a UITextView has been added to a screen with the designer, you can set or change its properties like this:
textview1.Text = "Lorem ipsum..."; // lots of text can go here
textview1.Editable = true;
textview1.DataDetectorTypes = UIDataDetectorType.PhoneNumber | UIDataDetectorType.Link;


