หมายเหตุ
การเข้าถึงหน้านี้ต้องได้รับการอนุญาต คุณสามารถลอง ลงชื่อเข้าใช้หรือเปลี่ยนไดเรกทอรีได้
การเข้าถึงหน้านี้ต้องได้รับการอนุญาต คุณสามารถลองเปลี่ยนไดเรกทอรีได้
This two-part guide expands the Phoneword application to handle a second screen. Along the way, basic Android Application Building Blocks are introduced with a deeper dive into Android architecture.
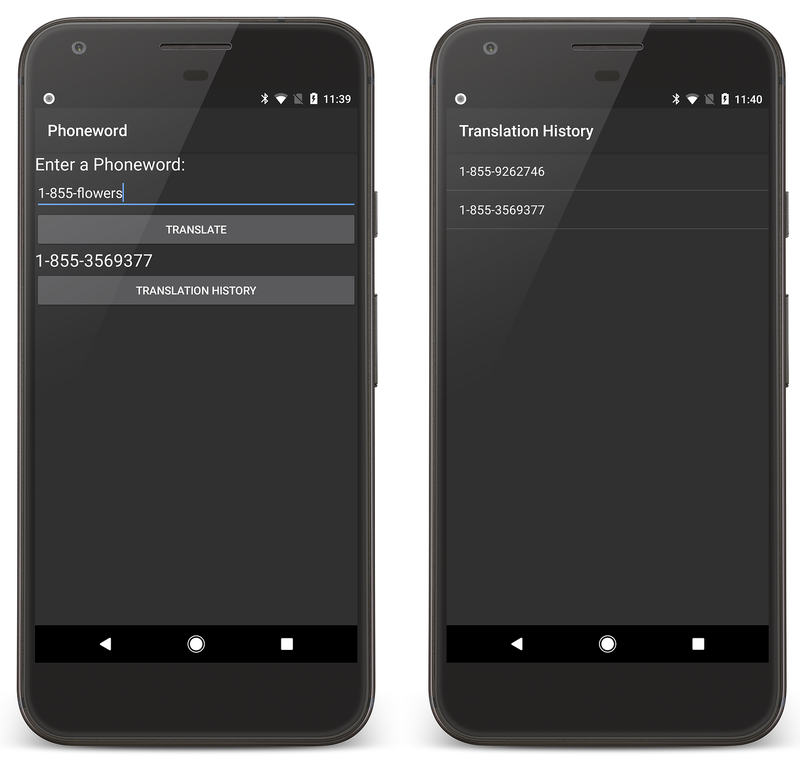
In the walkthrough portion of this guide, you'll add a second screen to Phoneword application to keep track of the history of numbers translated using the app. The final application will have a second screen that displays the numbers that were "translated", as illustrated by the screenshot on the right:
The accompanying Deep Dive reviews what was built and discusses architecture, navigation, and other new Android concepts encountered along the way.
Requirements
Because this guide picks up where Hello, Android leaves off, it requires completion of the Hello, Android Quickstart.
Walkthrough
In this walkthrough you'll add a Translation History screen to the Phoneword application.
Start by opening the Phoneword application in Visual Studio and editing the Main.axml file from the Solution Explorer.
Tip
Newer releases of Visual Studio support opening .xml files inside the Android Designer.
Both .axml and .xml files are supported in the Android Designer.
Updating the layout
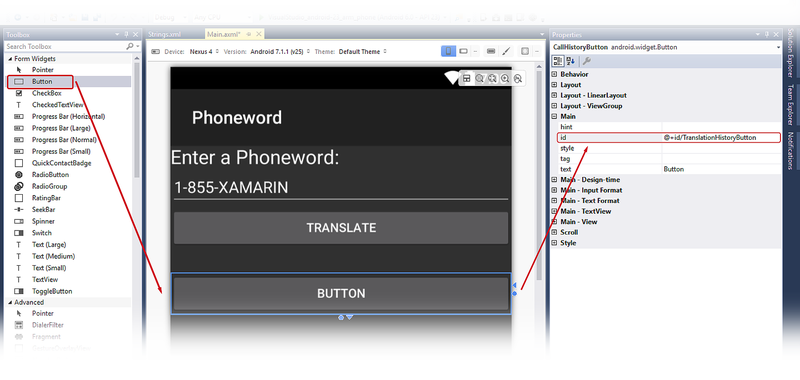
From the Toolbox, drag a Button onto the design surface and
place it below the TranslatedPhoneWord TextView. In the Properties pane, change the button Id to @+id/TranslationHistoryButton
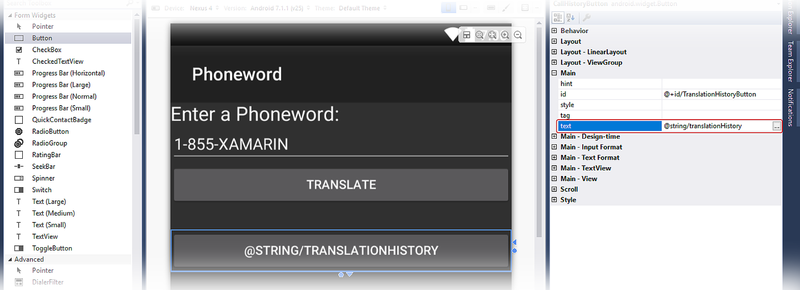
Set the Text property of the button to
@string/translationHistory. The Android Designer will interpret this
literally, but you're going to make a few changes so that the
button's text shows up correctly:
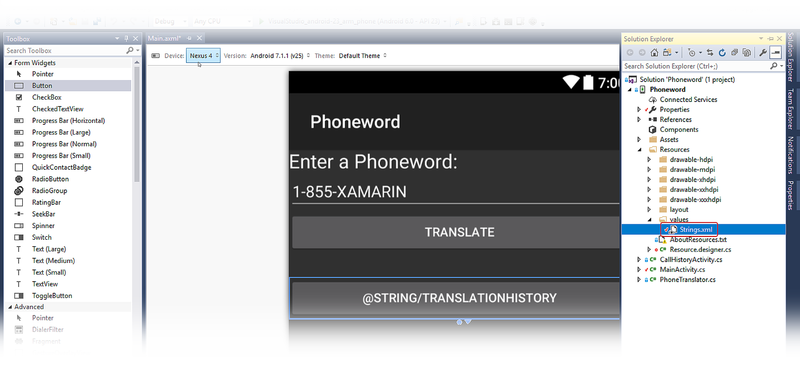
Expand the values node under the Resources folder in the Solution Explorer and double-click the string resources file, Strings.xml:
Add the translationHistory string name and value to the Strings.xml
file and save it:
<?xml version="1.0" encoding="utf-8"?>
<resources>
    <string name="translationHistory">Translation History</string>
    <string name="ApplicationName">Phoneword</string>
</resources>
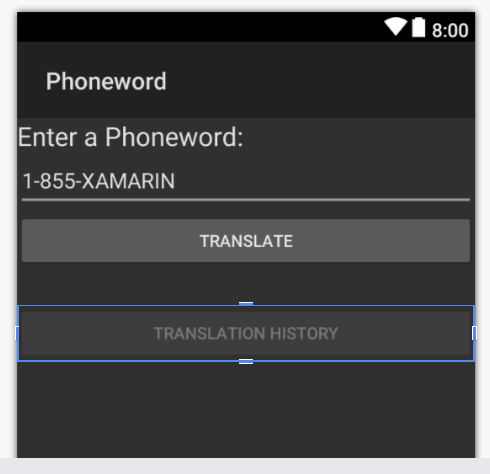
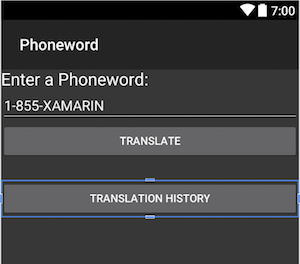
The Translation History button text should update to reflect the new string value:
With the Translation History button selected on the design surface,
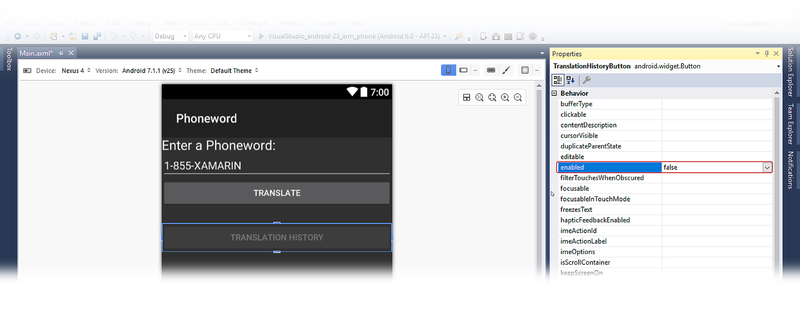
find the enabled setting in the Properties pane and set its
value to false to disable the button. This will cause the button
to become darker on the design surface:
Creating the second activity
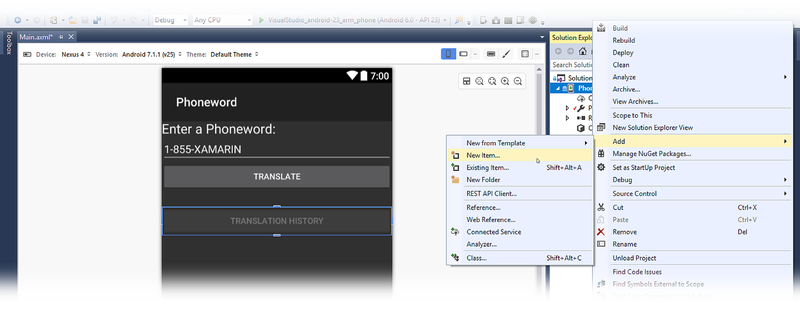
Create a second Activity to power the second screen. In the Solution Explorer, right-click the Phoneword project and choose Add > New Item...:
In the Add New Item dialog, choose Visual C# > Activity and name the Activity file TranslationHistoryActivity.cs.
Replace the template code in TranslationHistoryActivity.cs with the following:
using System;
using System.Collections.Generic;
using Android.App;
using Android.OS;
using Android.Widget;
namespace Phoneword
{
    [Activity(Label = "@string/translationHistory")]
    public class TranslationHistoryActivity : ListActivity
    {
        protected override void OnCreate(Bundle bundle)
        {
            base.OnCreate(bundle);
            // Create your application here
            var phoneNumbers = Intent.Extras.GetStringArrayList("phone_numbers") ?? new string[0];
            this.ListAdapter = new ArrayAdapter<string>(this, Android.Resource.Layout.SimpleListItem1, phoneNumbers);
        }
    }
}
In this class, you're creating a ListActivity and populating it
programmatically, so you don't need to create a new layout file
for this Activity. This is discussed in more detail in the
Hello, Android Multiscreen Deep Dive.
Adding a list
This app collects phone numbers (that the user has translated on the
first screen) and passes them to the second screen. The phone numbers
are stored as a list of strings. To support lists (and Intents, which
are used later), add the following using directives to the top of
MainActivity.cs:
using System.Collections.Generic;
using Android.Content;
Next, create an empty list that can be filled with phone numbers.
The MainActivity class will look like this:
[Activity(Label = "Phoneword", MainLauncher = true)]
public class MainActivity : Activity
{
    static readonly List<string> phoneNumbers = new List<string>();
    ...// OnCreate, etc.
}
In the MainActivity class, add the following code to register the
Translation History button (place this line after the translateButton declaration):
Button translationHistoryButton = FindViewById<Button> (Resource.Id.TranslationHistoryButton);
Add the following code to the end of the OnCreate method to wire up
the Translation History button:
translationHistoryButton.Click += (sender, e) =>
{
    var intent = new Intent(this, typeof(TranslationHistoryActivity));
    intent.PutStringArrayListExtra("phone_numbers", phoneNumbers);
    StartActivity(intent);
};
Update the Translate button to add the phone number to the list of
phoneNumbers. The Click handler for the translateButton
should resemble the following code:
// Add code to translate number
string translatedNumber = string.Empty;
translateButton.Click += (sender, e) =>
{
    // Translate user's alphanumeric phone number to numeric
    translatedNumber = Core.PhonewordTranslator.ToNumber(phoneNumberText.Text);
    if (string.IsNullOrWhiteSpace(translatedNumber))
    {
        translatedPhoneWord.Text = "";
    }
    else
    {
        translatedPhoneWord.Text = translatedNumber;
        phoneNumbers.Add(translatedNumber);
        translationHistoryButton.Enabled = true;
    }
};
Save and build the application to make sure there are no errors.
Running the app
Deploy the application to an emulator or device. The following screenshots illustrate the running Phoneword application:
Start by opening the Phoneword project in Visual Studio for Mac and editing the Main.axml file from the Solution Pad.
Tip
Newer releases of Visual Studio support opening .xml files inside the Android Designer.
Both .axml and .xml files are supported in the Android Designer.
Updating the layout
From the Toolbox, drag a Button onto the design surface and
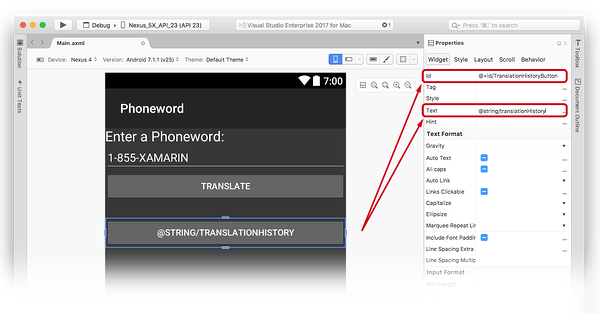
place it below the TranslatedPhoneWord TextView. In the Properties pad, change the button Id to @+id/TranslationHistoryButton:
Set the Text property of the button to
@string/translationHistory. The Android Designer will interpret this
literally, but you're going to make a few changes so that the
button's text shows up correctly:
Expand the values node under the Resources folder in the Solution Pad and double-click the string resources file, Strings.xml:
Add the translationHistory string name and value to the Strings.xml
file and save it:
<?xml version="1.0" encoding="utf-8"?>
<resources>
    <string name="translationHistory">Translation History</string>
    <string name="ApplicationName">Phoneword</string>
</resources>
The Translation History button text should update to reflect the new string value:
With the Translation History button selected on the design surface, open the Behavior tab in the Properties Pad and double-click the Enabled checkbox to disable the button. This will cause the button to become darker on the design surface:
Creating the second activity
Create a second Activity to power the second screen. In the Solution Pad, click the gray gear icon next to the Phoneword project and choose Add > New File...:
From the New File dialog, choose Android > Activity, name the Activity TranslationHistoryActivity, then click Add.
Replace the template code in TranslationHistoryActivity with the
following:
using System;
using System.Collections.Generic;
using Android.App;
using Android.OS;
using Android.Widget;
namespace Phoneword
{
    [Activity(Label = "@string/translationHistory")]
    public class TranslationHistoryActivity : ListActivity
    {
        protected override void OnCreate(Bundle bundle)
        {
            base.OnCreate(bundle);
            // Create your application here
            var phoneNumbers = Intent.Extras.GetStringArrayList("phone_numbers") ?? new string[0];
            this.ListAdapter = new ArrayAdapter<string>(this, Android.Resource.Layout.SimpleListItem1, phoneNumbers);
        }
    }
}
In this class, a ListActivity is created and populated
programmatically, so you don't have to create a new layout file for
this Activity. This is explained in more detail in the
Hello, Android Multiscreen Deep Dive.
Adding a list
This app collects phone numbers (that the user has translated on the
first screen) and passes them to the second screen. The phone numbers
are stored as a list of strings. To support lists (and Intents, which
are used later), add the following using directives to the top of
MainActivity.cs:
using System.Collections.Generic;
using Android.Content;
Next, create an empty list that can be filled with phone numbers. The MainActivity
class will look like this:
[Activity(Label = "Phoneword", MainLauncher = true)]
public class MainActivity : Activity
{
    static readonly List<string> phoneNumbers = new List<string>();
    ...// OnCreate, etc.
}
In the MainActivity class, add the following code to register the
TranslationHistory History button (place this line after the TranslationHistoryButton declaration):
Button translationHistoryButton = FindViewById<Button> (Resource.Id.TranslationHistoryButton);
Add the following code to the end of the OnCreate method to wire up
the Translation History button:
translationHistoryButton.Click += (sender, e) =>
{
    var intent = new Intent(this, typeof(TranslationHistoryActivity));
    intent.PutStringArrayListExtra("phone_numbers", phoneNumbers);
    StartActivity(intent);
};
Update the Translate button to add the phone number to the list of
phoneNumbers. The Click handler for the TranslateHistoryButton
should resemble the following code:
translateButton.Click += (sender, e) =>
{
    // Translate user's alphanumeric phone number to numeric
    translatedNumber = Core.PhonewordTranslator.ToNumber(phoneNumberText.Text);
    if (string.IsNullOrWhiteSpace(translatedNumber))
    {
        translatedPhoneWord.Text = "";
    }
    else
    {
        translatedPhoneWord.Text = translatedNumber;
        phoneNumbers.Add(translatedNumber);
        translationHistoryButton.Enabled = true;
    }
};
Running the app
Deploy the application to an emulator or device. The following screenshots illustrate the running Phoneword application:
Congratulations on completing your first multi-screen Xamarin.Android application! Now it's time to dissect the tools and skills you just learned – next up is the Hello, Android Multiscreen Deep Dive.
