Prepare the new hardware
TFS 2017
This topic, the first part of the Restore a Single-Server tutorial, teaches you how to install and configure the prerequisites, how to restore the databases and the SharePoint farm, and how to install but not configure Team Foundation Server (TFS) so that you can restore the databases on the new hardware.
Use this topic to:
- Choose hardware and name the server
- Install SQL Server on the new server
- Install SharePoint Foundation on the new server
- Install Team Foundation Server
Prerequisites
To perform the procedures in this topic, you must be a member of the Administrators security group on the server where you want to install the software.
Choose hardware and name the server
Restoring a deployment that has unexpectedly gone offline due to a hardware failure is always stressful, and usually involves acquiring hardware as quickly as possible. You might be tempted to grab an unused machine and try to use it as the new server. However, for the long-term health of your deployment and to help ensure a successful restoration of your deployment, you should not use any server that has less RAM than the previous machine, and you should make sure that the new server is running the same operating system as the old server. You also must match the service pack level of the previous server as closely as possible.
In addition, this can be an opportune time to expand the hard drive space or processing power for your deployment, particularly if your previous server was not performing as quickly as you wanted, or if you were running low on hard drive space. Upgrading the numbers or speed of the processors, adding more RAM, or adding more hard drive space should not adversely affect your restoration, and you and your users can benefit from a faster, more powerful server.
Name the server
Your users will experience the least amount of confusion and inconvenience if you give the new server the exact same name as the old one. You will also find it much easier to restore the deployment if the new server has the same name as the old server. Unless you have compelling reasons not to reuse the name, such as underscores in the old server name that interfered with navigation in Team Web Access, use the same name for the new server as the old server.
Install SQL Server on the new server
After you acquire a server that meets the requirements mentioned above and give it the same name, you must install the same version and edition of SQL Server on that new hardware. You must also make sure to choose the same collation settings as your previous deployment, or you will not be able to restore the databases you backed up for the old deployment.
Tip
Most installations of SQL Server use the default collation settings. The default collation settings are determined by the Windows system locale on the server where you install SQL Server.
To install SQL Server to support Team Foundation Server
Launch the SQL Server Installation Center.
On the SQL Server Installation Center page, choose Installation, and then choose New installation or add features to an existing installation.
On the Setup Support Rules page, verify that all rules have passed, and then choose OK.
On the Product Key page, provide your product key, and then choose Next.
On the License Terms page, review the license agreement. If you accept the terms, select I accept the license terms. Optionally, you can select the check box to send usage data to Microsoft, and then choose Next.
On the Setup Support Files page, choose Install.
On the Setup Support Rules page, review the setup information. Correct any failure conditions, and then choose Next.
On the Setup Role page, choose SQL Server Feature Installation, and then choose Next.
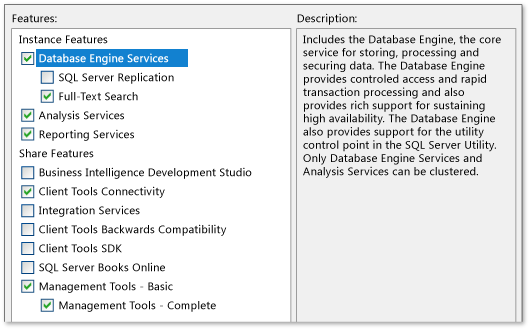
On the Feature Selection page, select the following check boxes, and then choose Next:
- Database Engine Services
- Full-Text Search
- Analysis Services, if reporting was part of the deployment you want to restore
- Reporting Services, if reporting was part of the deployment you want to restore
- Client Tools Connectivity
- Management Tools - Basic
- Management Tools - Complete

On the Installation Rules page, review any warnings and correct any failures, and then choose Next.
On the Instance Configuration page, choose Default instance, and then choose Next.
On the Disk Space Requirements page, review the information to make sure you have sufficient disk space, and then choose Next.
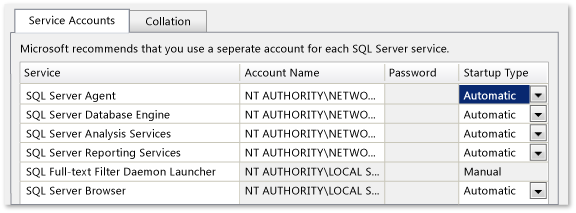
On the Server Configuration page, choose Use the same account for all SQL Server services. In the Use the same account for all SQL Server services window, choose or specify NT AUTHORITY\NETWORK SERVICE, and then choose OK.
In the Startup Type column, specify Automatic for all services that you can edit, and then choose Next.

On the Database Engine Services page, on the Account Provisioning tab, choose Windows authentication mode and then choose Add Current User to add your account as an administrator for this instance of SQL Server. Optionally add any other user accounts for users you want to act as database administrators, and then choose Next.
On the Analysis Services Configuration page, on the Account Provisioning tab, choose Add Current User to add your account as an administrator for the analysis services database. Optionally add any other user accounts for users you want to act as administrators, and then choose Next.
On the Reporting Services Configuration page, choose Install the native mode default configuration, and then choose Next.
On the Error Reporting page, choose whether to send information about errors to Microsoft, and then choose Next.
On the Installation Rules page, review any failures or warnings, and then choose Next.
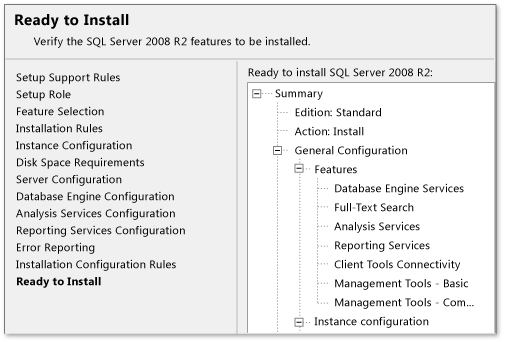
On the Ready to Install page, review the list of components to be installed, and if they match the list of features shown in the illustration below, then choose Install. If you need to make any changes, choose Back.

On the Installation Progress page, optionally monitor the installation progress of each component. When all components have finished installing, the Complete page appears. Review any messages, and then close the page.
After you finish the installation, visit Microsoft Update to apply the same service packs or updates that you applied to the installation on the old server. Do not apply any service packs or updates that were not applied to that server.
Installing SharePoint Foundation on the new server
Unlike a new installation of Team Foundation Server, you cannot use the installation wizard for TFS to install SharePoint Foundation for you. If you want to be able to restore the project portals and other information used in the SharePoint Foundation portion of your deployment, you must first install SharePoint Foundation manually, and then restore the farm.
Use SharePoint Tools to install SharePoint Foundation
You can use the tools and features provided with SharePoint Foundation to install it on the new server. You should choose the same deployment configuration as your previous deployment. For example, if you installed SharePoint Foundation automatically during the installation process for Team Foundation Server in your original deployment, you should choose to install SharePoint Foundation on a single server, but using the installation of SQL Server you have already installed on the new server. You should also run the Microsoft SharePoint Products Preparation Tool prior to installing SharePoint Foundation.
To install SharePoint Foundation in a single-server farm configuration
Launch the installation media for SharePoint Foundation. On the SharePoint Foundation Start page, choose Install SharePoint Foundation.
On the Read the Microsoft Software License Terms page, review the terms, select the I accept the terms of this agreement check box, and then choose Continue.
On the Choose the installation you want page, choose Server farm.
On the Server Type tab, choose Complete.
If you want to install SharePoint Foundation in a custom location, choose the Data Location tab, and then either type the location or choose Browse to specify the location.
Choose Install Now.
When setup completes, choose Close. Do not configure the initial farm.
Use Windows PowerShell to install SharePoint Foundation
While there are a number of ways to install SharePoint Foundation, including the tools provided with SharePoint Foundation, restoring the farm requires Windows PowerShell. You can also use Windows PowerShell to install SharePoint Foundation. For convenience, consider using Windows PowerShell for both installing and restoring SharePoint Foundation on the new server. For more information about Windows PowerShell, see Getting Started: Windows Server Administration with Windows PowerShell.
To install SharePoint Foundation using Windows PowerShell
Open a Windows PowerShell command prompt.
Input the following command, where Drive is the location of the installation media for SharePoint Foundation: all-SharePoint -SetupExePath "Drive:\SharePoint 2013\Setup\setup.exe"
This installs SharePoint Foundation using a PID key in a farm deployment, but does not configure it or create any databases. Instead, you will restore the farm and its databases to this installation.
Tip
As an alternative, you can choose to use a configuration XML file with the Install-SharePoint command to install SharePoint Foundation.
For more information, see Install SharePoint Foundation by using Windows PowerShell.
Install Team Foundation Server
To restore the databases using the Scheduled Backups features, you must install, but not configure, the Team Foundation Server software.
To install Team Foundation Server binaries and tools:
Launch the installation media for Team Foundation Server. On the Team Foundation Server Setup page, choose Install.
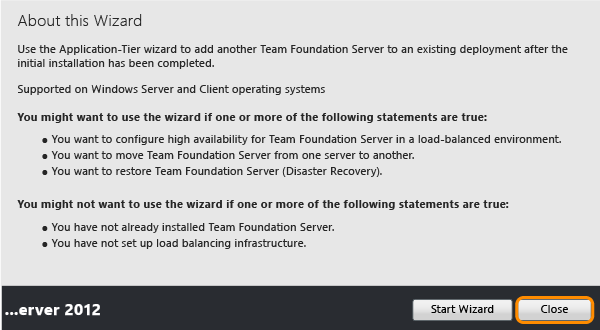
When the installation completes, the Team Foundation Server Configuration Center opens. Choose Cancel.

The administration console opens automatically in an unconfigured state. This is expected.