Deploy your Web Deploy package to IIS servers using WinRM
TFS 2017 | TFS 2015
Note
In Microsoft Team Foundation Server (TFS) 2018 and previous versions, build and release pipelines are called definitions, runs are called builds, service connections are called service endpoints, stages are called environments, and jobs are called phases.
A simpler way to deploy web applications to IIS servers is by using deployment groups instead of WinRM. However, deployment groups are not available in version of TFS earlier than TFS 2018.
Continuous deployment means starting an automated deployment pipeline whenever a new successful build is available. Here we'll show you how to set up continuous deployment of your ASP.NET or Node.js app to one or more IIS servers using Azure Pipelines. A task running on the Build and Release agent opens a WinRM connection to each IIS server to run PowerShell scripts remotely in order to deploy the Web Deploy package.
Get set up
Begin with a CI build
Before you begin, you'll need a CI build that publishes your Web Deploy package. To set up CI for your specific type of app, see:
WinRM configuration
Windows Remote Management (WinRM) requires target servers to be:
- Domain-joined or workgroup-joined
- Able to communicate using the HTTP or HTTPS protocol
- Addressed by using a fully qualified domain name (FQDN) or an IP address
This table shows the supported scenarios for WinRM.
| Joined to a | Protocol | Addressing mode |
|---|---|---|
| Workgroup | HTTPS | FQDN |
| Workgroup | HTTPS | IP address |
| Domain | HTTPS | IP address |
| Domain | HTTPS | FQDN |
| Domain | HTTP | FQDN |
Ensure that your IIS servers are set up in one of these configurations. For example, do not use WinRM over HTTP to communicate with a Workgroup machine. Similarly, do not use an IP address to access the target server(s) when you use HTTP. Instead, in both scenarios, use HTTPS.
If you need to deploy to a server that is not in the same workgroup or domain, add it to trusted hosts in your WinRM configuration.
Follow these steps to configure each target server.
Enable File and Printer Sharing. You can do this by executing the following command in a Command window with Administrative permissions:
netsh advfirewall firewall set rule group="File and Printer Sharing" new enable=yesCheck your PowerShell version. You need PowerShell version 4.0 or above installed on every target machine. To display the current PowerShell version, execute the following command in the PowerShell console:
$PSVersionTable.PSVersionCheck your .NET Framework version. You need version 4.5 or higher installed on every target machine. See How to: Determine Which .NET Framework Versions Are Installed.
Download from GitHub this PowerShell script for Windows 10 and Windows Server 2016, or this PowerShell script for previous versions of Windows. Copy them to every target machine. You will use them to configure WinRM in the following steps.
Decide if you want to use HTTP or HTTPS to communicate with the target machine(s).
If you choose HTTP, execute the following in a Command window with Administrative permissions:
ConfigureWinRM.ps1 {FQDN} httpThis command creates an HTTP WinRM listener and opens port 5985 inbound for WinRM over HTTP.
If you choose HTTPS, you can use either a FQDN or an IP address to access the target machine(s). To use a FQDN to access the target machine(s), execute the following in the PowerShell console with Administrative permissions:
ConfigureWinRM.ps1 {FQDN} httpsTo use an IP address to access the target machine(s), execute the following in the PowerShell console with Administrative permissions:
ConfigureWinRM.ps1 {ipaddress} httpsThese commands create a test certificate by using MakeCert.exe, use the certificate to create an HTTPS WinRM listener, and open port 5986 inbound for WinRM over HTTPS. The script also increases the WinRM MaxEnvelopeSizekb setting. By default on Windows Server this is 500 KB, which can result in a "Request size exceeded the configured MaxEnvelopeSize quota" error.
IIS configuration
If you are deploying an ASP.NET app, make sure that you have ASP.NET 4.5 or ASP.NET 4.6 installed on each of your IIS target servers. For more information, see this topic.
If you are deploying an ASP.NET Core application to IIS target servers, follow the additional instructions in this topic to install .NET Core Windows Server Hosting Bundle.
If you are deploying a Node.js application to IIS target servers, follow the instructions in this topic to install and configure IISnode on IIS servers.
In this example, we will deploy to the Default Web Site on each of the servers. If you need to deploy to another website, make sure you configure this as well.
IIS WinRM extension
Install the IIS Web App Deployment Using WinRM extension from Visual Studio Marketplace in Azure Pipelines or TFS.
Define and test your CD release pipeline
Continuous deployment (CD) means starting an automated release pipeline whenever a new successful build is available. Your CD release pipeline picks up the artifacts published by your CI build and then deploys them to your IIS servers.
Do one of the following:
If you've just completed a CI build (see above), then, in the build's Summary tab under Deployments, choose Create release followed by Yes. This starts a new release pipeline that's automatically linked to the build pipeline.
Open the Releases tab of Azure Pipelines, open the + drop down in the list of release pipelines, and choose Create release pipeline.
Choose Start with an empty pipeline.
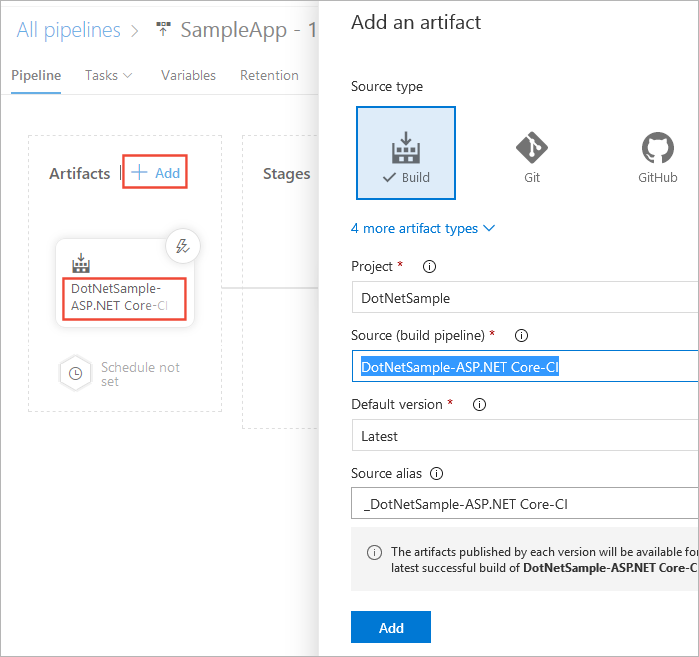
If you created your new release pipeline from a build summary, check that the build pipeline and artifact is shown in the Artifacts section on the Pipeline tab. If you created a new release pipeline from the Releases tab, choose the + Add link and select your build artifact.

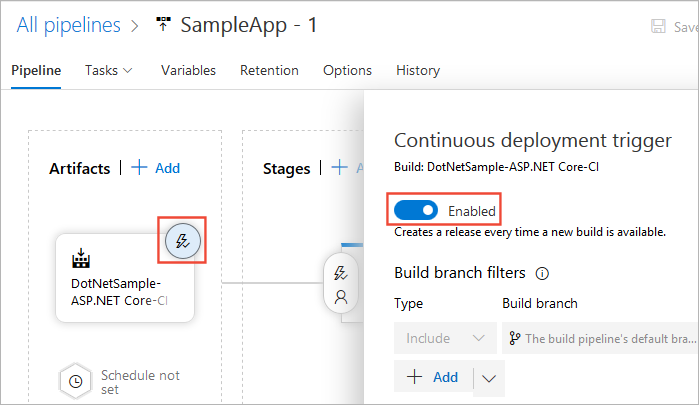
Choose the Continuous deployment icon in the Artifacts section, check that the continuous deployment trigger is enabled, and add a filter to include the main branch.

On the Variables tab of the stage in release pipeline, configure a variable named WebServers with the list of IIS servers as its value; for example
machine1,machine2,machine3.Configure the following tasks in the stage:
 Deploy: Windows Machine File Copy - Copy the Web Deploy package to the IIS servers.
Source: Select the Web deploy package (zip file) from the artifact source.
Machines:
$(WebServers)Admin Login: Enter the administrator credentials for the target servers. For workgroup-joined computers, use the format
.\username. For domain-joined computers, use the formatdomain\username.Password: Enter the administrator password for the target servers.
Destination Folder: Specify a folder on the target server where the files should be copied to.
 Deploy: WinRM - IIS Web App Deployment - Deploy the package.
Machines:
$(WebServers)Admin Login: Enter the administrator credentials for target servers. For workgroup-joined computers, use the format
.\username. For domain-joined computers, use the formatdomain\username.Password: Enter the administrator password for target servers.
Protocol: Select
HTTPorHTTPS(depending on how you configured the target machine earlier). Note that if the target machine is workgroup-joined, you must chooseHTTPS. You can use HTTP only if the target machine is domain-joined and configured to use a FQDN.Web Deploy Package: Fully qualified path of the zip file you copied to the target server in the previous task.
Website Name:
Default Web Site(or the name of the website if you configured a different one earlier).
Edit the name of the release pipeline, click Save, and click OK. The default stage is named Stage1, which you can edit by clicking directly on the name.
You're now ready to create a release, which means to run the release pipeline with the artifacts produced by a specific build. This will result in deploying the build to IIS servers:
Choose + Release and select Create a release.
In the Create a new release panel, check that the artifact version you want to use is selected and choose Create.
Choose the release link in the information bar message. For example: "Release Release-1 has been created".
In the pipeline view, choose the status link in the stages of the pipeline to see the logs and agent output.
After the release is complete, navigate to your app and verify its contents.
FAQ
I use TFS on-premises and I don't see some of these features. Why not?
Some of these features are available only on Azure Pipelines and not yet available on-premises. Some features are available on-premises if you have upgraded to the latest version of TFS.