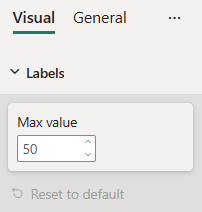
ชิ้นการจัดรูปแบบของ NumUpDown

ตัวอย่าง: การใช้งาน NumUpDown
ในตัวอย่างนี้ เราจะแสดงวิธีการสร้าง NumUpDown แบ่งส่วนโดยใช้ยูทิลิตี้แบบจําลองการจัดรูปแบบ
วัตถุ Capabilities
แทรกส่วนย่อย JSON ต่อไปนี้ลงในไฟล์ capabilities.json
{
  // ... same level as dataRoles and dataViewMappings
  "objects": {
    "labels": {
      "properties": {
        "max": {
          "type": {
            "integer": true
          }
        }
      }
    }
  }
}
การจัดรูปแบบคลาสแบบจําลอง
แทรกส่วนย่อยของโค้ดต่อไปนี้ลงในไฟล์การตั้งค่า
import { formattingSettings } from "powerbi-visuals-utils-formattingmodel";

class LabelsCardSetting extends formattingSettings.SimpleCard {
    name: string = "labels"; // same as capabilities object name
    displayName: string = "Labels";

    public maxValue : formattingSettings.NumUpDown = new formattingSettings.NumUpDown({
        name: "max", // same as capabilities property name
        displayName: "Max value",
        value: 50
    });

    public slices: formattingSettings.Slice[] = [ this.maxValue ];
}

export class VisualSettings extends formattingSettings.Model {
    public labels: LabelsCardSetting = new LabelsCardSetting();
    public cards: formattingSettings.SimpleCard[] = [this.labels];
}
ตัวตรวจสอบความถูกต้อง (ไม่บังคับ)
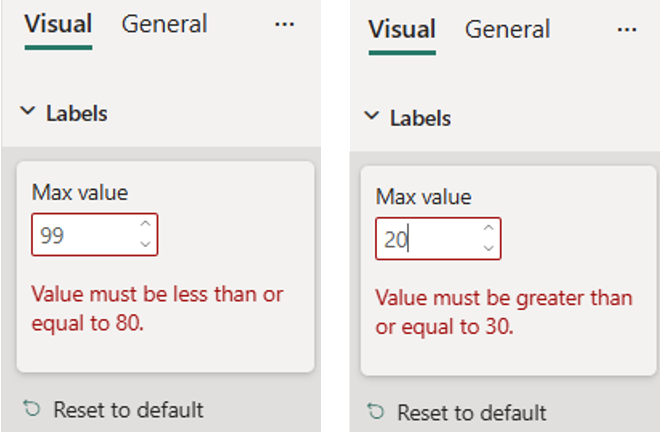
คุณสามารถตรวจสอบ NumUpDown แบ่งส่วนข้อมูลได้โดยการระบุตัวเลือก คุณสมบัติ ตามตัวอย่าง:
import powerbi from "powerbi-visuals-api";
import { formattingSettings } from "powerbi-visuals-utils-formattingmodel";

class LabelsCardSetting extends formattingSettings.SimpleCard {
    name: string = "labels"; // same as capabilities object name
    displayName: string = "Labels";

    public maxValue : formattingSettings.NumUpDown = new formattingSettings.NumUpDown({
        name: "max", // same as capabilities property name
        displayName: "Max value",
        value: 50, // default slice value
        options: // optional input value validator
        {
            maxValue: {
                type: powerbi.visuals.ValidatorType.Max,
                value: 80
            },
            minValue: {
                type: powerbi.visuals.ValidatorType.Min,
                value: 30
            }
        }
    });

    public slices: formattingSettings.Slice[] = [ this.maxValue ];
}
ข้อความเตือนจะปรากฏขึ้นถ้าค่าที่ส่งผ่านอยู่นอกช่วงที่ยอมรับได้
