Get started with WebView2 in Win32 apps
This article is to learn to write your own WebView2 code. If you want to run a sample first, see Win32 sample app or another sample app article.
In this article, you set up your development tools (if not done already), learn how to add WebView2 code to a Win32 app project, and learn about WebView2 concepts along the way.
This tutorial starts by opening an existing Win32 app project that has WebView2 code added. The project uses the Win32_GettingStarted (WebView2GettingStarted.sln) directory that's part of the WebView2Samples repo. To use this article, you do the following:
- Clone or download the
WebView2Samplesrepo to your local drive. - Run the completed project.
- Optionally delete the WebView2 code from
HelloWebView.cppto restore the Win32 baseline app. - Follow the remaining steps in this article about adding and understanding the WebView2 code.
This tutorial starts with the completed project that's in the repo, which already has WebView2 code added. (This tutorial doesn't have you create a new project; you don't use a project template in Visual Studio to create a new project, and then add WebView2 code.)
Completed project
The completed tutorial project is available in the WebView2Samples repo:
- Sample name: Win32_GettingStarted
- Repo directory: Win32_GettingStarted
- Solution file: WebView2GettingStarted.sln
Step 1 - Install Visual Studio
This tutorial requires Microsoft Visual Studio, not Microsoft Visual Studio Code.
- If Microsoft Visual Studio isn't installed already, in a new window or tab, see Install Visual Studio in Set up your Dev environment for WebView2. Follow the steps there to do a basic default installation of Visual Studio.
Then return to this page and continue below.
Step 2 - Clone or download the WebView2Samples repo
The code that you add in this tutorial's steps, has already been added to the sample repo, for you. An optional step below allows you to delete the WebView2 code from HelloWebView.cpp, so that you can add it yourself, if you want.
To keep this tutorial focused on WebView2-specific coding, we start from an existing Microsoft Visual Studio project (WebView2GettingStarted) that's stored in the WebView2Samples GitHub repo. We'll add WebView2 features - actually, the features have already been added, but follow along in the setup and explanation steps.
The existing Visual Studio project we'll start with is part of the sample code from a standard C++ Win32 desktop application. For information about the underlying, standard Win32 app sample, in a new window or tab, see Walkthrough: Create a traditional Windows Desktop application (C++).
Clone or download the WebView2Samples repo, as follows:
- If you haven't already, clone or download the
WebView2Samplesrepo. To do this, in a separate window or tab, follow the steps in Download the WebView2Samples repo or Clone the WebView2Samples repo in Set up your Dev environment for WebView2.
Then return here after you've copied the repo to your local drive, and continue with the steps below.
Step 3 - Open the finished solution (WebView2GettingStarted.sln)
You start with a basic desktop project that contains a single main window. We'll start with an existing app project from the WebView2Samples repo, which you cloned or downloaded from GitHub in the previous step.
Open Visual Studio (not Visual Studio Code).
Open
WebView2GettingStarted.sln, which is located at the path:<your repo directory>/WebView2Samples/GettingStartedGuides/Win32_GettingStarted/WebView2GettingStarted.sln.
Step 4 - Install workloads if prompted
Visual Studio Installer might open and prompt you to install a Workload:
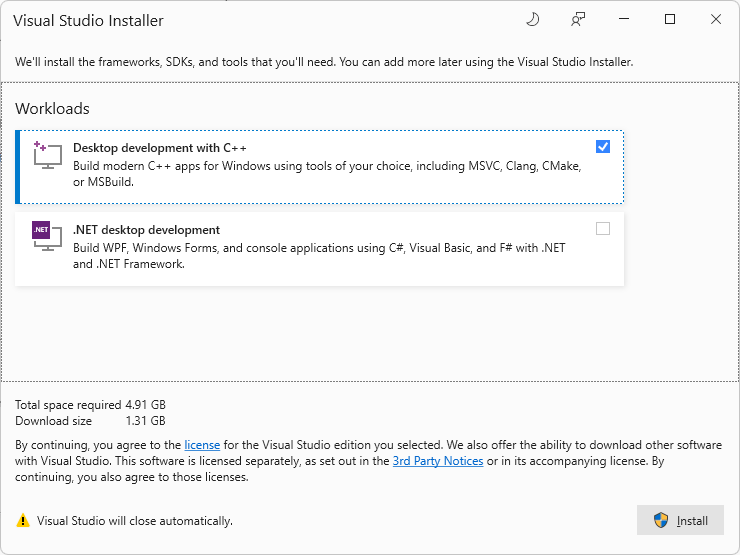
If Visual Studio Installer prompts you to install a Workload:
Select the Desktop development with C++ card so that a checkmark appears.
If you want, also select the .NET desktop development card (not needed for this tutorial), so that a checkmark appears on this card as well.
Click the Install button.
The Installer closes.
Retarget Projects
The Visual Studio Review Solution Actions dialog might appear, prompting you whether you want to Retarget Projects:
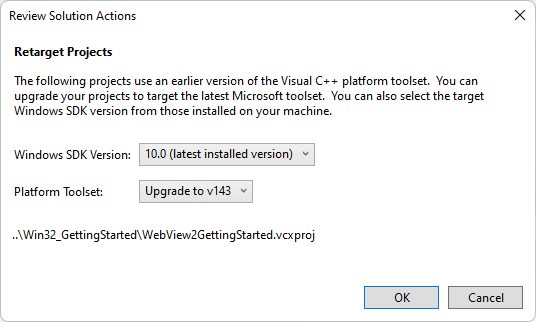
- If that dialog appears, you can click OK.
The WebView2GettingStarted solution opens in Visual Studio. The solution contains a single project: WebView2GettingStarted, which contains a single .cpp file: HelloWebView.cpp.
Step 5 - View the opened project in Visual Studio
If the WebView2GettingStarted project isn't open in Visual Studio, open it in Visual Studio:
Open
WebView2GettingStarted.sln, which is located at the path:<your repo directory>/WebView2Samples/GettingStartedGuides/Win32_GettingStarted/WebView2GettingStarted.sln.In Solution Explorer, expand the Source Files node, and then select HelloWebView.cpp.
HelloWebView.cppopens in the code editor of Visual Studio.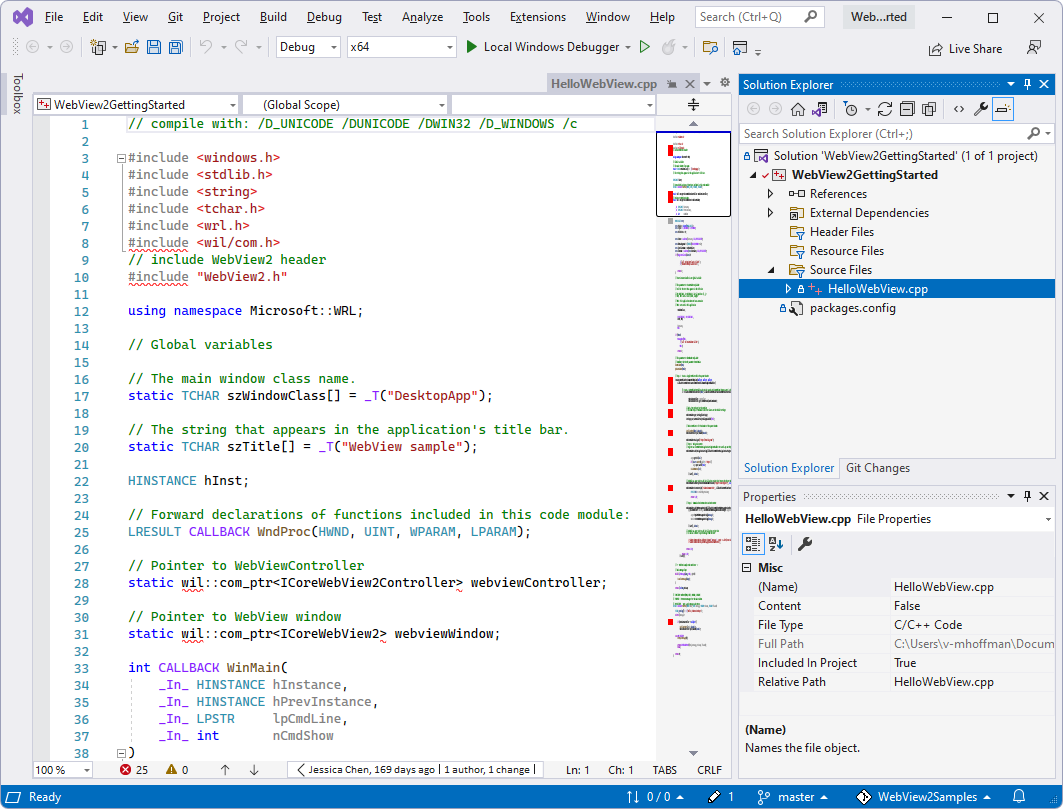
The above screenshot shows some WebView2 code (#include "WebView2.h"), that's already present in the file immediately after cloning (downloading) the repo.
Set the solution to use the Win10 SDK and Visual Studio toolset
This step is only needed for older versions of Visual Studio, so it's likely you can skip it. But you can take a look at this UI in any case:
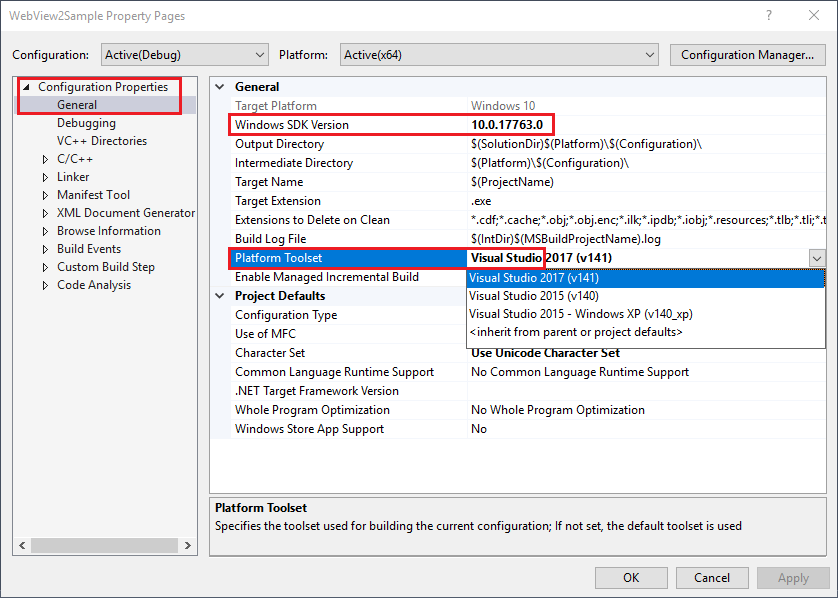
In Visual Studio's Solution Explorer, right-click the WebView2GettingStarted project (not the solution with the same name), and then select Properties.
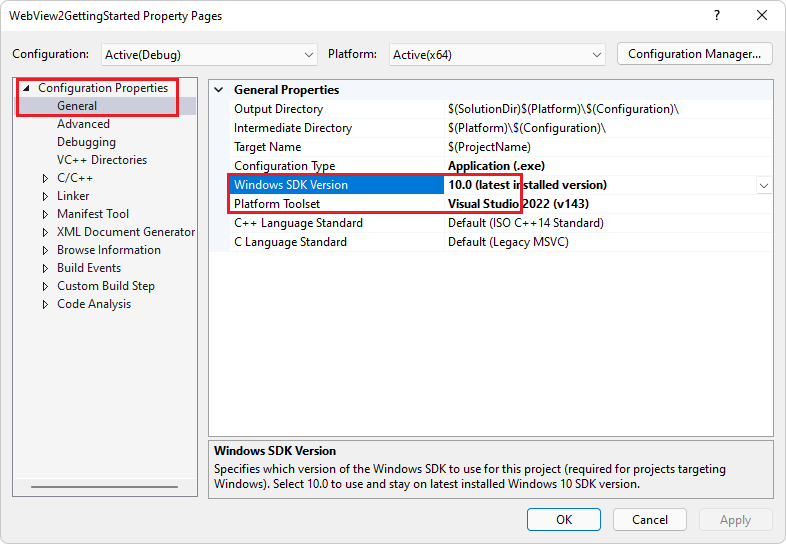
Select Configuration Properties > General, and then (if it's not the correct setting already):
Modify Windows SDK Version to use the Win10 SDK.
Modify Platform Toolset to use a Visual Studio toolset.
These modifications are only necessary for older versions of Visual Studio.
Here's a Visual Studio 2017 screenshot showing some valid settings:
The following is a Visual Studio 2022 screenshot; the values were already correct, so no change was required:
Continue with the steps below.
Step 6 - Build and run the repo's finished project
At this point, your Dev environment is set up to run Win32 WebView2 apps in debug mode in Visual Studio and add WebView2 features.
To confirm that your system is set up for WebView2 coding, run the project in Debug mode, as follows:
Select Debug > Start debugging (F5) to build and run the project.
The sample app first opens a pop-up window, which displays the URL that will be loaded, along with an OK button:
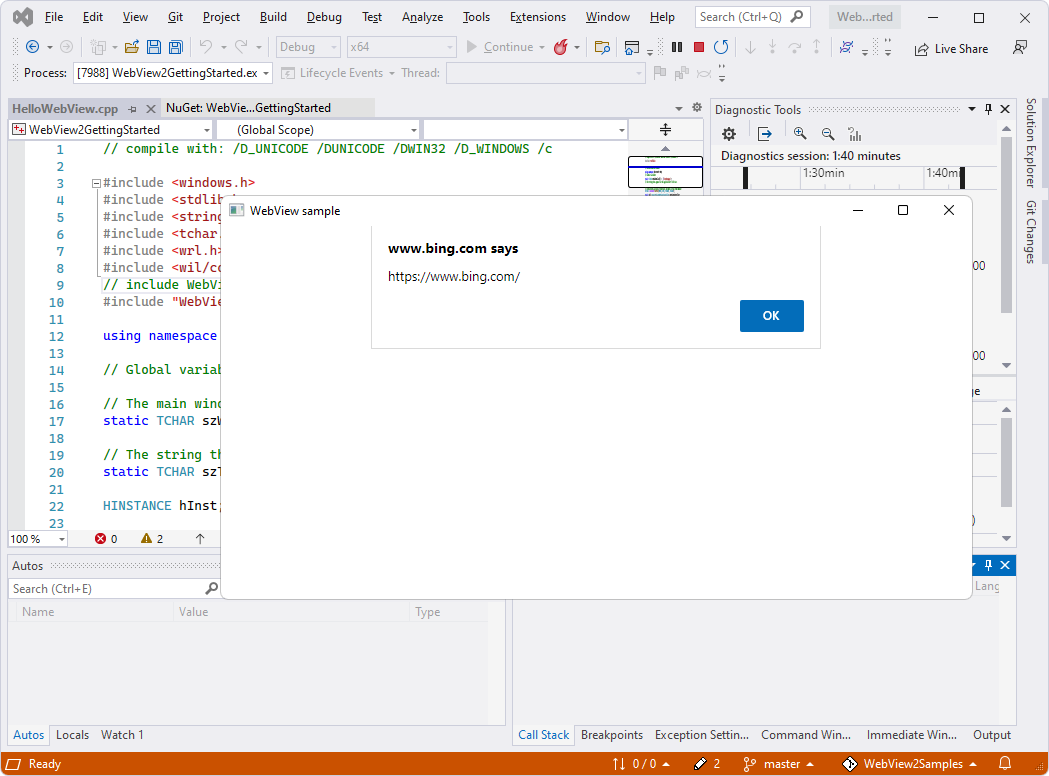
Click the OK button to dismiss the pop-window and continue to the URL:
The WebView2 window now displays webpage content: the Bing website,
http://www.bing.com.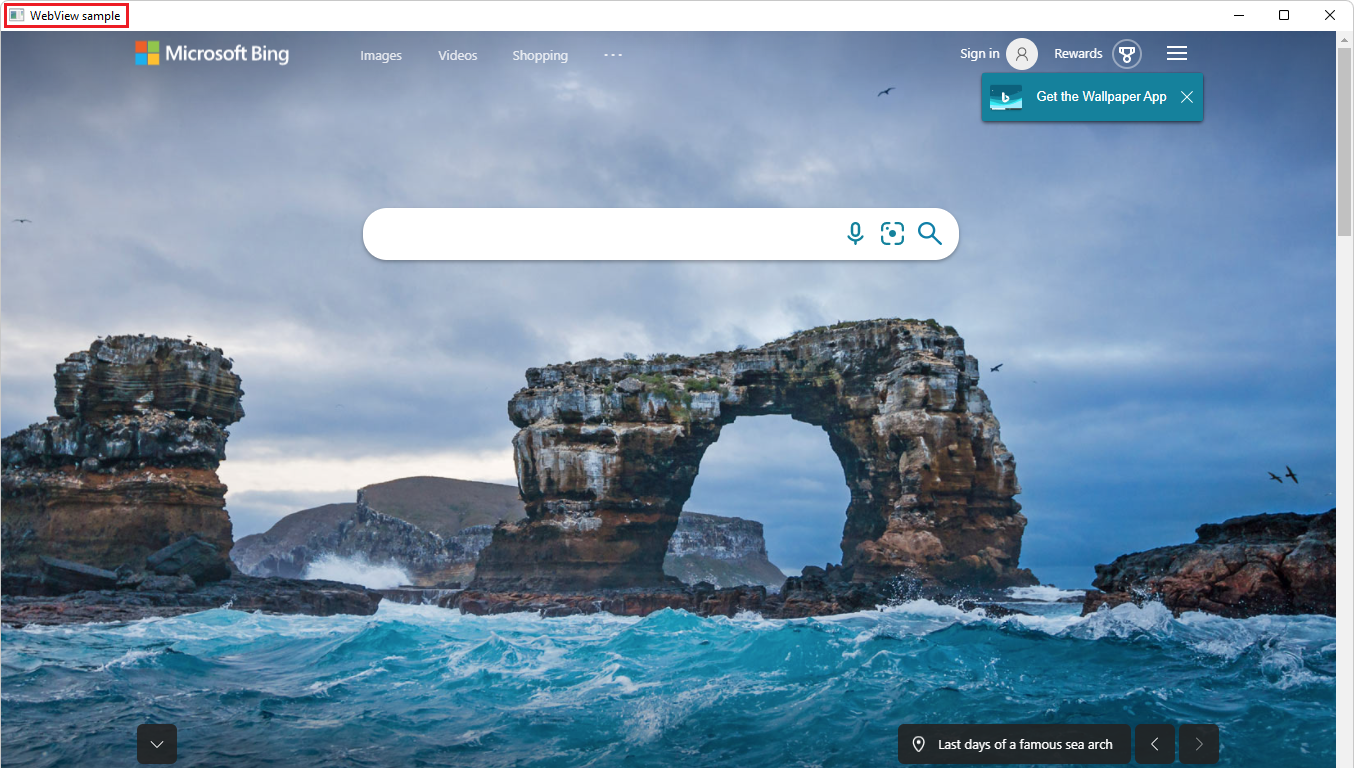
Close the WebView sample window.
Step 7 - Update or install the Windows Implementation Libraries (WIL)
WIL is already installed into the project at the repo, but walk through these steps to learn about setup and to check the project's setup.
In a moment, you'll install the Windows Implementation Libraries (WIL) - A header-only C++ library to make life easier for developers on Windows through readable, type-safe C++ interfaces for Windows COM coding patterns. You install this Microsoft.Windows.ImplementationLibrary package through Solution Explorer in Visual Studio, for the project.
This tutorial also uses Windows Runtime C++ Template Library (WRL) - A template library that provides a low-level way to author and use Windows Runtime components.
Install the Windows Implementation Libraries (WIL) from within Visual Studio, as follows:
In Visual Studio, make sure that the WebView2GettingStarted solution is still open.
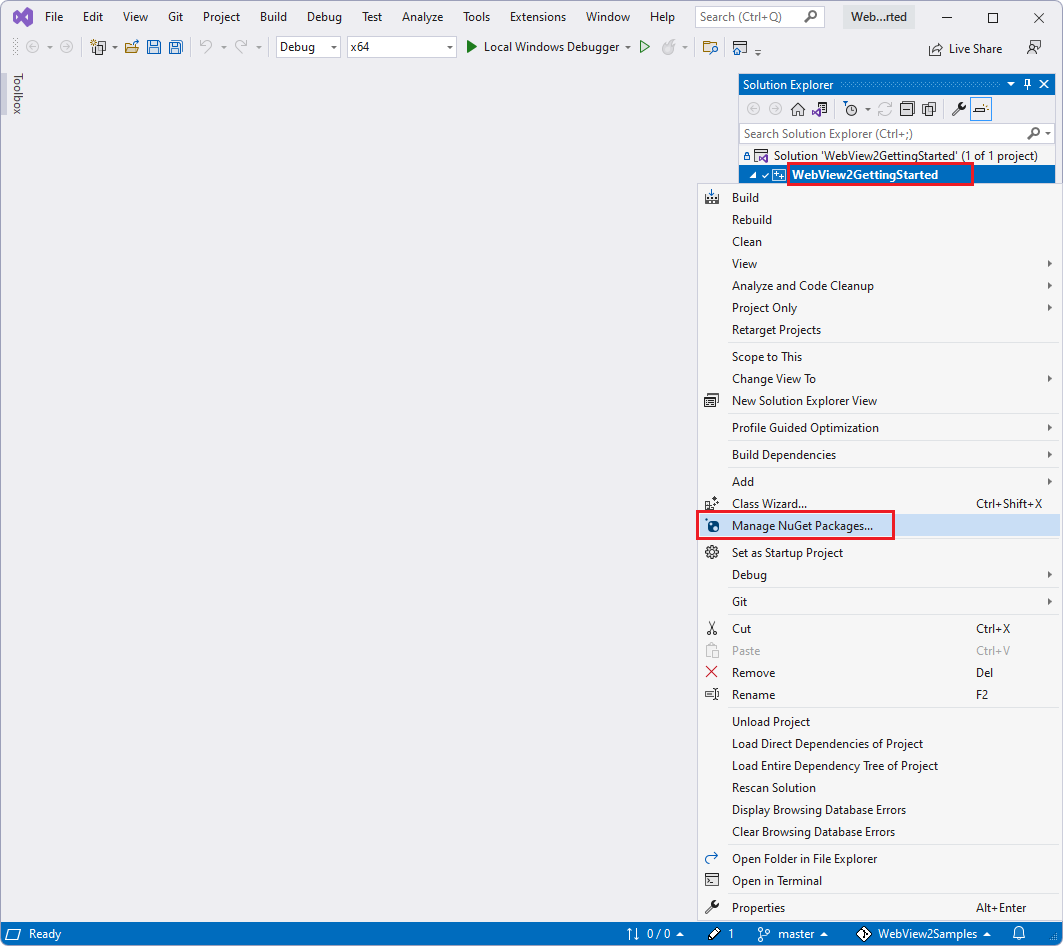
In Solution Explorer, right-click the WebView2GettingStarted project node (not the solution node) and then select Manage NuGet Packages.
In the NuGet window, click the Browse tab.
In the search bar in the upper left, type
Microsoft.Windows.ImplementationLibrary. Or, copy and paste the single-line code block below. Then select Microsoft.Windows.ImplementationLibrary.Microsoft.Windows.ImplementationLibrarySelecting the Microsoft.Windows.ImplementationLibrary package in NuGet Package Manager in Visual Studio:
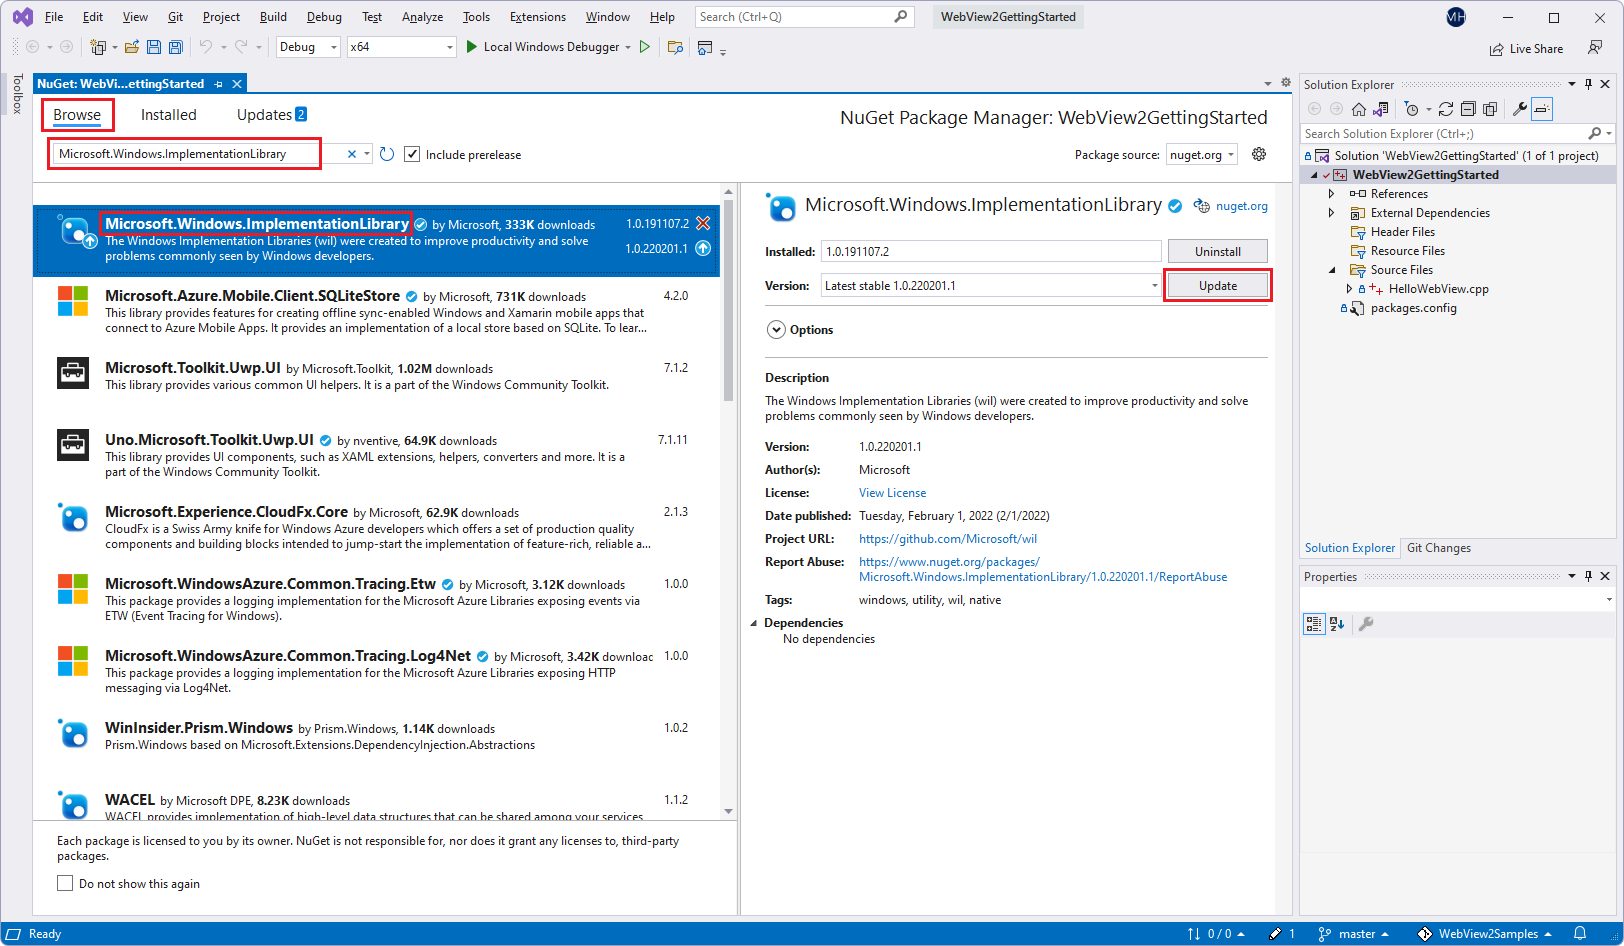
To zoom, right-click > Open image in new tab.
If you don't see Microsoft.Windows.ImplementationLibrary listed, check the NuGet source location, as follows:
Select Tools > Options > NuGet Package Manager > Package Sources.
Make sure that in Package sources there is a nuget.com source pointing to
https://api.nuget.org/v3/index.json.If Package sources doesn't contain that source, enter
nuget.comin the Name text box andhttps://api.nuget.org/v3/index.jsonin the Source text box. Then click Update and OK.
Toward the upper right, click the Install button (or the Update button). NuGet downloads the Windows Implementation Library (WIL) to your machine.
Windows Implementation Libraries (WIL) is now installed, along with Windows Runtime C++ Template Library (WRL).
Continue with the steps below.
Step 8 - Update or install the WebView2 SDK
The finished project in the repo already has a version of the WebView2 SDK installed for the project. If you were creating a project from scratch by starting by using a Win32 project template, you'd need to install the WebView SDK package for the project, as described here.
Next, update (or install) the WebView2 SDK. The WebView2 SDK includes the WebView2 control, which is powered by Microsoft Edge, and enables you to embed web technologies (HTML, CSS, and JavaScript) in your native applications.
Update (or install) the WebView2 SDK, as follows:
In Visual Studio, make sure that the WebView2GettingStarted solution is open, as described above.
In Solution Explorer, right-click the WebView2GettingStarted project node (not the WebView2GettingStarted solution node) and then select Manage NuGet Packages.
The NuGet Package Manager tab and panel opens in Visual Studio.

If the WebView2 SDK is already installed for the project, as is the case with the repo project, in the NuGet window, click the Installed tab or the Update tab.
Or, if you're installing the WebView2 SDK in a new project, click the Browse tab.
On the right of the search bar, clear the Include prerelease checkbox (unless you know that you want a prerelease version of the SDK).
In the search bar in the upper left, type
Microsoft.Web.WebView2. Or, copy and paste the single-line code block below. Then select Microsoft.Web.WebView2.Microsoft.Web.WebView2In the right-hand side window, click Update (or Install). NuGet downloads the WebView2 SDK to your machine.
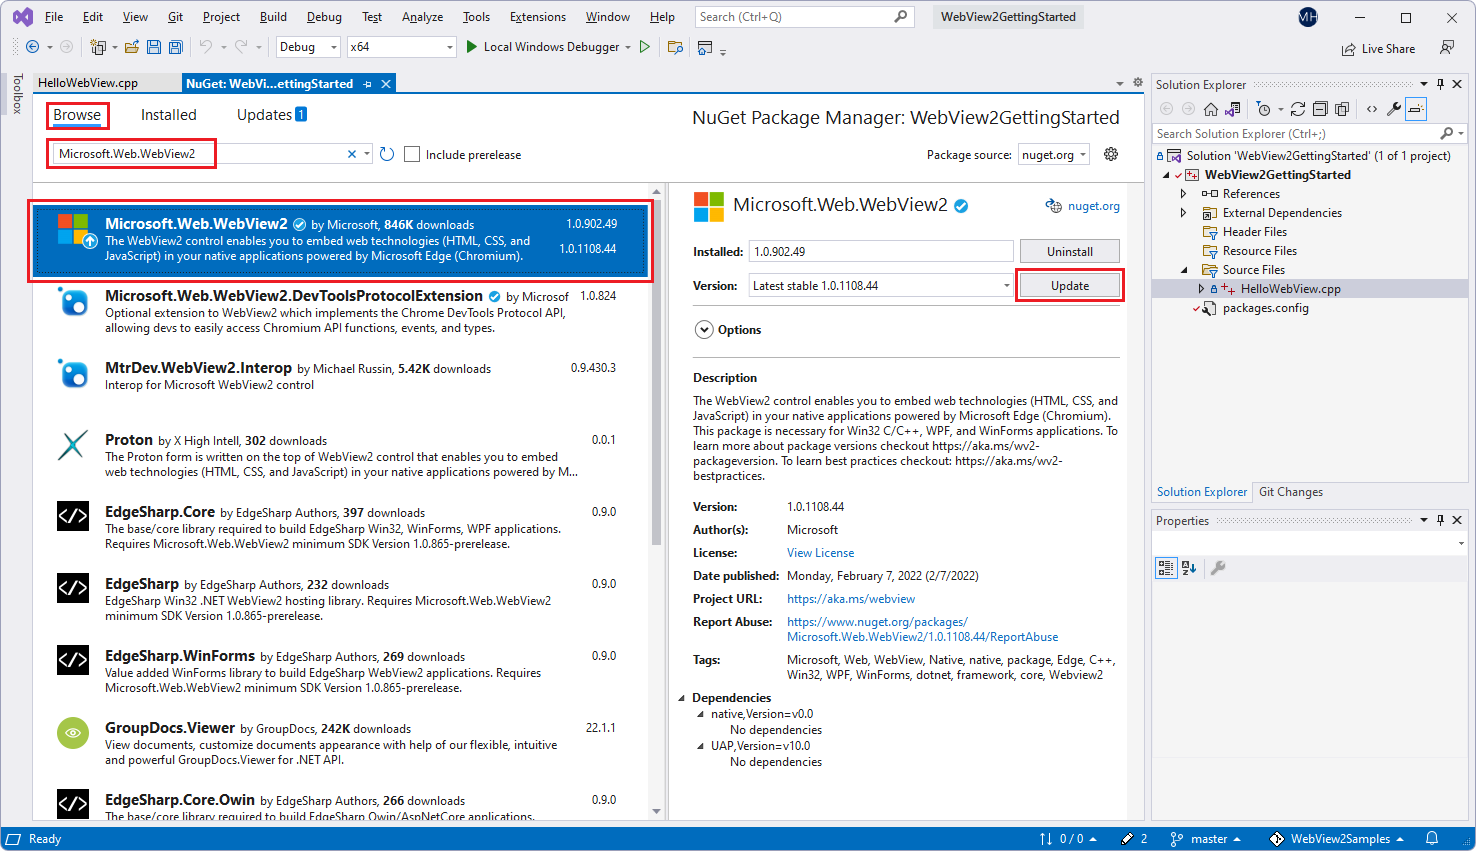
Close the NuGet Package Manager tab.
The WebView2 SDK is now updated or installed, so your development environment is now set up to add WebView2 features to your Win32 app.
Continue with the steps below.
Step 9 - Optionally delete the WebView2 code from HelloWebView.cpp
If you want to follow the steps below to add the WebView2 code to HelloWebView.cpp yourself, delete the two blocks of WebView2 code, as follows:
In
HelloWebView.cpp, delete the following code:// include WebView2 header #include "WebView2.h"In
HelloWebView.cpp, delete the lines of code that are in between these two comment lines, but keep these two comment lines:// <-- WebView2 sample code starts here --> ... // <-- WebView2 sample code ends here -->
Step 10 - Include the WebView2.h header in HelloWebView.cpp
Above, we did the following:
- Cloned or downloaded the samples repo including an existing project that contains a standard C++ Windows desktop application.
- Updated or installed the Windows Implementation Library (WIL).
- Updated or installed the WebView2 SDK, to add WebView2 features.
- Optionally deleted the WebView2 code from
HelloWebView.cpp.
Next, add WebView2 features to the app, as follows:
In Visual Studio, make sure the WebView2GettingStarted solution is open.
In Solution Explorer, expand Source Files and then click
HelloWebView.cpp.If the following code isn't already present, paste the following code in
HelloWebView.cpp, after the last#includeline:// include WebView2 header #include "WebView2.h"Make sure that the
includesection looks like the following:... #include <wrl.h> #include <wil/com.h> // include WebView2 header #include "WebView2.h"Note the headers used:
wrl.h- Windows Runtime C++ Template Library (WRL) - A template library that provides a low-level way to author and use Windows Runtime components.wil/com.h- Windows Implementation Libraries (WIL) - A header-only C++ library to make life easier for developers on Windows through readable, type-safe C++ interfaces for common Windows coding patterns.WebView2.h- The WebView2 control is powered by Microsoft Edge, and enables you to embed web technologies (HTML, CSS, and JavaScript) in your native applications.
Select File > Save All (Ctrl+Shift+S) to save the project.
The source code file and project is ready to use and build against the WebView2 API.
Continue with the steps below.
Step 11 - Build your empty sample app
Select Debug > Start debugging (F5) to build and run the project.
The sample app opens and displays an empty window:
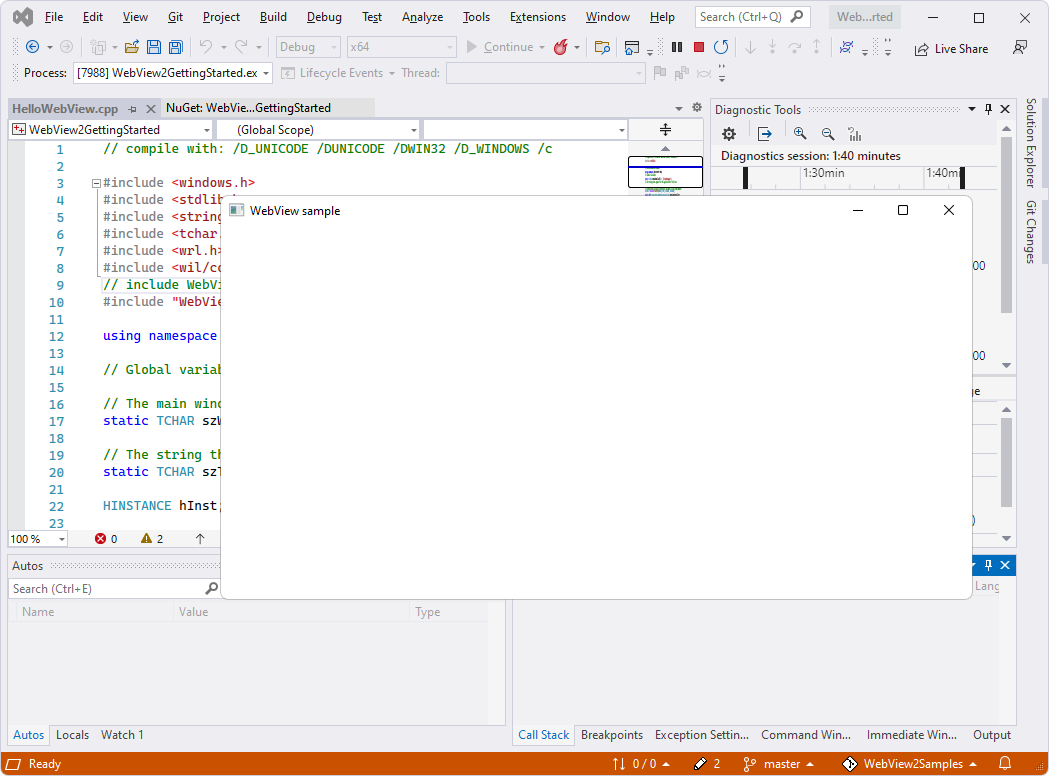
You now have a running, empty Win32 desktop app with potential WebView2 capabilities.
Close the WebView sample app window.
Continue with the steps below.
Step 12 - Add a WebView2 control in the parent window
Next, add a WebView2 control to the main window.
You'll use the CreateCoreWebView2Environment method to set up the environment and locate the Microsoft Edge browser powering the control.
Note that if you want to override the following defaults, you can instead use the "with options" version of that method, CreateCoreWebView2EnvironmentWithOptions:
- Browser location
- User data folder
- Browser flags
Upon completion of the CreateCoreWebView2Environment method, you'll:
Run the
ICoreWebView2Environment::CreateCoreWebView2Controllermethod inside theICoreWebView2CreateCoreWebView2EnvironmentCompletedHandlercallback.Run the
ICoreWebView2Controller::get_CoreWebView2method to get the associated WebView2 control.
Now to do the above, in the callback, you'll:
- Set a few more settings.
- Resize the WebView2 control to fill 100% of the parent window.
- Then display the Bing.com website in the WebView2 control in your Win32 app.
In
HelloWebView.cpp, locate the following code:UpdateWindow(hWnd); // <-- WebView2 sample code starts here -->If the following code isn't already present, paste the following code into
HelloWebView.cpp. Paste the code in between the lines// <-- WebView2 sample code starts here -->and// <-- WebView2 sample code ends here -->:// Step 3 - Create a single WebView within the parent window // Locate the browser and set up the environment for WebView CreateCoreWebView2EnvironmentWithOptions(nullptr, nullptr, nullptr, Callback<ICoreWebView2CreateCoreWebView2EnvironmentCompletedHandler>( [hWnd](HRESULT result, ICoreWebView2Environment* env) -> HRESULT { // Create a CoreWebView2Controller and get the associated CoreWebView2 whose parent is the main window hWnd env->CreateCoreWebView2Controller(hWnd, Callback<ICoreWebView2CreateCoreWebView2ControllerCompletedHandler>( [hWnd](HRESULT result, ICoreWebView2Controller* controller) -> HRESULT { if (controller != nullptr) { webviewController = controller; webviewController->get_CoreWebView2(&webview); } // Add a few settings for the webview // The demo step is redundant since the values are the default settings wil::com_ptr<ICoreWebView2Settings> settings; webview->get_Settings(&settings); settings->put_IsScriptEnabled(TRUE); settings->put_AreDefaultScriptDialogsEnabled(TRUE); settings->put_IsWebMessageEnabled(TRUE); // Resize WebView to fit the bounds of the parent window RECT bounds; GetClientRect(hWnd, &bounds); webviewController->put_Bounds(bounds); // Schedule an async task to navigate to Bing webview->Navigate(L"https://www.bing.com/"); // Step 4 - Navigation events // Step 5 - Scripting // Step 6 - Communication between host and web content return S_OK; }).Get()); return S_OK; }).Get());Select File > Save All (Ctrl+Shift+S) to save the project.
Build your Bing sample app
Press F5 to build and run the project.
If you started by deleting all of the WebView2 code, at this point, you now have a Win32 window that's filled with a WebView2 control that's filled with webpage content:

Close the WebView sample app window.
Or, if you kept all of the WebView2 code, at this point, a pop-up WebView2 window with an alert dialog from Bing opens, over an empty WebView2 window. Click the OK button to close the Bing dialog. Now the WebView2 control is filled by Bing page content:
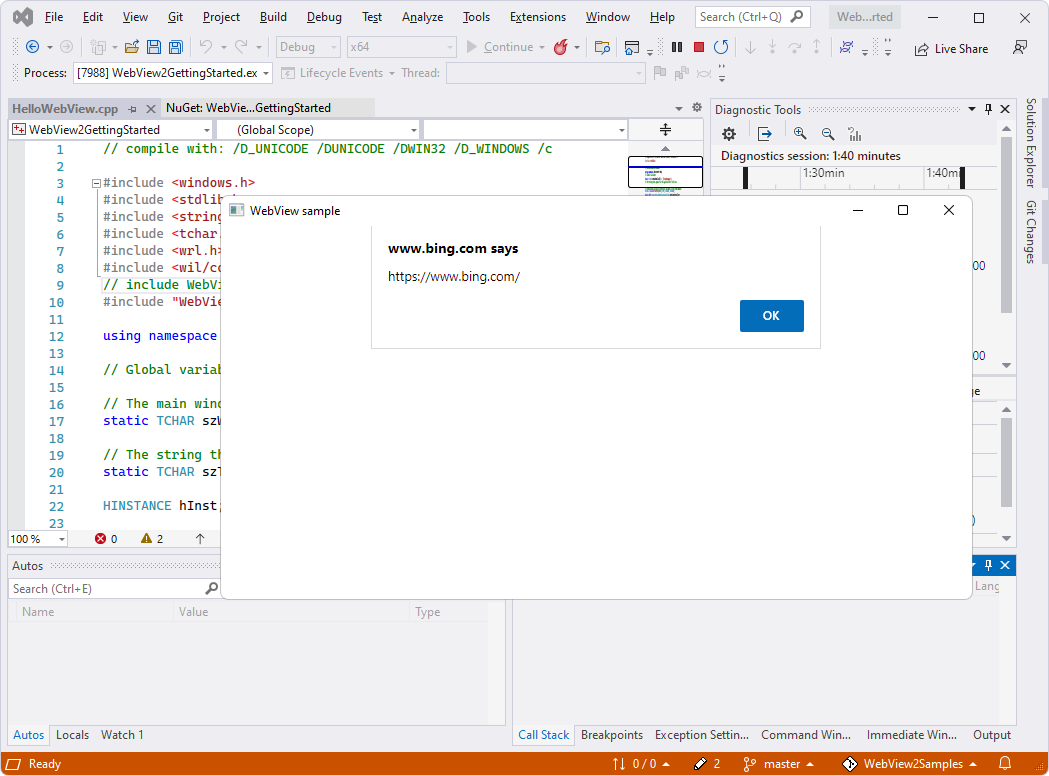
If the WebView sample app window is open, close it.
Continue with the steps below.
Step 13 - Navigation events
In the previous step, we discussed navigating to URL by using the ICoreWebView2::Navigate method. During navigation, WebView2 fires a sequence of events, which the host can listen for:
NavigationStartingSourceChangedContentLoadingHistoryChangedNavigationCompletedIf you want more information now, in a new window or tab, see Navigation events for WebView2 apps.
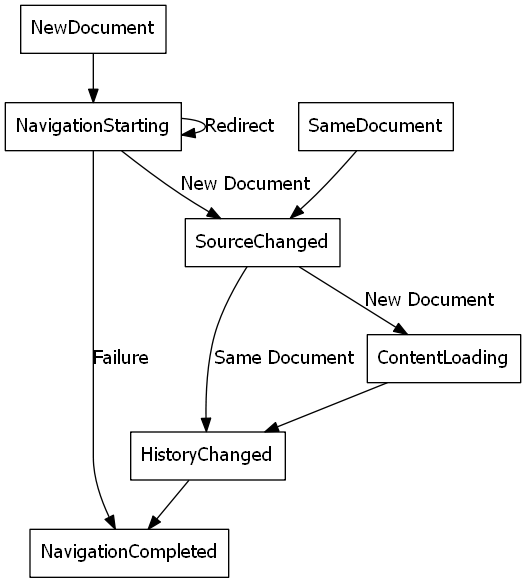
In error cases, one or more of the following events may occur, depending on whether the navigation continued to an error webpage:
SourceChangedContentLoadingHistoryChanged
If an HTTP redirect occurs, there are multiple NavigationStarting events in a row.
As an example of using navigation events, register a handler for the NavigationStarting event, to cancel any non-https (non-secure) requests, as follows.
If it's not already present, paste the following code into
HelloWebView.cpp, below the Step 3 code:// Step 4 - Navigation events // register an ICoreWebView2NavigationStartingEventHandler to cancel any non-https navigation EventRegistrationToken token; webview->add_NavigationStarting(Callback<ICoreWebView2NavigationStartingEventHandler>( [](ICoreWebView2* webview, ICoreWebView2NavigationStartingEventArgs* args) -> HRESULT { wil::unique_cotaskmem_string uri; args->get_Uri(&uri); std::wstring source(uri.get()); if (source.substr(0, 5) != L"https") { args->put_Cancel(true); } return S_OK; }).Get(), &token);
Now the app doesn't open any non-https sites. You can use a similar mechanism to accomplish other tasks, such as restricting navigation to within your own domain.
Continue with the steps below.
Step 14 - Scripting
Use host apps to inject JavaScript code into WebView2 controls at runtime. You can task WebView2 to run arbitrary JavaScript or add initialization scripts. The injected JavaScript applies to all new top-level documents and any child frames until the JavaScript is removed.
The injected JavaScript is run with specific timing:
- Run it after the creation of the global object.
- Run it before any other script included in the HTML document is run.
If the following code isn't present already, paste the following code into
HelloWebView.cpp:// Step 5 - Scripting // Schedule an async task to add initialization script that freezes the Object object webview->AddScriptToExecuteOnDocumentCreated(L"Object.freeze(Object);", nullptr); // Schedule an async task to get the document URL webview->ExecuteScript(L"window.document.URL;", Callback<ICoreWebView2ExecuteScriptCompletedHandler>( [](HRESULT errorCode, LPCWSTR resultObjectAsJson) -> HRESULT { LPCWSTR URL = resultObjectAsJson; //doSomethingWithURL(URL); return S_OK; }).Get());Select File > Save All (Ctrl+Shift+S) to save the project.
Now, WebView2 freezes the
Objectand returns the page document once.
If code must be run in order, use callbacks
The script injection APIs (and some other WebView2 APIs) are asynchronous. So, if code must be run in a specific order, you should use callbacks.
Continue with the steps below.
Step 15 - Communication between host and web content
The host and the web content can also communicate with each other through the postMessage method. The web content running within a WebView2 control can post to the host through the window.chrome.webview.postMessage method, and the message is handled by any registered ICoreWebView2WebMessageReceivedEventHandler event handler on the host.
Similarly, the host can message the web content through the ICoreWebView2::PostWebMessageAsString or ICoreWebView2::PostWebMessageAsJSON method, and the message is caught by handlers that are added from the window.chrome.webview.addEventListener listener. This communication mechanism allows the web content to use native capabilities by passing messages to ask the host to run native APIs.
As an example to understand the mechanism, the following steps occur when you try to output the document URL in WebView2:
The host registers a handler to return received message back to the web content.
The host injects a script to the web content that registers a handler to print message from the host.
The host injects a script to the web content that posts the URL to the host.
The handler of the host is triggered and returns the message (the URL) to the web content.
The handler of the web content is triggered and prints message from the host (the URL).
Have the host app and web content communicate through postMessage, as follows:
If it's not already present, paste the following code into
HelloWebView.cpp:// Step 6 - Communication between host and web content // Set an event handler for the host to return received message back to the web content webview->add_WebMessageReceived(Callback<ICoreWebView2WebMessageReceivedEventHandler>( [](ICoreWebView2* webview, ICoreWebView2WebMessageReceivedEventArgs* args) -> HRESULT { wil::unique_cotaskmem_string message; args->TryGetWebMessageAsString(&message); // processMessage(&message); webview->PostWebMessageAsString(message.get()); return S_OK; }).Get(), &token); // Schedule an async task to add initialization script that // 1) Add an listener to print message from the host // 2) Post document URL to the host webview->AddScriptToExecuteOnDocumentCreated( L"window.chrome.webview.addEventListener(\'message\', event => alert(event.data));" \ L"window.chrome.webview.postMessage(window.document.URL);", nullptr);Select File > Save All (Ctrl+Shift+S) to save the project.
Press F5 to build and run the project.
The sample app first opens a pop-up window, which displays the URL that will be loaded, along with an OK button:

Click the OK button to dismiss the pop-window and continue to the URL:
The WebView2 window now displays webpage content: the Bing website,
http://www.bing.com.
When you are ready, close the WebView sample window.
Congratulations, you've built a Win32 app that hosts and uses the WebView2 control! Your development environment is now set up for WebView2 app development, to include the WebView2 control in your Win32 apps. You've also had an introduction to WebView2 programming concepts.
API Reference
- API Reference for WebView2 Win32 C++
- WebView2 API reference - API Reference for each platform.