Manage Windows LAPS policy with Microsoft Intune
When you’re ready to manage the Windows Local Administrator Password Solution (Windows LAPS) on Windows devices you manage with Microsoft Intune, the information in this article can help you use the Intune admin center to:
- Create and assign Intune LAPS policy to devices.
- View a device’s local admin account details.
- Manually rotate the password for the managed account.
- Use reports on LAPS policy.
Before creating policies, be familiar with the information in Microsoft Intune support for Windows LAPS, which includes:
- An overview of Intune’s Windows LAPS policy and capabilities.
- The prerequisites for using Intune policies for LAPS.
- The role-based admin control (RBAC) permissions your account needs to have to manage LAPS policy.
- Frequently asked questions that can provide insight to configuring and using Intune LAPS policy.
Applies to:
- Windows 10
- Windows 11
About Intune LAPS policy
Intune supports configuration of Windows LAPS on devices through the Local admin password solution (Windows LAPS) profile for endpoint security account protection policy.
Intune policies manage LAPS by using the Windows LAPS configuration service provider (CSP). Windows LAPS CSP configurations take precedence over, and overwrite, any existing configurations from other LAPS sources, like GPOs or the Legacy Microsoft LAPS tool.
Windows LAPS allows for the management of a single local administrator account per device. Intune policy can specify which local admin account it applies to by use of the policy setting Administrator Account Name. If the account name specified in the policy isn’t present on the device, no account is managed. However, when Administrator Account Name is left blank, the policy defaults to the devices built-in local admin account that is identified by its well-known relative identifier (RID).
Note
Ensure the prerequisites for Intune to support Windows LAPS in your tenant are met before creating policies.
Intune’s LAPS policies do not create new accounts or passwords. Instead, they manage an account that’s already on the device.
Configure and assign LAPS policies carefully. The Windows LAPS CSP supports a single configuration for each LAPS setting on a device. Devices that receive multiple Intune policies that include conflicting settings can fail to process policy. Conflicts can also prevent the backup of the managed local admin account and password to your tenants Directory.
To help reduce potential conflicts, we recommend assigning a single LAPS policy to each device through device groups, and not through user groups. While LAPS policy supports user group assignments, they can result in a cycle of changing LAPS configurations each time a different user signs-in to a device. Frequently changing policies can introduce conflicts, a lack of device compliance with requirements, and create confusion around which local admin account from a device is currently being managed.
Create a LAPS policy
Important
Ensure that you have enabled LAPS in Microsoft Entra, as covered in the Enabling Windows LAPS with Microsoft Entra ID documentation.
To create or manage LAPS policy, your account must have applicable rights from the Security baseline category. By default, these permissions are included in the built-in role Endpoint Security Manager. To use custom roles, ensure the custom role includes the rights from the Security baselines category. See Role based access controls for LAPS.
Before you create a policy, you can review details about the available settings in the Windows LAPS CSP documentation.
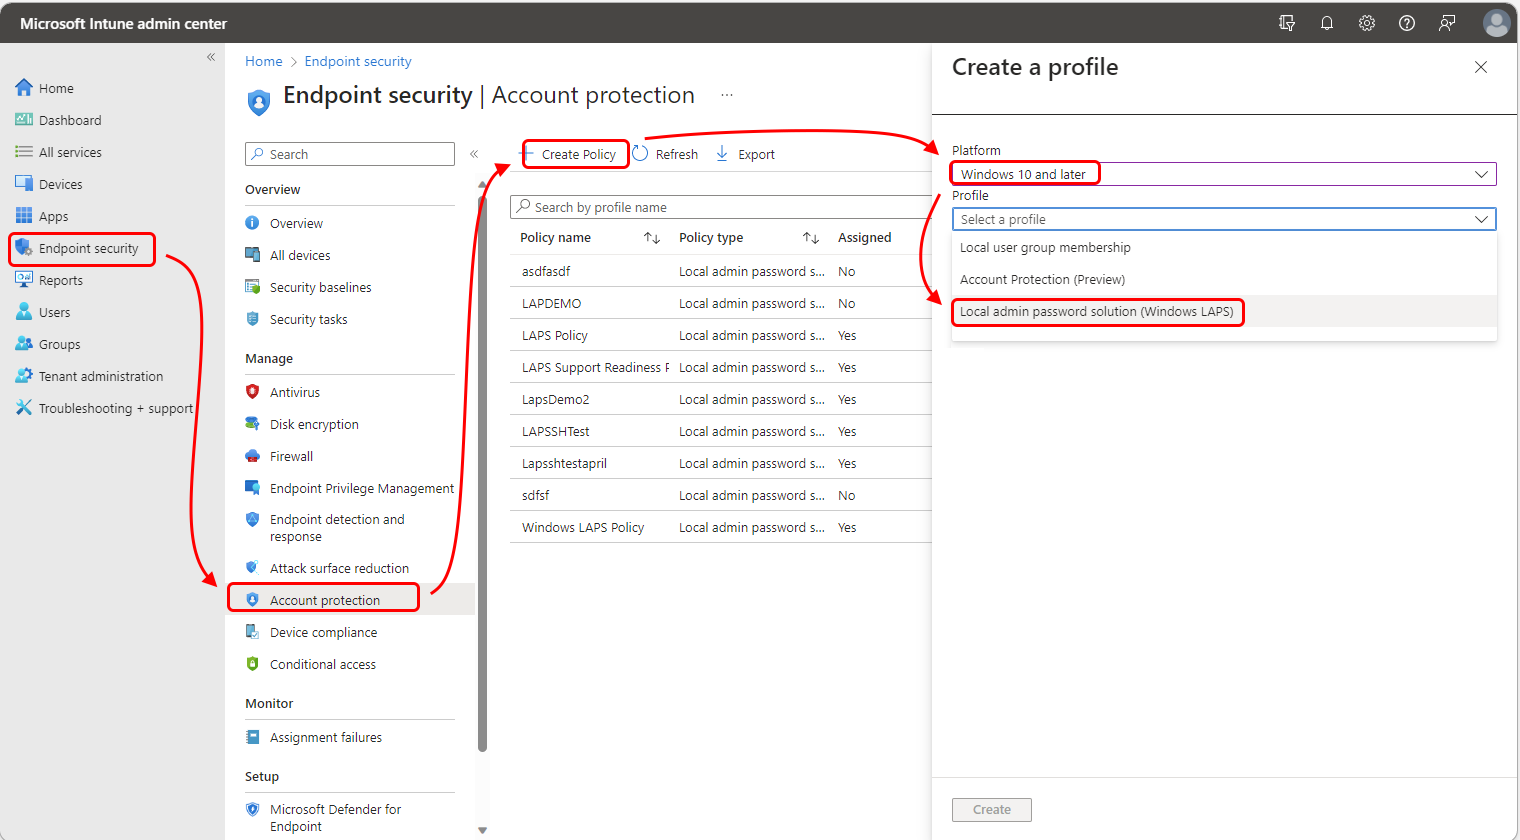
Sign in to the Microsoft Intune admin center and go to Endpoint security > Account protection, and then select Create Policy.
Set the Platform to Windows 10 and later, Profile to Local admin password solution (Windows LAPS), and then select Create.
On Basics, enter the following properties:
- Name: Enter a descriptive name for the profile. Name profiles so you can easily identify them later.
- Description: Enter a description for the profile. This setting is optional but recommended.
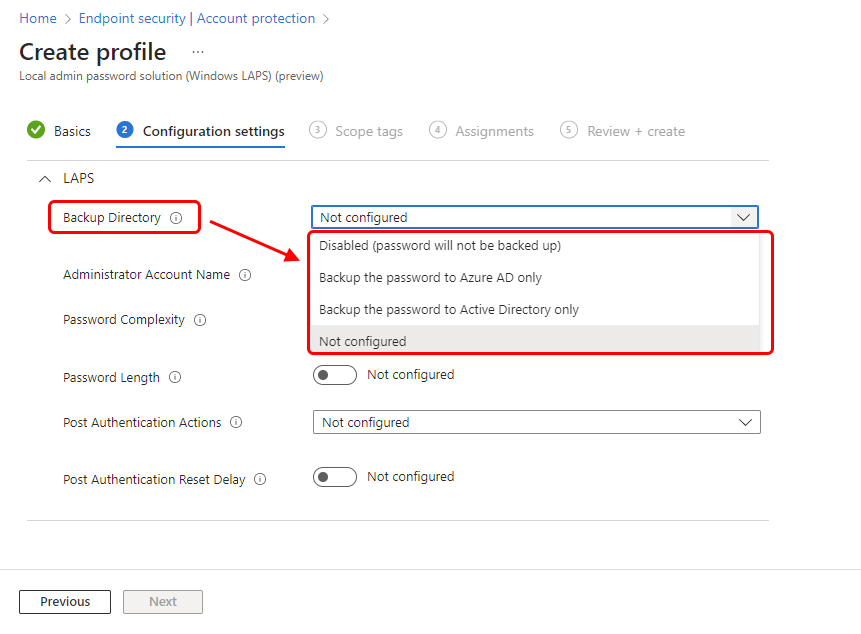
On Configuration settings, Configure a choice for Backup Directory to define the type of Directory to use to back up the local admin account. You can also choose not to back up an account and password. The type of Directory also determines which additional settings are available in this policy.
Important
When configuring a policy, keep in mind that the backup directory type in the policy must be supported by the join type of the device the policy is assigned to. For example, if you set the directory to Active Directory and the device isn’t domain joined (but a member of Microsoft Entra), the device can apply the policy settings from Intune without error, but LAPS on the device will not be able to successfully use that configuration to back up the account.
After configuring Backup Directory, review and configure the available settings to meet your organization’s requirements.
On the Scope tags page, select any desired scope tags to apply, then select Next.
For Assignments, select the groups to receive this policy. We recommend assigning LAPS policy to device groups. Policies assigned to user groups follow a user from device to device. When the user of a device changes, a new policy might apply to the device and introduce inconsistent behavior, including which account the device backs up or when the managed accounts password is next rotated.
Note
As with all Intune policies, when a new policy applies to a device, Intune attempts to notify that device to check in and process the policy.
Until a device successfully checks in with Intune and successfully processes its LAPS policy, data about its managed local admin account won’t be available to view or manage from within the admin center.
For more information on assigning profiles, see Assign user and device profiles.
In Review + create, review your settings and then select Create. When you select Create, your changes are saved, and the profile is assigned. The policy is also shown in the policy list.
View Device actions status
When your account has permissions equivalent to the Security baselines permissions that grant rights to all policy templates in the Endpoint security workload, you can use the Intune admin center to view the status of device actions that have been requested for the device.
For more information, see Role based access controls for LAPS.
In the Microsoft Intune admin center, go to Devices > All devices , and select a device that has a LAPS policy that backs up a local admin account. Intune displays that devices Overview pane.
On the device Overview pane, you can view Device actions status. Previously requested actions and pending actions display, including the time of the request, and if the action failed or was successful. In the following example screenshot, a device has had its Local Admin account Password successfully rotated.
Selecting an action from the list opens the Device action status pane, which can display additional details about that action.
View account and password details
To view account and password details, an account must have one of the following Microsoft Entra permissions:
microsoft.directory/deviceLocalCredentials/password/readmicrosoft.directory/deviceLocalCredentials/standard/read
Use the following methods to grant accounts these permissions:
- Assign the following built-in Microsoft Entra role:
- Cloud Device Administrator
Create and assign a custom role in Microsoft Entra ID that grants these permissions. See Create and assign a custom role in Microsoft Entra ID in the Microsoft Entra documentation.
For more information, see Role based access controls for LAPS.
In the Microsoft Intune admin center, go to Devices > All devices > select a Windows device to open its Overview pane.
From the overview pane, you can view the devices Device actions status. The status displays current and past actions, such as password rotation.
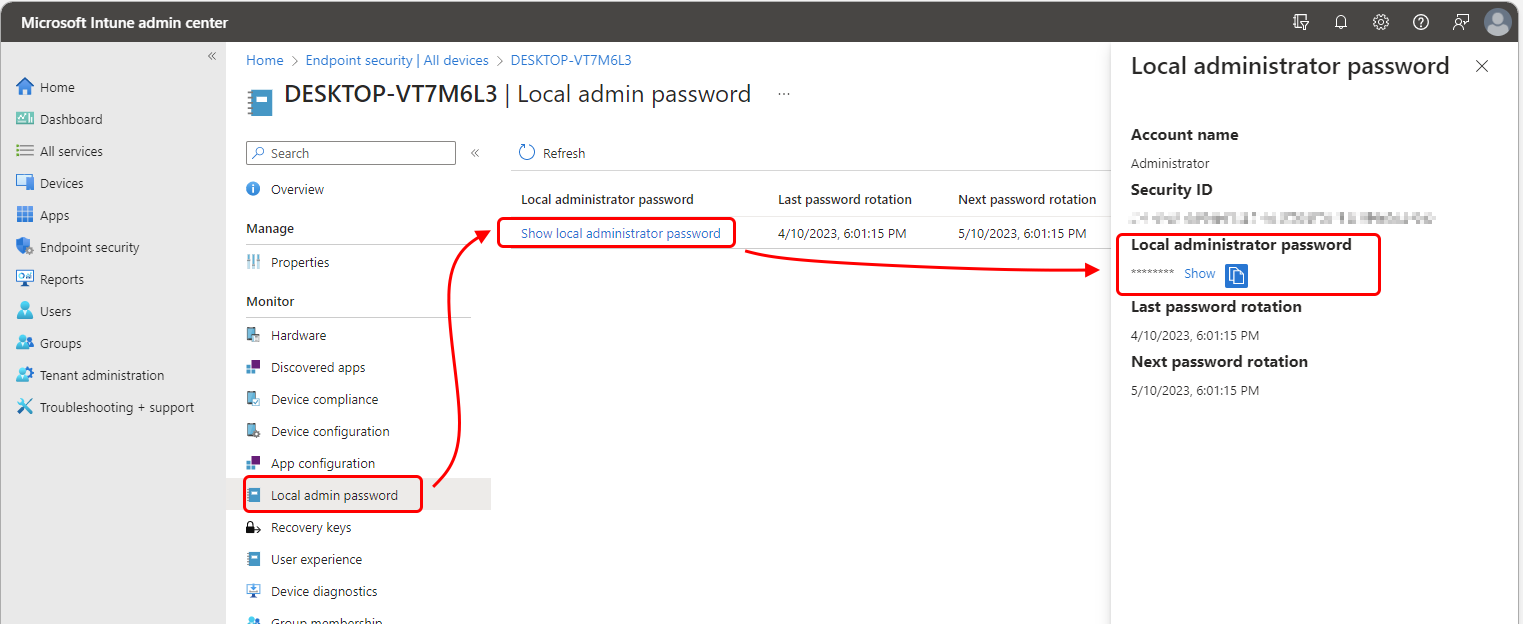
On the devices Overview pane, below Monitor select Local admin password. If your account has sufficient permissions, the Local admin password pane for the device opens, which is the same view that’s available from within the Azure portal.
The following information can be viewed from within the admin center. However, the Local admin password can only be viewed when the account was backed up to Microsoft Entra. It can’t be viewed for an account that’s backed up to an on-premises Active Directory (Windows Server Active Directory):
- Account name – The name of the local admin account that was backed up from the device.
- Security ID – The well-known SID for the account that is backed up from the device.
- Local admin password – Obscured by default. If your account has permission, you can select Show to reveal the password. You can then use the Copy option to copy the password to your clipboard. This information isn't available for devices that back up to an on-premises Active Directory.
- Last password rotation – In UTC, the date and time that the password was last changed or rotated by policy.
- Next password rotation – In UTC, the next date and time when the password will be rotated per policy.
The following are considerations for viewing a devices account and password information:
Retrieving (viewing) the password for a local admin account triggers an audit event.
You cannot view password details for the following devices:
- Devices that have their local admin account backed up to an on-premises Active Directory
- Devices that are set to use Active Directory to back up the account password.
Manually rotate passwords
LAPS policy includes a schedule for automatically rotating account passwords. In addition to a scheduled rotation, you can use the Intune device action of Rotate local admin password to manually rotate a devices password independent of the rotation schedule set by the devices LAPS Policy.
To use this device action, your account must have the following three Intune permissions:
- Managed devices: Read
- Organization: Read
- Remote tasks: Rotate Local Admin Password
See Role based access controls for LAPS.
To rotate a password
In the Microsoft Intune admin center, go to Devices > All devices, and select the Windows device with the account you want to rotate.
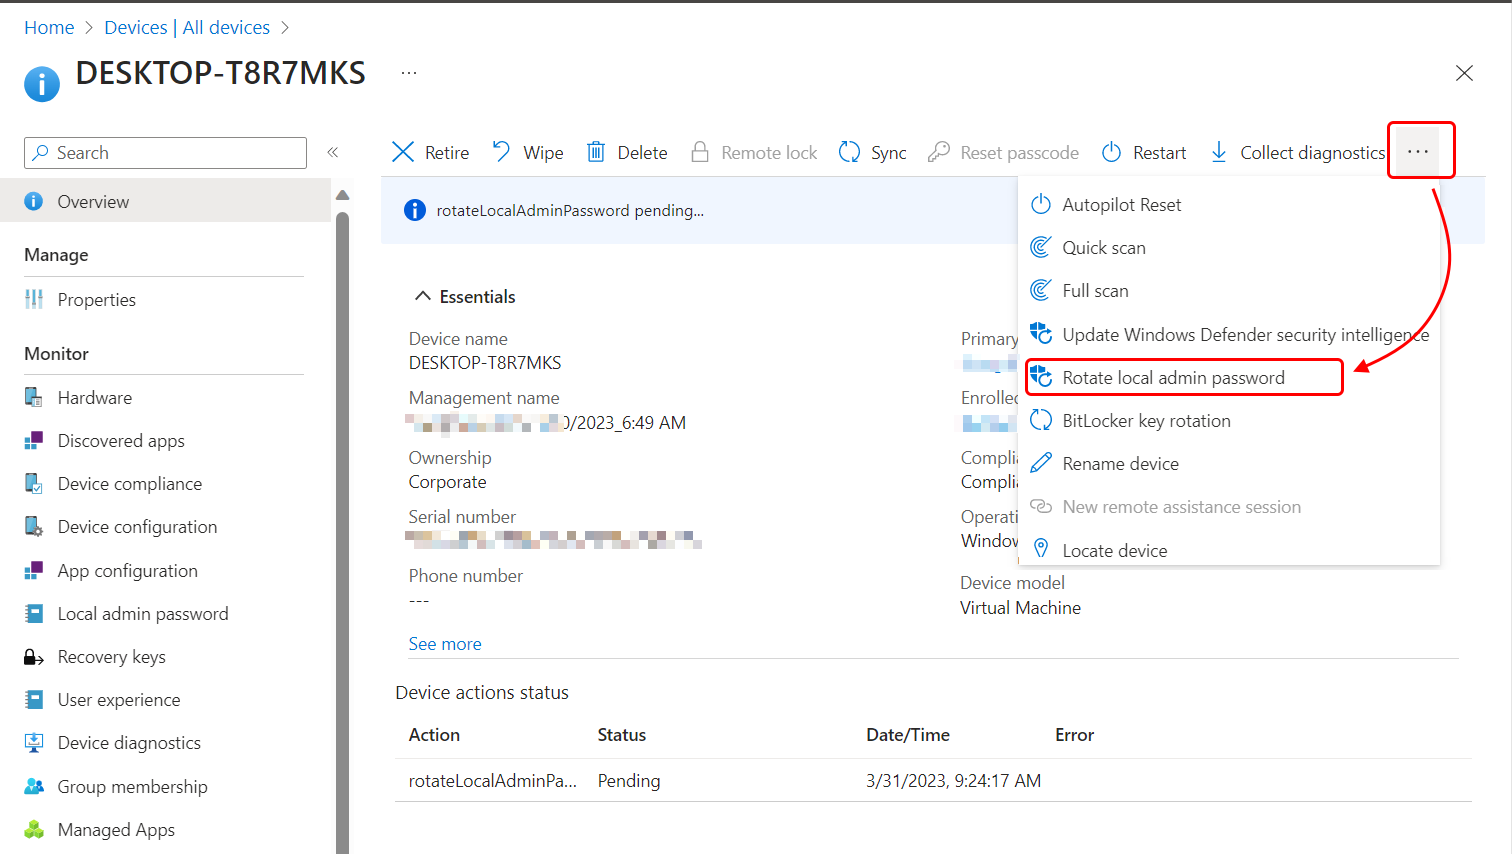
While viewing the device details, expand the ellipsis (…) on the right side of the menu bar to reveal the available options, and then select Rotate Local admin password.
When you select Rotate Local admin password, Intune displays a warning that requires confirmation before the password is rotated.
After you confirm the intent to rotate the password, Intune initiates the process, which can take a few minutes to complete. During this time, the device details pane displays a banner and a Device actions status that indicate the action is Pending.
After a successful rotation, the confirmation will be visible in the Device actions status as Complete.
The following are considerations for manual password rotation:
The Rotate local admin password device action is available for all Windows devices, but any device that hasn’t successfully backed up its account and password data fails to complete a rotate request.
Each manual rotation attempt results in an audit event. Scheduled password rotations also log an audit event.
When a password is manually rotated, the time to the next scheduled password rotation is reset. The time to the next scheduled rotation is managed through the PasswordAgeDays setting in the LAPS policy.
Here's how this works: A device receives a policy on March 1, which sets PasswordAgeDays to 10 days. The result is that the device will automatically rotate its password after 10 days, on March 11. On March 5, an admin manually rotates that device’s password, and action that resets the start date for PasswordAgeDays to March 5. As a result, the device will now automatically rotate its password 10 days later, on March 15.
For Microsoft Entra joined devices, the device must be online at the time the manual rotation is requested. If the device isn’t online at the time of the request, it results in a failure.
Password rotation isn't supported as Bulk Action. You can only rotate a single device at a time.
Avoid policy conflicts
The following details can help you avoid conflicts and understand the expected behavior from devices managed by LAPS policy.
When a device with successful policy is assigned an two or more policies that introduce a conflict:
- Settings that were in use on the device remain on the device at the value last set. Both policies, the original and the new, report as being in conflict.
- To resolve the conflict, either remove policy assignments until the conflicting policy doesn’t apply, or reconfigure applicable policies to set the same configuration, removing the conflict.
When a device that doesn’t have a LAPS policy then receives two conflicting policies at the same time:
- Settings aren't sent to the device, and both policies are reported as having conflicts.
- While a conflict remains, settings from the policies don't apply to the device.
To resolve conflicts, you must either remove policy assignments from the device, or reconfigure settings in applicable policies until no more conflicts remain.


