Configure Webhooks
Webhooks need to be configured for seven specific entities: UserGroups, Categories, Users,UserGroupAssignments,Addresses,AddressAssignment,Catalogs. This article walks you through the steps to configure and activate the webhooks for the Sitecore OrderCloud connector.
Step 1. Configure Webhooks on the OrderCloud portal
This step requires specifying the source for each webhook to ensure proper configuration.
Go to OrderCloud Portal > API Console.
Navigate to API Clients and select Create New API Client. Provide the name of the API client and select Create New API Client.
Select Delivery Configurations > POST integrations/deliveryconfig. Fill name as WebhooksDeliveryConfig and mark as Enabled.
Scroll down and find Event Hub. Fill name and connection string from the Eventstream OrderCloud source. Select Send. Note the Delivery Config ID.
Go to Webhooks, select the lightening bolt in the top left corner and switch to Classic view.
Select POST Create a new webhook and add Name to create webhooks for the seven specific entities.
Navigate to API Client ID and select Add Item.
Add the API Client ID created in the previous steps.
Add the Delivery Config ID created in the previous steps.
- Select Add Webhook Route for POST, DELETE, PATCH, PUT operations. Replace with the JSON given in the JSON for webhooks for each webhook.
Step 2. Configure Webhooks on the connector
This step requires specifying the destination for each webhook to ensure proper configuration.
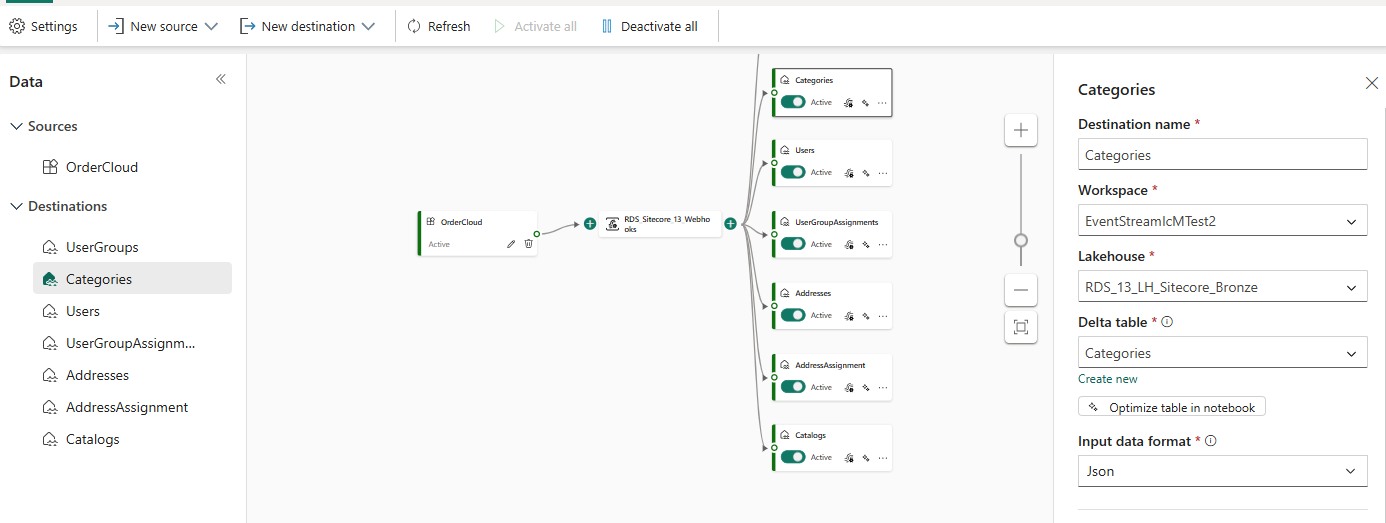
Go to your Webhooks Eventstream resource.
Create a new Custom App source called OrderCloud.
Create a new destination each for the seven entities.
Select Lakehouse as new destination.
In the Destination name and Delta table fields, enter the entity name (Categories, as example).
Enter the created Bronze Lakehouse name and the associated workspace name.
Repeat these steps for the other six entities.
After creating all of the seven destinations, select Deactivate all.
Step 3. Activate the configured Webhooks
After the source and destination for the webhooks are configured, you'll need to activate them so that the Webhooks are triggered with each data update. Now, to initiate the data flow, you should trigger the webhook. For example, you can create a new category on the source side and observe it being replicated on the destination side.
Go back to Eventstream source.
Select the relevant wave icon for a webhook on their area (Categories, for example) and arrange filters.
Repeat the steps to trigger the other six webhooks. You can see the arranged entities in the Arranged Entities section.
Select Activate all. Now the Eventstream resource syncs the new operations on arranged entities.
JSON for webhooks
AddressAssignmentsWebhook
{
  "Name": "AddressAssignmentsWebhook",
  "ApiClientIDs": ["<API_CLIENT_IDS>"],
  "WebhookRoutes": [
    {
	"Route": "v1/buyers/{buyerID}/addresses/{addressID}/assignments",
	"Verb": "DELETE"
    },
    {
	"Route": "v1/buyers/{buyerID}/addresses/assignments",
	"Verb": "POST"
    }
  ],
  "DeliveryConfigID": "<DELIVERY_CONFIG_FROM_EARLIER>"
}
AddressWebhook
{
  "Name": "AddressWebhook",
  "ApiClientIDs": ["<API_CLIENT_IDS>"],
  "WebhookRoutes": [
    {
					"Route": "v1/buyers/{buyerID}/addresses",
					"Verb": "POST"
				},
				{
					"Route": "v1/buyers/{buyerID}/addresses/{addressID}",
					"Verb": "DELETE"
				},
				{
					"Route": "v1/buyers/{buyerID}/addresses/{addressID}",
					"Verb": "PATCH"
				},
				{
					"Route": "v1/buyers/{buyerID}/addresses/{addressID}",
					"Verb": "PUT"
				}
  ],
  "DeliveryConfigID": "<DELIVERY_CONFIG_FROM_EARLIER>"
}
CatalogsWebhook
{
  "Name": "CatalogsWebhook",
  "ApiClientIDs": ["<API_CLIENT_IDS>"],
  "WebhookRoutes": [
    {
					"Route": "v1/catalogs",
					"Verb": "POST"
				},
				{
					"Route": "v1/catalogs/{catalogID}",
					"Verb": "DELETE"
				},
				{
					"Route": "v1/catalogs/{catalogID}",
					"Verb": "PATCH"
				},
				{
					"Route": "v1/catalogs/{catalogID}",
					"Verb": "PUT"
				}
  ],
  "DeliveryConfigID": "<DELIVERY_CONFIG_FROM_EARLIER>"
}
CategoriesWebhook
{
  "Name": "CategoriesWebhook",
  "ApiClientIDs": ["<API_CLIENT_IDS>"],
  "WebhookRoutes": [
    {
					"Route": "v1/catalogs/{catalogID}/categories",
					"Verb": "POST"
				},
				{
					"Route": "v1/catalogs/{catalogID}/categories/{categoryID}",
					"Verb": "DELETE"
				},
				{
					"Route": "v1/catalogs/{catalogID}/categories/{categoryID}",
					"Verb": "PATCH"
				},
				{
					"Route": "v1/catalogs/{catalogID}/categories/{categoryID}",
					"Verb": "PUT"
				}
  ],
  "DeliveryConfigID": "<DELIVERY_CONFIG_FROM_EARLIER>"
}
UserGroupAssignmentsWebhook
{
  "Name": "UserGroupAssignmentsWebhook",
  "ApiClientIDs": ["<API_CLIENT_IDS>"],
  "WebhookRoutes": [
    {
					"Route": "v1/buyers/{buyerID}/usergroups/{userGroupID}",
					"Verb": "PATCH"
				},
				{
					"Route": "v1/buyers/{buyerID}/usergroups/{userGroupID}",
					"Verb": "PUT"
				},
				{
					"Route": "v1/buyers/{buyerID}/usergroups/{userGroupID}/assignments/{userID}",
					"Verb": "DELETE"
				},
				{
					"Route": "v1/buyers/{buyerID}/usergroups/assignments",
					"Verb": "POST"
				}
  ],
  "DeliveryConfigID": "<DELIVERY_CONFIG_FROM_EARLIER>"
}
UserGroupsWebhook
{
  "Name": "UserGroupsWebhook",
  "ApiClientIDs": ["<API_CLIENT_IDS>"],
  "WebhookRoutes": [
    {
					"Route": "v1/buyers/{buyerID}/usergroups",
					"Verb": "POST"
				},
				{
					"Route": "v1/buyers/{buyerID}/usergroups/{userGroupID}",
					"Verb": "DELETE"
				},
				{
					"Route": "v1/buyers/{buyerID}/usergroups/{userGroupID}",
					"Verb": "PATCH"
				},
				{
					"Route": "v1/buyers/{buyerID}/usergroups/{userGroupID}",
					"Verb": "PUT"
				}
  ],
  "DeliveryConfigID": "<DELIVERY_CONFIG_FROM_EARLIER>"
}
UsersWebhook
{
  "Name": "UsersWebhook",
  "ApiClientIDs": ["<API_CLIENT_IDS>"],
  "WebhookRoutes": [
    {
					"Route": "v1/buyers/{buyerID}/users",
					"Verb": "POST"
				},
				{
					"Route": "v1/buyers/{buyerID}/users/{userID}",
					"Verb": "DELETE"
				},
				{
					"Route": "v1/buyers/{buyerID}/users/{userID}",
					"Verb": "PATCH"
				},
				{
					"Route": "v1/buyers/{buyerID}/users/{userID}",
					"Verb": "PUT"
				}
  ],
  "DeliveryConfigID": "<DELIVERY_CONFIG_FROM_EARLIER>"
}
Arranged Entities
UserGroups
Categories
Users
UserGroupAssignments
Addresses
AddressAssignment
Catalogs
Important
For detailed support, contact the Microsoft Cloud for Retail team at mcfrcommunity@microsoft.com.


