Configure custom domains with Microsoft Entra application proxy
When you publish an application through Microsoft Entra application proxy, you create an external URL for your users. This URL gets the default domain yourtenant.msappproxy.net. For example, if you publish an app named Expenses in your tenant named Contoso, the external URL is https:\//expenses-contoso.msappproxy.net. If you want to use your own domain name instead of msappproxy.net, you can configure a custom domain for your application.
Benefits of custom domains
It's a good idea to set up custom domains for your apps whenever possible. Some reasons to use custom domains include:
Links between apps work even outside the corporate network. Without a custom domain, if your app is hard-coding internal links to targets outside the application proxy, and the links aren't externally resolvable, they break. When your internal and external URLs are the same, you avoid this problem. If you're not able to use custom domains, see Redirect hardcoded links for apps published with Microsoft Entra application proxy for other ways to address this issue.
Your users have an easier experience, because they get to the app with the same URL from inside or outside your network. There's no need to learn different internal and external URLs, or track their current location.
You can control your branding and create the URLs you want. A custom domain can help build your users' confidence, because users see and use a familiar name instead of
msappproxy.net.Some configurations only work with custom domains. For example, you need custom domains for apps that use Security Assertion Markup Language (SAML). SAML is used when you’re using Active Directory Federation Services (AD FS) but are unable to use WS-Federation. For more information, see Work with claims-aware apps in application proxy.
If you're not able to make the internal and external URLs match, it's not as important to use custom domains. But you can still take advantage of the other benefits.
DNS configuration options
There are several options for setting up your DNS configuration, depending on your requirements:
Same internal and external URL, different internal and external behavior
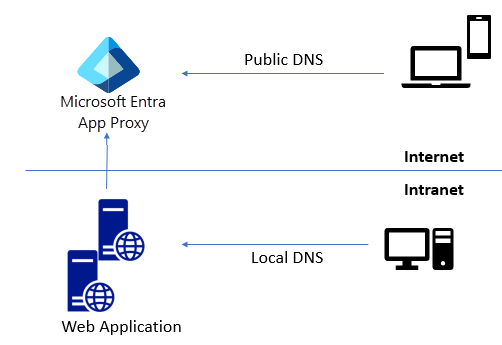
If you don't want your internal users to be directed through the application proxy, you can set up a split-brain DNS. A split DNS infrastructure directs name resolution based on host location. Internal hosts are directed to an internal domain name server, and external hosts to an external domain name server.

Different internal and external URLs
When internal and external URLs are different, don't configure split-brain behavior. User routing is determined using the URL. In this case, you change only the external DNS, and route the external URL to the application proxy endpoint.
When you select a custom domain for an external URL, an information bar shows the CNAME entry you need to add to the external DNS provider. You can always see this information by going to the app's Application proxy page.
Set up and use custom domains
To configure an on-premises app to use a custom domain, you need a verified Microsoft Entra custom domain, a PFX certificate for the custom domain, and an on-premises app to configure.
Important
You are responsible for maintaining DNS records that redirect your custom domains to the msappproxy.net domain. If you choose to later delete your application or tenant, make sure to also delete associated DNS records for application proxy to prevent misuse of dangling DNS records.
Create and verify a custom domain
To create and verify a custom domain:
- Sign in to the Microsoft Entra admin center as at least an Application Administrator.
- Browse to Identity > Settings > Domain names.
- Select Add custom domain.
- Enter your custom domain name and select Add Domain.
- On the domain page, copy the TXT record information for your domain.
- Go to your domain registrar and create a new TXT record for your domain, based on your copied DNS information.
- After you register the domain, on the domain's page in Microsoft Entra ID, select Verify. Once the domain status is Verified, you can use the domain across all your Microsoft Entra configurations, including application proxy.
For more detailed instructions, see Add your custom domain name using the Microsoft Entra admin center.
Configure an app to use a custom domain
To publish your app through application proxy with a custom domain:
For a new app, in the Microsoft Entra admin center, browse to Identity > Applications > Enterprise applications > Application proxy.
Select New application. In the On-premises applications section, select Add an on-premises application.
For an app already in Enterprise applications, select it from the list, and then select Application proxy in the left navigation.
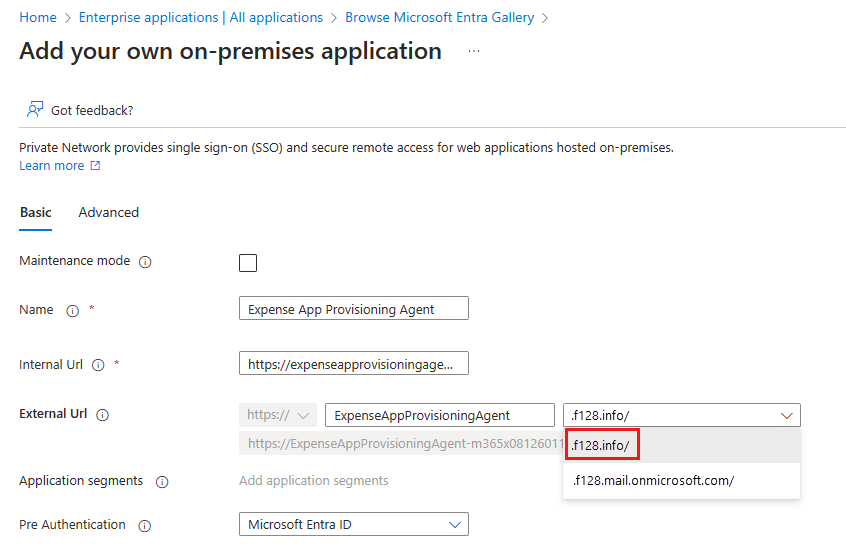
On the application proxy settings page, enter a Name if you're adding your own on-premises application.
In the Internal Url field, enter the internal URL for your app.
In the External Url field, drop down the list and select the custom domain you want to use.
Select Add.

If the domain already has a certificate, the Certificate field displays the certificate information. Otherwise, select the Certificate field.

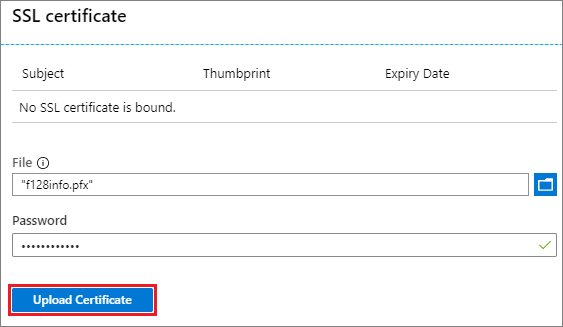
On the SSL certificate page, browse to and select your PFX certificate file. Enter the password for the certificate, and select Upload Certificate. For more information about certificates, see the Certificates for custom domains section. If the certificate isn't valid, or there's a problem with the password, you see an error message. The Application proxy FAQ contains some troubleshooting steps you can try.

Tip
A custom domain only needs its certificate uploaded once. After that, the uploaded certificate is applied automatically when you use the custom domain for other apps.
If you added a certificate, on the Application proxy page, select Save.
In the information bar on the Application proxy page, note the CNAME entry you need to add to your DNS zone.

Follow the instructions at Manage DNS records and record sets by using the Microsoft Entra admin center to add a DNS record that redirects the new external URL to the
msappproxy.netdomain in Azure DNS. If a different DNS provider is used, contact the vendor for the instructions.Important
Ensure that you are properly using a CNAME record that points to the
msappproxy.netdomain. Do not point records to IP addresses or server DNS names since these are not static and may impact the resiliency of the service.To check that the DNS record is configured correctly, use the nslookup command to confirm that your external URL is reachable and the
msapproxy.netdomain appears as an alias.
Your application is now set up to use the custom domain. Be sure to assign users to your application before you test or release it.
To change the domain for an app, select a different domain from the dropdown list in External URL on the app's Application proxy page. Upload a certificate for the updated domain, if necessary, and update the DNS record. If you don't see the custom domain you want in the dropdown list in External URL, it might not be verified.
For more detailed instructions for application proxy, see Tutorial: Add an on-premises application for remote access through application proxy in Microsoft Entra ID.
Certificates for custom domains
A certificate creates the secure TLS connection for your custom domain.
Certificate formats
You must use a PFX certificate, to ensure all required intermediate certificates are included. The certificate must include the private key.
Most common certificate signature methods are supported such as Subject Alternative Name (SAN).
You can use wildcard certificates as long as the wildcard matches the external URL. You must use wildcard certificates for wildcard applications. If you want to use the certificate to also access subdomains, you must add the subdomain wildcards as subject alternative names in the same certificate. For example, a certificate for *.adventure-works.com fails for *.apps.adventure-works.com unless you add *.apps.adventure-works.com as a subject alternative name.
You can use certificates issued by your own public key infrastructure (PKI) if the certificate chain is installed on your client devices. Microsoft Intune can deploy these certificates to managed devices. For nonmanaged devices, you must manually install these certificates.
We don't recommend using a private root Certificate Authority (CA) since the private root CA would also need to be pushed to client machines, which may introduce many challenges.
Certificate management
All certificate management is through the individual application pages. Go to the application's Application proxy page to access the Certificate field.
If you upload a certificate, then new apps use it. As long as they're configured to use it. However, you need to upload the certificate again for apps that were already there when you uploaded it.
When a certificate expires, you get a warning telling you to upload another certificate. If the certificate is revoked, your users may see a security warning when accessing the app. To update the certificate for an app, navigate to the Application proxy page for the app, select Certificate, and upload a new certificate. Old certificates that aren't being used by other apps are automatically deleted.
Next steps
- Enable single sign-on to your published apps with Microsoft Entra authentication.
- Conditional Access for your published cloud apps.