Automate agent tasks with Power Automate
Applies to: Dynamics 365 Customer Service
It's common for customer service representatives, or agents, to rely on other applications outside of Customer Service workspace to conduct their day-to-day business. Some of these tasks can be monotonous or repetitive. With the help of Power Automate Desktop, a user can automate these tasks and call them directly within Customer Service workspace.
What are desktop flows?
Desktop flows broaden the existing robotic process automation (RPA) capabilities in Power Automate and enable you to automate all repetitive desktop processes. Automating is quicker and easier with the new intuitive Power Automate desktop flow designer. Here, you use the prebuilt drag-and-drop actions or record your own desktop flows to run later.
Desktop flows are for use by anyone who is performing simple or complex rule-based tasks on their workstations. Users at home, small businesses, enterprises, or larger companies can use automation capabilities in Power Automate to create flows, interact with everyday tools like email and Excel, or work with modern and legacy applications. Learn more at Introduction to desktop flows.
Use desktop flows to automate tasks for customer service representatives
Customer service representatives (CSRs) commonly manage their daily activities with many different applications. Using desktop flows, a CSR can get information from Dynamics 365 Customer Service workspace and automate a task with a legacy system on their workstation. This enables the user to avoid having to do repetitive or low value tasks.
Sample automated task using Contoso Invoicing
The following sections describe a sample Power Automate desktop flow that takes information from a Dynamics 365 case record and enters it into a .NET application, Contoso Invoicing. The automation is triggered within the Customer Service workspace through a command bar button.
Prerequisites
Go through the first five, of eight, units of the Power Automate online workshop at Training | Microsoft Learn.
Import and modify the existing solution
This process requires a few steps. First, you must import the solution, get the URL of the desktop flow, and then update the web resource.
Download the managed solution from the GitHub folder.
Browse to https://make.powerapps.com/.
In the navigation panel on the left, choose Solutions.
Choose Import solution.
Choose Browse.
Locate the RPACaseToInvoicing_1_0_0_XX_managed.zip file, and choose Open.
Note
XX is a placeholder for the current minor version of the solution.
Choose Next.
Choose Import. Wait for the import to complete.
Once complete, on the workstation used to install the prerequisites, open the Power Automate app.
In the Power Automate app, choose CSW Case to Contoso Invoicing and then choose the icon with three vertical dots. Choose the Properties element.
Open the details and copy the value of the Run URL field. Save this for later.
Update the JavaScript file
The JavaScript file used for the command bar button has references to the specific Power Automate desktop used for automation. You must update the JavaScript file to reflect that flow.
Download the extn_remoteDesktopCasetoContosoInvoicing.js web resource JavaScript file included in the solution.
Locate the following line:
var desktopFlowURL = "ms-powerautomate:/console/flow/run?environmentid=REPLACEWITHENVID&workflowid=REPLACEWITHWORKFLOWID&source=Other"After
var desktopFlowURL =, remove everything between the quotes and replace it with the value from the Run URL field from the earlier instructions. Save the file.In https://make.powerapps.com/, choose Solutions.
Choose Unmanaged and find Default Solution.
On the left pane under Objects, expand Web Resources, and then choose Code.
Search for extn_remoteDesktopCasetoContosoInvoicing.js, select it, and then choose Edit.
Select Choose file and then specify the remoteDesktopCasetoContosoInvoicing.js file that you modified earlier.
Save your changes.
Choose Publish.
Run the desktop flow
Once the solution has been imported and the necessary customizations changed and published, the Desktop Flow is ready to run.
On the workstation used to install the prerequisites, open the Contoso Invoicing application.
Open Dynamics 365 Customer Service workspace.
Choose Menu and then choose Cases.
Open a case.
On the command bar, choose the Add to Contoso Inv action.
This opens a browser and a prompt:
Choose Open.
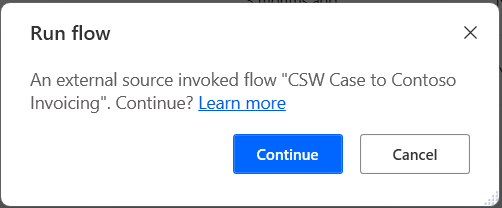
You'll get the following prompt:
Choose Continue.
Note
You can disable this prompt as outlined in the following article. However, this can pose a security threat. Learn more at Run desktop flows via URL or desktop shortcuts.
This will now run the flow by opening the Contoso Invoicing app and entering the details from the case.
Note
This sample has some hard-coded data in JavaScript to keep the example simple. The data that is hard-coded is the Address, Phone, and Email.

