Brush Transformation Overview
The Brush class provides two transformation properties: Transform and RelativeTransform. The properties enable you to rotate, scale, skew, and translate a brush's contents. This topic describes the differences between these two properties and provides examples of their usage.
Prerequisites
To understand this topic, you should understand the features of the brush that you are transforming. For LinearGradientBrush and RadialGradientBrush, see the Painting with Solid Colors and Gradients Overview. For ImageBrush, DrawingBrush, or VisualBrush, see Painting with Images, Drawings, and Visuals. You should also be familiar with the 2D transforms described in the Transforms Overview.
Differences between the Transform and RelativeTransform Properties
When you apply a transform to a brush's Transform property, you need to know the size of the painted area if you want to transform the brush contents about its center. Suppose the painted area is 200 device independent pixels wide and 150 tall. If you used a RotateTransform to rotate the brush's output 45 degrees about its center, you'd give the RotateTransform a CenterX of 100 and a CenterY of 75.
When you apply a transform to a brush's RelativeTransform property, that transform is applied to the brush before its output is mapped to the painted area. The following list describes the order in which a brush’s contents are processed and transformed.
Process the brush’s contents. For a GradientBrush, this means determining the gradient area. For a TileBrush, the Viewbox is mapped to the Viewport. This becomes the brush’s output.
Project the brush’s output onto the 1 x 1 transformation rectangle.
Apply the brush’s RelativeTransform, if it has one.
Project the transformed output onto the area to paint.
Apply the brush’s Transform, if it has one.
Because the RelativeTransform is applied while the brush’s output is mapped to a 1 x 1 rectangle, transform center and offset values appear to be relative. For example, if you used a RotateTransform to rotate the brush's output 45 degrees about its center, you'd give the RotateTransform a CenterX of 0.5 and a CenterY of 0.5.
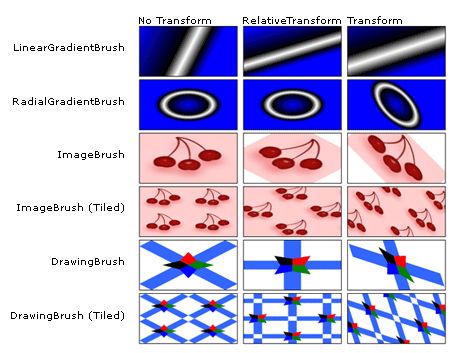
The following illustration shows the output of several brushes that have been rotated by 45 degrees using the RelativeTransform and Transform properties.

Using RelativeTransform with a TileBrush
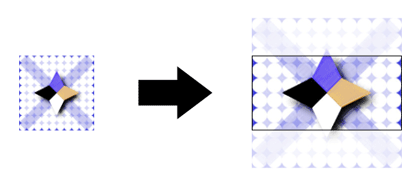
Because tile brushes are more complex than other brushes, applying a RelativeTransform to one might produce unexpected results. For example, take the following image.

The following example uses an ImageBrush to paint a rectangular area with the preceding image. It applies a RotateTransform to the ImageBrush object's RelativeTransform property, and sets its Stretch property to UniformToFill, which should preserve the image's aspect ratio when it is stretched to completely fill the rectangle.
<Rectangle Width="200" Height="100" Stroke="Black" StrokeThickness="1">
  <Rectangle.Fill>
    <ImageBrush Stretch="UniformToFill">
      <ImageBrush.ImageSource>
        <BitmapImage UriSource="sampleImages\square.jpg" />
      </ImageBrush.ImageSource>
      <ImageBrush.RelativeTransform>
        <RotateTransform CenterX="0.5" CenterY="0.5" Angle="90" />
      </ImageBrush.RelativeTransform>
    </ImageBrush>
  </Rectangle.Fill>
</Rectangle>
This example produces the following output:

Notice that the image is distorted, even though the brush's Stretch was set to UniformToFill. That's because the relative transform is applied after the brush's Viewbox is mapped to its Viewport. The following list describes each step of the process:
Project the brush's contents (Viewbox) onto its base tile (Viewport) using the brush's Stretch setting.

Project the base tile onto the 1 x 1 transformation rectangle.

Apply the RotateTransform.

Project the transformed base tile onto the area to paint.

Example: Rotate an ImageBrush 45 Degrees
The following example applies a RotateTransform to the RelativeTransform property of an ImageBrush. The RotateTransform object's CenterX and CenterY properties are both set to 0.5, the relative coordinates of the content's center point. As a result, the brush's contents are rotated about its center.
//
// Create an ImageBrush with a relative transform and
// use it to paint a rectangle.
//
ImageBrush relativeTransformImageBrush = new ImageBrush();
relativeTransformImageBrush.ImageSource =
    new BitmapImage(new Uri(@"sampleImages\pinkcherries.jpg", UriKind.Relative));

// Create a 45 rotate transform about the brush's center
// and apply it to the brush's RelativeTransform property.
RotateTransform aRotateTransform = new RotateTransform();
aRotateTransform.CenterX = 0.5;
aRotateTransform.CenterY = 0.5;
aRotateTransform.Angle = 45;
relativeTransformImageBrush.RelativeTransform = aRotateTransform;

// Use the brush to paint a rectangle.
Rectangle relativeTransformImageBrushRectangle = new Rectangle();
relativeTransformImageBrushRectangle.Width = 175;
relativeTransformImageBrushRectangle.Height = 90;
relativeTransformImageBrushRectangle.Stroke = Brushes.Black;
relativeTransformImageBrushRectangle.Fill = relativeTransformImageBrush;
'
' Create an ImageBrush with a relative transform and
' use it to paint a rectangle.
'
Dim relativeTransformImageBrush As New ImageBrush()
relativeTransformImageBrush.ImageSource = New BitmapImage(New Uri("sampleImages\pinkcherries.jpg", UriKind.Relative))

' Create a 45 rotate transform about the brush's center
' and apply it to the brush's RelativeTransform property.
Dim aRotateTransform As New RotateTransform()
aRotateTransform.CenterX = 0.5
aRotateTransform.CenterY = 0.5
aRotateTransform.Angle = 45
relativeTransformImageBrush.RelativeTransform = aRotateTransform

' Use the brush to paint a rectangle.
Dim relativeTransformImageBrushRectangle As New Rectangle()
relativeTransformImageBrushRectangle.Width = 175
relativeTransformImageBrushRectangle.Height = 90
relativeTransformImageBrushRectangle.Stroke = Brushes.Black
relativeTransformImageBrushRectangle.Fill = relativeTransformImageBrush
<Rectangle Width="175" Height="90" Stroke="Black">
  <Rectangle.Fill>
    <ImageBrush ImageSource="sampleImages\pinkcherries.jpg">
      <ImageBrush.RelativeTransform>
        <RotateTransform CenterX="0.5" CenterY="0.5" Angle="45" />
      </ImageBrush.RelativeTransform>
    </ImageBrush>
  </Rectangle.Fill>
</Rectangle>
The next example also applies a RotateTransform to an ImageBrush, but uses the Transform property instead of the RelativeTransform property. To rotate the brush about its center, the RotateTransform object's CenterX and CenterY must be set to absolute coordinates. Because the rectangle being painted by the brush is 175 by 90 pixels, its center point is (87.5, 45).
//
// Create an ImageBrush with a transform and
// use it to paint a rectangle.
//
ImageBrush transformImageBrush = new ImageBrush();
transformImageBrush.ImageSource =
    new BitmapImage(new Uri(@"sampleImages\pinkcherries.jpg", UriKind.Relative));

// Create a 45 rotate transform about the brush's center
// and apply it to the brush's Transform property.
RotateTransform anotherRotateTransform = new RotateTransform();
anotherRotateTransform.CenterX = 87.5;
anotherRotateTransform.CenterY = 45;
anotherRotateTransform.Angle = 45;
transformImageBrush.Transform = anotherRotateTransform;

// Use the brush to paint a rectangle.
Rectangle transformImageBrushRectangle = new Rectangle();
transformImageBrushRectangle.Width = 175;
transformImageBrushRectangle.Height = 90;
transformImageBrushRectangle.Stroke = Brushes.Black;
transformImageBrushRectangle.Fill = transformImageBrush;
'
' Create an ImageBrush with a transform and
' use it to paint a rectangle.
'
Dim transformImageBrush As New ImageBrush()
transformImageBrush.ImageSource = New BitmapImage(New Uri("sampleImages\pinkcherries.jpg", UriKind.Relative))

' Create a 45 rotate transform about the brush's center
' and apply it to the brush's Transform property.
Dim anotherRotateTransform As New RotateTransform()
anotherRotateTransform.CenterX = 87.5
anotherRotateTransform.CenterY = 45
anotherRotateTransform.Angle = 45
transformImageBrush.Transform = anotherRotateTransform

' Use the brush to paint a rectangle.
Dim transformImageBrushRectangle As New Rectangle()
transformImageBrushRectangle.Width = 175
transformImageBrushRectangle.Height = 90
transformImageBrushRectangle.Stroke = Brushes.Black
transformImageBrushRectangle.Fill = transformImageBrush
<Rectangle Width="175" Height="90" Stroke="Black">
  <Rectangle.Fill>
    <ImageBrush ImageSource="sampleImages\pinkcherries.jpg">
      <ImageBrush.Transform>
        <RotateTransform CenterX="87.5" CenterY="45" Angle="45" />
      </ImageBrush.Transform>
    </ImageBrush>
  </Rectangle.Fill>
</Rectangle>
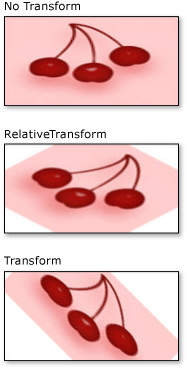
The following illustration shows the brush without a transform, with the transform applied to the RelativeTransform property, and with the transform applied to the Transform property.

This example is part of a larger sample. For the complete sample, see the Brushes Sample. For more information about brushes, see the WPF Brushes Overview.
See also
.NET Desktop feedback
