Tutorial: Create a .NET class library using Visual Studio
In this tutorial, you create a simple class library that contains a single string-handling method.
A class library defines types and methods that are called by an application. If the library targets .NET Standard 2.0, it can be called by any .NET implementation (including .NET Framework) that supports .NET Standard 2.0. If the library targets .NET 8, it can be called by any application that targets .NET 8. This tutorial shows how to target .NET 8.
When you create a class library, you can distribute it as a NuGet package or as a component bundled with the application that uses it.
Prerequisites
Visual Studio 2022 with the .NET desktop development workload installed. The .NET 8 SDK is automatically installed when you select this workload.
For more information, see Install the .NET SDK with Visual Studio.
Create a solution
Start by creating a blank solution to put the class library project in. A Visual Studio solution serves as a container for one or more projects. You'll add additional, related projects to the same solution.
To create the blank solution:
Start Visual Studio.
On the start window, choose Create a new project.
On the Create a new project page, enter solution in the search box. Choose the Blank Solution template, and then choose Next.
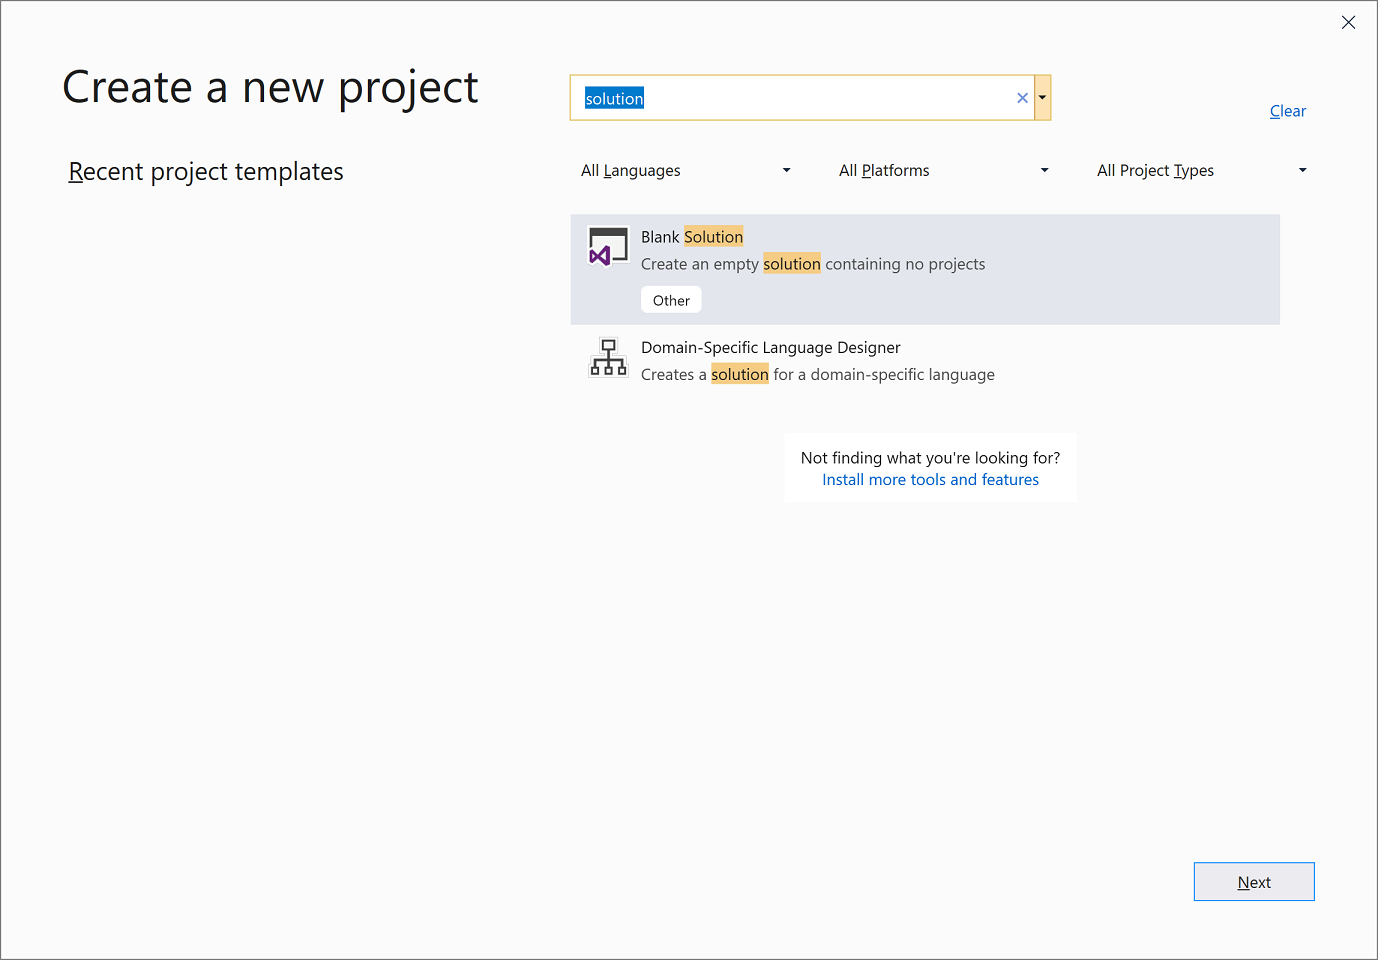
On the Configure your new project page, enter ClassLibraryProjects in the Solution name box. Then choose Create.
Create a class library project
Add a new .NET class library project named "StringLibrary" to the solution.
Right-click on the solution in Solution Explorer and select Add > New Project.
On the Add a new project page, enter library in the search box. Choose C# or Visual Basic from the Language list, and then choose All platforms from the Platform list. Choose the Class Library template, and then choose Next.
On the Configure your new project page, enter StringLibrary in the Project name box, and then choose Next.
On the Additional information page, select .NET 8, and then choose Create.
Check to make sure that the library targets the correct version of .NET. Right-click on the library project in Solution Explorer, and then select Properties. The Target Framework text box shows that the project targets .NET 8.0.
If you're using Visual Basic, clear the text in the Root namespace text box.
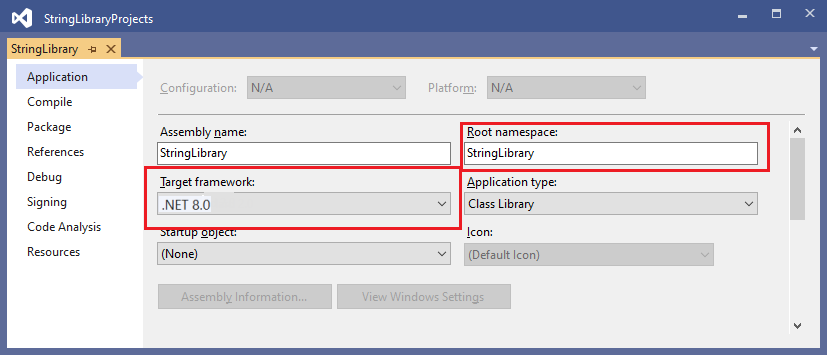
For each project, Visual Basic automatically creates a namespace that corresponds to the project name. In this tutorial, you define a top-level namespace by using the
namespacekeyword in the code file.Replace the code in the code window for Class1.cs or Class1.vb with the following code, and save the file. If the language you want to use isn't shown, change the language selector at the top of the page.
using System;

namespace UtilityLibraries
{
    public static class StringLibrary
    {
        public static bool StartsWithUpper(this string str)
        {
            if (string.IsNullOrWhiteSpace(str))
                return false;

            char ch = str[0];
            return char.IsUpper(ch);
        }
    }
}
Imports System.Runtime.CompilerServices Namespace UtilityLibraries Public Module StringLibrary <Extension> Public Function StartsWithUpper(str As String) As Boolean If String.IsNullOrWhiteSpace(str) Then Return False End If Dim ch As Char = str(0) Return Char.IsUpper(ch) End Function End Module End NamespaceThe class library,
UtilityLibraries.StringLibrary, contains a method namedStartsWithUpper. This method returns a Boolean value that indicates whether the current string instance begins with an uppercase character. The Unicode standard distinguishes uppercase characters from lowercase characters. The Char.IsUpper(Char) method returnstrueif a character is uppercase.StartsWithUpperis implemented as an extension method so that you can call it as if it were a member of the String class. The question mark (?) afterstringin the C# code indicates that the string may be null.On the menu bar, select Build > Build Solution or press Ctrl+Shift+B to verify that the project compiles without error.
Add a console app to the solution
Add a console application that uses the class library. The app will prompt the user to enter a string and report whether the string begins with an uppercase character.
Add a new .NET console application named "ShowCase" to the solution.
Right-click on the solution in Solution Explorer and select Add > New project.
On the Add a new project page, enter console in the search box. Choose C# or Visual Basic from the Language list, and then choose All platforms from the Platform list.
Choose the Console Application template, and then choose Next.
On the Configure your new project page, enter ShowCase in the Project name box. Then choose Next.
On the Additional information page, select .NET 8 in the Framework box. Then choose Create.
In the code window for the Program.cs or Program.vb file, replace all of the code with the following code.
using System;
using UtilityLibraries;

class Program
{
    static void Main(string[] args)
    {
        int row = 0;

        do
        {
            if (row == 0 || row >= 25)
                ResetConsole();

            string? input = Console.ReadLine();
            if (string.IsNullOrEmpty(input)) break;
            Console.WriteLine($"Input: {input} {"Begins with uppercase? ",30}: " +
                              $"{(input.StartsWithUpper() ? "Yes" : "No")}{Environment.NewLine}");
            row += 3;
        } while (true);
        return;

        // Declare a ResetConsole local method
        void ResetConsole()
        {
            if (row > 0)
            {
                Console.WriteLine("Press any key to continue...");
                Console.ReadKey();
            }
            Console.Clear();
            Console.WriteLine($"{Environment.NewLine}Press <Enter> only to exit; otherwise, enter a string and press <Enter>:{Environment.NewLine}");
            row = 3;
        }
    }
}
Imports UtilityLibraries Module Program Dim row As Integer = 0 Sub Main() Do If row = 0 OrElse row >= 25 Then ResetConsole() Dim input As String = Console.ReadLine() If String.IsNullOrEmpty(input) Then Return Console.WriteLine($"Input: {input} {"Begins with uppercase? ",30}: " + $"{If(input.StartsWithUpper(), "Yes", "No")} {Environment.NewLine}") row += 3 Loop While True End Sub Private Sub ResetConsole() If row > 0 Then Console.WriteLine("Press any key to continue...") Console.ReadKey() End If Console.Clear() Console.WriteLine($"{Environment.NewLine}Press <Enter> only to exit; otherwise, enter a string and press <Enter>:{Environment.NewLine}") row = 3 End Sub End ModuleThe code uses the
rowvariable to maintain a count of the number of rows of data written to the console window. Whenever it's greater than or equal to 25, the code clears the console window and displays a message to the user.The program prompts the user to enter a string. It indicates whether the string starts with an uppercase character. If the user presses the Enter key without entering a string, the application ends, and the console window closes.
Add a project reference
Initially, the new console app project doesn't have access to the class library. To allow it to call methods in the class library, create a project reference to the class library project.
In Solution Explorer, right-click the
ShowCaseproject's Dependencies node, and select Add Project Reference.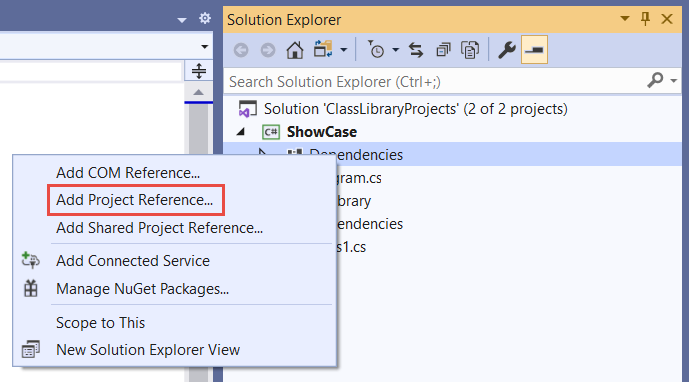
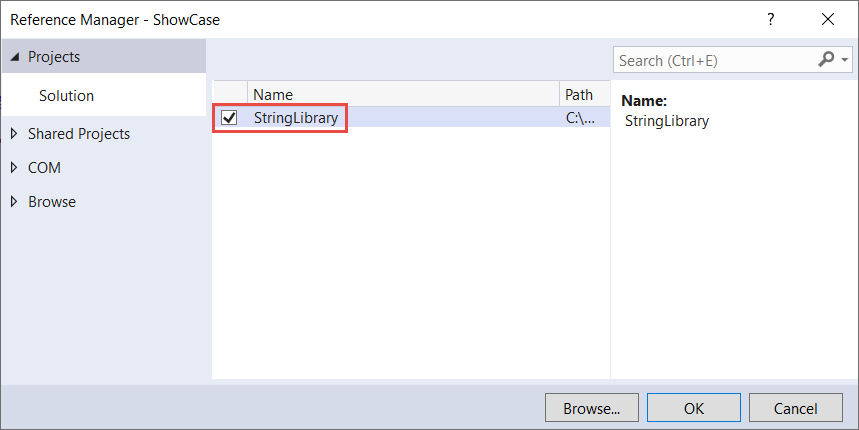
In the Reference Manager dialog, select the StringLibrary project, and select OK.
Run the app
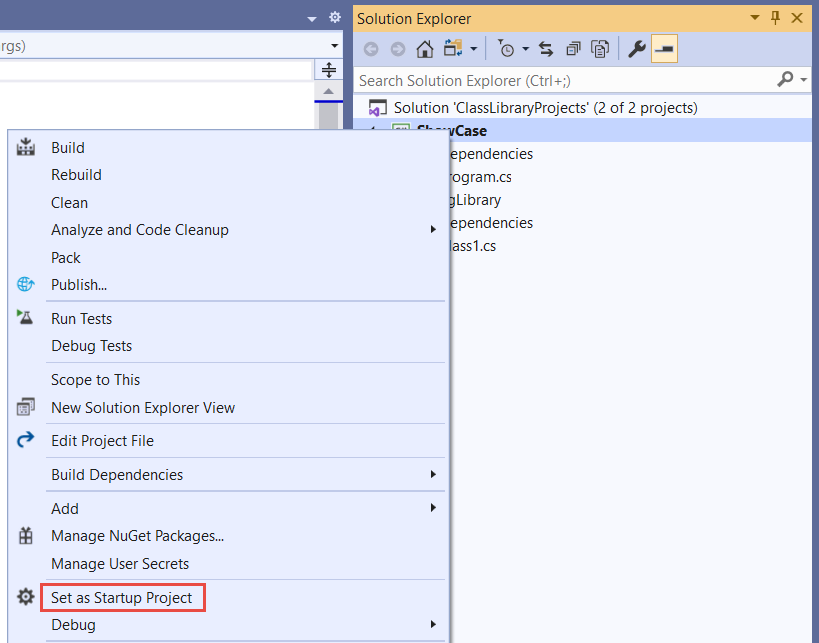
In Solution Explorer, right-click the ShowCase project and select Set as StartUp Project in the context menu.
Press Ctrl+F5 to compile and run the program without debugging.
Try out the program by entering strings and pressing Enter, then press Enter to exit.

Additional resources
Next steps
In this tutorial, you created a class library. In the next tutorial, you learn how to unit test the class library.
Or you can skip automated unit testing and learn how to share the library by creating a NuGet package:
Or learn how to publish a console app. If you publish the console app from the solution you created in this tutorial, the class library goes with it as a .dll file.
