Network device discovery and vulnerability management
Applies to:
- Microsoft Defender for Endpoint Plan 1
- Microsoft Defender for Endpoint Plan 2
- Defender Vulnerability Management
- Microsoft Defender XDR
Want to experience Microsoft Defender for Endpoint? Sign up for a free trial.
Note
The Network device discovery and vulnerability assessments Blog (published 04-13-2021) provides insights into the new Network device discovery capabilities in Defender for Endpoint. This article provides an overview of the challenge that Network device discovery is designed to address, and detailed information about how get started using these new capabilities.
Network discovery capabilities are available in the Device inventory section of the Microsoft Defender portal and Microsoft Defender XDR consoles.
A designated Microsoft Defender for Endpoint device is used on each network segment to perform periodic authenticated scans of preconfigured network devices. Once discovered, vulnerability management capabilities in Defender for Endpoint provide integrated workflows to secure discovered switches, routers, WLAN controllers, firewalls, and VPN gateways.
Once the network devices are discovered and classified, security administrators are able to receive the latest security recommendations and review recently discovered vulnerabilities on network devices deployed across their organizations.
Approach
Network devices aren't managed as standard endpoints since Defender for Endpoint doesn't have a sensor built into the network devices themselves. These types of devices require an agentless approach where a remote scan obtains the necessary information from the devices. Depending on the network topology and characteristics, a single device or a few devices onboarded to Microsoft Defender for Endpoint performs authenticated scans of network devices using SNMP (read-only).
There are two types of devices to keep in mind:
- Scanning device: A device that's already onboarded that you use to scan the network devices.
- Network devices: The network devices you plan to scan and onboard.
Vulnerability management for network devices
Once the network devices are discovered and classified, security administrators are able to receive the latest security recommendations and review recently discovered vulnerabilities on network devices deployed across their organizations.
Operating systems that are supported
The following operating systems are currently supported:
- Cisco IOS, IOS-XE, NX-OS
- Fortinet FortiOS
- Juniper JUNOS
- HPE Aruba Networking ArubaOS, AOS-CX
- HPE ArubaOS, Procurve Switch Software
- Palo Alto Networks PAN-OS
More networking vendors and OS will be added over time, based on data gathered from customer usage. Therefore, you're encouraged to configure all your network devices, even if they're not specified in this list.
How to get started
Your first step is to select a device that performs the authenticated network scans.
Decide on a Defender for Endpoint onboarded device (client or server) that has a network connection to the management port for the network devices you plan on scanning.
SNMP traffic between the Defender for Endpoint scanning device and the targeted network devices must be allowed (for example, by the Firewall).
Decide which network devices are assessed for vulnerabilities (for example: a Cisco switch or a Palo Alto Networks firewall).
Make sure SNMP read-only is enabled on all configured network devices to allow the Defender for Endpoint scanning device to query the configured network devices. 'SNMP write' isn't needed for the proper functionality of this feature.
Obtain the IP addresses of the network devices to be scanned (or the subnets where these devices are deployed).
Obtain the SNMP credentials of the network devices (for example: Community String, noAuthNoPriv, authNoPriv, authPriv). You're required to provide the credentials when configuring a new scan job.
Proxy client configuration: No extra configuration is required other than the Defender for Endpoint device proxy requirements.
To allow the scanner to be authenticated and work properly, it's essential that you add the following domains/URLs:
- *.security.microsoft.com
- login.microsoftonline.com
- *.blob.core.windows.net/networkscannerstable/*
Note
Not all URLs are specified in the Defender for Endpoint documented list of allowed data collection.
Permissions
To configure scan jobs, the following user permission option is required: Manage security settings in Defender. You can find the permission by going to Settings > Roles. For more information, see Create and manage roles for role-based access control.
Windows version pre-requisite for the scanner
The scanner is supported on Windows 10, version 1903 and Windows Server, version 1903 and later. For more information, see Windows 10, version 1903 and Windows Server, version 1903.
Note
There's a limit of 40 scanner installations per tenant.
Install the scanner
Go to Microsoft 365 security > Settings > Device discovery > Authenticated scans.
Download the scanner and install it on the designated Defender for Endpoint scanning device.
Scanner installation & registration
The signing-in process can be completed on the designated scanning device itself or any other device (for example, your personal client device).
Note
Both the account the user signs in with and the device being used to complete the sign in process, must be in the same tenant where the device is onboarded to Microsoft Defender for Endpoint.
To complete the scanner registration process:
Copy and follow the URL that appears on the command line and use the provided installation code to complete the registration process.
Note
You may need to change Command Prompt settings to be able to copy the URL.
Enter the code and sign in using a Microsoft account that has the Defender for Endpoint permission called "Manage security settings in Defender."
When finished, you should see a message confirming you've signed in.
Updates for scanner
The scanner has a scheduled task that, by default, is configured to look for updates regularly. When the task runs, it compares the version of the scanner on the client device to the version of the agent on the update location. The update location is where Windows looks for updates, such as on a network share or from the internet.
If there's a difference between the two versions, the update process determines which files are different and need to be updated on the local computer. Once the required updates are determined, the downloading of the updates start.
Configure a new network device authenticated scan
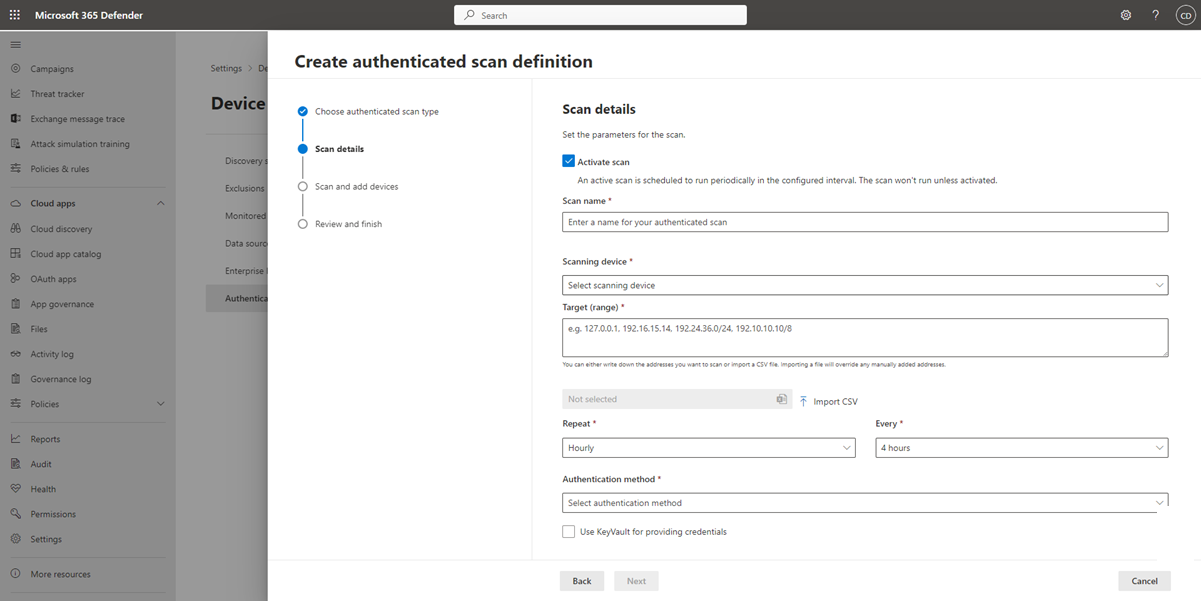
Go to Settings > Device discovery > Authenticated scans in the Microsoft Defender portal.
Select Add new scan and choose Network device authenticated scan and select Next.
Choose whether to Activate scan.
Enter a Scan name.
Select the Scanning device: The onboarded device you use to scan the network devices.
Enter the Target (range): The IP address ranges or hostnames you want to scan. You can either enter the addresses or import a CSV file. Importing a file overrides any manually added addresses.
Select the Scan interval: By default, the scan runs every four hours, you can change the scan interval or have it only run once, by selecting Don't repeat.
Choose your Authentication method.
You can select to Use azure KeyVault for providing credentials: If you manage your credentials in Azure KeyVault, you can enter the Azure KeyVault URL and Azure KeyVault secret name to be accessed by the scanning device to provide credentials. The secret value is dependent on the Authenticated Method you choose, as described in the following table:
Authentication Method Azure KeyVault secret value AuthPriv Username;AuthPassword;PrivPassword AuthNoPriv Username;AuthPassword CommunityString CommunityString Select Next to run or skip the test scan.
Select Next to review the settings and the select Submit to create your new network device authenticated scan.
Note
To prevent device duplication in the network device inventory, make sure each IP address is configured only once across multiple scanning devices.
Scan and add network devices
During the set-up process, you can perform a one time test scan to verify that:
- There's connectivity between the Defender for Endpoint scanning device and the configured target network devices.
- The configured SNMP credentials are correct.
Each scanning device can support up to 1,500 successful IP addresses scan. For example, if you scan 10 different subnets where only 100 IP addresses return successful results, you'll be able to scan 1,400 IP additional addresses from other subnets on the same scanning device.
If there are multiple IP address ranges/subnets to scan, the test scan results take several minutes to show up. A test scan is available for up to 1,024 addresses.
Once the results show up, you can choose which devices will be included in the periodic scan. If you skip viewing the scan results, all configured IP addresses are added to the network device authenticated scan (regardless of the device's response). The scan results can also be exported.
Device inventory
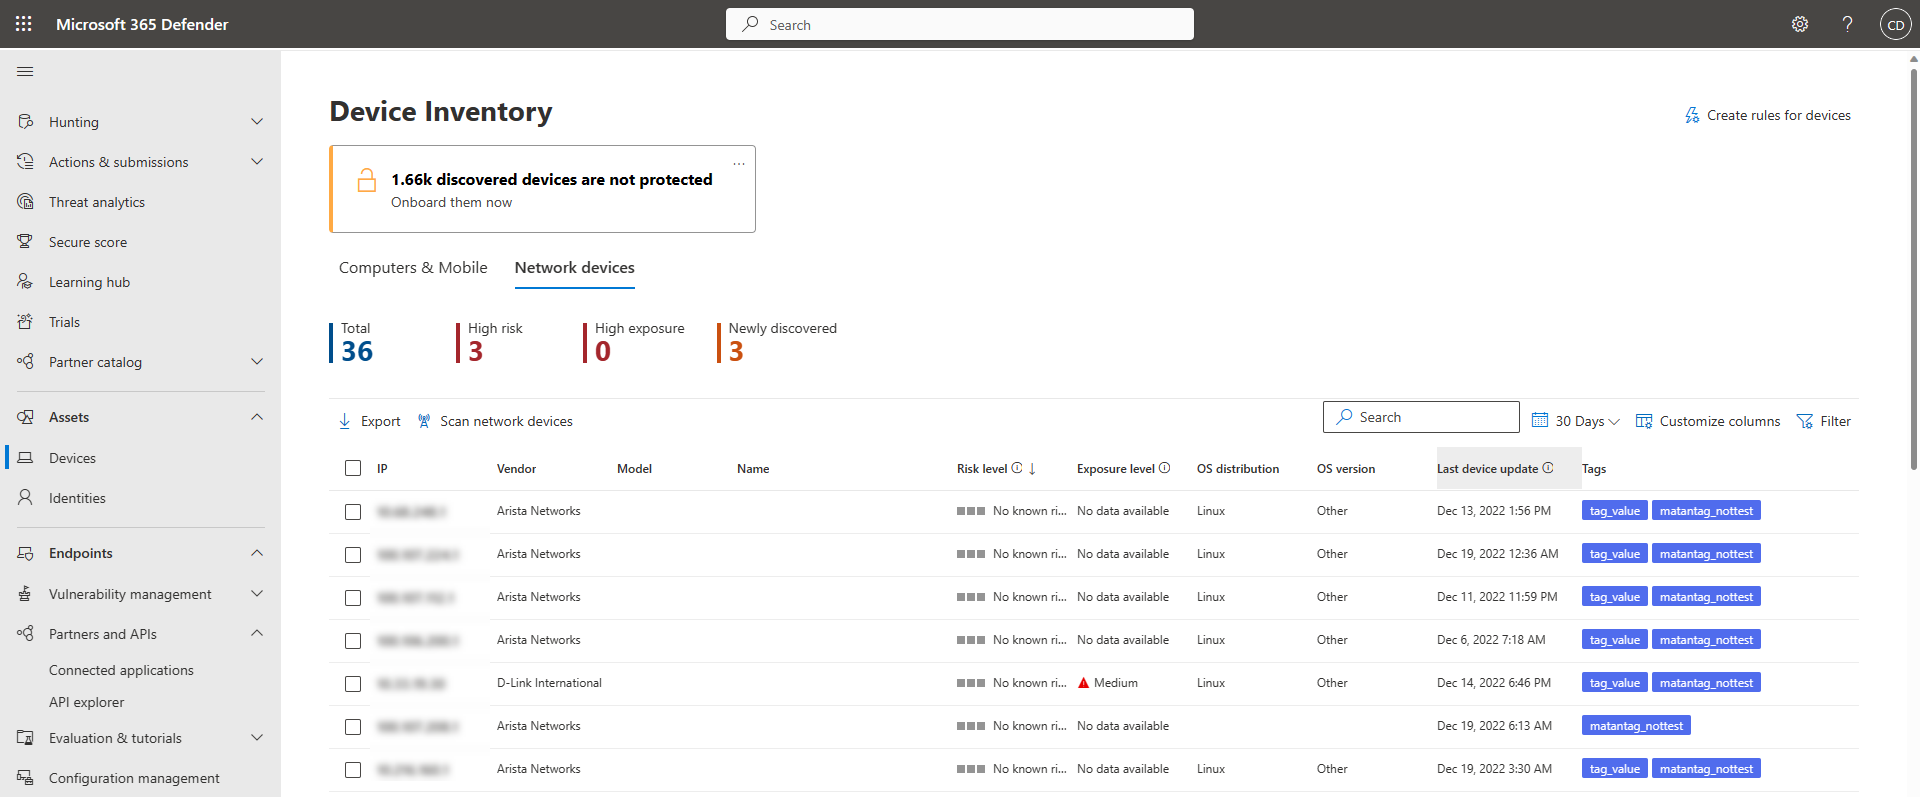
Newly discovered devices are shown under the new Network devices tab in the Device inventory page. It may take up to two hours after adding a scanning job until the devices are updated.
Troubleshooting
Scanner installation has failed
Verify that the required URLs are added to the allowed domains in your firewall settings. Also, make sure proxy settings are configured as described in Configure device proxy and Internet connectivity settings.
The Microsoft.com/devicelogin web page did not show up
Verify that the required URLs are added to the allowed domains in your firewall. Also, make sure proxy settings are configured as described in Configure device proxy and Internet connectivity settings.
Network devices are not shown in the device inventory after several hours
The scan results should be updated a few hours after the initial scan that took place after completing the network device authenticated scan configuration.
If devices are still not shown, verify that the service 'MdatpNetworkScanService' is running on your devices being scanned, on which you installed the scanner, and perform a "Run scan" in the relevant network device authenticated scan configuration.
If you still don't get results after 5 minutes, restart the service.
Devices last seen time is longer than 24 hours
Validate that the scanner is running properly. Then go to the scan definition and select "Run test." Check what error messages are returning from the relevant IP addresses.
My scanner is configured but scans aren't running
As the authenticated scanner currently uses an encryption algorithm that isn't compliant with Federal Information Processing Standards (FIPS), the scanner can't operate when an organization enforces the use of FIPS compliant algorithms.
To allow algorithms that aren't compliant with FIPS, set the following value in the registry for the devices where the scanner will run:
Computer\HKEY_LOCAL_MACHINE\SYSTEM\CurrentControlSet\Control\Lsa\FipsAlgorithmPolicy with a DWORD value named Enabled and value of 0x0
FIPS compliant algorithms are only used in relation to departments and agencies of the United States federal government.
Required Defender Vulnerability Management user permission
Registration finished with an error: "It looks like you don't have sufficient permissions for adding a new agent. The required permission is 'Manage security settings in Defender'."
Press any key to exit.
Ask your system administrator to assign you the required permissions. Alternately, ask another relevant member to help you with the sign-in process by providing them with the sign-in code and link.
Registration process fails using provided link in the command line in registration process
Try a different browser or copy the sign-in link and code to a different device.
Text too small or can't copy text from command line
Change command-line settings on your device to allow copying and change text size.
Related articles
Tip
Do you want to learn more? Engage with the Microsoft Security community in our Tech Community: Microsoft Defender for Endpoint Tech Community.


