Converting Virtual Machines Running Linux from SCSI to NVMe
In this article, we discuss the process of converting virtual machines (VM) running Linux from SCSI to NVMe storage. By migrating to NVMe, you can take advantage of its improved performance and scalability.
SCSI vs NVMe
Azure VMs support two types of storage interfaces: Small Computer System Interface (SCSI) and NVMe. The SCSI interface is a legacy standard that provides physical connectivity and data transfer between computers and peripheral devices. NVMe is similar to SCSI in that it provides connectivity and data transfer, but NVMe is a faster and more efficient interface for data transfer between servers and storage systems.
Note
VMs configured with Trusted Launch can't move from SCSI to NVMe.
Support for SCSI interface VMs
Azure continues to support the SCSI interface on the versions of VM offerings that provide SCSI storage. However, not all new VM series have SCSI storage as an option going forward.
What is changing for your VM?
Changing the host interface from SCSI to NVMe doesn't change the remote storage (OS disk or data disks), but change the way the operating systems sees the disks.
| SCSI enabled VM | NVMe enabled VM | |
|---|---|---|
| OS disk | /dev/sda | /dev/nvme0n1 |
| Temp Disk | /dev/sdb | /dev/sda |
| First Data Disk | /dev/sdc | /dev/nvme0n2 |
In the following sections, we provide a guide to convert your Azure VM from SCSI to NVMe using Azure Boost ensuring you can take full advantage of these performance improvements and maintain a competitive edge in the cloud computing landscape.
Migrate your virtual machine (VM) from SCSI to NVMe
In order to migrate from SCSI to NVMe, some steps need to be followed:
- Check if your virtual machine series supports NVMe
- Check your operating system for NVMe readiness
- Convert your virtual machine to NVMe
- Check your operating system
1. Check if your virtual machine series supports NVMe
The supported virtual machines to support NVMe attached disks is described on the Azure Boost overview site in the availability table.
Important
If your VM type is not listed change the VM type.
2. Check your operating system for NVMe readiness
The operating system needs to support NVMe devices, includes for example, device drivers and initrdm, the temporary file system used during boot, need to be prepared. In addition to that you need to validate the mount points of the file systems as they check if you use the SCSI device name (/dev/sdX).
To make this process easier, we created a bash script that does the prevalidation for you.
2.1 Check Controller Type of VM
2.1.1 Check Controller Type using PowerShell
PS C:\Users\user1> $vm = Get-AzVM -name nvme-conversion-vm
PS C:\Users\user1> $vm.StorageProfile.DiskControllerType
SCSI
PS C:\Users\user1>
2.1.2 Check Controller Type using Azure CLI
$ az vm show --name nvme-conversion-vm --resource-group nvme-conversion
{
"additionalCapabilities": {
...
 "storageProfile": {
 ...
   "diskControllerType": "SCSI",
 ...
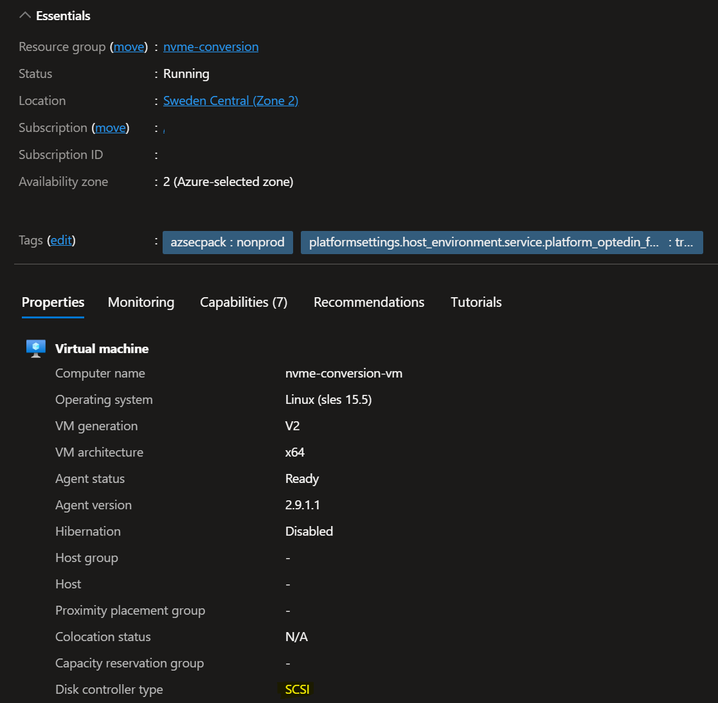
2.1.3 Check Controller Type using Azure portal

2.2 Run Preflight Check script
The bash script doesn't automatically change anything on your system. It only provides recommendations for commands to run.
Recommendations include
- NVMe modules
- GRUB configuration
- /etc/fstab checks for devices
To start the script, use the following command (curl):
curl -s -S -L https://raw.githubusercontent.com/Azure/SAP-on-Azure-Scripts-and-Utilities/main/NVMe-Preflight-Check/azure-nvme-preflight-check.sh | sh -s -- -v
As an alternative you can also use wget:
wget --no-verbose -O - https://raw.githubusercontent.com/Azure/SAP-on-Azure-Scripts-and-Utilities/main/NVMe-Preflight-Check/azure-nvme-preflight-check.sh | sh -s -- -v
Third option is to download the script from the [GitHub repository](https://github.com/Azure/SAP-on-Azure-Scripts-and-Utilities/tree/main/NVMe-Preflight-Check) and run it manually.

nvme-conversion-vm:/home/azureuser # curl -s -S -L https://raw.githubusercontent.com/Azure/SAP-on-Azure-Scripts-and-Utilities/main/NVMe-Preflight-Check/azure-nvme-preflight-check.sh | sh -s -- -v
------------------------------------------------
START of script
------------------------------------------------
------------------------------------------------
OK NVMe Module is installed and available on your VM
------------------------------------------------
------------------------------------------------
ERROR NVMe Module is not loaded in the initramfs image.

     mkdir -p /etc/dracut.conf.d
     echo 'add_drivers+=" nvme nvme-core nvme-fabrics nvme-fc nvme-rdma nvme-loop nvmet nvmet-fc nvme-tcp "' >/etc/dracut.conf.d/nvme.conf
     dracut -f -v

------------------------------------------------
GRUB_CMDLINE_LINUX_DEFAULT="console=ttyS0 net.ifnames=0 dis_ucode_ldr earlyprintk=ttyS0 multipath=off rootdelay=300 scsi_mod.use_blk_mq=1 USE_BY_UUID_DEVICE_NAMES=1 nvme_core.io_timeout=240"
------------------------------------------------
OK GRUB contains timeouts.
------------------------------------------------
------------------------------------------------
OK fstab file doesn't contain device names
------------------------------------------------
Please crosscheck your /etc/fstab file
------------------------------------------------
END of script
------------------------------------------------
nvme-conversion-vm:/home/azureuser #
In this example initrd and the kernel aren't ready for NVMe, running the dracut commands enable the operating system.
nvme-conversion-vm:/home/azureuser # mkdir -p /etc/dracut.conf.d
nvme-conversion-vm:/home/azureuser # echo 'add_drivers+=" nvme nvme-core nvme-fabrics nvme-fc nvme-rdma nvme-loop nvmet nvmet-fc nvme-tcp "' >/etc/dracut.conf.d/nvme.conf
nvme-conversion-vm:/home/azureuser # dracut -f -v
dracut: Executing: /usr/bin/dracut -f -v
...
dracut: *** Creating initramfs image file '/boot/initrd-5.14.21-150500.55.65-default' done ***
nvme-conversion-vm:/home/azureuser # reboot
3. Convert your virtual machine to NVMe
To convert the operating system multiple steps are required.
Change the metadata of the OS disk to include NVMe capabilities Change the SCSI controller to NVMe This process is automated using a PowerShell script.
3.1 Download the PowerShell script
To download the PowerShell script from the GitHub repo, use the following command:
Invoke-WebRequest -Uri "https://raw.githubusercontent.com/Azure/SAP-on-Azure-Scripts-and-Utilities/main/NVMe-Preflight-Check/azure-nvme-VM-update.ps1" -OutFile ".\azure-nvme-VM-update.ps1"
3.2. Convert the Virtual Machine
To convert run the script, detailed documentation is also available on the GitHub repository.
You can decide if, for example, the VM should automatically be started after the reconfiguration.
.\azure-nvme-VM-update.ps1 -subscription_id XXXXXXXX-a961-4fb7-88c0-757472230e6c -resource_group_name nvme-conversion -vm_name nvme-conversion-vm -disk_controller_change_to NVMe -vm_size_change_to Standard_E64bds_v5
INFO - OS Disk found
INFO - Access token generated
INFO - Getting VM info
INFO - Getting all VM SKUs available in Region swedencentral
INFO - This will take about a minute ...
INFO - Found VM SKU - Checking for Capabilities
INFO - VM supports NVMe
INFO - Checking for TrustedLaunch
INFO - Checking if VM is stopped and deallocated
INFO - Stopping VM
   Tenant: 72f988bf-86f1-41af-91ab-2d7cd011db47
SubscriptionName SubscriptionId                      Account                Environment
---------------- --------------                      -------                -----------
XX-XX-XX-XX      XXXXXXX-a961-4fb7-88c0-757472230e6c xxxxxx@microsoft.com   AzureCloud

OperationId : cf02d28c-c711-4fe5-89fc-854fba31b67a
Status : Succeeded
StartTime : 07.06.2024 15:18:35
EndTime : 07.06.2024 15:19:17
Error :
Name :

INFO - Setting OS Disk to SCSI/NVMe
INFO - Getting VM config to prepare new config
INFO - Setting new VM size
INFO - Setting disk controller for VM
INFO - Updating the VM configuration

RequestId :
IsSuccessStatusCode : True
StatusCode : OK
ReasonPhrase :

INFO - Not starting VM
3.3 Check the result
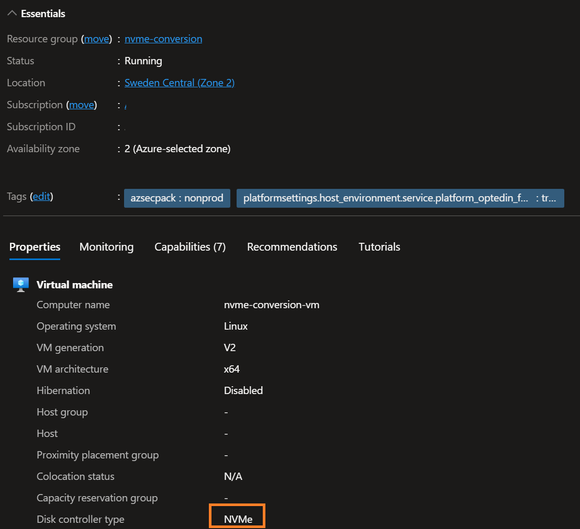
3.3.1 Check result in Azure portal

3.3.2 Check result in PowerShell
PS C:\Users> $vm = Get-AzVM -name nvme-conversion-vm
PS C:\Users> $vm.StorageProfile.DiskControllerType
NVMe
PS C:\Users>
4. Check your operating system
4.1 Check devices
You can check the devices using nvme command, if the nvme command is missing, install the "nvme-cli" package.
nvme list
The output should show the OS disk and the data disks.

4.2 Get udev file for NVMe (Optional)
On SCSI virtual machines, the udev rules integrated in waagent (Azure agent) created links in /dev/disk/azure/scsi1/lunX to identify the data disks. As SCSI isn't used anymore, the rules don't apply.
With one of the two available options to deploy NVMe enabled udev rules you see new symbolic links in the directory /dev/disk/azure/data/by-lun. This directory is the replacement for /dev/disk/azure/scsi1.
nvme-conversion-vm:/usr/lib/udev/rules.d # ls -l /dev/disk/azure/data/by-lun/
total 0
lrwxrwxrwx 1 root root 19 Jun 7 13:52 0 -> ../../../../nvme0n2
lrwxrwxrwx 1 root root 19 Jun 7 13:52 1 -> ../../../../nvme0n3
nvme-conversion-vm:/usr/lib/udev/rules.d #
4.2.1 Manual download of udev file
To download the new udev rules file, use this command:
curl https://raw.githubusercontent.com/Azure/SAP-on-Azure-Scripts-and-Utilities/refs/heads/main/NVMe-Preflight-Check/88-azure-nvme-data-disk.rules
and then run udevadm control --reload-rules && udevadm trigger
to reload the udev rules.
4.2.2 Ready to install packages using Azure NVMe utils
There are precompiled packages available on Index of /results/cjp256/azure-nvme-utils/for multiple distributions. We're working on enabling and integrating Azure NVMe utils in all major distributions.