Manage Azure Blob Storage resources with Storage Explorer
Overview
Azure Blob Storage is a service for storing large amounts of unstructured data, such as text or binary data, that can be accessed from anywhere in the world via HTTP or HTTPS. You can use Blob storage to expose data publicly to the world, or to store application data privately. In this article, you'll learn how to use Storage Explorer to work with blob containers and blobs.
Prerequisites
To complete the steps in this article, you'll need the following:
Create a blob container
All blobs must reside in a blob container, which is simply a logical grouping of blobs. An account can contain an unlimited number of containers, and each container can store an unlimited number of blobs.
The following steps illustrate how to create a blob container within Storage Explorer.
Open Storage Explorer.
In the left pane, expand the storage account within which you wish to create the blob container.
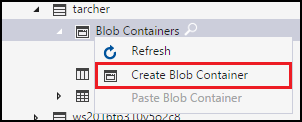
Right-click Blob Containers, and - from the context menu - select Create Blob Container.
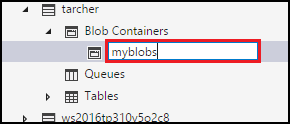
A text box will appear below the Blob Containers folder. Enter the name for your blob container. See Create a container for information on rules and restrictions on naming blob containers.
Press Enter when done to create the blob container, or Esc to cancel. Once the blob container has been successfully created, it will be displayed under the Blob Containers folder for the selected storage account.
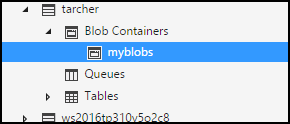
View a blob container's contents
Blob containers contain blobs and virtual directories (that can also contain blobs).
The following steps illustrate how to view the contents of a blob container within Storage Explorer:
Open Storage Explorer.
In the left pane, expand the storage account containing the blob container you wish to view.
Expand the storage account's Blob Containers.
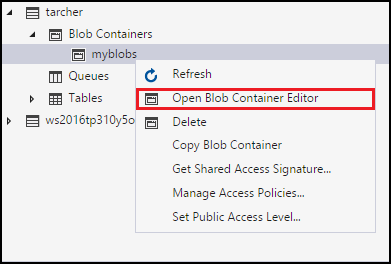
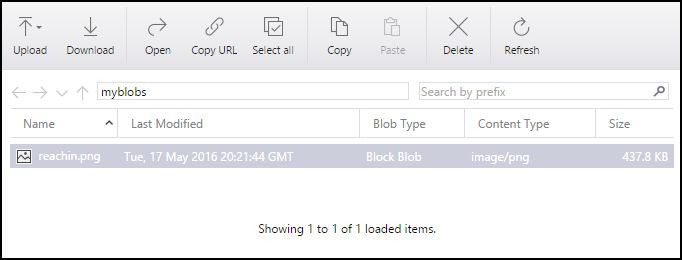
Right-click the blob container you wish to view, and - from the context menu - select Open Blob Container Editor. You can also double-click the blob container you wish to view.
The main pane will display the blob container's contents.
Delete a blob container
Blob containers can be easily created and deleted as needed. (To see how to delete individual blobs, refer to the section, Managing blobs in a blob container.)
The following steps illustrate how to delete a blob container within Storage Explorer:
Open Storage Explorer.
In the left pane, expand the storage account containing the blob container you wish to view.
Expand the storage account's Blob Containers.
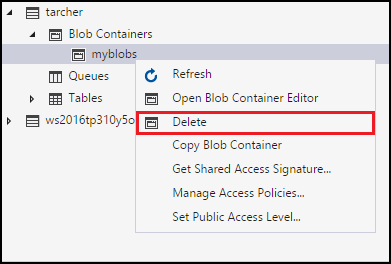
Right-click the blob container you wish to delete, and - from the context menu - select Delete. You can also press Delete to delete the currently selected blob container.
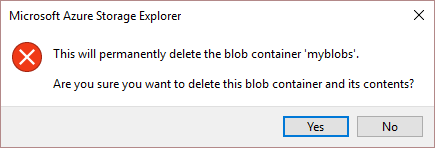
Select Yes to the confirmation dialog.
Copy a blob container
Storage Explorer enables you to copy a blob container to the clipboard, and then paste that blob container into another storage account. (To see how to copy individual blobs, refer to the section, Managing blobs in a blob container.)
The following steps illustrate how to copy a blob container from one storage account to another.
Open Storage Explorer.
In the left pane, expand the storage account containing the blob container you wish to copy.
Expand the storage account's Blob Containers.
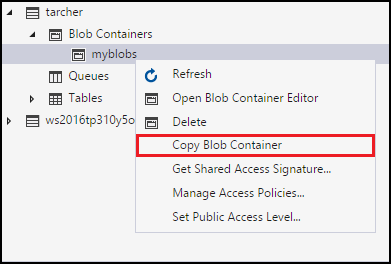
Right-click the blob container you wish to copy, and - from the context menu - select Copy Blob Container.
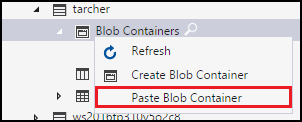
Right-click the desired "target" storage account into which you want to paste the blob container, and - from the context menu - select Paste Blob Container.
Get the SAS for a blob container
A shared access signature (SAS) provides delegated access to resources in your storage account. This means that you can grant a client limited permissions to objects in your storage account for a specified period of time and with a specified set of permissions, without having to share your account access keys.
The following steps illustrate how to create a SAS for a blob container:
Open Storage Explorer.
In the left pane, expand the storage account containing the blob container for which you wish to get a SAS.
Expand the storage account's Blob Containers.
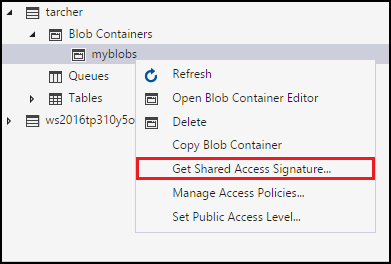
Right-click the desired blob container, and - from the context menu - select Get Shared Access Signature.
In the Shared Access Signature dialog, specify the policy, start and expiration dates, time zone, and access levels you want for the resource.
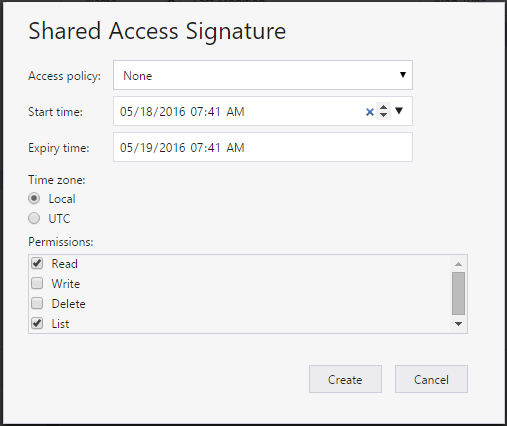
When you're finished specifying the SAS options, select Create.
A second Shared Access Signature dialog will then display that lists the blob container along with the URL and QueryStrings you can use to access the storage resource. Select Copy next to the URL you wish to copy to the clipboard.
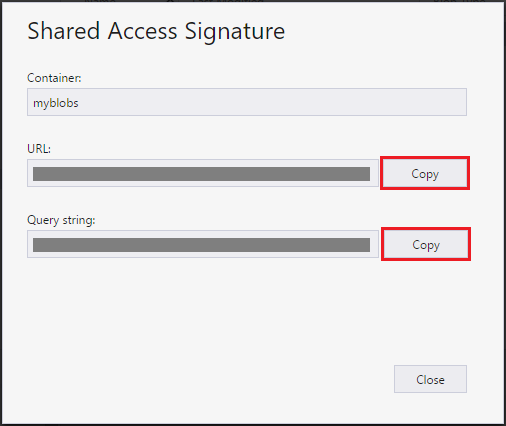
When done, select Close.
Manage Access Policies for a blob container
The following steps illustrate how to manage (add and remove) access policies for a blob container:
Open Storage Explorer.
In the left pane, expand the storage account containing the blob container whose access policies you wish to manage.
Expand the storage account's Blob Containers.
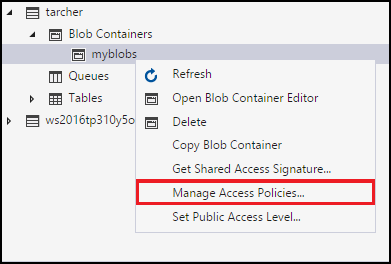
Select the desired blob container, and - from the context menu - select Manage Access Policies.
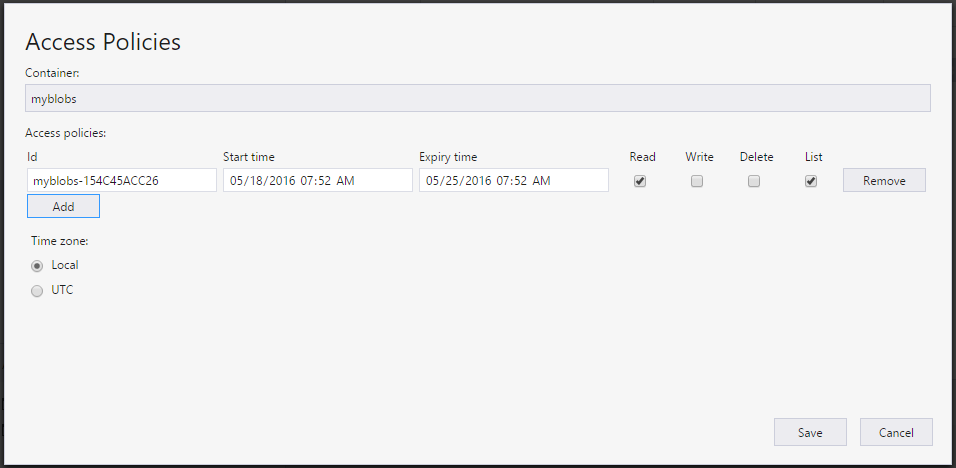
The Access Policies dialog will list any access policies already created for the selected blob container.
Follow these steps depending on the access policy management task:
- Add a new access policy - Select Add. Once generated, the Access Policies dialog will display the newly added access policy (with default settings).
- Edit an access policy - Make any desired edits, and select Save.
- Remove an access policy - Select Remove next to the access policy you wish to remove.
Note
Modifying immutability policies is not supported from Storage Explorer.
Set the Public Access Level for a blob container
By default, every blob container is set to "No public access".
The following steps illustrate how to specify a public access level for a blob container.
Open Storage Explorer.
In the left pane, expand the storage account containing the blob container whose access policies you wish to manage.
Expand the storage account's Blob Containers.
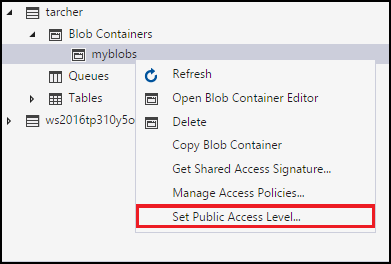
Select the desired blob container, and - from the context menu - select Set Public Access Level.
In the Set Container Public Access Level dialog, specify the desired access level.
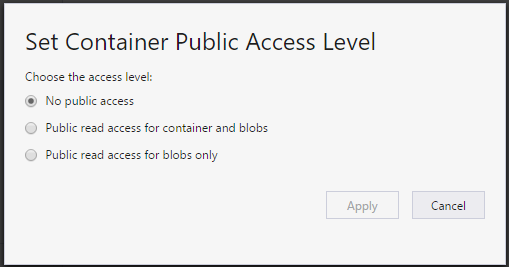
Select Apply.
Managing blobs in a blob container
Once you've created a blob container, you can upload a blob to that blob container, download a blob to your local computer, open a blob on your local computer, and much more.
The following steps illustrate how to manage the blobs (and virtual directories) within a blob container.
Open Storage Explorer.
In the left pane, expand the storage account containing the blob container you wish to manage.
Expand the storage account's Blob Containers.
Double-click the blob container you wish to view.
The main pane will display the blob container's contents.

The main pane will display the blob container's contents.
Follow these steps depending on the task you wish to perform:
Upload files to a blob container
On the main pane's toolbar, select Upload, and then Upload Files from the drop-down menu.

In the Upload files dialog, select the ellipsis (…) button on the right side of the Files text box to select the file(s) you wish to upload.
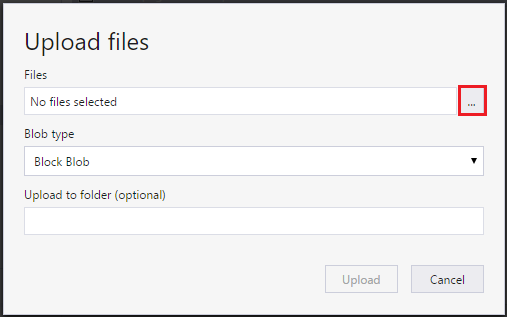
Specify the type of Blob type. See Create a container for more information.
Optionally, specify a target virtual directory into which the selected file(s) will be uploaded. If the target virtual directory doesn’t exist, it will be created.
Select Upload.
Upload a folder to a blob container
On the main pane's toolbar, select Upload, and then Upload Folder from the drop-down menu.

In the Upload folder dialog, select the ellipsis (…) button on the right side of the Folder text box to select the folder whose contents you wish to upload.
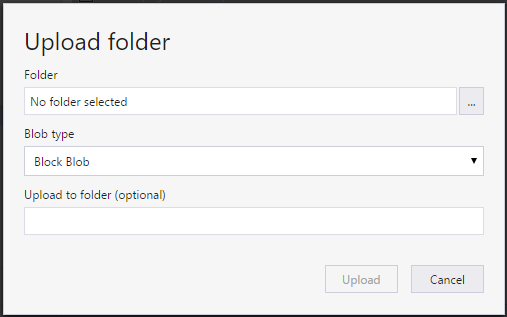
Specify the type of Blob type. See Create a container for more information.
Optionally, specify a target virtual directory into which the selected folder's contents will be uploaded. If the target virtual directory doesn’t exist, it will be created.
Select Upload.
Download a blob to your local computer
- Select the blob you wish to download.
- On the main pane's toolbar, select Download.
- In the Specify where to save the downloaded blob dialog, specify the location where you want the blob downloaded, and the name you wish to give it.
- Select Save.
Open a blob on your local computer
- Select the blob you wish to open.
- On the main pane's toolbar, select Open.
- The blob will be downloaded and opened using the application associated with the blob's underlying file type.
Copy a blob to the clipboard
- Select the blob you wish to copy.
- On the main pane's toolbar, select Copy.
- In the left pane, navigate to another blob container, and double-click it to view it in the main pane.
- On the main pane's toolbar, select Paste to create a copy of the blob.
Delete a blob
- Select the blob you wish to delete.
- On the main pane's toolbar, select Delete.
- Select Yes to the confirmation dialog.
Delete a blob along with snapshots
- Select the blob you wish to delete.
- On the main pane's toolbar, select Delete.
- Select Yes to the confirmation dialog.
- Under Activities the deletion of the blob will be skipped now click on retry.
- Retry Azcopy window will open and from Snapshot select Delete blobs with snapshots option from dropdown then select Retry selected.