Use Visual Studio to simplify writing and managing your Service Fabric applications
You can manage your Azure Service Fabric applications and services through Visual Studio. Once you've set up your development environment, you can use Visual Studio to create Service Fabric applications, add services, or package, register, and deploy applications in your local development cluster.
Note
With the transition from ADAL to MSAL, administrators are now required to explicitly grant permission to the Visual Studio client for publishing applications by adding the following in the cluster's Microsoft Entra App Registration.
- Visual Studio 2022 and future versions: 04f0c124-f2bc-4f59-8241-bf6df9866bbd
- Visual Studio 2019 and earlier: 872cd9fa-d31f-45e0-9eab-6e460a02d1f1
Deploy your Service Fabric application
By default, deploying an application combines the following steps into one simple operation:
- Creating the application package
- Uploading the application package to the image store
- Registering the application type
- Removing any running application instances
- Creating an application instance
In Visual Studio, pressing F5 deploys your application and attach the debugger to all application instances. You can use Ctrl+F5 to deploy an application without debugging, or you can publish to a local or remote cluster by using the publish profile.
Application Debug Mode
Visual Studio provides a property called Application Debug Mode, which controls how you want Visual Studios to handle Application deployment as part of debugging.
To set the Application Debug Mode property
- On the Service Fabric application project's (*.sfproj) shortcut menu, choose Properties (or press the F4 key).
- In the Properties window, set the Application Debug Mode property.
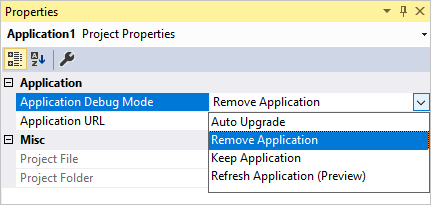
Application Debug Modes
- Refresh Application This mode enables you to quickly change and debug your code and supports editing static web files while debugging. This mode only works if your local development cluster is in 1-Node mode. This is the default Application Debug Mode.
- Remove Application causes the application to be removed when the debug session ends.
- Auto Upgrade The application continues to run when the debug session ends. The next debug session will treat the deployment as an upgrade. The upgrade process preserves any data that you entered in a previous debug session.
- Keep Application The application keeps running in the cluster when the debug session ends. At the beginning of the next debug session, the application will be removed.
For Auto Upgrade data is preserved by applying the application upgrade capabilities of Service Fabric. For more information about upgrading applications and how you might perform an upgrade in a real environment, see Service Fabric application upgrade.
Add a service to your Service Fabric application
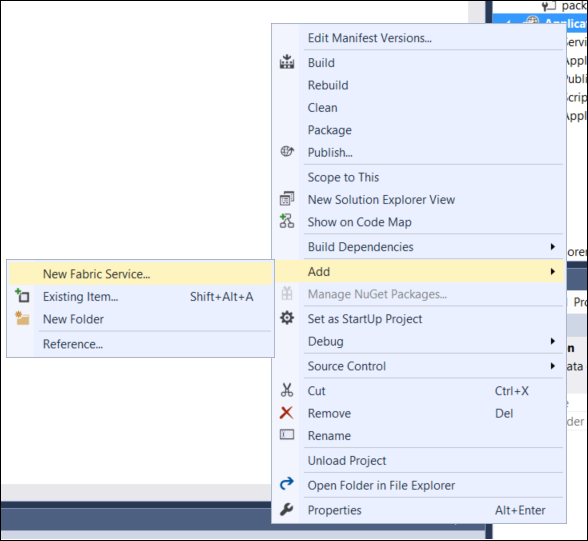
You can add new services to your application to extend its functionality. To ensure that the service is included in your application package, add the service through the New Fabric Service... menu item.
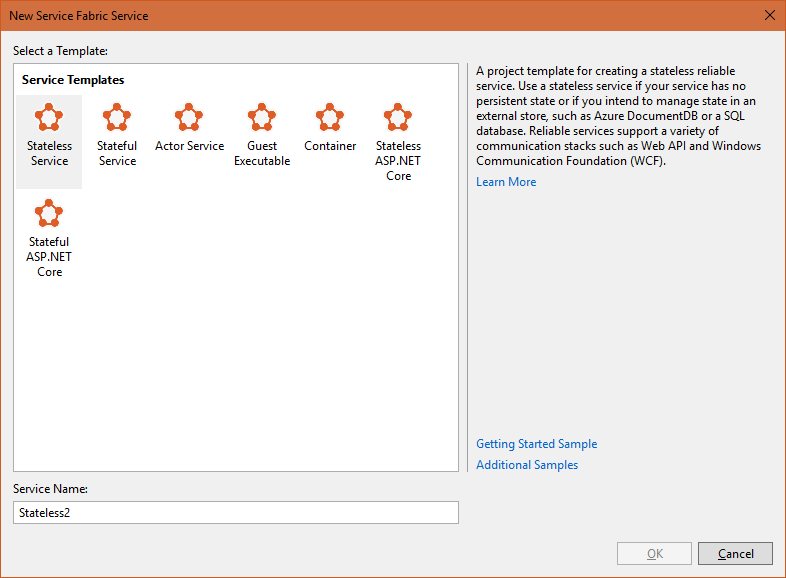
Select a Service Fabric project type to add to your application, and specify a name for the service. See Choosing a framework for your service to help you decide which service type to use.
The new service is added to your solution and existing application package. The service references and a default service instance will be added to the application manifest, causing the service to be created and started the next time you deploy the application.
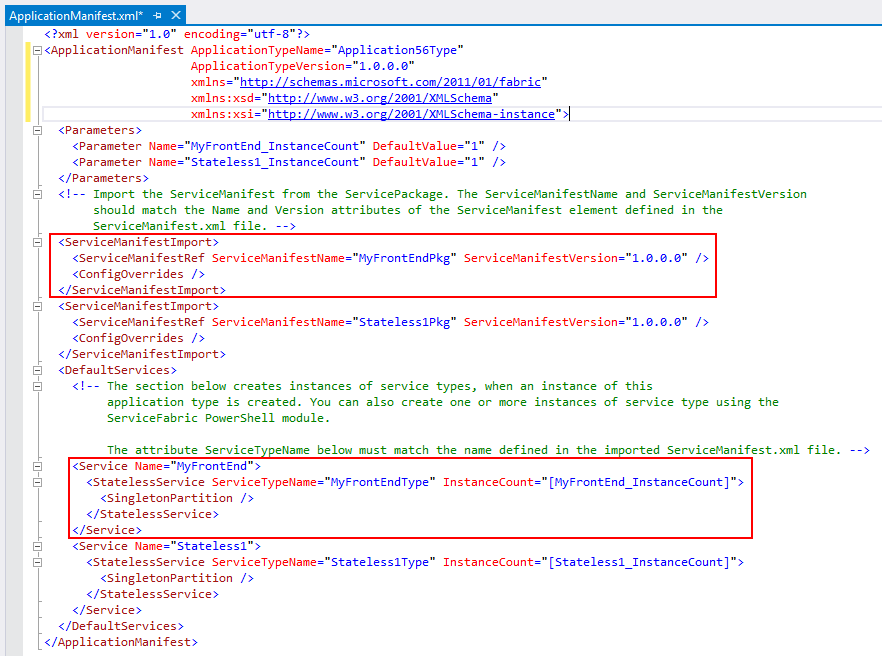
Package your Service Fabric application
To deploy the application and its services to a cluster, you need to create an application package. The package organizes the application manifest, service manifests, and other necessary files in a specific layout. Visual Studio sets up and manages the package in the application project's folder, in the 'pkg' directory. Clicking Package from the Application context menu creates or updates the application package.
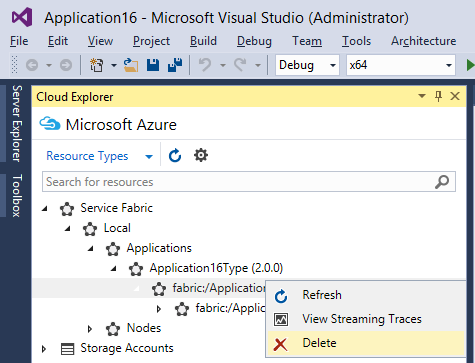
Remove applications and application types using Cloud Explorer
You can perform basic cluster management operations from within Visual Studio using Cloud Explorer, which you can launch from the View menu. For instance, you can delete applications and unprovision application types on local or remote clusters.
Tip
For a richer cluster management functionality, see Visualizing your cluster with Service Fabric Explorer.