Tutorial: Migrate outbound access to Azure NAT Gateway
In this tutorial, you learn how to migrate your outbound connectivity from default outbound access to a NAT gateway. You learn how to change your outbound connectivity from load balancer outbound rules to a NAT gateway. You reuse the IP address from the outbound rule configuration for the NAT gateway.
Azure NAT Gateway is the recommended method for outbound connectivity. A NAT gateway is a fully managed and highly resilient Network Address Translation (NAT) service. A NAT gateway doesn't have the same limitations of Source Network Address Translation (SNAT) port exhaustion as default outbound access. A NAT gateway replaces the need for outbound rules in a load balancer for outbound connectivity.
For more information about Azure NAT Gateway, see What is Azure NAT Gateway?
In this tutorial, you learn how to:
- Migrate default outbound access to a NAT gateway.
- Migrate load balancer outbound connectivity and IP address to a NAT gateway.
Prerequisites
An Azure account with an active subscription. Create an account for free.
A standard public load balancer in your subscription. The load balancer must have a separate frontend IP address and outbound rules configured. For more information on creating an Azure Load Balancer, see Quickstart: Create a public load balancer to load balance VMs using the Azure portal.
- The load balancer name used in the examples is myLoadBalancer.
Note
Azure NAT Gateway provides outbound connectivity for standard internal load balancers. For more information on integrating a NAT gateway with your internal load balancers, see Tutorial: Integrate a NAT gateway with an internal load balancer using Azure portal.
Migrate default outbound access
In this section, you learn how to change your outbound connectivity method from default outbound access to a NAT gateway.
Sign in to the Azure portal.
In the search box at the top of the portal, enter NAT gateway. Select NAT gateways.
In NAT gateways, select + Create.
In Create network address translation (NAT) gateway, enter or select the following information in the Basics tab.
Setting Value Project details Subscription Select your subscription. Resource group Select Create new.
Enter myResourceGroup.
Select OK.Instance details NAT gateway name Enter myNATgateway. Region Select the region of your virtual network. In this example, it's West Europe. Availability zone Leave the default of None. Idle timeout (minutes) Enter 10. Select the Outbound IP tab, or select Next: Outbound IP at the bottom of the page.
In Public IP addresses in the Outbound IP tab, select Create a new public IP address.
In Add a public IP address, enter myNATgatewayIP in Name. Select OK.
Select the Subnet tab, or select Next: Subnet at the bottom of the page.
In the pull-down box for Virtual network, select your virtual network.
In Subnet name, select the checkbox next to your subnet.
Select the Review + create tab, or select Review + create at the bottom of the page.
Select Create.
Migrate load balancer outbound connectivity
In this section, you learn how to change your outbound connectivity method from outbound rules to a NAT gateway. You keep the same frontend IP address used for the outbound rules. You remove the outbound rule’s frontend IP configuration then create a NAT gateway with the same frontend IP address. A public load balancer is used throughout this section.
Remove outbound rule frontend IP configuration
You remove the outbound rule and the associated frontend IP configuration from your load balancer. The load balancer name used in this example is myLoadBalancer.
Sign in to the Azure portal.
In the search box at the top of the portal, enter Load balancer. Select Load balancers in the search results.
Select myLoadBalancer or your load balancer.
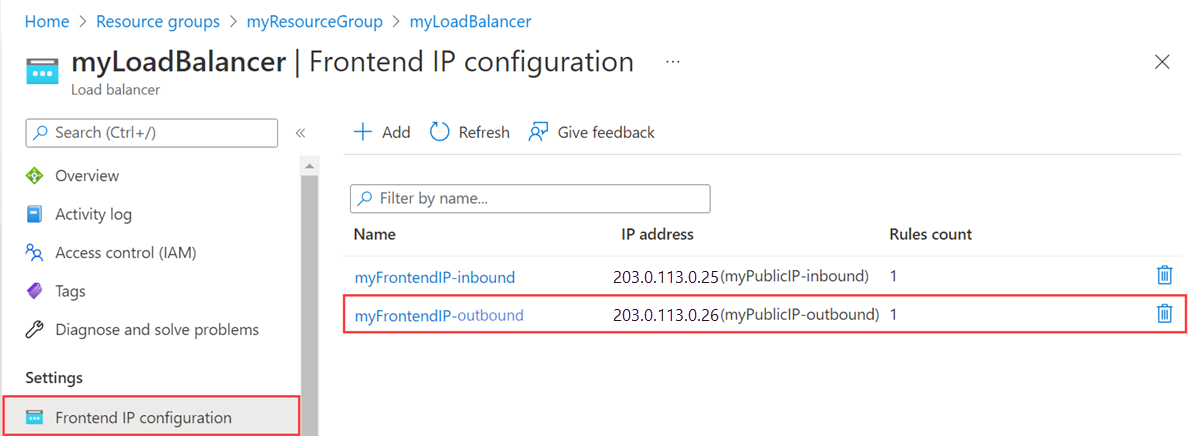
In myLoadBalancer, select Frontend IP configuration in Settings.
Note the IP address in Frontend IP configuration that you wish to migrate to a NAT gateway. You'll need this information in the next section. In this example, it's myFrontendIP-outbound.
Select Delete next to the IP configuration you wish to remove. In this example, it's myFrontendIP-outbound.

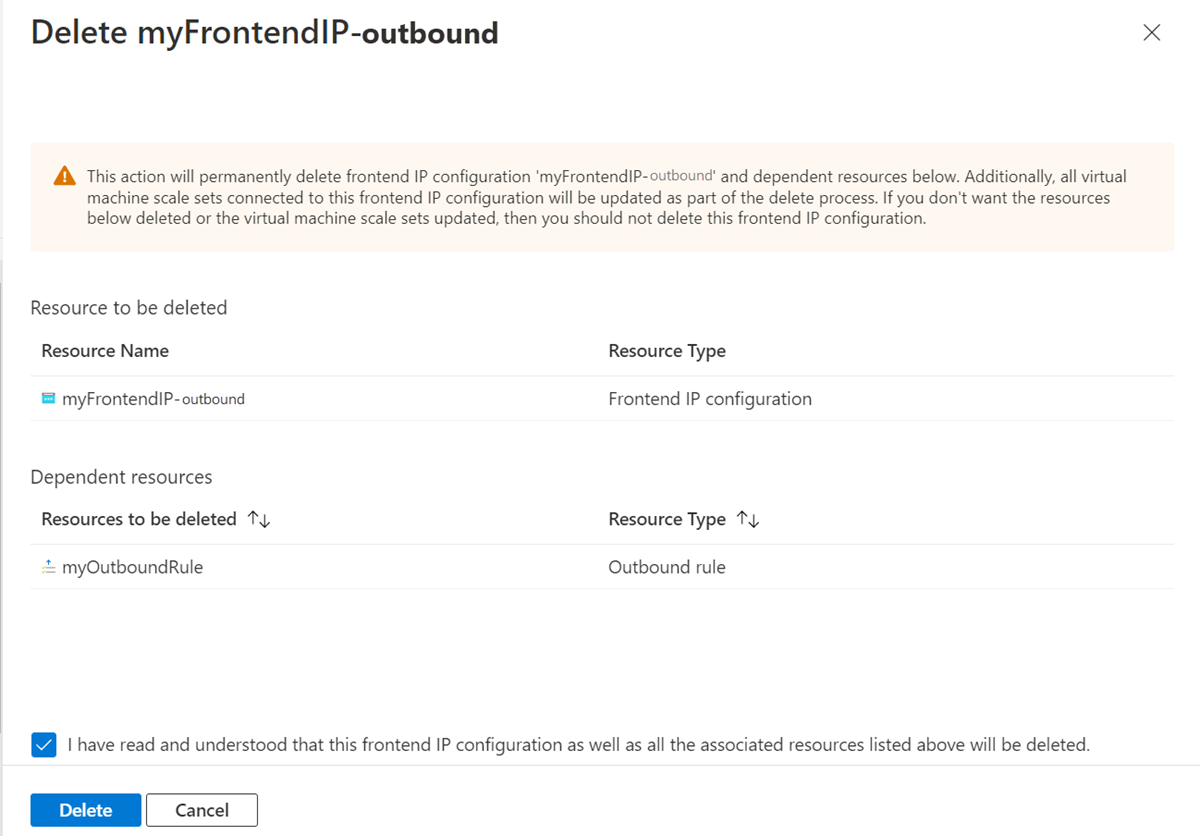
Select Delete.
In Delete myFrontendIP-outbound, select the check box next to I have read and understood that this frontend IP configuration as well as the associated resources listed above will be deleted.
Select Delete. This procedure deletes the frontend IP configuration and the outbound rule associated with the frontend.

Create NAT gateway
In this section, you create a NAT gateway with the IP address previously used for outbound rule and assign it to your precreated subnet within your virtual network. The subnet name for this example is myBackendSubnet.
In the search box at the top of the portal, enter NAT gateway. Select NAT gateways.
In NAT gateways, select + Create.
In Create network address translation (NAT) gateway, enter or select the following information in the Basics tab.
Setting Value Project details Subscription Select your subscription. Resource group Select Create new.
Enter myResourceGroup.
Select OK.Instance details NAT gateway name Enter myNATgateway. Region Select the region of your virtual network. In this example, it's West Europe. Availability zone Leave the default of None. Idle timeout (minutes) Enter 10. Select the Outbound IP tab, or select Next: Outbound IP at the bottom of the page.
In Public IP addresses in the Outbound IP tab, select the IP address you noted from the previous section. In this example, it's myPublicIP-outbound.
Select the Subnet tab, or select Next: Subnet at the bottom of the page.
In the pull-down box for Virtual network, select your virtual network.
In Subnet name, select the checkbox for your subnet. In this example, it's myBackendSubnet.
Select the Review + create tab, or select Review + create at the bottom of the page.
Select Create.
Clean up resources
If you're not going to continue to use this application, delete the NAT gateway with the following steps:
From the left-hand menu, select Resource groups.
Select the myResourceGroup resource group.
Select Delete resource group.
Enter myResourceGroup and select Delete.
Next step
In this article, you learned how to:
Migrate default outbound access to a NAT gateway.
Migrate load balancer outbound connectivity and IP address to a NAT gateway.
For more information about NAT gateway and the connectivity benefits it provides, see Design virtual networks with NAT gateway.
Advance to the next article to learn how to integrate a NAT gateway with a public load balancer: