This article shows you how to deploy a dual stack (IPv4 + IPv6) application using Standard Load Balancer in Azure. The scenario includes a dual stack virtual network with a dual stack subnet, a Standard Load Balancer with dual (IPv4 + IPv6) frontend configurations, VMs with NICs that have a dual IP configuration, dual network security group rules, and dual public IPs.
Follow these instructions in Azure PowerShell to deploy a dual stack (IPv4 + IPv6) application using Standard Load Balancer in Azure.
Create a resource group
Before you can create your dual-stack virtual network, you must create a resource group with New-AzResourceGroup. The following example creates a resource group named myRGDualStack in the east us location:
   $rg = New-AzResourceGroup `
  -ResourceGroupName "dsRG1"  `
  -Location "east us"
Create IPv4 and IPv6 public IP addresses
To access your virtual machines from the Internet, you need IPv4 and IPv6 public IP addresses for the load balancer. Create public IP addresses with New-AzPublicIpAddress. The following example creates IPv4 and IPv6 public IP address named dsPublicIP_v4 and dsPublicIP_v6 in the dsRG1 resource group:
$PublicIP_v4 = New-AzPublicIpAddress `
  -Name "dsPublicIP_v4" `
  -ResourceGroupName $rg.ResourceGroupName `
  -Location $rg.Location  `
  -AllocationMethod Static `
  -IpAddressVersion IPv4 `
  -Sku Standard

$PublicIP_v6 = New-AzPublicIpAddress `
  -Name "dsPublicIP_v6" `
  -ResourceGroupName $rg.ResourceGroupName `
  -Location $rg.Location  `
  -AllocationMethod Static `
  -IpAddressVersion IPv6 `
  -Sku Standard
To access your virtual machines using a RDP connection, create an IPV4 public IP addresses for the virtual machines with New-AzPublicIpAddress.
  $RdpPublicIP_1 = New-AzPublicIpAddress `
  -Name "RdpPublicIP_1" `
  -ResourceGroupName $rg.ResourceGroupName `
  -Location $rg.Location  `
  -AllocationMethod Static `
  -Sku Standard `
  -IpAddressVersion IPv4

  $RdpPublicIP_2 = New-AzPublicIpAddress `
   -Name "RdpPublicIP_2" `
   -ResourceGroupName $rg.ResourceGroupName `
   -Location $rg.Location  `
   -AllocationMethod Static `
   -Sku Standard `
   -IpAddressVersion IPv4
Create Standard Load Balancer
In this section, you configure dual frontend IP (IPv4 and IPv6) and the backend address pool for the load balancer and then create a Standard Load Balancer.
Create frontend IP
Create a frontend IP with New-AzLoadBalancerFrontendIpConfig. The following example creates IPv4 and IPv6 frontend IP configurations named dsLbFrontEnd_v4 and dsLbFrontEnd_v6:
$frontendIPv4 = New-AzLoadBalancerFrontendIpConfig `
  -Name "dsLbFrontEnd_v4" `
  -PublicIpAddress $PublicIP_v4

$frontendIPv6 = New-AzLoadBalancerFrontendIpConfig `
  -Name "dsLbFrontEnd_v6" `
  -PublicIpAddress $PublicIP_v6
Create a backend address pool with New-AzLoadBalancerBackendAddressPoolConfig for the virtual machines deployed later. The following example creates backend address pools named dsLbBackEndPool_v4 and dsLbBackEndPool_v6 to include virtual machines with both IPV4 and IPv6 NIC configurations:
$backendPoolv4 = New-AzLoadBalancerBackendAddressPoolConfig `
-Name "dsLbBackEndPool_v4"

$backendPoolv6 = New-AzLoadBalancerBackendAddressPoolConfig `
-Name "dsLbBackEndPool_v6"
Create a health probe
Use Add-AzLoadBalancerProbeConfig to create a health probe to monitor the health of the VMs.
$probe = New-AzLoadBalancerProbeConfig -Name MyProbe -Protocol tcp -Port 3389 -IntervalInSeconds 15 -ProbeCount 2
Create a load balancer rule
A load balancer rule is used to define how traffic is distributed to the VMs. You define the frontend IP configuration for the incoming traffic and the backend IP pool to receive the traffic, along with the required source and destination port. To make sure only healthy VMs receive traffic, you can optionally define a health probe. Basic load balancer uses an IPv4 probe to assess health for both IPv4 and IPv6 endpoints on the VMs. Standard load balancer includes support for explicitly IPv6 health probes.
Create a load balancer rule with Add-AzLoadBalancerRuleConfig. The following example creates load balancer rules named dsLBrule_v4 and dsLBrule_v6 and balances traffic on TCP port 80 to the IPv4 and IPv6 frontend IP configurations:
$lbrule_v4 = New-AzLoadBalancerRuleConfig `
  -Name "dsLBrule_v4" `
  -FrontendIpConfiguration $frontendIPv4 `
  -BackendAddressPool $backendPoolv4 `
  -Protocol Tcp `
  -FrontendPort 80 `
  -BackendPort 80 `
   -probe $probe

$lbrule_v6 = New-AzLoadBalancerRuleConfig `
  -Name "dsLBrule_v6" `
  -FrontendIpConfiguration $frontendIPv6 `
  -BackendAddressPool $backendPoolv6 `
  -Protocol Tcp `
  -FrontendPort 80 `
  -BackendPort 80 `
   -probe $probe
Create load balancer
Create a Standard Load Balancer with New-AzLoadBalancer. The following example creates a public Standard Load Balancer named myLoadBalancer using the IPv4 and IPv6 frontend IP configurations, backend pools, and load-balancing rules that you created in the preceding steps:
$lb = New-AzLoadBalancer `
-ResourceGroupName $rg.ResourceGroupName `
-Location $rg.Location  `
-Name "MyLoadBalancer" `
-Sku "Standard" `
-FrontendIpConfiguration $frontendIPv4,$frontendIPv6 `
-BackendAddressPool $backendPoolv4,$backendPoolv6 `
-LoadBalancingRule $lbrule_v4,$lbrule_v6 `
-Probe $probe
Create network resources
Before you deploy some VMs and can test your balancer, you must create supporting network resources - availability set, network security group, virtual network, and virtual NICs.
Create an availability set
To improve the high availability of your app, place your VMs in an availability set.
Create an availability set with New-AzAvailabilitySet. The following example creates an availability set named myAvailabilitySet:
$avset = New-AzAvailabilitySet `
  -ResourceGroupName $rg.ResourceGroupName `
  -Location $rg.Location  `
  -Name "dsAVset" `
  -PlatformFaultDomainCount 2 `
  -PlatformUpdateDomainCount 2 `
  -Sku aligned
Create network security group
Create a network security group for the rules that govern inbound and outbound communication in your virtual network.
Create a network security group rule for port 3389
Create a network security group rule to allow RDP connections through port 3389 with New-AzNetworkSecurityRuleConfig.
$rule1 = New-AzNetworkSecurityRuleConfig `
-Name 'myNetworkSecurityGroupRuleRDP' `
-Description 'Allow RDP' `
-Access Allow `
-Protocol Tcp `
-Direction Inbound `
-Priority 100 `
-SourceAddressPrefix * `
-SourcePortRange * `
-DestinationAddressPrefix * `
-DestinationPortRange 3389
Create a network security group rule for port 80
Create a network security group rule to allow internet connections through port 80 with New-AzNetworkSecurityRuleConfig.
$rule2 = New-AzNetworkSecurityRuleConfig `
  -Name 'myNetworkSecurityGroupRuleHTTP' `
  -Description 'Allow HTTP' `
  -Access Allow `
  -Protocol Tcp `
  -Direction Inbound `
  -Priority 200 `
  -SourceAddressPrefix * `
  -SourcePortRange * `
  -DestinationAddressPrefix * `
  -DestinationPortRange 80
Create a network security group
Create a network security group with New-AzNetworkSecurityGroup.
$nsg = New-AzNetworkSecurityGroup `
-ResourceGroupName $rg.ResourceGroupName `
-Location $rg.Location  `
-Name "dsNSG1"  `
-SecurityRules $rule1,$rule2
Create a virtual network
Create a virtual network with New-AzVirtualNetwork. The following example creates a virtual network named dsVnet with mySubnet:
# Create dual stack subnet
$subnet = New-AzVirtualNetworkSubnetConfig `
-Name "dsSubnet" `
-AddressPrefix "10.0.0.0/24","fd00:db8:deca:deed::/64"

# Create the virtual network
$vnet = New-AzVirtualNetwork `
  -ResourceGroupName $rg.ResourceGroupName `
  -Location $rg.Location  `
  -Name "dsVnet" `
  -AddressPrefix "10.0.0.0/16","fd00:db8:deca::/48"  `
  -Subnet $subnet
Create NICs
Create virtual NICs with New-AzNetworkInterface. The following example creates two virtual NICs both with IPv4 and IPv6 configurations. (One virtual NIC for each VM you create for your app in the following steps).
  $Ip4Config=New-AzNetworkInterfaceIpConfig `
    -Name dsIp4Config `
    -Subnet $vnet.subnets[0] `
    -PrivateIpAddressVersion IPv4 `
    -LoadBalancerBackendAddressPool $backendPoolv4 `
    -PublicIpAddress  $RdpPublicIP_1

  $Ip6Config=New-AzNetworkInterfaceIpConfig `
    -Name dsIp6Config `
    -Subnet $vnet.subnets[0] `
    -PrivateIpAddressVersion IPv6 `
    -LoadBalancerBackendAddressPool $backendPoolv6

  $NIC_1 = New-AzNetworkInterface `
    -Name "dsNIC1" `
    -ResourceGroupName $rg.ResourceGroupName `
    -Location $rg.Location  `
    -NetworkSecurityGroupId $nsg.Id `
    -IpConfiguration $Ip4Config,$Ip6Config

  $Ip4Config=New-AzNetworkInterfaceIpConfig `
    -Name dsIp4Config `
    -Subnet $vnet.subnets[0] `
    -PrivateIpAddressVersion IPv4 `
    -LoadBalancerBackendAddressPool $backendPoolv4 `
    -PublicIpAddress  $RdpPublicIP_2

  $NIC_2 = New-AzNetworkInterface `
    -Name "dsNIC2" `
    -ResourceGroupName $rg.ResourceGroupName `
    -Location $rg.Location  `
    -NetworkSecurityGroupId $nsg.Id `
    -IpConfiguration $Ip4Config,$Ip6Config
Create virtual machines
Set an administrator username and password for the VMs with Get-Credential:
$cred = get-credential -Message "DUAL STACK VNET SAMPLE: Please enter the Administrator credential to log into the VMs."
Now you can create the VMs with New-AzVM. The following example creates two VMs and the required virtual network components if they don't already exist.
$vmsize = "Standard_A2"
$ImagePublisher = "MicrosoftWindowsServer"
$imageOffer = "WindowsServer"
$imageSKU = "2019-Datacenter"

$vmName= "dsVM1"
$VMconfig1 = New-AzVMConfig -VMName $vmName -VMSize $vmsize -AvailabilitySetId $avset.Id 3> $null | Set-AzVMOperatingSystem -Windows -ComputerName $vmName -Credential $cred -ProvisionVMAgent 3> $null | Set-AzVMSourceImage -PublisherName $ImagePublisher -Offer $imageOffer -Skus $imageSKU -Version "latest" 3> $null | Set-AzVMOSDisk -Name "$vmName.vhd" -CreateOption fromImage  3> $null | Add-AzVMNetworkInterface -Id $NIC_1.Id  3> $null
$VM1 = New-AzVM -ResourceGroupName $rg.ResourceGroupName  -Location $rg.Location  -VM $VMconfig1

$vmName= "dsVM2"
$VMconfig2 = New-AzVMConfig -VMName $vmName -VMSize $vmsize -AvailabilitySetId $avset.Id 3> $null | Set-AzVMOperatingSystem -Windows -ComputerName $vmName -Credential $cred -ProvisionVMAgent 3> $null | Set-AzVMSourceImage -PublisherName $ImagePublisher -Offer $imageOffer -Skus $imageSKU -Version "latest" 3> $null | Set-AzVMOSDisk -Name "$vmName.vhd" -CreateOption fromImage  3> $null | Add-AzVMNetworkInterface -Id $NIC_2.Id  3> $null
$VM2 = New-AzVM -ResourceGroupName $rg.ResourceGroupName  -Location $rg.Location  -VM $VMconfig2
Determine IP addresses of the IPv4 and IPv6 endpoints
Get all Network Interface Objects in the resource group to summarize the IPs used in this deployment with get-AzNetworkInterface. Also, get the Load Balancer's frontend addresses of the IPv4 and IPv6 endpoints with get-AzpublicIpAddress.
$rgName= "dsRG1"
$NICsInRG= get-AzNetworkInterface -resourceGroupName $rgName
write-host `nSummary of IPs in this Deployment:
write-host ******************************************
foreach ($NIC in $NICsInRG) {

    $VMid= $NIC.virtualmachine.id
    $VMnamebits= $VMid.split("/")
    $VMname= $VMnamebits[($VMnamebits.count-1)]
    write-host `nPrivate IP addresses for $VMname
    $IPconfigsInNIC= $NIC.IPconfigurations
    foreach ($IPconfig in $IPconfigsInNIC) {

        $IPaddress= $IPconfig.privateipaddress
        write-host "    "$IPaddress
        IF ($IPconfig.PublicIpAddress.ID) {

            $IDbits= ($IPconfig.PublicIpAddress.ID).split("/")
            $PipName= $IDbits[($IDbits.count-1)]
            $PipObject= get-azPublicIpAddress -name $PipName -resourceGroup $rgName
            write-host "    "RDP address:  $PipObject.IpAddress
                 }
         }
 }


  write-host `nPublic IP addresses on Load Balancer:

  (get-AzpublicIpAddress -resourcegroupname $rgName | where { $_.name -notlike "RdpPublicIP*" }).IpAddress
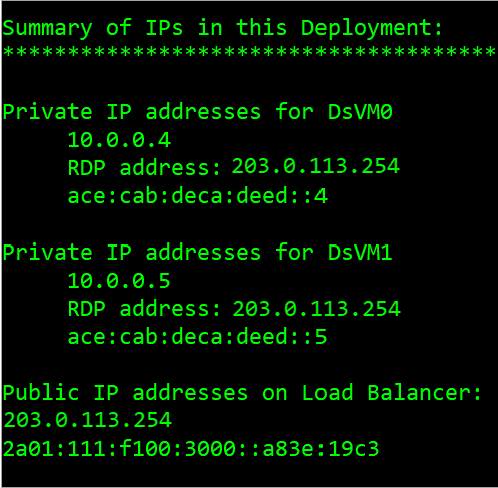
The following figure shows a sample output that lists the private IPv4 and IPv6 addresses of the two VMs, and the frontend IPv4 and IPv6 IP addresses of the Load Balancer.
View IPv6 dual stack virtual network in Azure portal
You can view the IPv6 dual stack virtual network in Azure portal as follows:
- In the portal's search bar, enter dsVnet.
- When dsVnet appears in the search results, select it. This launches the Overview page of the dual stack virtual network named dsVnet. The dual stack virtual network shows the two NICs with both IPv4 and IPv6 configurations located in the dual stack subnet named dsSubnet.
Clean up resources
When no longer needed, you can use the Remove-AzResourceGroup command to remove the resource group, VM, and all related resources.
Remove-AzResourceGroup -Name dsRG1
Follow these instructions in Azure CLI to deploy a dual stack (IPv4 + IPv6) application using Standard Load Balancer in Azure.
Create a resource group
Before you can create your dual-stack virtual network, you must create a resource group with az group create. The following example creates a resource group named DsResourceGroup01 in the eastus location:
az group create \
--name DsResourceGroup01 \
--location eastus
Create IPv4 and IPv6 public IP addresses for load balancer
To access your IPv4 and IPv6 endpoints on the Internet, you need IPv4 and IPv6 public IP addresses for the load balancer. Create a public IP address with az network public-ip create. The following example creates IPv4 and IPv6 public IP address named dsPublicIP_v4 and dsPublicIP_v6 in the DsResourceGroup01 resource group:
# Create an IPV4 IP address
az network public-ip create \
--name dsPublicIP_v4  \
--resource-group DsResourceGroup01  \
--location eastus  \
--sku STANDARD  \
--allocation-method static  \
--version IPv4

# Create an IPV6 IP address
az network public-ip create \
--name dsPublicIP_v6  \
--resource-group DsResourceGroup01  \
--location eastus \
--sku STANDARD  \
--allocation-method static  \
--version IPv6
Create public IP addresses for VMs
To remotely access your VMs on the internet, you need IPv4 public IP addresses for the VMs. Create a public IP address with az network public-ip create.
az network public-ip create \
--name dsVM0_remote_access  \
--resource-group DsResourceGroup01 \
--location eastus  \
--sku Standard  \
--allocation-method static  \
--version IPv4

az network public-ip create \
--name dsVM1_remote_access  \
--resource-group DsResourceGroup01  \
--location eastus  \
--sku Standard  \
--allocation-method static  \
--version IPv4
Create Standard Load Balancer
In this section, you configure dual frontend IP (IPv4 and IPv6) and the backend address pool for the load balancer and then create a Standard Load Balancer.
Create load balancer
Create the Standard Load Balancer with az network lb create named dsLB that includes a frontend pool named dsLbFrontEnd_v4, a backend pool named dsLbBackEndPool_v4 that is associated with the IPv4 public IP address dsPublicIP_v4 that you created in the preceding step.
az network lb create \
--name dsLB  \
--resource-group DsResourceGroup01 \
--sku Standard \
--location eastus \
--frontend-ip-name dsLbFrontEnd_v4  \
--public-ip-address dsPublicIP_v4  \
--backend-pool-name dsLbBackEndPool_v4
Create IPv6 frontend
Create an IPV6 frontend IP with az network lb frontend-ip create. The following example creates a frontend IP configuration named dsLbFrontEnd_v6 and attaches the dsPublicIP_v6 address:
az network lb frontend-ip create \
--lb-name dsLB  \
--name dsLbFrontEnd_v6  \
--resource-group DsResourceGroup01  \
--public-ip-address dsPublicIP_v6
Create a IPv6 backend address pools with az network lb address-pool create. The following example creates backend address pool named dsLbBackEndPool_v6 to include VMs with IPv6 NIC configurations:
az network lb address-pool create \
--lb-name dsLB  \
--name dsLbBackEndPool_v6  \
--resource-group DsResourceGroup01
Create a health probe
Create a health probe with az network lb probe create to monitor the health of the virtual machines.
az network lb probe create -g DsResourceGroup01 --lb-name dsLB -n dsProbe --protocol tcp --port 3389
Create a load balancer rule
A load balancer rule is used to define how traffic is distributed to the VMs. You define the frontend IP configuration for the incoming traffic and the backend IP pool to receive the traffic, along with the required source and destination port.
Create a load balancer rule with az network lb rule create. The following example creates load balancer rules named dsLBrule_v4 and dsLBrule_v6 and balances traffic on TCP port 80 to the IPv4 and IPv6 frontend IP configurations:
az network lb rule create \
--lb-name dsLB  \
--name dsLBrule_v4  \
--resource-group DsResourceGroup01  \
--frontend-ip-name dsLbFrontEnd_v4  \
--protocol Tcp  \
--frontend-port 80  \
--backend-port 80  \
--probe-name dsProbe \
--backend-pool-name dsLbBackEndPool_v4


az network lb rule create \
--lb-name dsLB  \
--name dsLBrule_v6  \
--resource-group DsResourceGroup01 \
--frontend-ip-name dsLbFrontEnd_v6  \
--protocol Tcp  \
--frontend-port 80 \
--backend-port 80  \
--probe-name dsProbe \
--backend-pool-name dsLbBackEndPool_v6
Create network resources
Before you deploy some VMs, you must create supporting network resources - availability set, network security group, virtual network, and virtual NICs.
Create an availability set
To improve the availability of your app, place your VMs in an availability set.
Create an availability set with az vm availability-set create. The following example creates an availability set named dsAVset:
az vm availability-set create \
--name dsAVset  \
--resource-group DsResourceGroup01  \
--location eastus \
--platform-fault-domain-count 2  \
--platform-update-domain-count 2
Create network security group
Create a network security group for the rules that govern inbound and outbound communication in your virtual network.
Create a network security group
Create a network security group with az network nsg create
az network nsg create \
--name dsNSG1  \
--resource-group DsResourceGroup01  \
--location eastus
Create a network security group rule for inbound and outbound connections
Create a network security group rule to allow RDP connections through port 3389, internet connection through port 80, and for outbound connections with az network nsg rule create.
# Create inbound rule for port 3389
az network nsg rule create \
--name allowRdpIn  \
--nsg-name dsNSG1  \
--resource-group DsResourceGroup01  \
--priority 100  \
--description "Allow Remote Desktop In"  \
--access Allow  \
--protocol "*"  \
--direction Inbound  \
--source-address-prefixes "*"  \
--source-port-ranges "*"  \
--destination-address-prefixes "*"  \
--destination-port-ranges 3389

# Create inbound rule for port 80
az network nsg rule create \
--name allowHTTPIn  \
--nsg-name dsNSG1  \
--resource-group DsResourceGroup01  \
--priority 200  \
--description "Allow HTTP In"  \
--access Allow  \
--protocol "*"  \
--direction Inbound  \
--source-address-prefixes "*"  \
--source-port-ranges 80  \
--destination-address-prefixes "*"  \
--destination-port-ranges 80

# Create outbound rule

az network nsg rule create \
--name allowAllOut  \
--nsg-name dsNSG1  \
--resource-group DsResourceGroup01  \
--priority 300  \
--description "Allow All Out"  \
--access Allow  \
--protocol "*"  \
--direction Outbound  \
--source-address-prefixes "*"  \
--source-port-ranges "*"  \
--destination-address-prefixes "*"  \
--destination-port-ranges "*"
Create a virtual network
Create a virtual network with az network vnet create. The following example creates a virtual network named dsVNET with subnets dsSubNET_v4 and dsSubNET_v6:
# Create the virtual network
az network vnet create \
--name dsVNET \
--resource-group DsResourceGroup01 \
--location eastus  \
--address-prefixes "10.0.0.0/16" "fd00:db8:deca::/48"

# Create a single dual stack subnet

az network vnet subnet create \
--name dsSubNET \
--resource-group DsResourceGroup01 \
--vnet-name dsVNET \
--address-prefixes "10.0.0.0/24" "fd00:db8:deca:deed::/64" \
--network-security-group dsNSG1
Create NICs
Create virtual NICs for each VM with az network nic create. The following example creates a virtual NIC for each VM. Each NIC has two IP configurations (1 IPv4 config, 1 IPv6 config). You create the IPV6 configuration with az network nic ip-config create.
# Create NICs
az network nic create \
--name dsNIC0  \
--resource-group DsResourceGroup01 \
--network-security-group dsNSG1  \
--vnet-name dsVNET  \
--subnet dsSubNet  \
--private-ip-address-version IPv4 \
--lb-address-pools dsLbBackEndPool_v4  \
--lb-name dsLB  \
--public-ip-address dsVM0_remote_access

az network nic create \
--name dsNIC1 \
--resource-group DsResourceGroup01 \
--network-security-group dsNSG1 \
--vnet-name dsVNET \
--subnet dsSubNet \
--private-ip-address-version IPv4 \
--lb-address-pools dsLbBackEndPool_v4 \
--lb-name dsLB \
--public-ip-address dsVM1_remote_access

# Create IPV6 configurations for each NIC

az network nic ip-config create \
--name dsIp6Config_NIC0  \
--nic-name dsNIC0  \
--resource-group DsResourceGroup01 \
--vnet-name dsVNET \
--subnet dsSubNet \
--private-ip-address-version IPv6 \
--lb-address-pools dsLbBackEndPool_v6 \
--lb-name dsLB

az network nic ip-config create \
--name dsIp6Config_NIC1 \
--nic-name dsNIC1 \
--resource-group DsResourceGroup01 \
--vnet-name dsVNET \
--subnet dsSubNet \
--private-ip-address-version IPv6 \
--lb-address-pools dsLbBackEndPool_v6 \
--lb-name dsLB
Create virtual machines
Create the VMs with az vm create. The following example creates two VMs and the required virtual network components if they don't already exist.
Create virtual machine dsVM0 as follows:
 az vm create \
--name dsVM0 \
--resource-group DsResourceGroup01 \
--nics dsNIC0 \
--size Standard_A2 \
--availability-set dsAVset \
--image MicrosoftWindowsServer:WindowsServer:2019-Datacenter:latest
Create virtual machine dsVM1 as follows:
az vm create \
--name dsVM1 \
--resource-group DsResourceGroup01 \
--nics dsNIC1 \
--size Standard_A2 \
--availability-set dsAVset \
--image MicrosoftWindowsServer:WindowsServer:2019-Datacenter:latest
View IPv6 dual stack virtual network in Azure portal
You can view the IPv6 dual stack virtual network in Azure portal as follows:
- In the portal's search bar, enter dsVnet.
- When myVirtualNetwork appears in the search results, select it. This launches the Overview page of the dual stack virtual network named dsVnet. The dual stack virtual network shows the two NICs with both IPv4 and IPv6 configurations located in the dual stack subnet named dsSubnet.
Clean up resources
When no longer needed, you can use the az group delete command to remove the resource group, VM, and all related resources.
az group delete --name DsResourceGroup01
Use the template described in this article to deploy a dual stack (IPv4 + IPv6) application using Standard Load Balancer in Azure.
Required configurations
Search for the template sections in the template to see where they should occur.
IPv6 addressSpace for the virtual network
Template section to add:
        "addressSpace": {
          "addressPrefixes": [
            "[variables('vnetv4AddressRange')]",
            "[variables('vnetv6AddressRange')]"
IPv6 subnet within the IPv6 virtual network addressSpace
Template section to add:
          {
            "name": "V6Subnet",
            "properties": {
              "addressPrefix": "[variables('subnetv6AddressRange')]"
            }
IPv6 configuration for the NIC
Template section to add:
          {
            "name": "ipconfig-v6",
            "properties": {
              "privateIPAllocationMethod": "Dynamic",
          "privateIPAddressVersion":"IPv6",
              "subnet": {
                "id": "[variables('v6-subnet-id')]"
              },
              "loadBalancerBackendAddressPools": [
                {
                  "id": "[concat(resourceId('Microsoft.Network/loadBalancers','loadBalancer'),'/backendAddressPools/LBBAP-v6')]"
                }
IPv6 network security group (NSG) rules
          {
            "name": "default-allow-rdp",
            "properties": {
              "description": "Allow RDP",
              "protocol": "Tcp",
              "sourcePortRange": "33819-33829",
              "destinationPortRange": "5000-6000",
              "sourceAddressPrefix": "fd00:db8:deca:deed::/64",
              "destinationAddressPrefix": "fd00:db8:deca:deed::/64",
              "access": "Allow",
              "priority": 1003,
              "direction": "Inbound"
            }
Conditional configuration
If you're using a network virtual appliance, add IPv6 routes in the Route Table. Otherwise, this configuration is optional.
    {
      "type": "Microsoft.Network/routeTables",
      "name": "v6route",
      "apiVersion": "[variables('ApiVersion')]",
      "location": "[resourceGroup().location]",
      "properties": {
        "routes": [
          {
            "name": "v6route",
            "properties": {
              "addressPrefix": "fd00:db8:deca:deed::/64",
              "nextHopType": "VirtualAppliance",
              "nextHopIpAddress": "fd00:db8:ace:f00d::1"
            }
Optional configuration
IPv6 Internet access for the virtual network
{
            "name": "LBFE-v6",
            "properties": {
              "publicIPAddress": {
                "id": "[resourceId('Microsoft.Network/publicIPAddresses','lbpublicip-v6')]"
              }
IPv6 Public IP addresses
    {
      "apiVersion": "[variables('ApiVersion')]",
      "type": "Microsoft.Network/publicIPAddresses",
      "name": "lbpublicip-v6",
      "location": "[resourceGroup().location]",
      "sku": {
        "name": "Standard"
      },
      "properties": {
        "publicIPAllocationMethod": "Static",
        "publicIPAddressVersion": "IPv6"
      }
IPv6 Front end for Load Balancer
          {
            "name": "LBFE-v6",
            "properties": {
              "publicIPAddress": {
                "id": "[resourceId('Microsoft.Network/publicIPAddresses','lbpublicip-v6')]"
              }
IPv6 Backend address pool for Load Balancer
              "backendAddressPool": {
                "id": "[concat(resourceId('Microsoft.Network/loadBalancers', 'loadBalancer'), '/backendAddressPools/LBBAP-v6')]"
              },
              "protocol": "Tcp",
              "frontendPort": 8080,
              "backendPort": 8080
            },
            "name": "lbrule-v6"
IPv6 load balancer rules to associate incoming and outgoing ports
          {
            "name": "ipconfig-v6",
            "properties": {
              "privateIPAllocationMethod": "Dynamic",
          "privateIPAddressVersion":"IPv6",
              "subnet": {
                "id": "[variables('v6-subnet-id')]"
              },
              "loadBalancerBackendAddressPools": [
                {
                  "id": "[concat(resourceId('Microsoft.Network/loadBalancers','loadBalancer'),'/backendAddressPools/LBBAP-v6')]"
                }
Sample VM template JSON
To deploy an IPv6 dual stack application in Azure virtual network using Azure Resource Manager template, view sample template here.
