Deploy Azure IoT Edge modules from the Azure portal
Applies to: ![]() IoT Edge 1.5
IoT Edge 1.5 ![]() IoT Edge 1.4
IoT Edge 1.4
Important
IoT Edge 1.5 LTS and IoT Edge 1.4 LTS are supported releases. IoT Edge 1.4 LTS is end of life on November 12, 2024. If you are on an earlier release, see Update IoT Edge.
Important
Starting August 28th 2024, Azure Marketplace is updating the distribution model for IoT Edge modules. Partners (module publishers) will begin hosting their IoT Edge modules on publisher-owned container registries. IoT Edge module images won't be available for download from the Azure Marketplace container registry.
Contact the IoT Edge module publisher to obtain the updated container image URI and update your IoT Edge device configurations with the new image URI provided by the publisher.
IoT Edge devices that don't use partner modules acquired from Azure Marketplace aren't affected and no action is required.
Once you create IoT Edge modules with your business logic, you want to deploy them to your devices to operate at the edge. If you have multiple modules that work together to collect and process data, you can deploy them all at once and declare the routing rules that connect them.
This article shows how the Azure portal guides you through creating a deployment manifest and pushing the deployment to an IoT Edge device. For information about creating a deployment that targets multiple devices based on their shared tags, see Deploy and monitor IoT Edge modules at scale.
Prerequisites
An IoT Hub in your Azure subscription.
An IoT Edge device.
If you don't have an IoT Edge device set up, you can create one in an Azure virtual machine. Follow the steps in one of the quickstart articles to Create a virtual Linux device or Create a virtual Windows device.
Configure a deployment manifest
A deployment manifest is a JSON document that describes which modules to deploy, how data flows between the modules, and desired properties of the module twins. For more information about how deployment manifests work and how to create them, see Understand how IoT Edge modules can be used, configured, and reused.
The Azure portal has a wizard that walks you through creating the deployment manifest, instead of building the JSON document manually. It has three steps: Add modules, Specify routes, and Review deployment.
Note
The steps in this article reflect the latest schema version of the IoT Edge agent and hub. Schema version 1.1 was released along with IoT Edge version 1.0.10, and enables the module startup order and route prioritization features.
If you are deploying to a device running version 1.0.9 or earlier, edit the Runtime Settings in the Modules step of the wizard to use schema version 1.0.
Select device and add modules
Sign in to the Azure portal and navigate to your IoT Hub.
On the left pane, select Devices under the Device management menu.
Select the target IoT Edge device from the list.
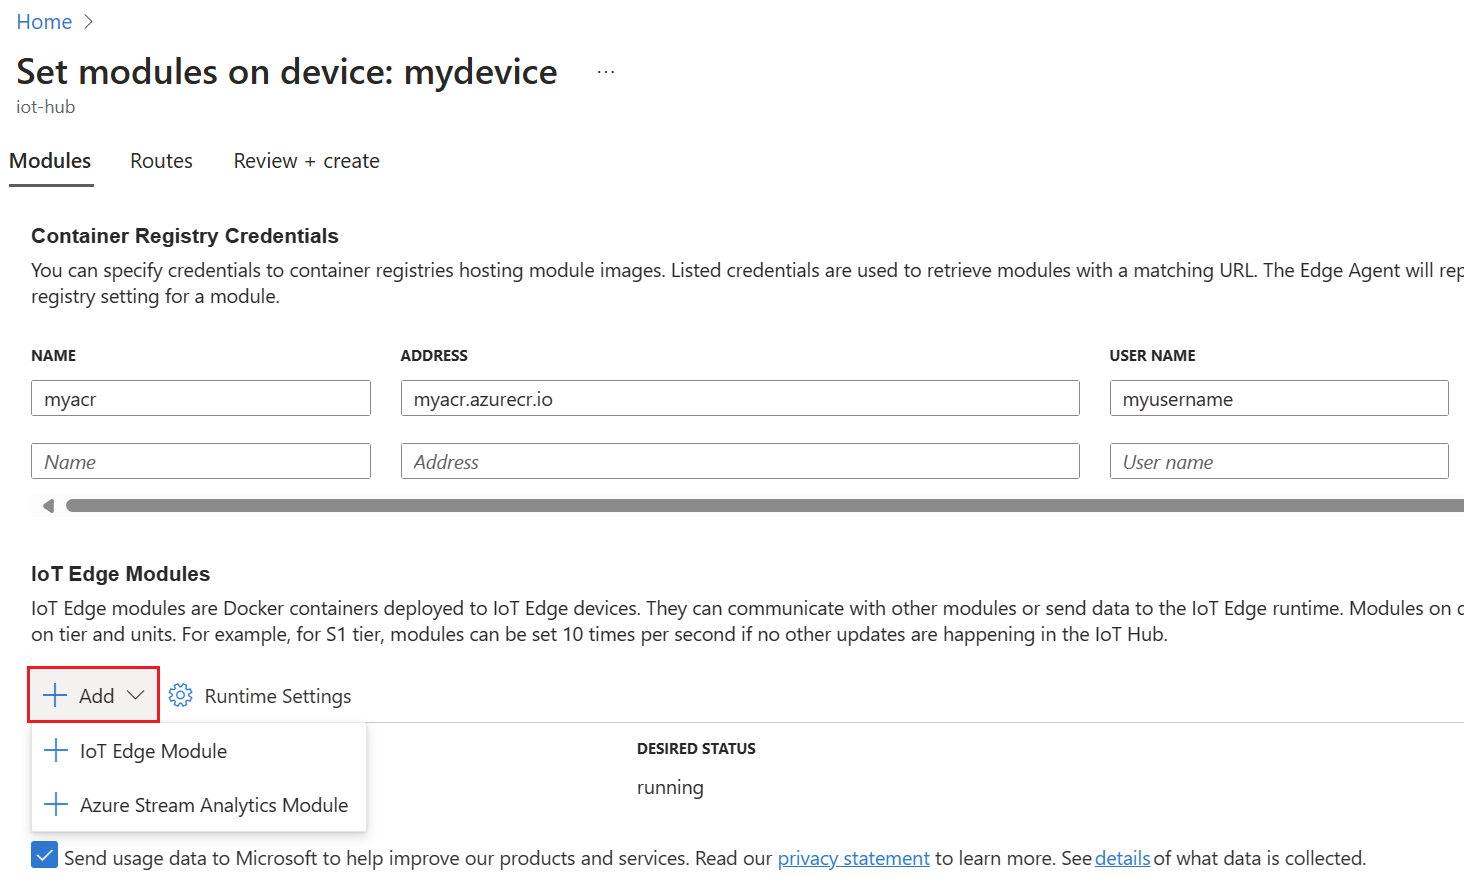
On the upper bar, select Set Modules.
In the Container Registry Credentials section of the page, provide credentials to access container registries that contain module images. For example, your modules are in your private container registry or you are using a partner container registry that requires authentication.
In the IoT Edge Modules section of the page, select Add.

Choose the type of modules you want to add from the drop-down menu. You can add IoT Edge modules or Azure Stream Analytics modules.
IoT Edge Module
Use this option to add Microsoft modules, partner modules, or custom modules. You provide the module name and container image URI. The container image URI is the location of the module image in a container registry. For a list of Microsoft IoT Edge module images, see the Microsoft Artifact Registry. For partner modules, contact the IoT Edge module publisher to obtain the container image URI.
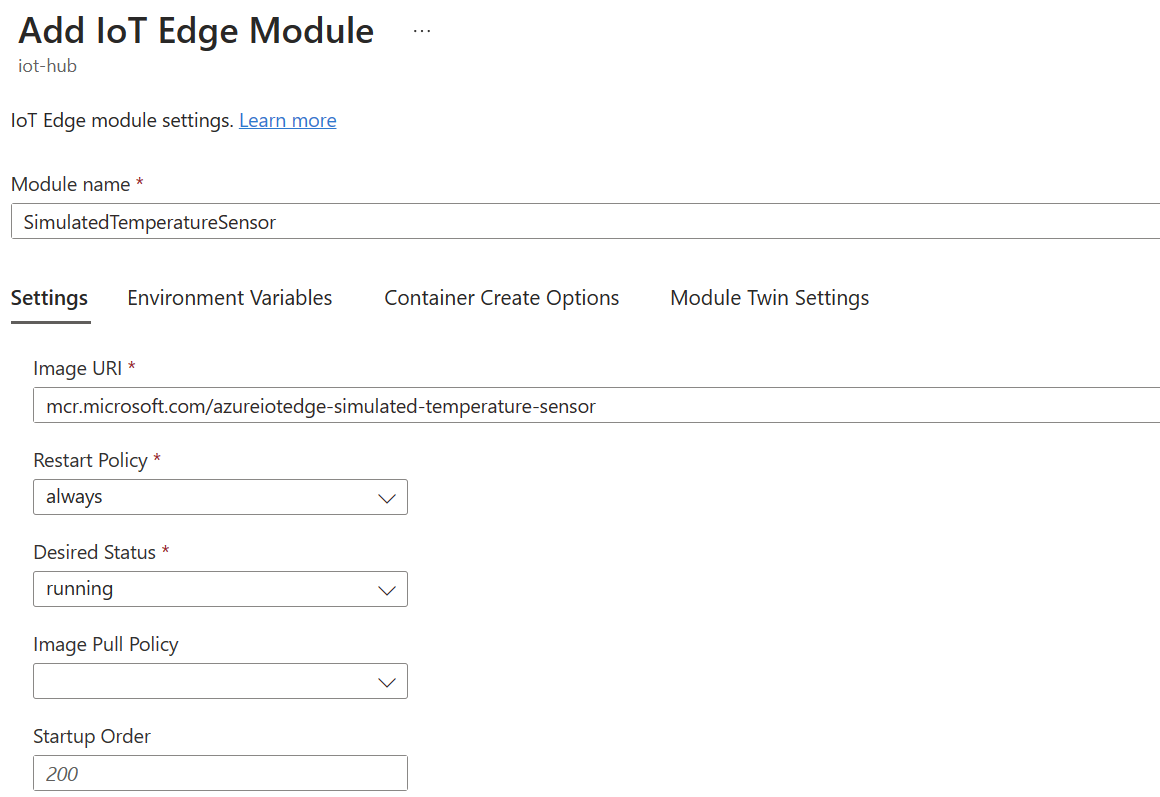
For example to add the Microsoft simulated temperature sensor module:
Enter the following settings:
Setting Value Image URI mcr.microsoft.com/azureiotedge-simulated-temperature-sensorRestart Policy always Desired Status running 
Select Add.
After adding a module, select the module name from the list to open the module settings. Fill out the optional fields if necessary.

For more information about the available module settings, see Module configuration and management.
For more information about the module twin, see Define or update desired properties.
Azure Stream Analytics Module
Use this option for modules generated from an Azure Stream Analytics workload.
- Select your subscription and the Azure Stream Analytics Edge job that you created.
- Select Save.
For more information about deploying Azure Stream Analytics in an IoT Edge module, see Tutorial: Deploy Azure Stream Analytics as an IoT Edge module.
Specify routes
On the Routes tab, you define how messages are passed between modules and the IoT Hub. Messages are constructed using name/value pairs. By default, the first deployment for a new device includes a route called route and defined as FROM /messages/* INTO $upstream, which means that any messages output by any modules are sent to your IoT Hub.
The Priority and Time to live parameters are optional parameters that you can include in a route definition. The priority parameter allows you to choose which routes should have their messages processed first, or which routes should be processed last. Priority is determined by setting a number 0-9, where 0 is top priority. The time to live parameter allows you to declare how long messages in that route should be held until they're either processed or removed from the queue.
For more information about how to create routes, see Declare routes.
Once the routes are set, select Next: Review + create to continue to the next step of the wizard.
Review deployment
The review section shows you the JSON deployment manifest that was created based on your selections in the previous two sections. Note that there are two modules declared that you didn't add: $edgeAgent and $edgeHub. These two modules make up the IoT Edge runtime and are required defaults in every deployment.
Review your deployment information, then select Create.
View modules on your device
Once you've deployed modules to your device, you can view all of them in the device details page of your IoT Hub. This page displays the name of each deployed module, as well as useful information like the deployment status and exit code.
Select Next: Routes and continue with deployment as described by Specify routes and Review Deployment earlier in this article.
Next steps
Learn how to Deploy and monitor IoT Edge modules at scale.