Programmatically create a Device Provisioning Service enrollment group for X.509 certificate attestation
This article shows you how to programmatically create an enrollment group in Azure IoT Hub Device Provisioning Service (DPS) that uses intermediate or root CA X.509 certificates. The enrollment group is created by using the Azure IoT service SDK and a sample application. An enrollment group controls access to the provisioning service for devices that share a common signing certificate in their certificate chain. To learn more, see Use X.509 certificates with DPS. For more information about using X.509 certificate-based Public Key Infrastructure (PKI) with Azure IoT Hub and Device Provisioning Service, see X.509 CA certificate security overview.
Prerequisites
If you don't have an Azure subscription, create a free account before you begin.
Complete the steps in Set up IoT Hub Device Provisioning Service with the Azure portal.
Install .NET 6.0 SDK or later or later on your Windows-based machine. You can use the following command to check your version.
dotnet --info
- Install Node.js v4.0 or above or later on your machine.
Java SE Development Kit 8. This article uses the Azure IoT SDK for Java, which works on both Windows and Linux. This article uses Windows.
- Install the latest version of Git. Make sure that Git is added to the environment variables accessible to the command window. See Software Freedom Conservancy's Git client tools for the latest version of
gittools to install, which includes Git Bash, the command-line app that you can use to interact with your local Git repository.
Note
Although the steps in this article work on both Windows and Linux computers, this article uses a Windows development computer.
Create test certificates
Enrollment groups that use X.509 certificate attestation can be configured to use a root CA certificate or an intermediate certificate. The more usual case is to configure the enrollment group with an intermediate certificate. Using an intermediate certificate provides more flexibility as multiple intermediate certificates can be generated or revoked by the same root CA certificate.
For this article, you need either a root CA certificate file, an intermediate CA certificate file, or both in .pem or .cer format. One file contains the public portion of the root CA X.509 certificate and the other contains the public portion of the intermediate CA X.509 certificate.
If you already have a root CA file and/or an intermediate CA file, you can continue to Add and verify your root or intermediate CA certificate.
If you don't have a root CA file and/or an intermediate CA file, follow the steps in Create an X.509 certificate chain to create them. You can stop after you complete the steps in Create the intermediate CA certificate as you don't need device certificates to complete the steps in this article. When you're finished, you have two X.509 certificate files: ./certs/azure-iot-test-only.root.ca.cert.pem and ./certs/azure-iot-test-only.intermediate.cert.pem.
Add and verify your root or intermediate CA certificate
Devices that provision through an enrollment group using X.509 certificates, present the entire certificate chain when they authenticate with DPS. For DPS to be able to validate the certificate chain, the root or intermediate certificate configured in an enrollment group must either be a verified certificate or must roll up to a verified certificate in the certificate chain a device presents when it authenticates with the service.
For this article, assuming you have both a root CA certificate and an intermediate CA certificate signed by the root CA:
If you plan on creating the enrollment group with the root CA certificate, you need to upload and verify the root CA certificate.
If you plan on creating the enrollment group with the intermediate CA certificate, you can upload and verify either the root CA certificate or the intermediate CA certificate. (If you have multiple intermediate CA certificates in the certificate chain, you could, alternatively, upload and verify any intermediate certificate that sits between the root CA certificate and the intermediate certificate that you create the enrollment group with.)
To add and verify your root or intermediate CA certificate to the Device Provisioning Service:
Sign in to the Azure portal.
On the left-hand menu or on the portal page, select All resources.
Select your Device Provisioning Service.
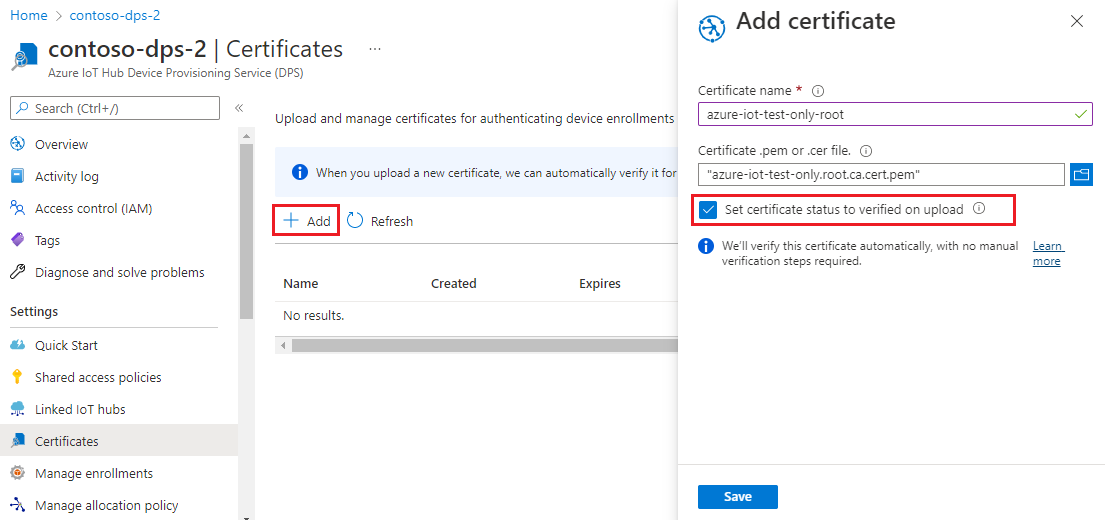
In the Settings menu, select Certificates.
On the top menu, select + Add:.
Enter a name for your root or intermediate CA certificate, and upload the .pem or .cer file.
Select Set certificate status to verified on upload.

Select Save.
Get the connection string for your provisioning service
For the sample in this article, you need the connection string for your provisioning service. Use the following steps to retrieve it.
Sign in to the Azure portal.
On the left-hand menu or on the portal page, select All resources.
Select your Device Provisioning Service.
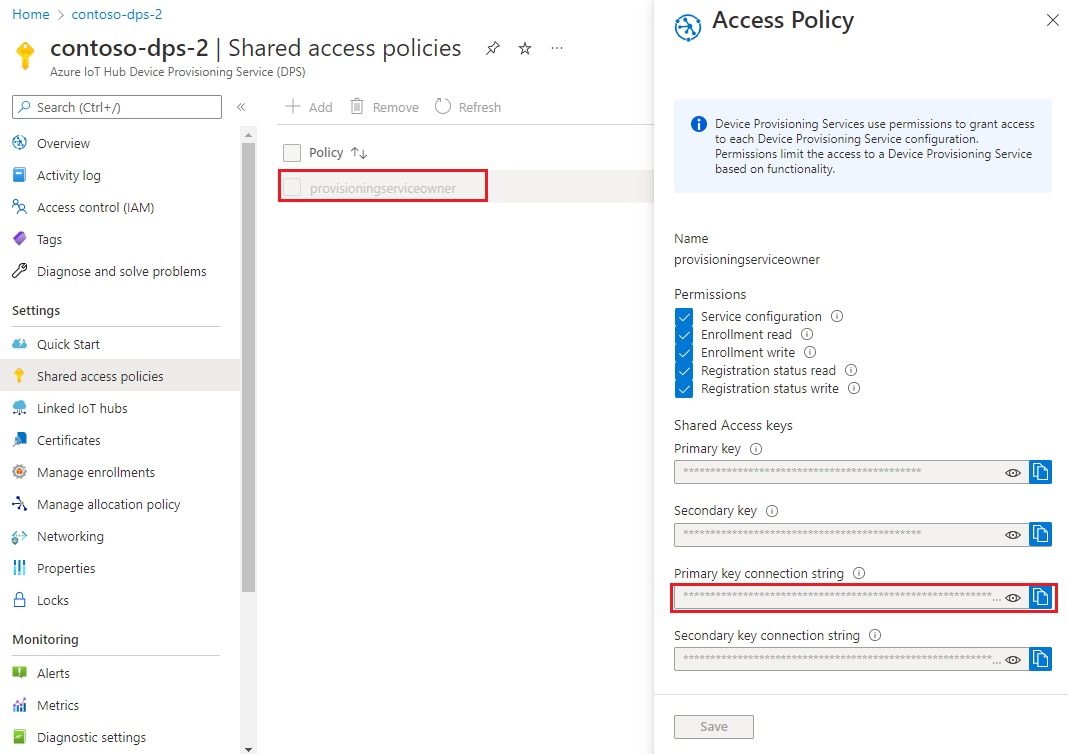
In the Settings menu, select Shared access policies.
Select the access policy that you want to use.
In the Access Policy panel, copy and save the primary key connection string.

Create the enrollment group sample
This section shows you how to create a .NET Core console application that adds an enrollment group to your provisioning service.
Open a Windows command prompt and navigate to a folder where you want to create your app.
To create a console project, run the following command:
dotnet new console --framework net6.0 --use-program-mainTo add a reference to the DPS service SDK, run the following command:
dotnet add package Microsoft.Azure.Devices.Provisioning.ServiceThis step downloads, installs, and adds a reference to the Azure IoT DPS service client NuGet package and its dependencies. This package includes the binaries for the .NET service SDK.
Open Program.cs file in an editor.
Replace the namespace statement at the top of the file with the following line:
namespace CreateEnrollmentGroup;Add the following
usingstatements at the top of the file above thenamespacestatement:using System.Security.Cryptography.X509Certificates; using System.Threading.Tasks; using Microsoft.Azure.Devices.Provisioning.Service;Add the following fields to the
Programclass, and make the indicated changes.private static string ProvisioningConnectionString = "{ProvisioningServiceConnectionString}"; private static string EnrollmentGroupId = "enrollmentgrouptest"; private static string X509RootCertPath = @"{Path to a .cer or .pem file for a verified root CA or intermediate CA X.509 certificate}";Replace the
ProvisioningServiceConnectionStringplaceholder value with the connection string of the provisioning service that you copied in the previous section.Replace the
X509RootCertPathplaceholder value with the path to a .pem or .cer file. This file represents the public part of a either a root CA X.509 certificate that was previously uploaded and verified with your provisioning service, or an intermediate certificate that was uploaded and verified or had a certificate in its signing chain uploaded and verified.You can optionally change the
EnrollmentGroupIdvalue. The string can contain only lower case characters and hyphens.
Important
In production code, be aware of the following security considerations:
- Hard-coding the connection string for the provisioning service administrator is against security best practices. Instead, the connection string should be held in a secure manner, such as in a secure configuration file or in the registry.
- Be sure to upload only the public part of the signing certificate. Never upload .pfx (PKCS12) or .pem files containing private keys to the provisioning service.
Add the following method to the
Programclass. This code creates anEnrollmentGroupentry and then calls theProvisioningServiceClient.CreateOrUpdateEnrollmentGroupAsyncmethod to add the enrollment group to the provisioning service.public static async Task RunSample() { Console.WriteLine("Starting sample..."); using (ProvisioningServiceClient provisioningServiceClient = ProvisioningServiceClient.CreateFromConnectionString(ProvisioningConnectionString)) { #region Create a new enrollmentGroup config Console.WriteLine("\nCreating a new enrollmentGroup..."); var certificate = new X509Certificate2(X509RootCertPath); Attestation attestation = X509Attestation.CreateFromRootCertificates(certificate); EnrollmentGroup enrollmentGroup = new EnrollmentGroup( EnrollmentGroupId, attestation) { ProvisioningStatus = ProvisioningStatus.Enabled }; Console.WriteLine(enrollmentGroup); #endregion #region Create the enrollmentGroup Console.WriteLine("\nAdding new enrollmentGroup..."); EnrollmentGroup enrollmentGroupResult = await provisioningServiceClient.CreateOrUpdateEnrollmentGroupAsync(enrollmentGroup).ConfigureAwait(false); Console.WriteLine("\nEnrollmentGroup created with success."); Console.WriteLine(enrollmentGroupResult); #endregion } }Finally, replace the
Mainmethod with the following lines:static async Task Main(string[] args) { await RunSample(); Console.WriteLine("\nHit <Enter> to exit ..."); Console.ReadLine(); }Save your changes.
This section shows you how to create a Node.js script that adds an enrollment group to your provisioning service.
Tip
For simplicity, this sample uses SAS authentication to connect to the DPS service API. A more secure approach is to use Azure token credentials. For an example of that authentication method, see the create_tpm_enrollment_with_token_credentials.js sample in the Node.js SDK.
From a command window in your working folder, run:
npm install azure-iot-provisioning-serviceThis step downloads, installs, and adds a reference to the Azure IoT DPS service client package and its dependencies. This package includes the binaries for the Node.js service SDK.
Using a text editor, create a create_enrollment_group.js file in your working folder. Add the following code to the file and save:
    'use strict';
    var fs = require('fs');

    var provisioningServiceClient = require('azure-iot-provisioning-service').ProvisioningServiceClient;

    var serviceClient = provisioningServiceClient.fromConnectionString(process.argv[2]);

    var enrollment = {
      enrollmentGroupId: 'first',
      attestation: {
        type: 'x509',
        x509: {
          signingCertificates: {
            primary: {
              certificate: fs.readFileSync(process.argv[3], 'utf-8').toString()
            }
          }
        }
      },
      provisioningStatus: 'disabled'
    };

    serviceClient.createOrUpdateEnrollmentGroup(enrollment, function(err, enrollmentResponse) {
      if (err) {
        console.log('error creating the group enrollment: ' + err);
      } else {
        console.log("enrollment record returned: " + JSON.stringify(enrollmentResponse, null, 2));
        enrollmentResponse.provisioningStatus = 'enabled';
        serviceClient.createOrUpdateEnrollmentGroup(enrollmentResponse, function(err, enrollmentResponse) {
          if (err) {
            console.log('error updating the group enrollment: ' + err);
          } else {
            console.log("updated enrollment record returned: " + JSON.stringify(enrollmentResponse, null, 2));
          }
        });
      }
    });
Open a Windows command prompt.
Clone the GitHub repo for device enrollment code sample using the Java Service SDK:
git clone https://github.com/Azure/azure-iot-sdk-java.git --recursiveFrom the location where you downloaded the repo, go to the sample folder:
cd azure-iot-sdk-java\provisioning\provisioning-service-client-samples\service-enrollment-group-sampleOpen the file /src/main/java/samples/com/microsoft/azure/sdk/iot/ServiceEnrollmentGroupSample.java in an editor of your choice.
Replace
[Provisioning Connection String]with the connection string that you copied in Get the connection string for your provisioning service.Replace the
PUBLIC_KEY_CERTIFICATE_STRINGconstant string with the value of your root or intermediate CA certificate.pemfile. This file represents the public part of a either a root CA X.509 certificate that was previously uploaded and verified with your provisioning service, or an intermediate certificate that was uploaded and verified or had a certificate in its signing chain uploaded and verified.The syntax of certificate text must follow this pattern with no extra spaces or characters:
private static final String PUBLIC_KEY_CERTIFICATE_STRING =
        "-----BEGIN CERTIFICATE-----\n" +
        "MIIFOjCCAyKgAwIBAgIJAPzMa6s7mj7+MA0GCSqGSIb3DQEBCwUAMCoxKDAmBgNV\n" +
            ...
        "MDMwWhcNMjAxMTIyMjEzMDMwWjAqMSgwJgYDVQQDDB9BenVyZSBJb1QgSHViIENB\n" +
        "-----END CERTIFICATE-----";
Updating this string value manually can be prone to error. To generate the proper syntax, you can copy and paste the following command into a Git Bash prompt, replace
your-cert.pemwith the location of your certificate file, and press ENTER. This command generates the syntax for thePUBLIC_KEY_CERTIFICATE_STRINGstring constant value and writes it to the output.sed 's/^/"/;$ !s/$/\\n" +/;$ s/$/"/' your-cert.pemCopy and paste the output certificate text for the constant value.
Important
In production code, be aware of the following security considerations:
- Hard-coding the connection string for the provisioning service administrator is against security best practices. Instead, the connection string should be held in a secure manner, such as in a secure configuration file or in the registry.
- Be sure to upload only the public part of the signing certificate. Never upload .pfx (PKCS12) or .pem files containing private keys to the provisioning service.
The sample allows you to set an IoT hub in the enrollment group to provision the device to. This must be an IoT hub that was previously linked to the provisioning service. For this article, we let DPS choose from the linked hubs according to the default allocation policy, evenly weighted distribution. Comment out the following statement in the file:
enrollmentGroup.setIotHubHostName(IOTHUB_HOST_NAME); // Optional parameter.The sample code creates, updates, queries, and deletes an enrollment group for X.509 devices. To verify successful creation of the enrollment group in Azure portal, comment out the following lines of code near the end of the file:
// ************************************** Delete info of enrollmentGroup ***************************************
System.out.println("\nDelete the enrollmentGroup...");
provisioningServiceClient.deleteEnrollmentGroup(enrollmentGroupId);
Save the ServiceEnrollmentGroupSample.java file.
Run the enrollment group sample
Run the sample:
dotnet runUpon successful creation, the command window displays the properties of the new enrollment group.
Run the following command in your command prompt. Include the quotes around the command arguments and replace
<connection string>withe connection string you copied in the previous section, and<certificate .pem file>with the path to your certificate.pemfile. This file represents the public part of a either a root CA X.509 certificate that was previously uploaded and verified with your provisioning service, or an intermediate certificate that was uploaded and verified or had a certificate in its signing chain uploaded and verified.node create_enrollment_group.js "<connection string>" "<certificate .pem file>"Upon successful creation, the command window displays the properties of the new enrollment group.
From the azure-iot-sdk-java\provisioning\provisioning-service-client-samples\service-enrollment-group-sample folder in your command prompt, run the following command to build the sample:
mvn install -DskipTestsThis command downloads the Azure IoT DPS service client Maven package to your machine and builds the sample. This package includes the binaries for the Java service SDK.
Switch to the target folder and run the sample. The build in the previous step outputs .jar file in the target folder with the following file format:
provisioning-x509-sample-{version}-with-deps.jar; for example:provisioning-x509-sample-1.8.1-with-deps.jar. You might need to replace the version in the following command.cd target java -jar ./service-enrollment-group-sample-1.8.1-with-deps.jarUpon successful creation, the command window displays the properties of the new enrollment group.
To verify that the enrollment group was created:
In the Azure portal, navigate to your Device Provisioning Service instance.
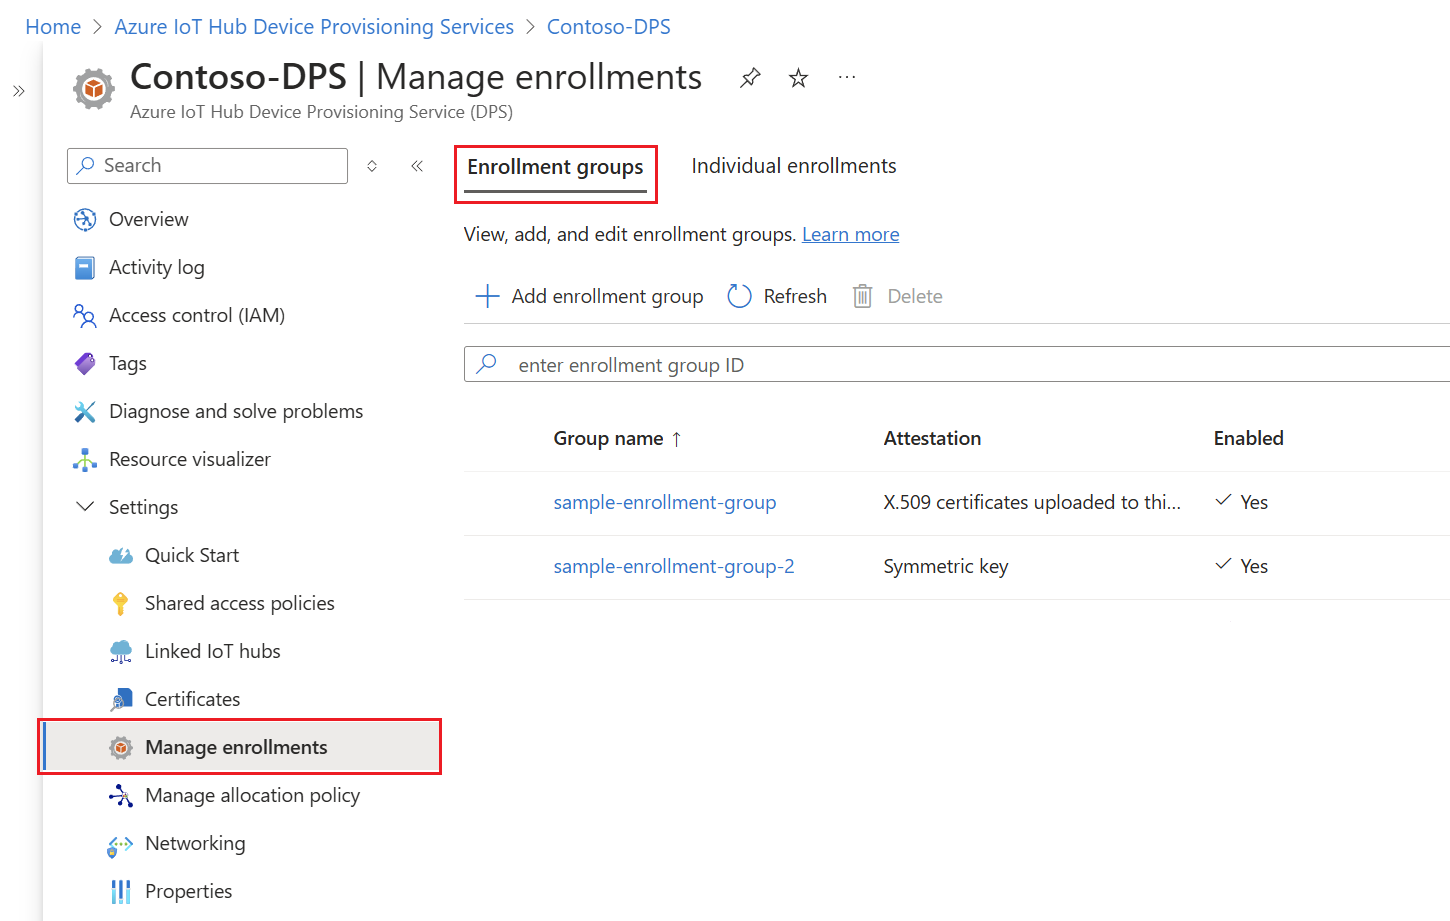
In the Settings menu, select Manage enrollments.
Select the Enrollment groups tab. You should see a new enrollment entry that corresponds to the enrollment group ID that you used in the sample.

Clean up resources
If you plan to explore the Azure IoT Hub Device Provisioning Service tutorials, don't clean up the resources created in this article. Otherwise, use the following steps to delete all resources created by this article.
Close the sample output window on your computer.
From the left-hand menu in the Azure portal, select All resources.
Select your Device Provisioning Service.
In the left-hand menu under Settings, select Manage enrollments.
Select the Enrollment groups tab.
Select the check box next to the group name of the enrollment group you created in this article.
At the top of the page, select Delete.
From your Device Provisioning Service in the Azure portal, select Certificates under Settings on the left-hand menu.
Select the certificate you uploaded for this article.
At the top of Certificate details, select Delete.
Certificate tooling
The Azure IoT C SDK has scripts that can help you create and manage certificates. To learn more, see Managing test CA certificates for samples and tutorials.
The Azure IoT Node.js SDK has scripts that can help you create and manage certificates. To learn more, see Tools for the Azure IoT Device Provisioning Device SDK for Node.js.
You can also use tools available in the Azure IoT C SDK. To learn more, see Managing test CA certificates for samples and tutorials.
The Azure IoT Java SDK contains test tooling that can help you create and manage certificates. To learn more, see X509 certificate generator using DICE emulator.
Next steps
In this article, you created an enrollment group for an X.509 intermediate or root CA certificate using the Azure IoT Hub Device Provisioning Service. To explore further, check out the following links:
For more information about X.509 certificate attestation with DPS, see X.509 certificate attestation.
For an end-to-end example of provisioning devices through an enrollment group using X.509 certificates, see the Provision multiple X.509 devices using enrollment groups tutorial.
To learn about managing individual enrollments and enrollment groups using Azure portal, see How to manage device enrollments with Azure portal.