Tutorial: Create a rule and set up notifications in your Azure IoT Central application
In this tutorial, you learn how to use Azure IoT Central to remotely monitor your connected devices. Azure IoT Central rules let you monitor your devices in near real time and automatically invoke actions, such as sending an email. This article explains how to create rules to monitor the telemetry your devices send.
Devices use telemetry to send numerical data from the device. A rule triggers when the selected telemetry crosses a specified threshold.
In this tutorial, you learn how to:
- Create a rule that fires when the device temperature reaches 70° F.
- Add an email action to notify you when the rule fires.
Prerequisites
To complete the steps in this tutorial, you need:
An active Azure subscription. If you don't have an Azure subscription, create a free account before you begin.
An IoT Central application created from the Custom application template. To learn more, see Create an IoT Central application and About your application.
Add and customize a device template
Add a device template from the device catalog. This tutorial uses the Onset Hobo MX-100 Temp Sensor device template:
To add a new device template, select + New on the Device templates page.
On the Select type page, scroll down until you find the Onset Hobo MX-100 Temp Sensor tile in the Featured device templates section.
Select the Onset Hobo MX-100 Temp Sensor tile, and then select Next: Review.
On the Review page, select Create.
The name of the template you created is Hobo MX-100. The model includes components such as Hobo MX-100 and IotDevice. Components define the capabilities of an ESP32 device. Capabilities can include the telemetry, properties, and commands.
Add a simulated device
To test the rule you create in the next section, add a simulated device to your application:
Select Devices in the left-navigation panel. Then select Hobo MX-100.
Select + New. In the Create a new device panel, leave the default device name and device ID values. Toggle Simulate this device? to Yes.
Select Create.
Create a rule
To create a telemetry rule, the device template must include at least one telemetry value. This tutorial uses a simulated Hobo MX-100 device that sends temperature telemetry. The rule monitors the temperature reported by the device and sends an email when it goes above 70 degrees.
Note
There is a limit of 50 rules per application.
In the left pane, select Rules.
Select + New to add a new rule.
Enter the name Temperature monitor to identify the rule and press Enter.
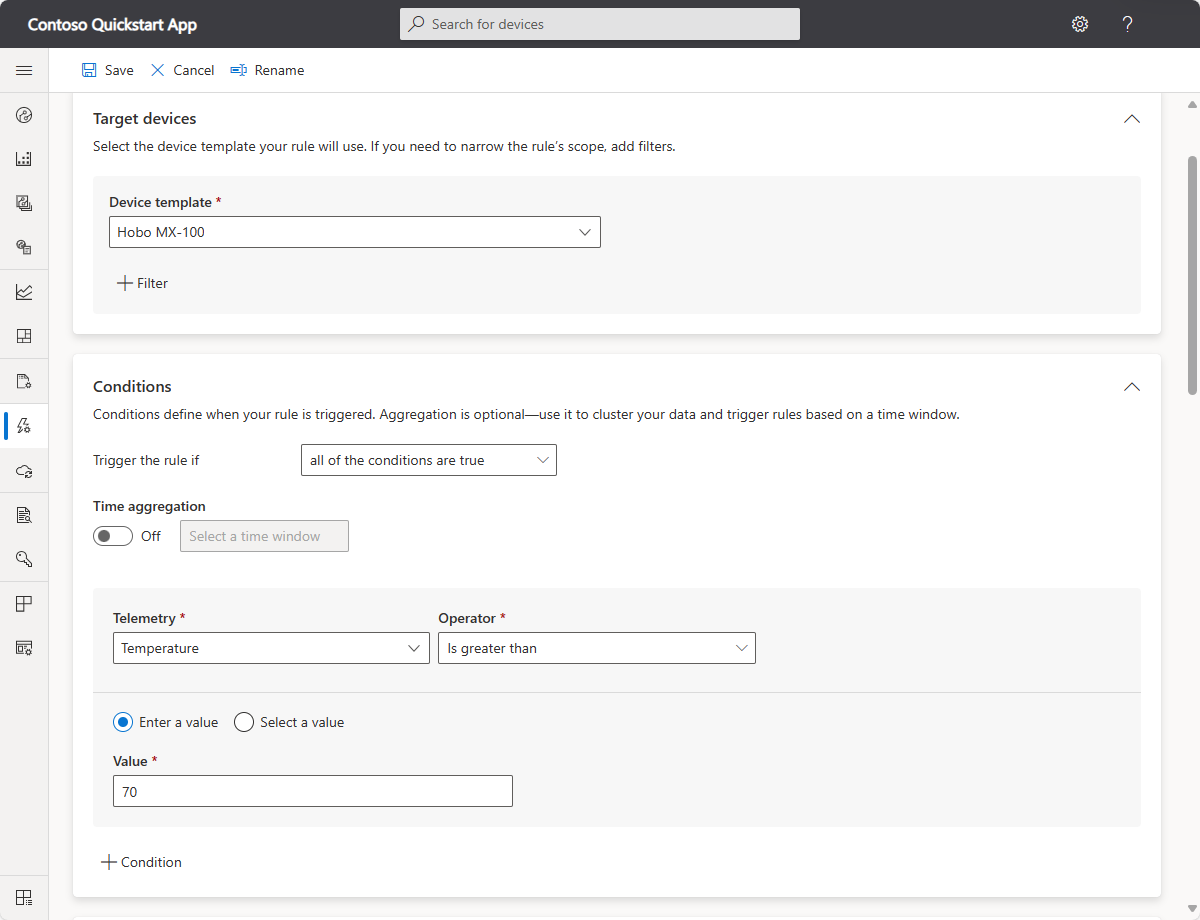
Select the Hobo MX-100 device template. By default, the rule automatically applies to all the devices assigned to the device template:
To filter for a subset of the devices, select + Filter and use device properties to identify the devices. To disable the rule, toggle the Enabled/Disabled button.
Configure the rule conditions
Conditions define the criteria that the rule monitors. In this tutorial, you configure the rule to fire when the temperature exceeds 70° F.
Select Temperature in the Telemetry dropdown.
Next, choose Is greater than as the Operator and enter 70 as the Value:
Optionally, you can set a Time aggregation. When you select a time aggregation, you must also select an aggregation type, such as average or sum from the aggregation drop-down.
- Without aggregation, the rule triggers for each telemetry data point that meets the condition. For example, if you configure the rule to trigger when temperature is above 70 then the rule triggers almost instantly when the device temperature exceeds this value.
- With aggregation, the rule triggers if the aggregate value of the telemetry data points in the time window meets the condition. For example, if you configure the rule to trigger when temperature is above 70 and with an average time aggregation of 10 minutes, then the rule triggers when the device reports an average temperature greater than 70, calculated over a 10-minute interval.
You can add multiple conditions to a rule by selecting + Condition. When multiple conditions are added, you can specify if all the conditions must be met or any of the conditions must be met for the rule to trigger. If you're using time aggregation with multiple conditions, all the telemetry values must be aggregated.
Configure actions
After you define the condition, you set up the actions to take when the rule fires. Actions are invoked when all the conditions specified in the rule evaluate to true.
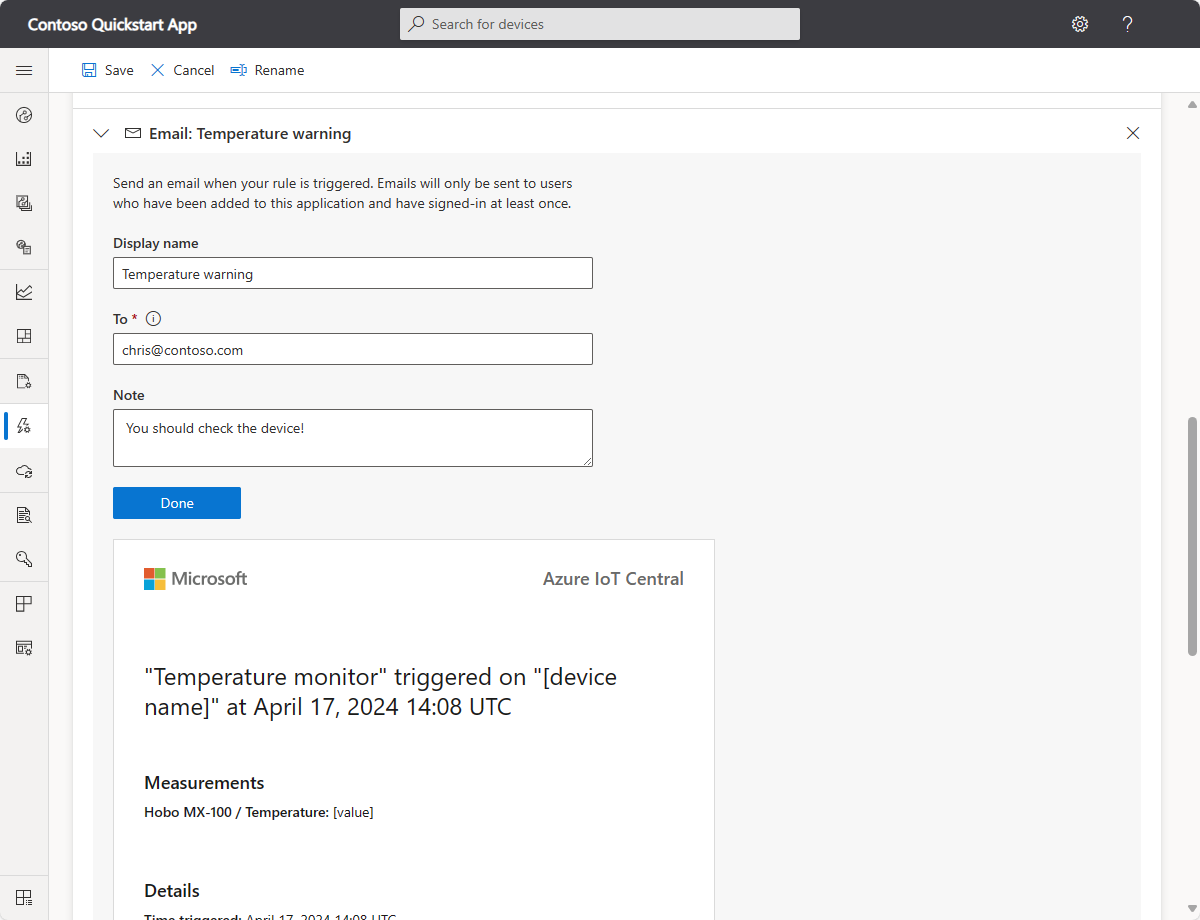
Select + Email in the Actions section.
Enter Temperature warning as the display name for the action, your email address in the To field, and You should check the device! as a note to appear in the body of the email.
Note
Emails are only sent to the users that have been added to the application and have logged in at least once. Learn more about user management in Azure IoT Central.
To save the action, choose Done. You can add multiple actions to a rule.
To save the rule, choose Save. The rule goes live within a few minutes and starts monitoring telemetry being sent to your application. When the condition specified in the rule is met, the rule triggers the configured email action.
After a while, you receive an email message when the rule fires:
Delete a rule
If you no longer need a rule, delete it by opening the rule and choosing Delete.
Enable or disable a rule
Choose the rule you want to enable or disable. Toggle the Enabled/Disabled button in the rule to enable or disable the rule for all devices that are scoped in the rule.
Enable or disable a rule for specific devices
Choose the rule you want to customize. Use one or more filters in the Target devices section to narrow the scope of the rule to the devices you want to monitor.
Clean up resources
If you don't plan to complete any further IoT Central quickstarts or tutorials, you can delete your IoT Central application:
- In your IoT Central application, navigate to Application > Management.
- Select Delete and then confirm your action.
Next step
Now that you've defined a threshold-based rule the suggested next step is to learn how to:


