Use Spark & Hive Tools for Visual Studio Code
Learn how to use Apache Spark & Hive Tools for Visual Studio Code. Use the tools to create and submit Apache Hive batch jobs, interactive Hive queries, and PySpark scripts for Apache Spark. First we'll describe how to install Spark & Hive Tools in Visual Studio Code. Then we'll walk through how to submit jobs to Spark & Hive Tools.
Spark & Hive Tools can be installed on platforms that are supported by Visual Studio Code. Note the following prerequisites for different platforms.
Prerequisites
The following items are required for completing the steps in this article:
- An Azure HDInsight cluster. To create a cluster, see Get started with HDInsight. Or use a Spark and Hive cluster that supports an Apache Livy endpoint.
- Visual Studio Code.
- Mono. Mono is required only for Linux and macOS.
- A PySpark interactive environment for Visual Studio Code.
- A local directory. This article uses
C:\HD\HDexample.
Install Spark & Hive Tools
After you meet the prerequisites, you can install Spark & Hive Tools for Visual Studio Code by following these steps:
Open Visual Studio Code.
From the menu bar, navigate to View > Extensions.
In the search box, enter Spark & Hive.
Select Spark & Hive Tools from the search results, and then select Install:
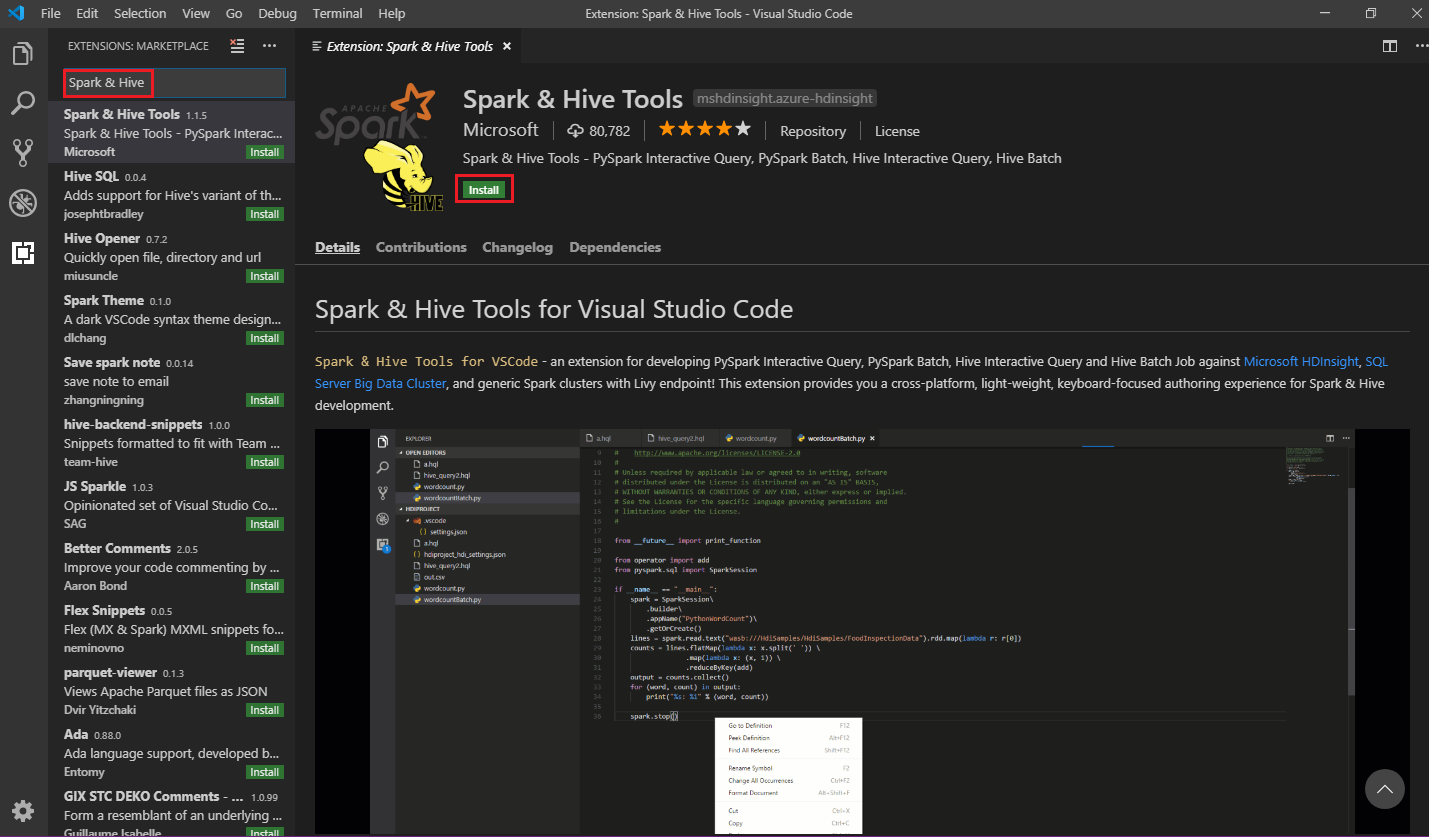
Select Reload when necessary.
Open a work folder
To open a work folder and to create a file in Visual Studio Code, follow these steps:
From the menu bar, navigate to File > Open Folder... >
C:\HD\HDexample, and then select the Select Folder button. The folder appears in the Explorer view on the left.In Explorer view, select the
HDexamplefolder, and then select the New File icon next to the work folder: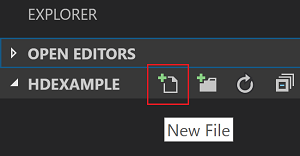
Name the new file by using either the
.hql(Hive queries) or the.py(Spark script) file extension. This example uses HelloWorld.hql.
Set the Azure environment
For a national cloud user, follow these steps to set the Azure environment first, and then use the Azure: Sign In command to sign in to Azure:
Navigate to File > Preferences > Settings.
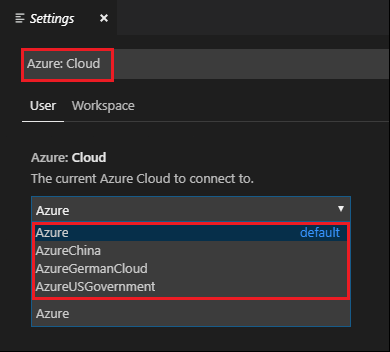
Search on the following string: Azure: Cloud.
Select the national cloud from the list:
Connect to an Azure account
Before you can submit scripts to your clusters from Visual Studio Code, user can either sign in to Azure subscription, or link a HDInsight cluster. Use the Ambari username/password or domain joined credential for ESP cluster to connect to your HDInsight cluster. Follow these steps to connect to Azure:
From the menu bar, navigate to View > Command Palette..., and enter Azure: Sign In:

Follow the sign-in instructions to sign in to Azure. After you're connected, your Azure account name shows on the status bar at the bottom of the Visual Studio Code window.
Link a cluster
Link: Azure HDInsight
You can link a normal cluster by using an Apache Ambari-managed username, or you can link an Enterprise Security Pack secure Hadoop cluster by using a domain username (such as: user1@contoso.com).
From the menu bar, navigate to View > Command Palette..., and enter Spark / Hive: Link a Cluster.

Select linked cluster type Azure HDInsight.
Enter the HDInsight cluster URL.
Enter your Ambari username; the default is admin.
Enter your Ambari password.
Select the cluster type.
Set the display name of the cluster (optional).
Review OUTPUT view for verification.
Note
The linked username and password are used if the cluster both logged in to the Azure subscription and linked a cluster.
Link: Generic Livy endpoint
From the menu bar, navigate to View > Command Palette..., and enter Spark / Hive: Link a Cluster.
Select linked cluster type Generic Livy Endpoint.
Enter the generic Livy endpoint. For example: http://10.172.41.42:18080.
Select authorization type Basic or None. If you select Basic:
Enter your Ambari username; the default is admin.
Enter your Ambari password.
Review OUTPUT view for verification.
List clusters
From the menu bar, navigate to View > Command Palette..., and enter Spark / Hive: List Cluster.
Select the subscription that you want.
Review the OUTPUT view. This view shows your linked cluster (or clusters) and all the clusters under your Azure subscription:

Set the default cluster
Reopen the
HDexamplefolder that was discussed earlier, if closed.Select the HelloWorld.hql file that was created earlier. It opens in the script editor.
Right-click the script editor, and then select Spark / Hive: Set Default Cluster.
Connect to your Azure account, or link a cluster if you haven't yet done so.
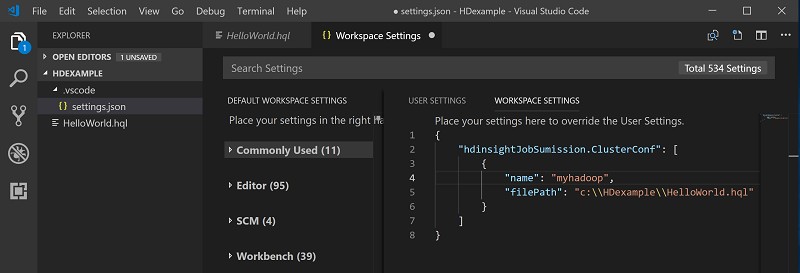
Select a cluster as the default cluster for the current script file. The tools automatically update the .VSCode\settings.json configuration file:
Submit interactive Hive queries and Hive batch scripts
With Spark & Hive Tools for Visual Studio Code, you can submit interactive Hive queries and Hive batch scripts to your clusters.
Reopen the
HDexamplefolder that was discussed earlier, if closed.Select the HelloWorld.hql file that was created earlier. It opens in the script editor.
Copy and paste the following code into your Hive file, and then save it:
SELECT * FROM hivesampletable;Connect to your Azure account, or link a cluster if you haven't yet done so.
Right-click the script editor and select Hive: Interactive to submit the query, or use the Ctrl+Alt+I keyboard shortcut. Select Hive: Batch to submit the script, or use the Ctrl+Alt+H keyboard shortcut.
If you haven't specified a default cluster, select a cluster. The tools also let you submit a block of code instead of the whole script file by using the context menu. After a few moments, the query results appear in a new tab:
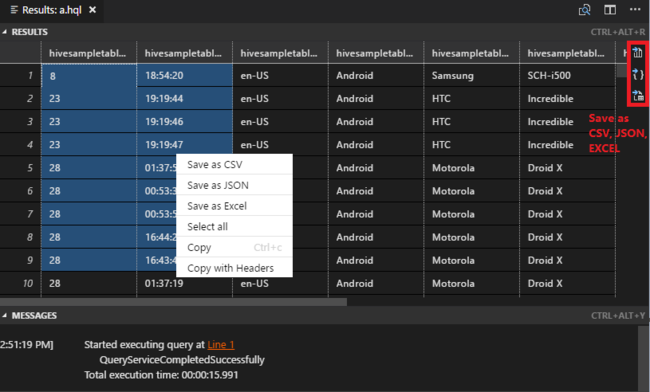
RESULTS panel: You can save the whole result as a CSV, JSON, or Excel file to a local path or just select multiple lines.
MESSAGES panel: When you select a Line number, it jumps to the first line of the running script.
Submit interactive PySpark queries
Prerequisite for Pyspark interactive
Note here that Jupyter Extension version (ms-jupyter): v2022.1.1001614873 and Python Extension version (ms-python): v2021.12.1559732655, Python 3.6.x and 3.7.x are required for HDInsight interactive PySpark queries.
Users can perform PySpark interactive in the following ways.
Using the PySpark interactive command in PY file
Using the PySpark interactive command to submit the queries, follow these steps:
Reopen the
HDexamplefolder that was discussed earlier, if closed.Create a new HelloWorld.py file, following the earlier steps.
Copy and paste the following code into the script file:
from operator import add
from pyspark.sql import SparkSession
spark = SparkSession.builder \
      .appName('hdisample') \
      .getOrCreate()
lines = spark.read.text("/HdiSamples/HdiSamples/FoodInspectionData/README").rdd.map(lambda r: r[0])
counters = lines.flatMap(lambda x: x.split(' ')) \
             .map(lambda x: (x, 1)) \
             .reduceByKey(add)

coll = counters.collect()
sortedCollection = sorted(coll, key = lambda r: r[1], reverse = True)

for i in range(0, 5):
     print(sortedCollection[i])
The prompt to install PySpark/Synapse Pyspark kernel is displayed in the lower right corner of the window. You can click on Install button to proceed for the PySpark/Synapse Pyspark installations; or click on Skip button to skip this step.

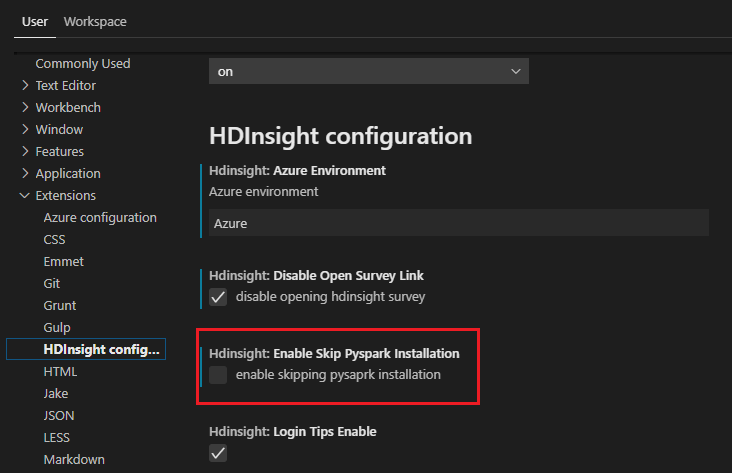
If you need to install it later, you can navigate to File > Preference > Settings, then uncheck HDInsight: Enable Skip Pyspark Installation in the settings.
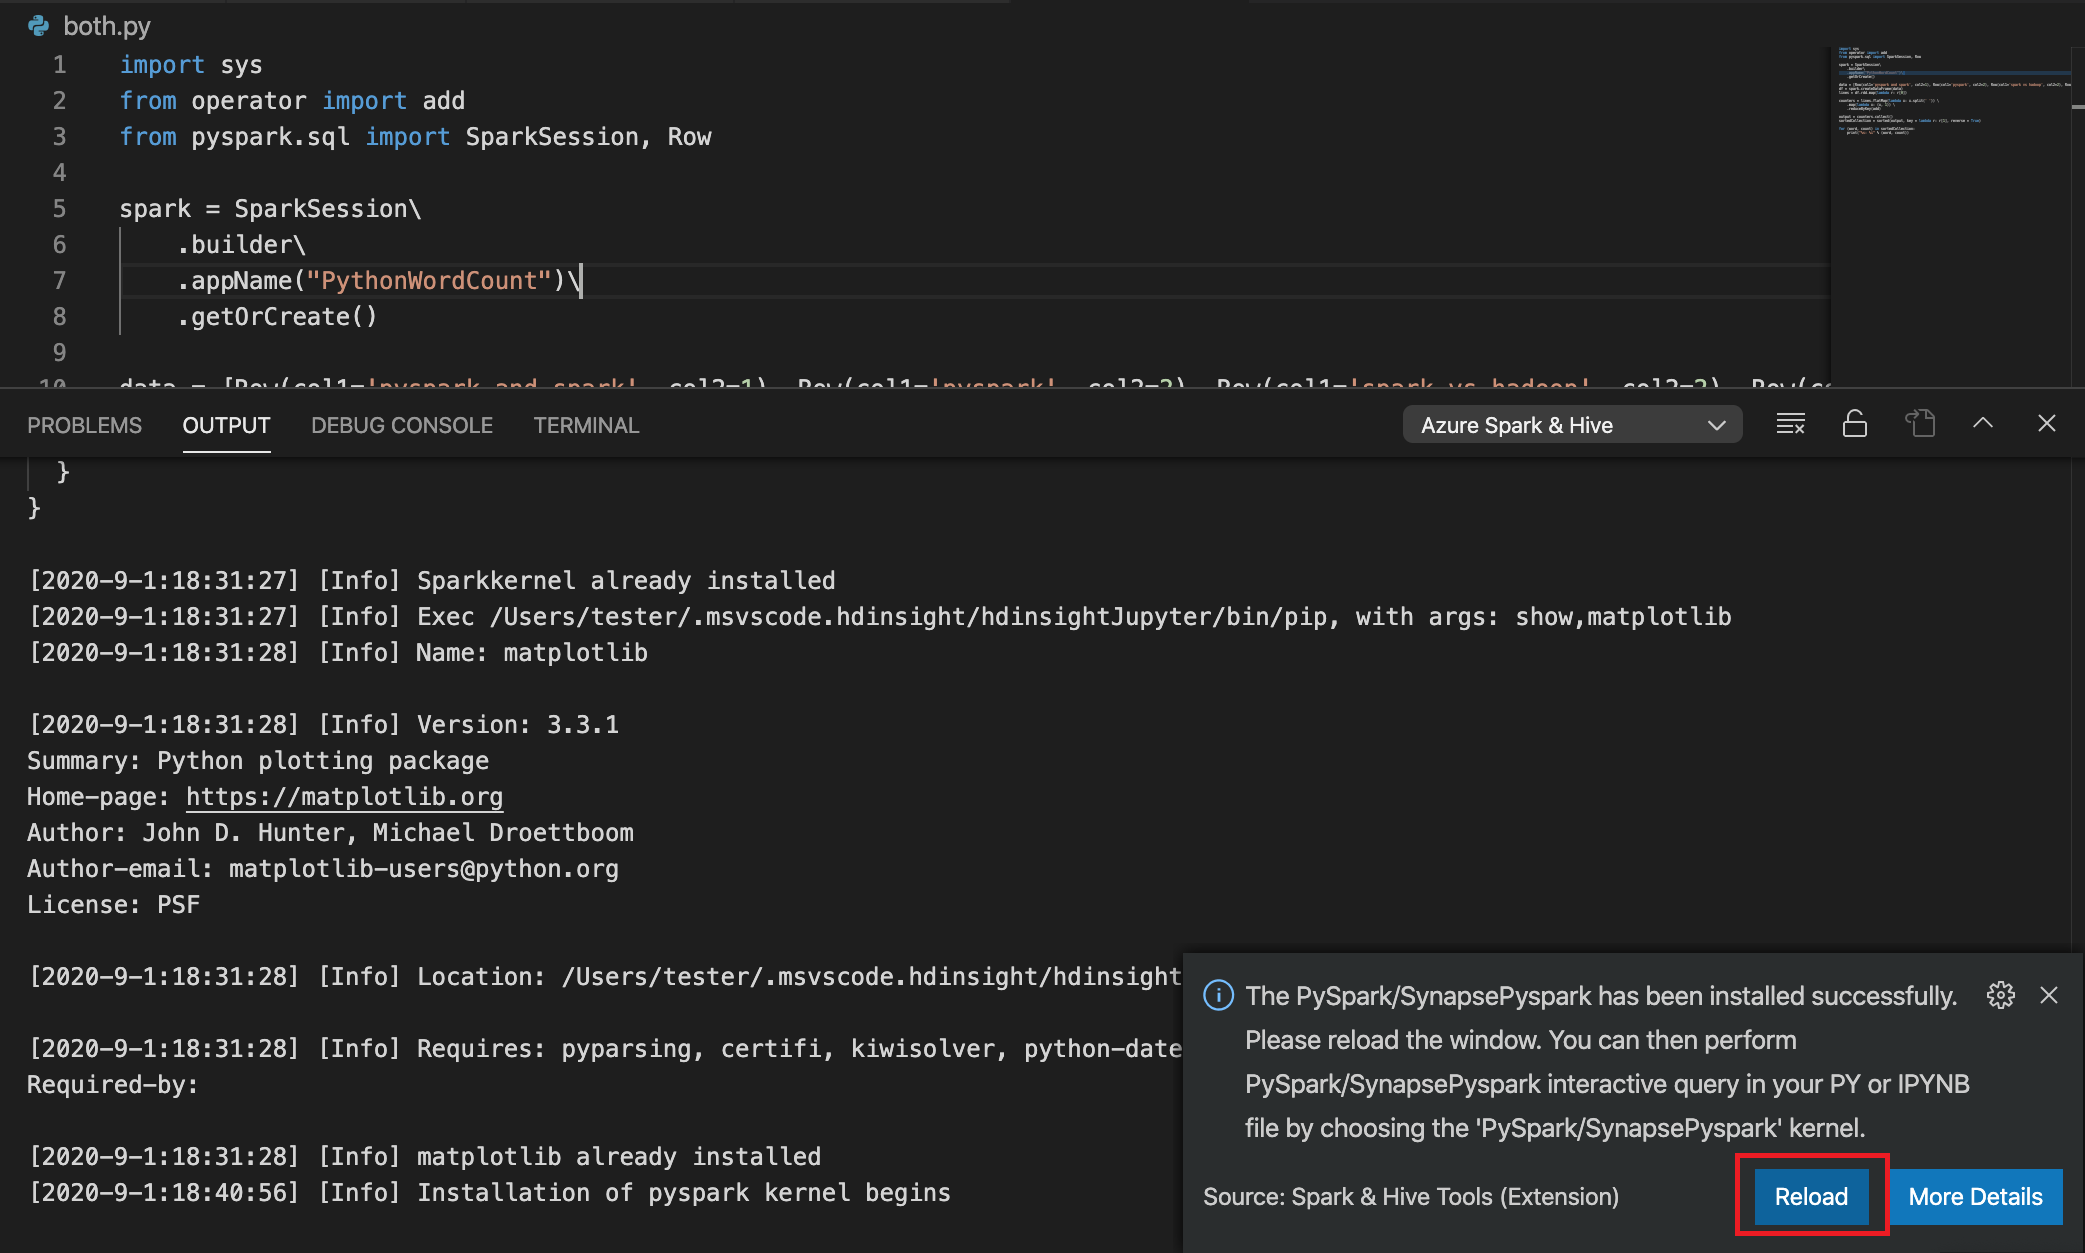
If the installation is successful in step 4, the "PySpark installed successfully" message box is displayed in the lower right corner of the window. Click on Reload button to reload the window.
From the menu bar, navigate to View > Command Palette... or use the Shift + Ctrl + P keyboard shortcut, and enter Python: Select Interpreter to start Jupyter Server.

Select the Python option below.

From the menu bar, navigate to View > Command Palette... or use the Shift + Ctrl + P keyboard shortcut, and enter Developer: Reload Window.

Connect to your Azure account, or link a cluster if you haven't yet done so.
Select all the code, right-click the script editor, and select Spark: PySpark Interactive / Synapse: Pyspark Interactive to submit the query.
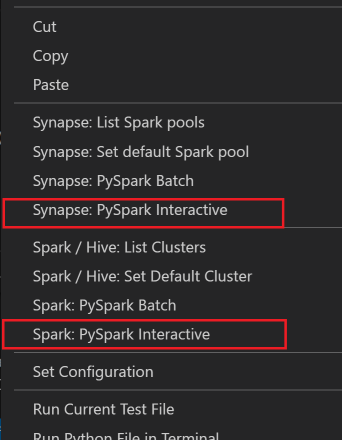
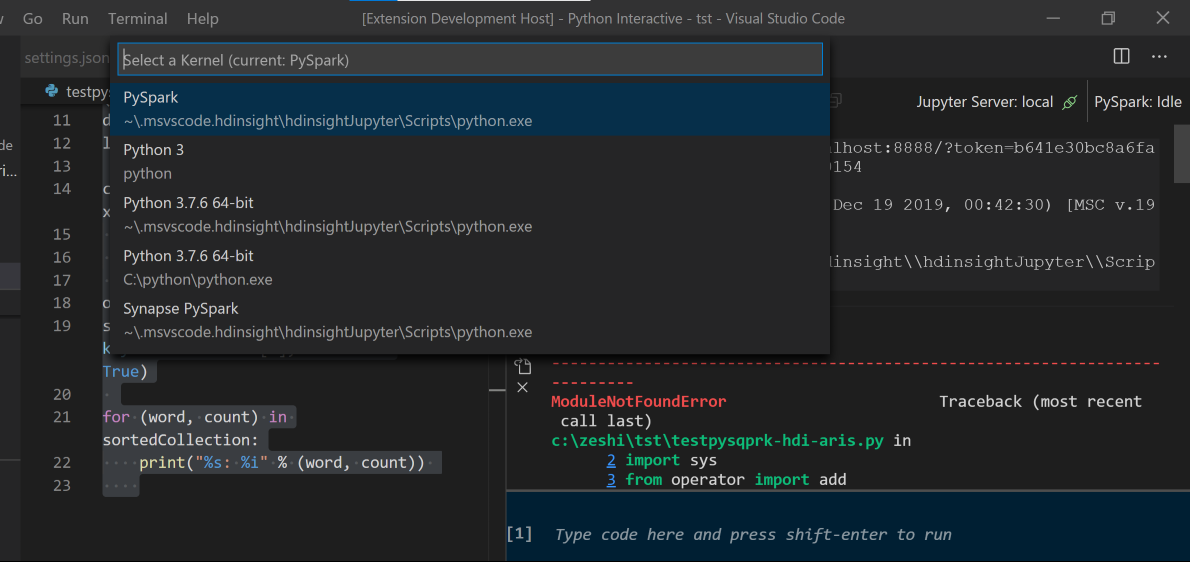
Select the cluster, if you haven't specified a default cluster. After a few moments, the Python Interactive results appear in a new tab. Click on PySpark to switch the kernel to PySpark / Synapse Pyspark, and the code will run successfully. If you want to switch to Synapse Pyspark kernel, disabling auto-settings in Azure portal is encouraged. Otherwise it may take a long while to wake up the cluster and set synapse kernel for the first time use. If The tools also let you submit a block of code instead of the whole script file by using the context menu:
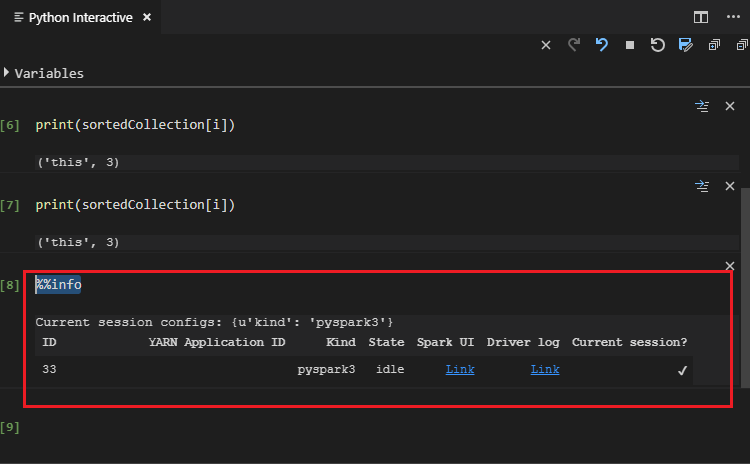
Enter %%info, and then press Shift+Enter to view the job information (optional):
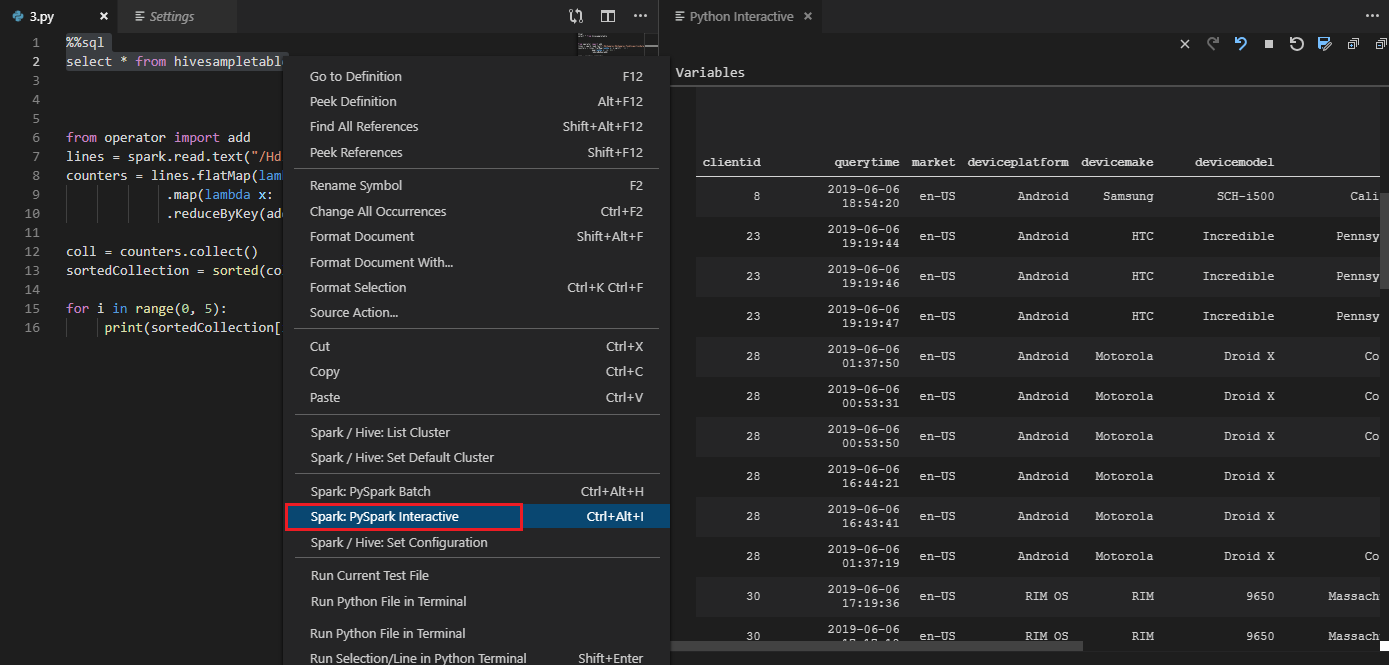
The tool also supports the Spark SQL query:
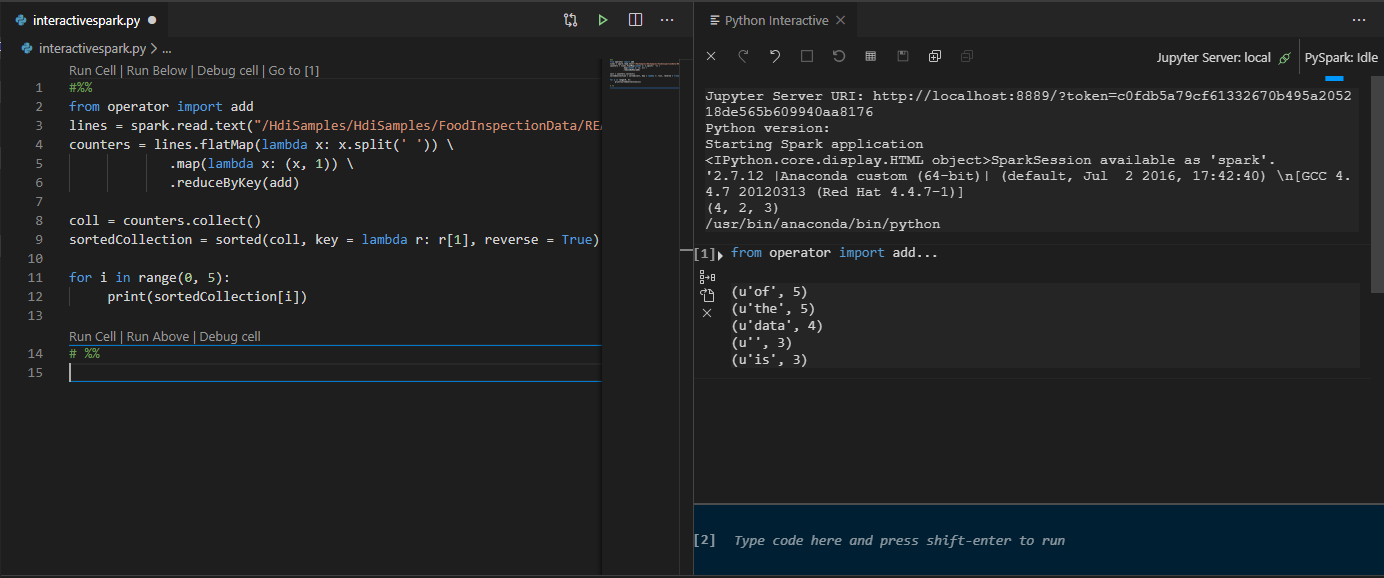
Perform interactive query in PY file using a #%% comment
Add #%% before the Py code to get notebook experience.
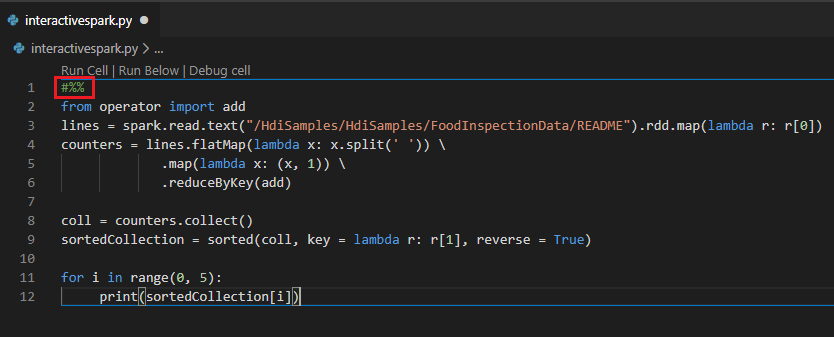
Click on Run Cell. After a few moments, the Python Interactive results appear in a new tab. Click on PySpark to switch the kernel to PySpark/Synapse PySpark, then click on Run Cell again, and the code will run successfully.
Leverage IPYNB support from Python extension
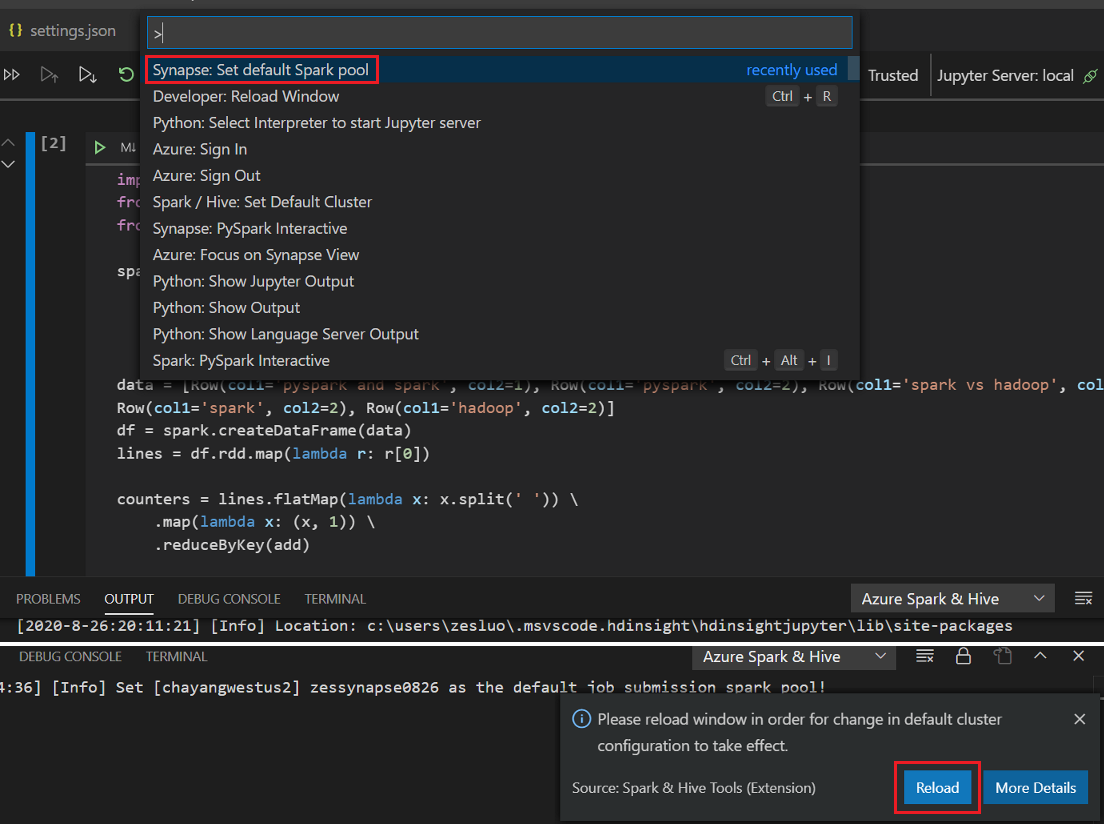
You can create a Jupyter Notebook by command from the Command Palette or by creating a new
.ipynbfile in your workspace. For more information, see Working with Jupyter Notebooks in Visual Studio CodeClick on Run cell button, follow the prompts to set the default spark pool (we suggest you to set default cluster/pool every time before opening a notebook) and then, Reload window.
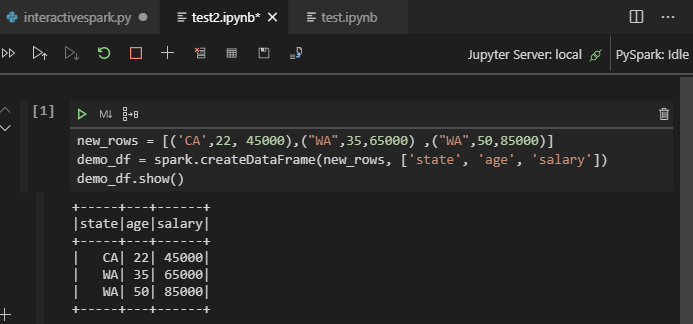
Click on PySpark to switch kernel to PySpark / Synapse Pyspark, and then click on Run Cell, after a while, the result will be displayed.
Note
For Synapse PySpark installation error, since its dependency will not be maintained anymore by other team, this will not be maintained anymore as well. If you try to use Synapse Pyspark interactive, please switch to use Azure Synapse Analytics instead. And it's a long term change.
Submit PySpark batch job
Reopen the
HDexamplefolder that you discussed earlier, if closed.Create a new BatchFile.py file by following the earlier steps.
Copy and paste the following code into the script file:
from __future__ import print_function
import sys
from operator import add
from pyspark.sql import SparkSession
if __name__ == "__main__":
    spark = SparkSession\
        .builder\
        .appName("PythonWordCount")\
        .getOrCreate()

    lines = spark.read.text('/HdiSamples/HdiSamples/SensorSampleData/hvac/HVAC.csv').rdd.map(lambda r: r[0])
    counts = lines.flatMap(lambda x: x.split(' '))\
               .map(lambda x: (x, 1))\
                .reduceByKey(add)
    output = counts.collect()
    for (word, count) in output:
        print("%s: %i" % (word, count))
    spark.stop()
Connect to your Azure account, or link a cluster if you haven't yet done so.
Right-click the script editor, and then select Spark: PySpark Batch, or Synapse: PySpark Batch*.
Select a cluster/spark pool to submit your PySpark job to:
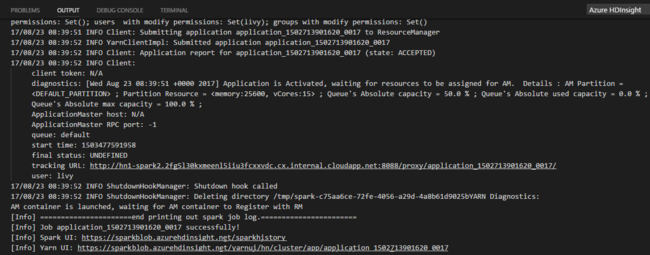
After you submit a Python job, submission logs appear in the OUTPUT window in Visual Studio Code. The Spark UI URL and Yarn UI URL are also shown. If you submit the batch job to an Apache Spark pool, the Spark history UI URL and the Spark Job Application UI URL are also shown. You can open the URL in a web browser to track the job status.
Integrate with HDInsight Identity Broker (HIB)
Connect to your HDInsight ESP cluster with ID Broker (HIB)
You can follow the normal steps to sign in to Azure subscription to connect to your HDInsight ESP cluster with ID Broker (HIB). After sign-in, you'll see the cluster list in Azure Explorer. For more instructions, see Connect to your HDInsight cluster.
Run a Hive/PySpark job on an HDInsight ESP cluster with ID Broker (HIB)
For run a hive job, you can follow the normal steps to submit job to HDInsight ESP cluster with ID Broker (HIB). Refer to Submit interactive Hive queries and Hive batch scripts for more instructions.
For run an interactive PySpark job, you can follow the normal steps to submit job to HDInsight ESP cluster with ID Broker (HIB). Refer to Submit interactive PySpark queries.
For run a PySpark batch job, you can follow the normal steps to submit job to HDInsight ESP cluster with ID Broker (HIB). Refer to Submit PySpark batch job for more instructions.
Apache Livy configuration
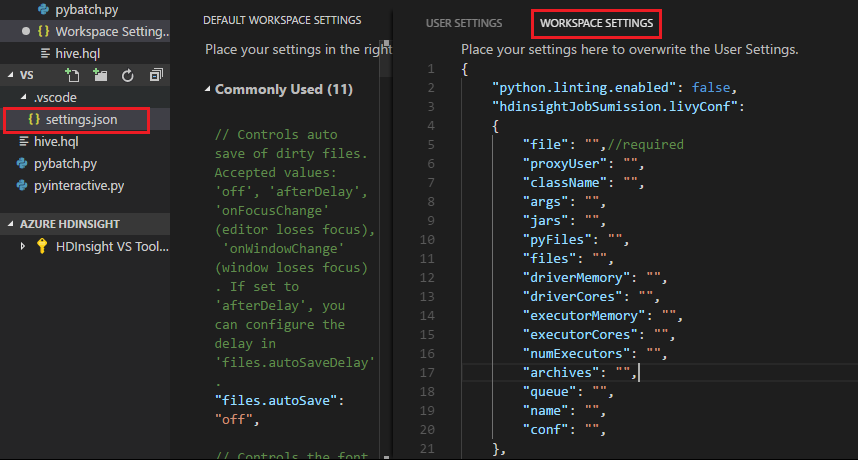
Apache Livy configuration is supported. You can configure it in the .VSCode\settings.json file in the workspace folder. Currently, Livy configuration only supports Python script. For more information, see Livy README.
How to trigger Livy configuration
Method 1
- From the menu bar, navigate to File > Preferences > Settings.
- In the Search settings box, enter HDInsight Job Submission: Livy Conf.
- Select Edit in settings.json for the relevant search result.
Method 2
Submit a file, and notice that the .vscode folder is automatically added to the work folder. You can see the Livy configuration by selecting .vscode\settings.json.
The project settings:
Note
For the driverMemory and executorMemory settings, set the value and unit. For example: 1g or 1024m.
Supported Livy configurations:
POST /batches
Request body
name description type file File containing the application to execute Path (required) proxyUser User to impersonate when running the job String className Application Java/Spark main class String args Command-line arguments for the application List of strings jars Jars to be used in this session List of strings pyFiles Python files to be used in this session List of strings files Files to be used in this session List of strings driverMemory Amount of memory to use for the driver process String driverCores Number of cores to use for the driver process Int executorMemory Amount of memory to use per executor process String executorCores Number of cores to use for each executor Int numExecutors Number of executors to launch for this session Int archives Archives to be used in this session List of strings queue Name of the YARN queue to be submitted to String name Name of this session String conf Spark configuration properties Map of key=val Response body The created Batch object.
name description type ID Session ID Int appId Application ID of this session String appInfo Detailed application info Map of key=val log Log lines List of strings state Batch state String Note
The assigned Livy config is displayed in the output pane when you submit the script.
Integrate with Azure HDInsight from Explorer
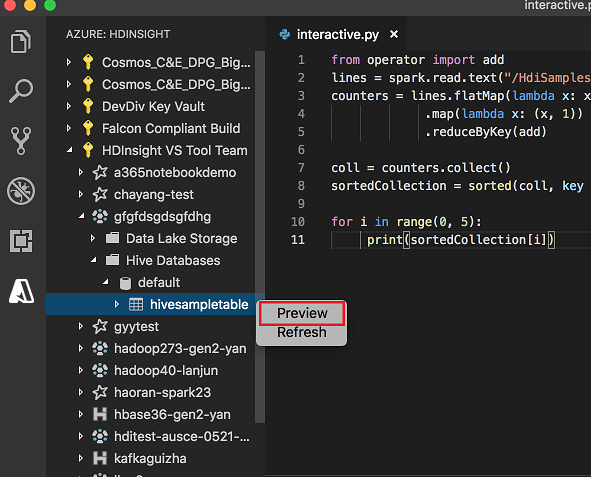
You can preview Hive Table in your clusters directly through the Azure HDInsight explorer:
Connect to your Azure account if you haven't yet done so.
Select the Azure icon from leftmost column.
From the left pane, expand AZURE: HDINSIGHT. The available subscriptions and clusters are listed.
Expand the cluster to view the Hive metadata database and table schema.
Right-click the Hive table. For example: hivesampletable. Select Preview.
The Preview Results window opens:
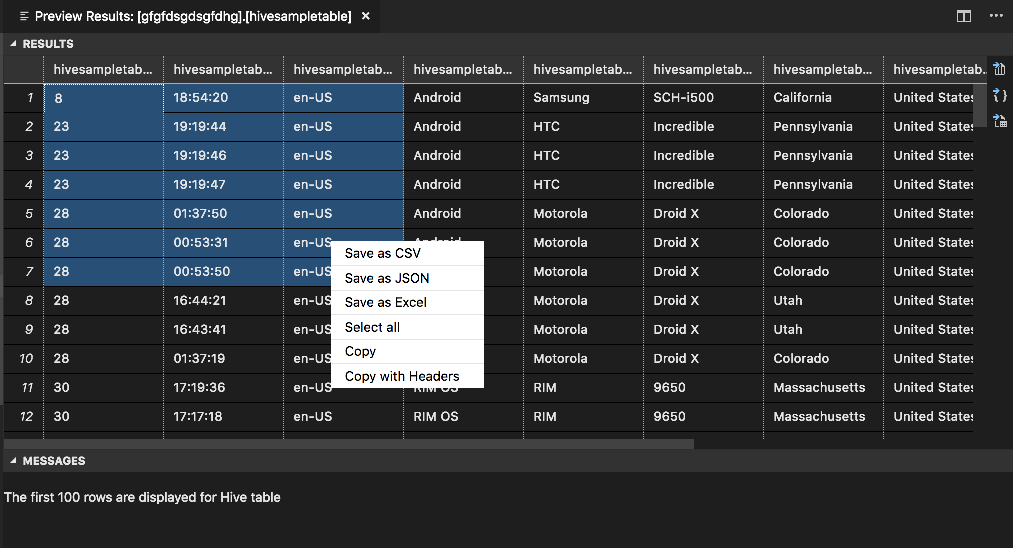
RESULTS panel
You can save the whole result as a CSV, JSON, or Excel file to a local path, or just select multiple lines.
MESSAGES panel
When the number of rows in the table is greater than 100, you see the following message: "The first 100 rows are displayed for Hive table."
When the number of rows in the table is less than or equal to 100, you see the following message: "60 rows are displayed for Hive table."
When there's no content in the table, you see the following message: "
0 rows are displayed for Hive table."Note
In Linux, install xclip to enable copy-table data.

Additional features
Spark & Hive for Visual Studio Code also supports the following features:
IntelliSense autocomplete. Suggestions pop up for keywords, methods, variables, and other programming elements. Different icons represent different types of objects:

IntelliSense error marker. The language service underlines editing errors in the Hive script.
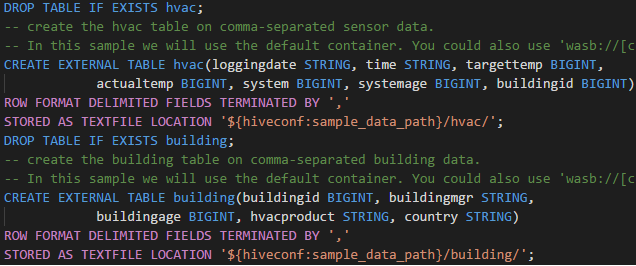
Syntax highlights. The language service uses different colors to differentiate variables, keywords, data type, functions, and other programming elements:
Reader-only role
Users who are assigned the reader-only role for the cluster can't submit jobs to the HDInsight cluster, nor view the Hive database. Contact the cluster administrator to upgrade your role to HDInsight Cluster Operator in the Azure portal. If you have valid Ambari credentials, you can manually link the cluster by using the following guidance.
Browse the HDInsight cluster
When you select the Azure HDInsight explorer to expand an HDInsight cluster, you're prompted to link the cluster if you have the reader-only role for the cluster. Use the following method to link to the cluster by using your Ambari credentials.
Submit the job to the HDInsight cluster
When submitting job to an HDInsight cluster, you're prompted to link the cluster if you're in the reader-only role for the cluster. Use the following steps to link to the cluster by using Ambari credentials.
Link to the cluster
Enter a valid Ambari username.
Enter a valid password.
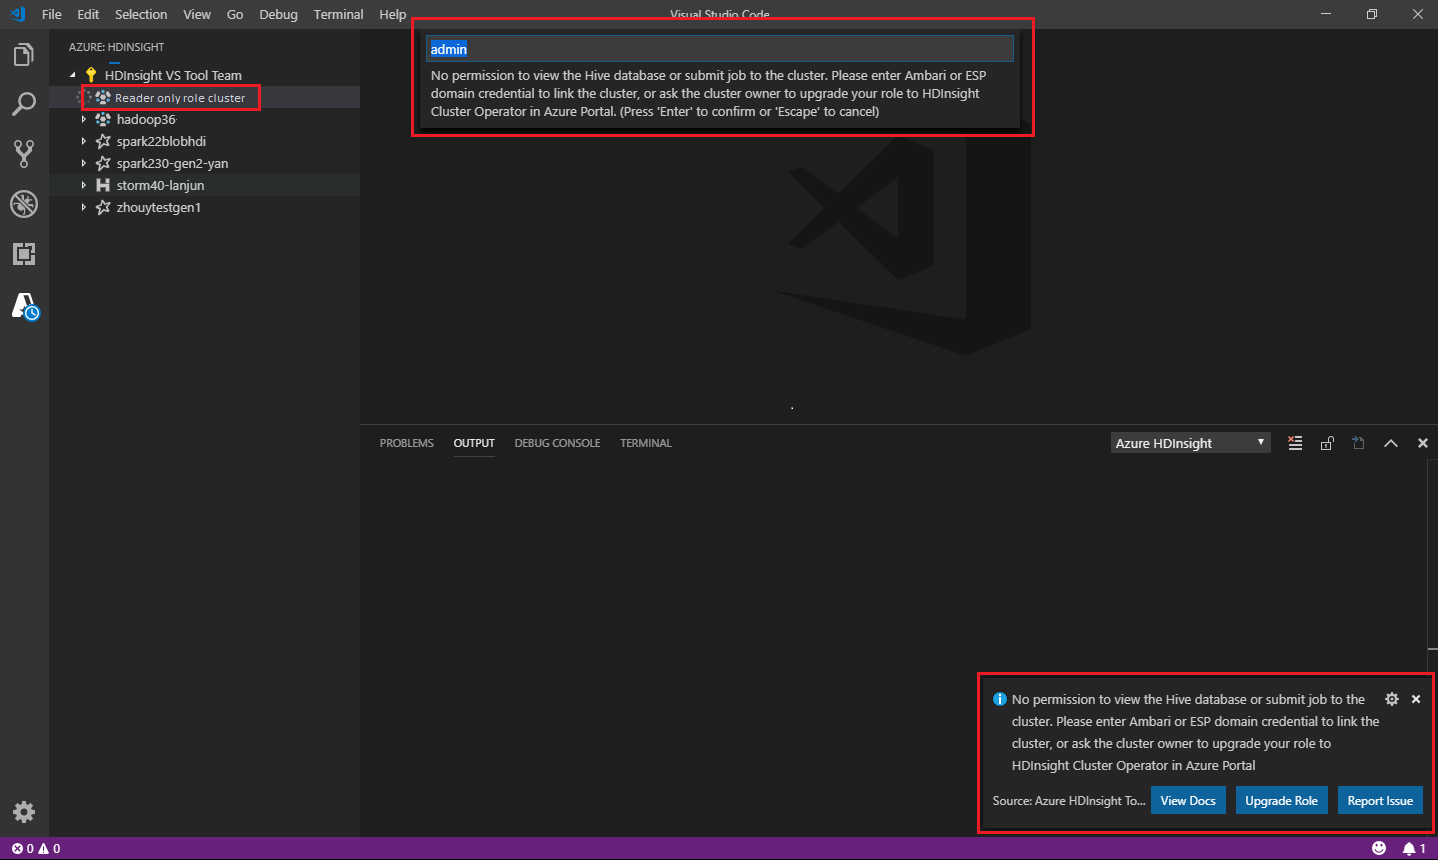

Note
You can use
Spark / Hive: List Clusterto check the linked cluster:
Azure Data Lake Storage Gen2
Browse a Data Lake Storage Gen2 account
Select the Azure HDInsight explorer to expand a Data Lake Storage Gen2 account. You're prompted to enter the storage access key if your Azure account has no access to Gen2 storage. After the access key is validated, the Data Lake Storage Gen2 account is auto-expanded.
Submit jobs to an HDInsight cluster with Data Lake Storage Gen2
Submit a job to an HDInsight cluster using Data Lake Storage Gen2. You're prompted to enter the storage access key if your Azure account has no write access to Gen2 storage. After the access key is validated, the job will be successfully submitted.

Note
You can get the access key for the storage account from the Azure portal. For more information, see Manage storage account access keys.
Unlink cluster
From the menu bar, go to View > Command Palette, and then enter Spark / Hive: Unlink a Cluster.
Select a cluster to unlink.
See the OUTPUT view for verification.
Sign out
From the menu bar, go to View > Command Palette, and then enter Azure: Sign Out.
Known Issues
Synapse PySpark installation error.
For Synapse PySpark installation error, since its dependency will not be maintained anymore by other team, it will not be maintained anymore. If you try to use Synapse Pyspark interactive, please use Azure Synapse Analytics instead. And it's a long term change.

Next steps
For a video that demonstrates using Spark & Hive for Visual Studio Code, see Spark & Hive for Visual Studio Code.