Tutorial: Create a child DNS zone
You can use Azure DNS to add child DNS zones for your subdomains to the parent DNS zone.
In this tutorial, you learn how to:
- Create a child DNS zone via parent DNS zone.
- Create a child DNS zone via new DNS zone.
- Verify NS Delegation for the new child DNS zone.
If you don’t have an Azure subscription, create a free account before you begin.
Prerequisites
- An Azure account with an active subscription. If you don't have one, you can create an account for free.
- A parent Azure DNS zone. If you don't have one, you can create a DNS zone.
Note
In this tutorial, contoso.com is used for the parent zone and subdomain.contoso.com for the child zone. Replace contoso.com with your parent domain name and subdomain with your child domain.
There are two ways you can create your child DNS zone:
- Through the Overview page of the parent DNS zone.
- Through the Create DNS zone page.
Sign in to Azure
Sign in to the Azure portal.
Create a child DNS zone via parent DNS zone Overview page
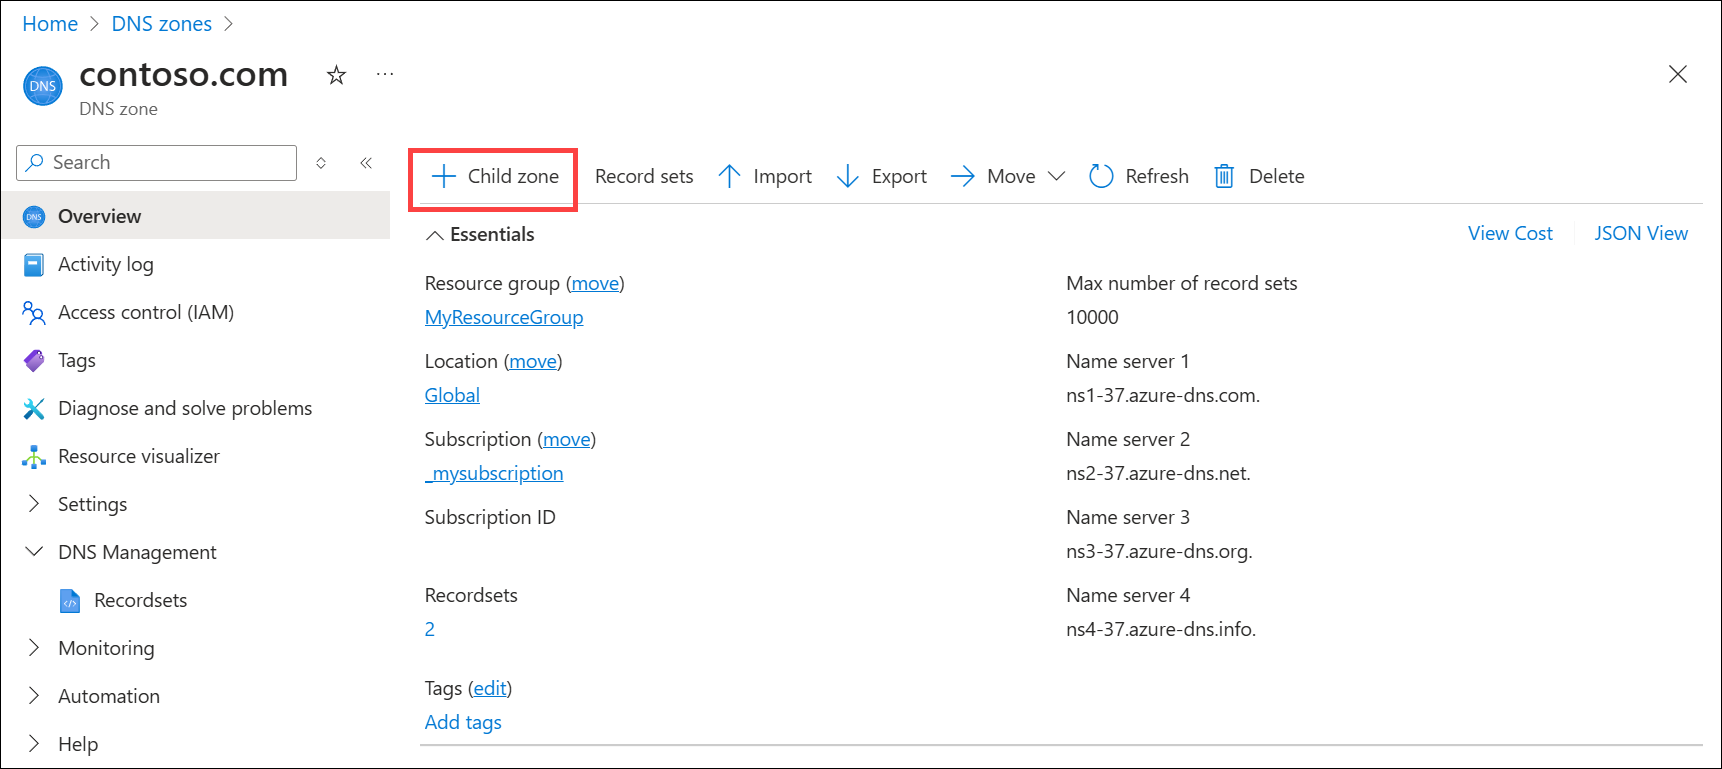
You'll create a new child DNS zone and delegate it to the parent DNS zone using the + Child Zone button from parent zone Overview page. By using this button to create a child zone, the parent parameters are automatically pre-populated.
In the Azure portal, enter contoso.com in the search box at the top of the portal and then select contoso.com DNS zone from the search results.
In the Overview page, select the + Child zone button.

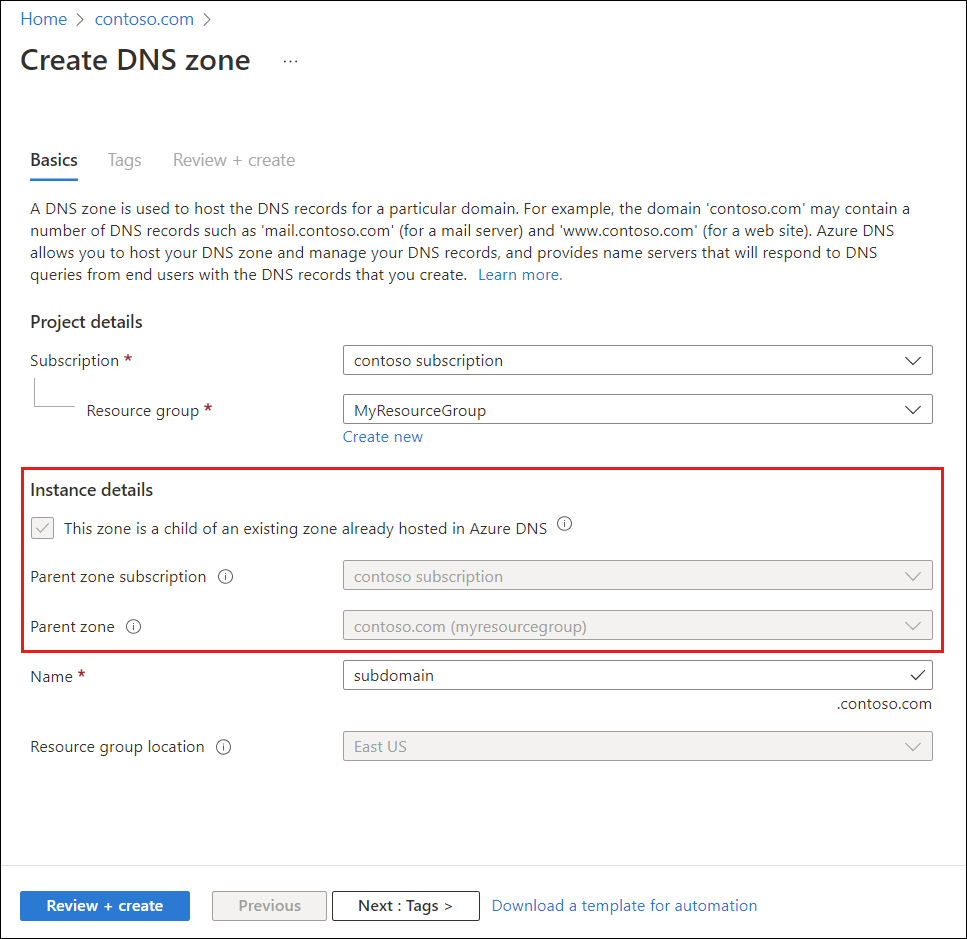
In the Create DNS zone, enter or select this information in the Basics tab:
Setting Value Project details Subscription Select your Azure subscription. Resource group Select an existing resource group for the child zone or create a new one by selecting Create new.
In this tutorial, the resource group MyResourceGroup of the parent DNS zone is selected.Instance details Name Enter your child zone name. In this tutorial, subdomain is used. Notice that the parent DNS zone name contoso.comis automatically added as a suffix to Name.Resource group location The resource group location is selected for you if you select an existing resource group for the child zone.
Select the resource group location if you create a new resource group for the child zone.
The resource group location doesn't affect your DNS zone service, which is global and not bound to a location.
Note
Parent zone information is automatically pre-populated when adding a child zone from the parent zone.
Select Review + create.
Select Create. It may take a few minutes to create the child zone.
Create a child DNS zone via Create DNS zone
You'll create a new child DNS zone and delegate it to the parent DNS zone using the Create DNS zone page.
On the Azure portal menu or from the Home page, select Create a resource and then select Networking.
Select DNS zone and then select the Create button.
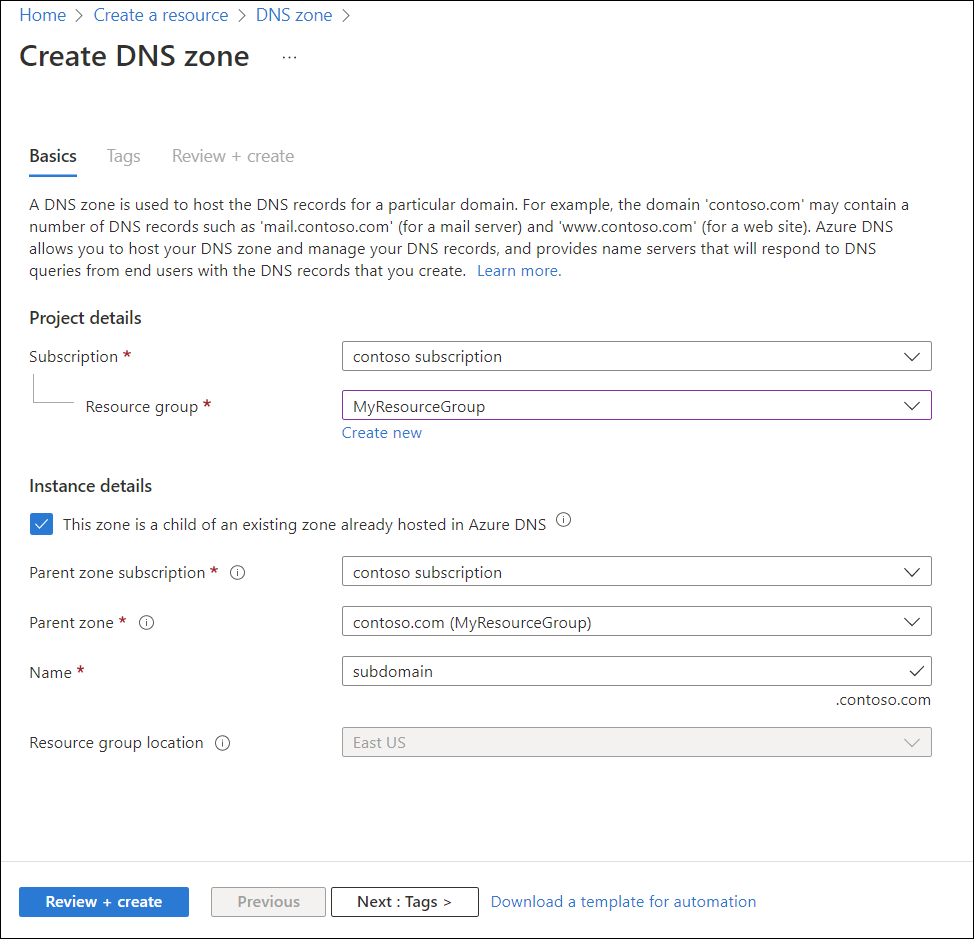
In Create DNS zone, enter or select this information in the Basics tab:
Setting Value Project details Subscription Select your Azure subscription. Resource group Select an existing resource group or create a new one by selecting Create new.
In this tutorial, the resource group MyResourceGroup of the parent DNS zone is selected.Instance details This zone is a child of an existing zone already hosted in Azure DNS Select this checkbox. Parent zone subscription Select your Azure subscription under which parent DNS zone contoso.comwas created.Parent zone In the search bar, enter contoso.com to load it in dropdown list. Once loaded, select it from dropdown list. Name Enter your child zone name. In this tutorial, subdomain is used. Notice that the parent DNS zone name contoso.comis automatically added as a suffix to Name after you selected parent zone from the previous step.Resource group location The resource group location is selected for you if you select an existing resource group for the child zone.
Select the resource group location if you create a new resource group for the child zone.
The resource group location doesn't affect your DNS zone service, which is global and not bound to a location.
Select Review + create.
Select Create. It may take a few minutes to create the zone.
Verify the child DNS zone
After the new child DNS zone subdomain.contoso.com created, verify that the delegation configured correctly. You'll need to check that your child zone name server (NS) records are in the parent zone as described below.
Retrieve name servers of child DNS zone
In the Azure portal, enter subdomain.contoso.com in the search box at the top of the portal and then select subdomain.contoso.com DNS zone from the search results.
Retrieve the name servers from the DNS zone Overview page. In this example, the zone
subdomain.contoso.comhas been assigned name serversns1-05.azure-dns.com.,ns2-05.azure-dns.net.,ns3-05.azure-dns.org., andns4-05.azure-dns.info.:
Check the NS record set in parent DNS zone
After retrieving the name servers from the child DNS zone, check that the parent DNS zone contoso.com has the NS record set entry for its child zone name servers.
In the Azure portal, enter contoso.com in the search box at the top of the portal and then select contoso.com DNS zone from the search results.
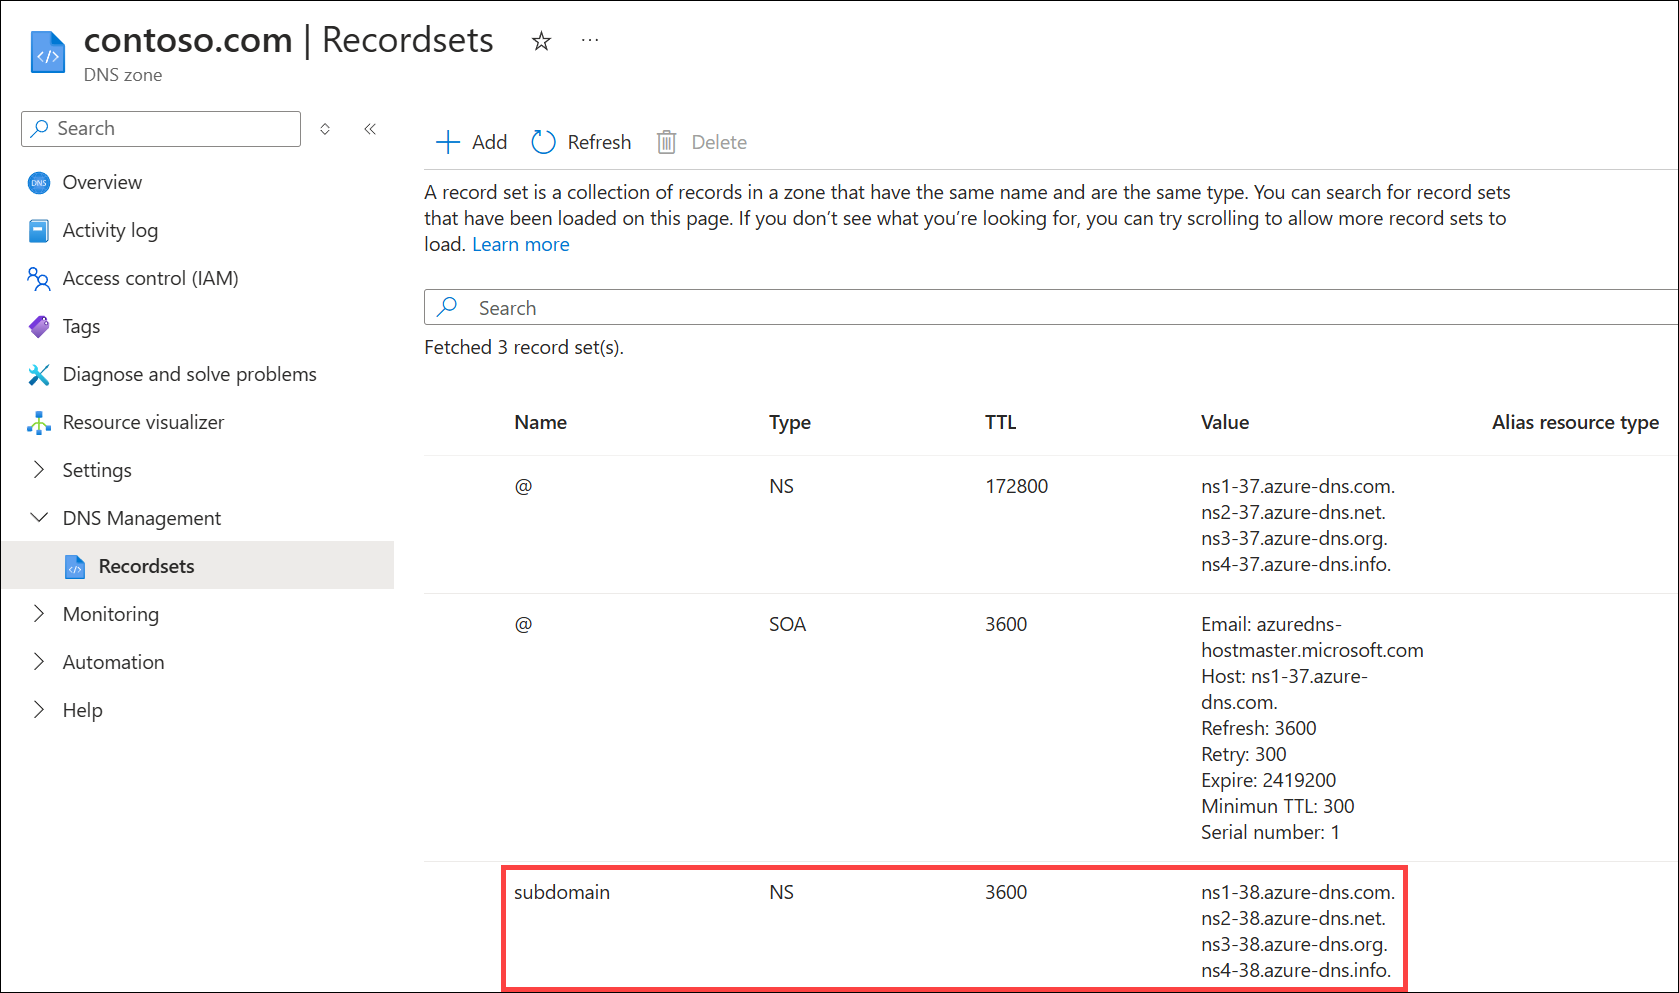
Check the record sets under Recordsets for the contoso.com DNS zone.
You'll find a record set of type NS and name subdomain created in the parent DNS zone. Compare the name servers in this record set with the ones you retrieved from the child DNS zone. The NS records should match.
Clean up resources
When no longer needed, you can delete all resources created in this tutorial by following these steps:
- On the Azure portal menu, select All resources.
- Select subdomain.contoso.com DNS zone.
- On the Overview page, select the Delete zone button.
- Enter subdomain.contoso.com and select Delete.
- Select All resources again from the Azure portal menu.
- Select contoso.com DNS zone.
- On the Overview page, select the subdomain record.
- Select Delete and then Yes.
Next steps
In this tutorial, you learned how to create a child zone in Azure DNS for your subdomain. To learn how to create custom DNS records for web apps, continue with the next tutorial:

