About SQL Server Backup in Azure VMs
Azure Backup offers a stream-based, specialized solution to back up SQL Server running in Azure VMs. This solution aligns with Azure Backup's benefits of zero-infrastructure backup, long-term retention, and central management. It additionally provides the following advantages specifically for SQL Server:
- Workload aware backups that support all backup types - full, differential, and log
- 15 minute RPO (recovery point objective) with frequent log backups
- Point-in-time recovery up to a second
- Individual database level back up and restore
To view the backup and restore scenarios that we support today, see the support matrix.
Backup process
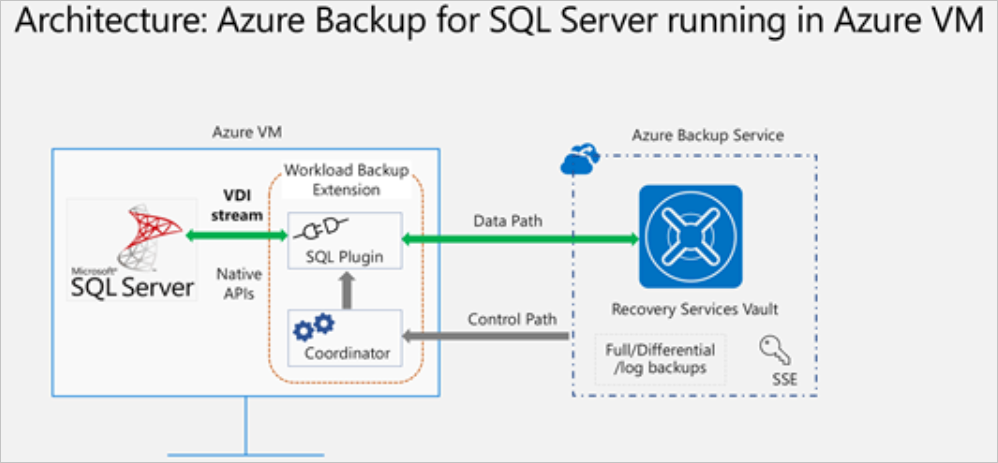
This solution leverages the SQL native APIs to take backups of your SQL databases.
Once you specify the SQL Server VM that you want to protect and query for the databases in it, Azure Backup service will install a workload backup extension on the VM by the name
AzureBackupWindowsWorkloadextension.This extension consists of a coordinator and a SQL plugin. While the coordinator is responsible for triggering workflows for various operations like configure backup, backup and restore, the plugin is responsible for actual data flow.
To be able to discover databases on this VM, Azure Backup creates the account
NT SERVICE\AzureWLBackupPluginSvc. This account is used for backup and restore and requires SQL sysadmin permissions. TheNT SERVICE\AzureWLBackupPluginSvcaccount is a Virtual Service Account, and so doesn't require any password management. Azure Backup uses theNT AUTHORITY\SYSTEMaccount for database discovery/inquiry, so this account needs to be a public login on SQL. If you didn't create the SQL Server VM from Azure Marketplace, you might receive an error UserErrorSQLNoSysadminMembership. If this occurs follow these instructions.Once you trigger configure protection on the selected databases, the backup service sets up the coordinator with the backup schedules and other policy details, which the extension caches locally on the VM.
At the scheduled time, the coordinator communicates with the plugin and it starts streaming the backup data from the SQL server using VDI.
The plugin sends the data directly to the Recovery Services vault, thus eliminating the need for a staging location. The data is encrypted and stored by the Azure Backup service in storage accounts.
When the data transfer is complete, coordinator confirms the commit with the backup service.
Before you start
Before you start, verify the following requirements:
- Make sure you have a SQL Server instance running in Azure. You can quickly create a SQL Server instance in the marketplace.
- Review the feature considerations and scenario support.
- Review common questions about this scenario.
Set VM permissions
When you run discovery on a SQL Server, Azure Backup does the following:
- Adds the AzureBackupWindowsWorkload extension.
- Creates an NT SERVICE\AzureWLBackupPluginSvc account to discover databases on the virtual machine. This account is used for a backup and restore and requires SQL sysadmin permissions.
- Discovers databases that are running on a VM, Azure Backup uses the NT AUTHORITY\SYSTEM account. This account must be a public sign-in on SQL.
If you didn't create the SQL Server VM in Azure Marketplace or if you're on SQL 2008 or 2008 R2, you might receive a UserErrorSQLNoSysadminMembership error.
For giving permissions in the case of SQL 2008 and 2008 R2 running on Windows 2008 R2, refer to here.
For all other versions, fix permissions with the following steps:
Use an account with SQL Server sysadmin permissions to sign in to SQL Server Management Studio (SSMS). Unless you need special permissions, Windows authentication should work.
On the SQL Server, open the Security/Logins folder.
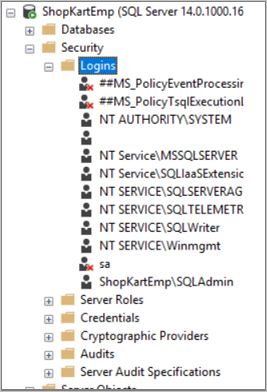
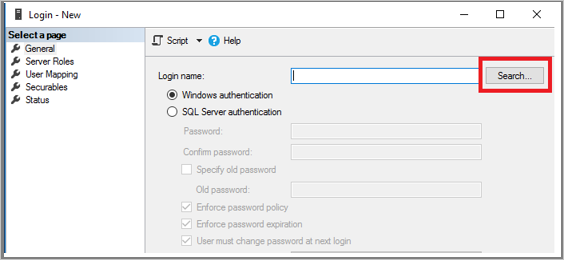
Right-click the Logins folder and select New Login. In Login - New, select Search.
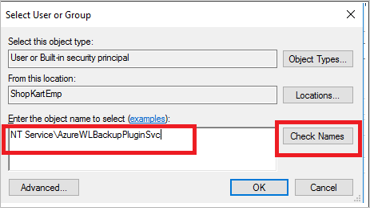
The Windows virtual service account NT SERVICE\AzureWLBackupPluginSvc was created during the virtual machine registration and SQL discovery phase. Enter the account name as shown in Enter the object name to select. Select Check Names to resolve the name. Select OK.
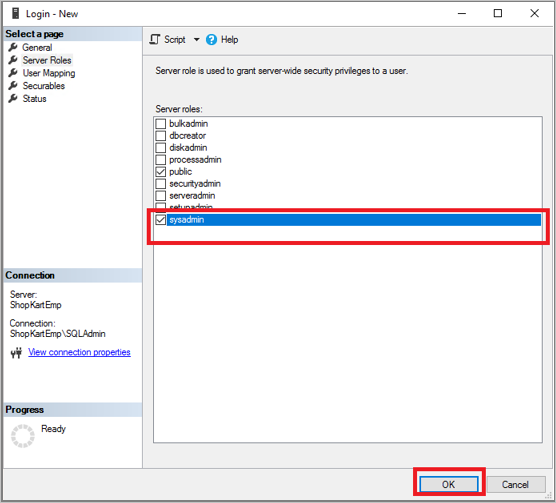
In Server Roles, make sure the sysadmin role is selected. Select OK. The required permissions should now exist.
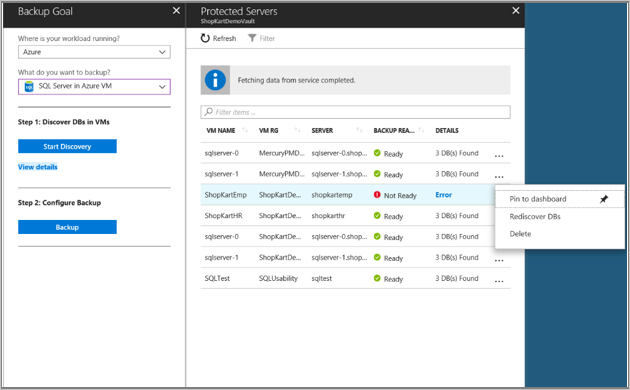
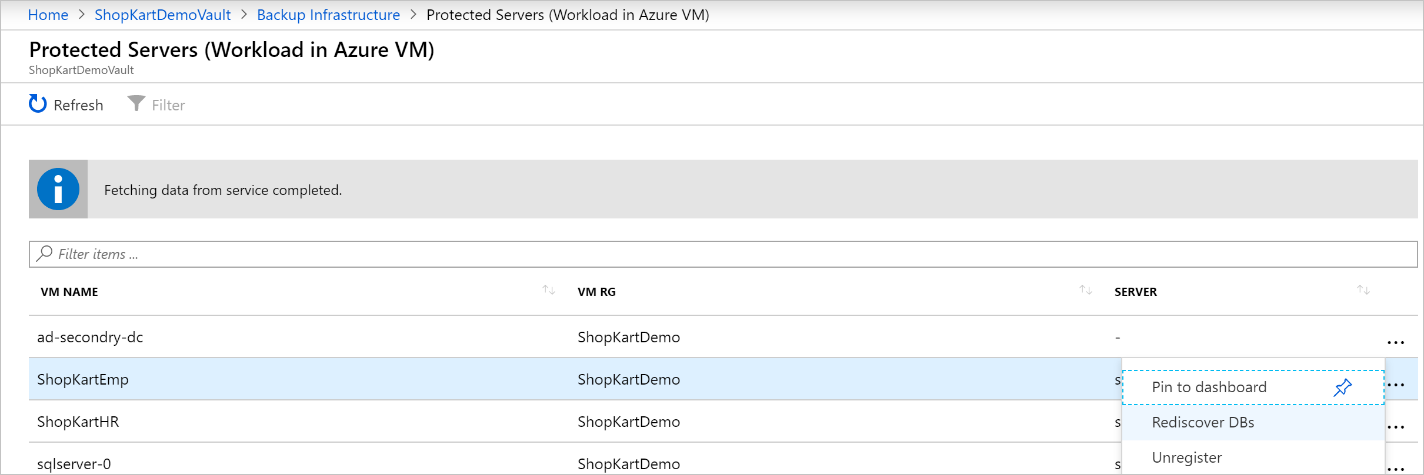
Now associate the database with the Recovery Services vault. In the Azure portal, in the Protected Servers list, right-click the server that's in an error state > Rediscover DBs.
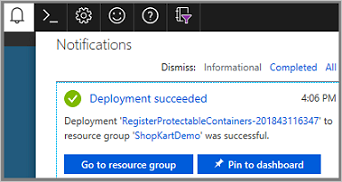
Check progress in the Notifications area. When the selected databases are found, a success message appears.
Note
If your SQL Server has multiple instances of SQL Server installed, then you must add sysadmin permission for NT Service\AzureWLBackupPluginSvc account to all SQL instances.
Give SQL sysadmin permissions for SQL 2008 and SQL 2008 R2
Add NT AUTHORITY\SYSTEM and NT Service\AzureWLBackupPluginSvc logins to the SQL Server Instance:
Go the SQL Server Instance in the Object explorer.
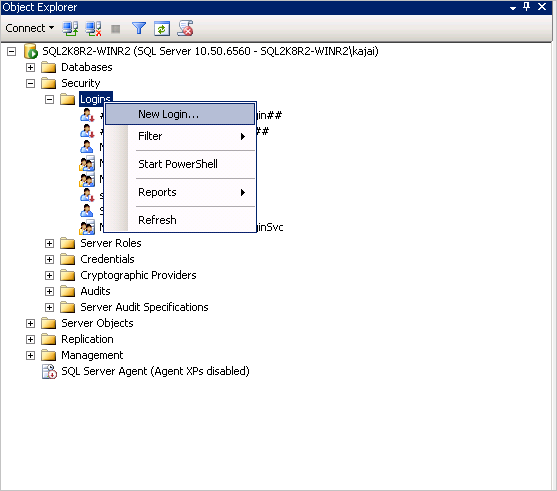
Navigate to Security -> Logins
Right-click the logins and select New Login…
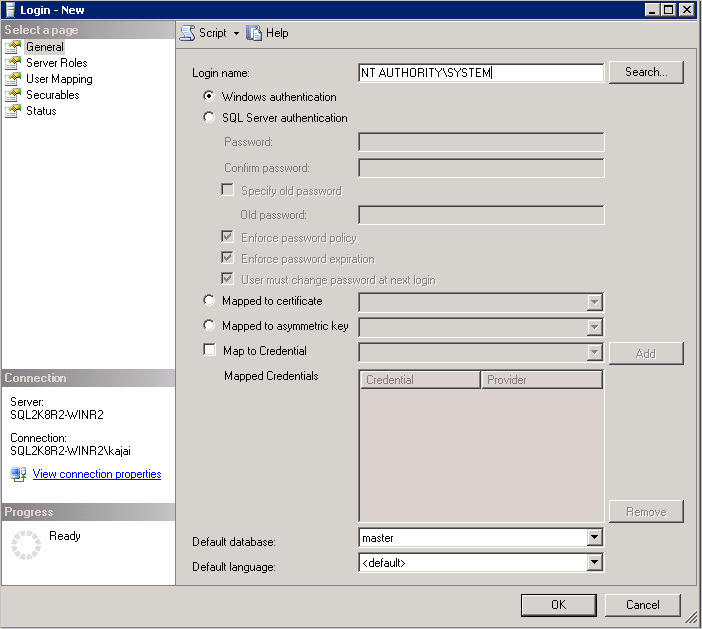
Go to the General tab and enter NT AUTHORITY\SYSTEM as the Login Name.
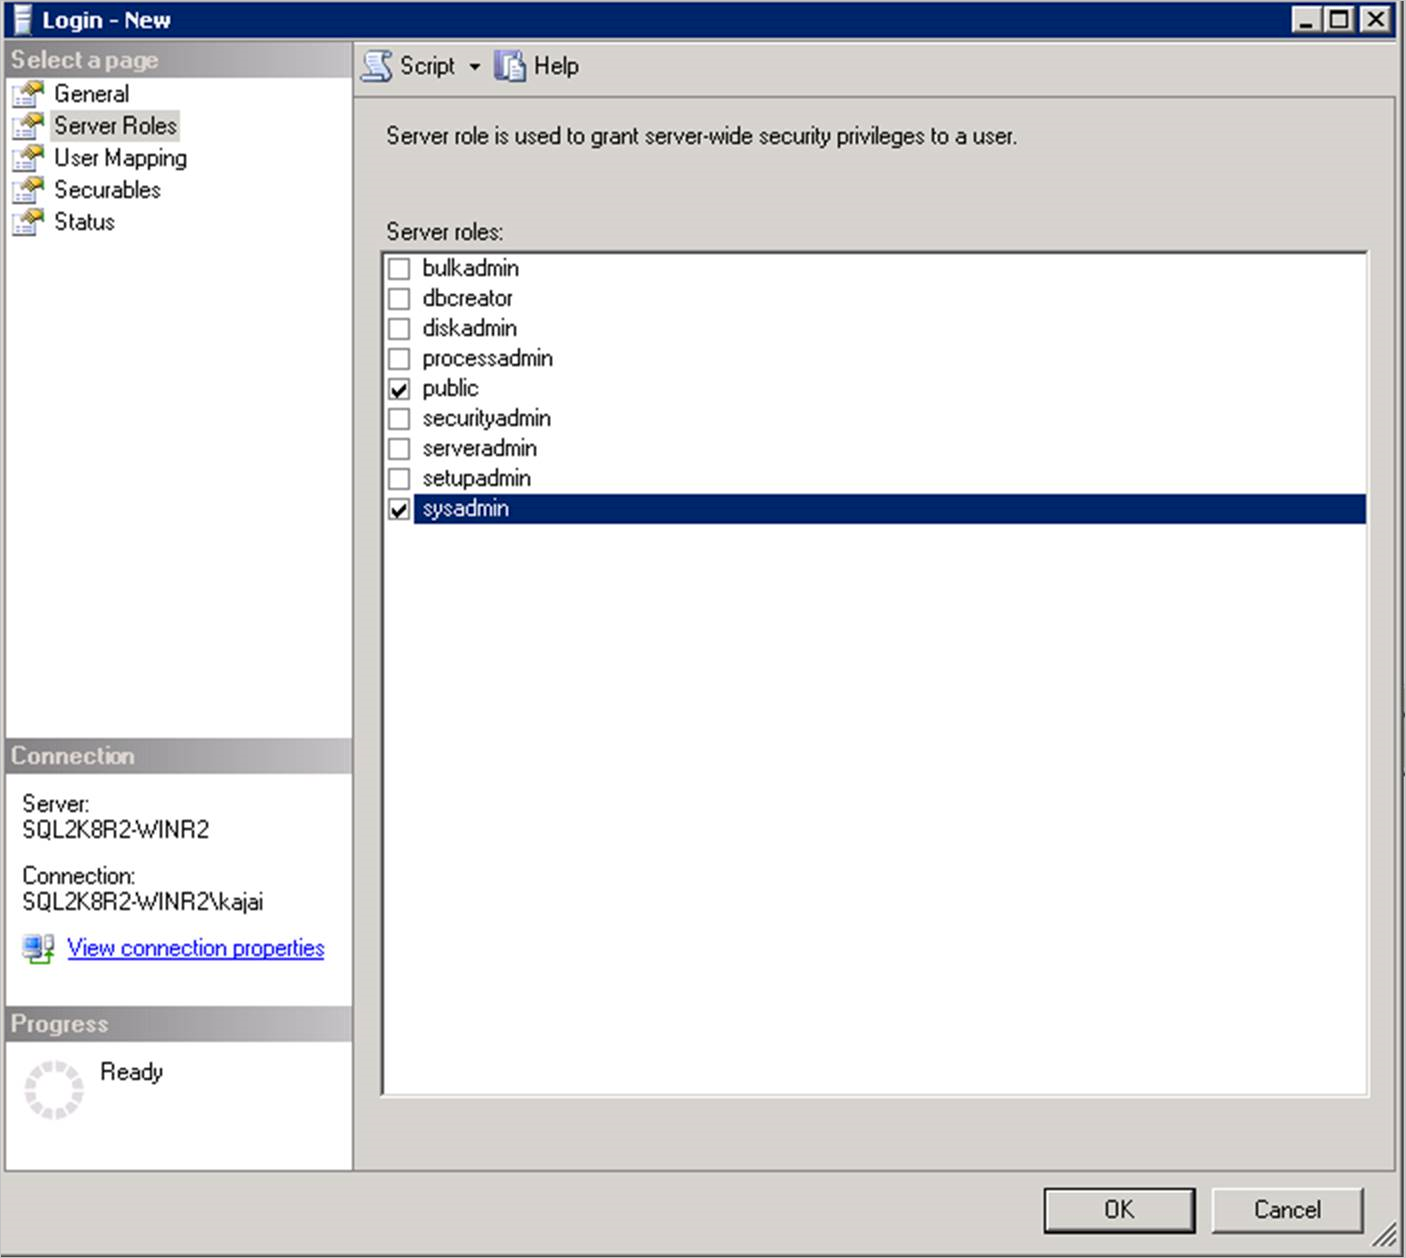
Go to Server Roles and choose public and sysadmin roles.
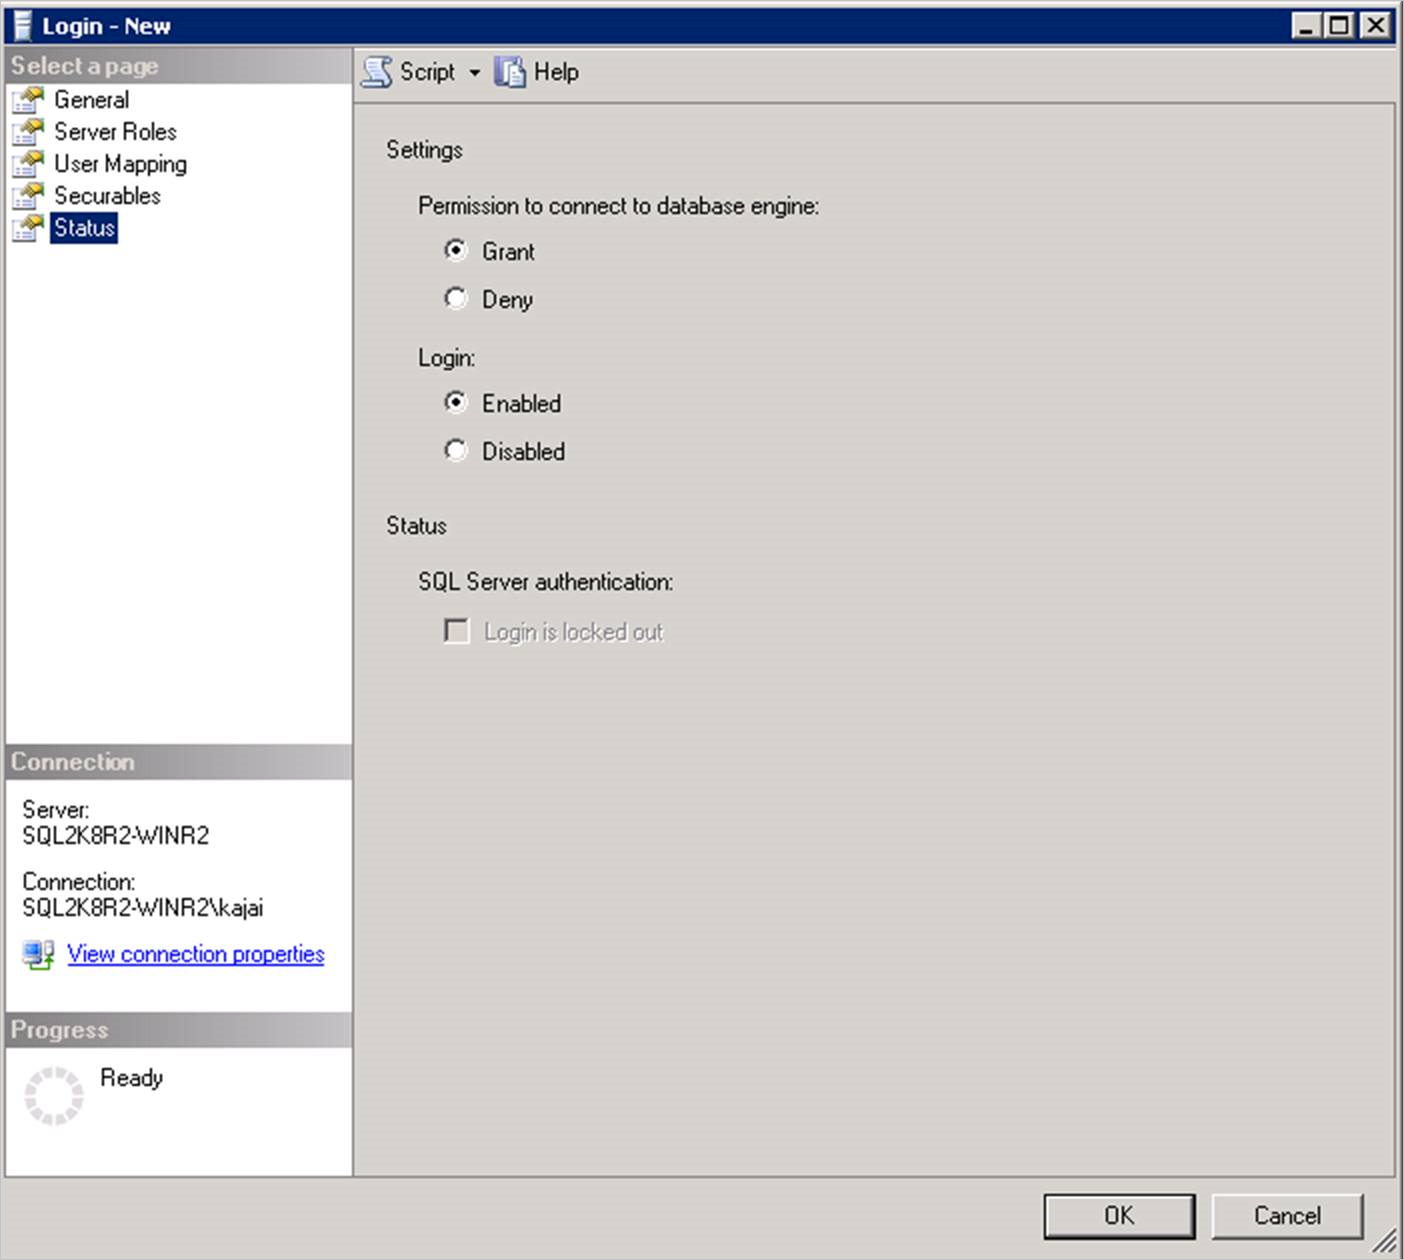
Go to Status. Grant the Permission to connect to database engine and Login as Enabled.
Select OK.
Repeat the same sequence of steps (1-7 above) to add NT Service\AzureWLBackupPluginSvc login to the SQL Server instance. If the login already exists, make sure it has the sysadmin server role and under Status it has Grant the Permission to connect to database engine and Login as Enabled.
After granting permission, Rediscover DBs in the portal: Vault -> Manage -> Backup Infrastructure -> Workload in Azure VM:
Alternatively, you can automate giving the permissions by running the following PowerShell commands in admin mode. The instance name is set to MSSQLSERVER by default. Change the instance name argument in script if needed.
param(
    [Parameter(Mandatory=$false)]
    [string] $InstanceName = "MSSQLSERVER"
)
if ($InstanceName -eq "MSSQLSERVER")
{
    $fullInstance = $env:COMPUTERNAME   # In case it is the default SQL Server Instance
}
else
{
    $fullInstance = $env:COMPUTERNAME + "\" + $InstanceName   # In case of named instance
}
try
{
    sqlcmd.exe -S $fullInstance -Q "sp_addsrvrolemember 'NT Service\AzureWLBackupPluginSvc', 'sysadmin'" # Adds login with sysadmin permission if already not available
}
catch
{
    Write-Host "An error occurred:"
    Write-Host $_.Exception|format-list -force
}
try
{
    sqlcmd.exe -S $fullInstance -Q "sp_addsrvrolemember 'NT AUTHORITY\SYSTEM', 'sysadmin'" # Adds login with sysadmin permission if already not available
}
catch
{
    Write-Host "An error occurred:"
    Write-Host $_.Exception|format-list -force
}
Configure simultaneous backups
You can now configure backups to save the SQL server recovery points and logs in a local storage and Recovery Services vault simultaneously.
To configure simultaneous backups, follow these steps:
Go to the
C:\Program Files\Azure Workload Backup\bin\pluginslocation, and then create the file PluginConfigSettings.json, if it's not present.Add the comma separated key value entities, with keys
EnableLocalDiskBackupForBackupTypesandLocalDiskBackupFolderPathto the JSON file.Under
EnableLocalDiskBackupForBackupTypes, list the backup types that you want to store locally.For example, if you want to store the Full and Log backups, mention
["Full", "Log"]. To store only the log backups, mention["Log"].Under
LocalDiskBackupFolderPath, mention the path to the local folder. Ensure that you use the double forward slash while mentioning the path in the JSON file.For example, if the preferred path for local backup is
E:\LocalBackup, mention the path in JSON asE:\\LocalBackup.The final JSON should appear as:
{
   "EnableLocalDiskBackupForBackupTypes": ["Log"],
   "LocalDiskBackupFolderPath": "E:\\LocalBackup",
}
If there are other pre-populated entries in the JSON file, add the above two entries at the bottom of the JSON file just before the closing curly bracket.
For the changes to take effect immediately instead of regular one hour, go to TaskManager > Services, right-click AzureWLbackupPluginSvc and select Stop.
Caution
This action will cancel all the ongoing backup jobs.
The naming convention of the stored backup file and the folder structure for it will be
{LocalDiskBackupFolderPath}\{SQLInstanceName}\{DatabaseName}.For example, if you have a database
Contosounder the SQL instanceMSSQLSERVER, the files will be located at inE:\LocalBackup\MSSQLSERVER\Contoso.The name of the file is the
VDI device set guid, which is used for the backup operation.Check if the target location under
LocalDiskBackupFolderPathhas read and write permissions forNT Service\AzureWLBackupPluginSvc.Note
For a folder on the local VM disks, right-click the folder and configure the required permissions for
NT Service\AzureWLBackupPluginSvcon the Security tab.If you're using a network or SMB share, configure the permissions by running the below PowerShell cmdlets from a user console that already has the permission to access the share:
$cred = Get-Credential New-SmbGlobalMapping -RemotePath <FileSharePath> -Credential $cred -LocalPath <LocalDrive>: -FullAccess @("<Comma Separated list of accounts>") -Persistent $trueExample:
$cred = Get-Credential
New-SmbGlobalMapping -RemotePath \\i00601p1imsa01.file.core.windows.net\rsvshare -Credential $cred -LocalPath Y:  -FullAccess @("NT AUTHORITY\SYSTEM","NT Service\AzureWLBackupPluginSvc") -Persistent $true
Next steps
- Learn about backing up SQL Server databases.
- Learn about restoring backed up SQL Server databases.
- Learn about managing backed up SQL Server databases.