You can convert an existing database in Azure SQL Database to Hyperscale using the Azure portal, the Azure CLI, PowerShell, or Transact-SQL.
Cutover
The conversion process is divided into two stages - the conversion of database, which occurs while the existing database is online, and then a cutover to the new Hyperscale database.
The time required to move an existing database to Hyperscale consists of the time to copy data and the time to replay the changes made in the source database while copying data. The data copy time is proportional to data size. We recommend converting to Hyperscale during a lower write activity period so that the time to replay accumulated changes is shorter.
You'll only experience a short period of downtime, generally less than a minute, during the final cutover to Hyperscale. You have the ability to choose when the cutover occurs - as soon as the database is ready, or manually at a time of your choosing. By default, the process to convert to Hypersacle will cutover automatically.
Note
The ability to initiate a manual cutover for a conversion to Hyperscale is a preview feature.
In the current preview, during a conversion to Hyperscale, you have three days to initiate the manual cutover after the point when the database ready for cutover. You can initiate a manual cutover via the Azure portal, Azure CLI, PowerShell, or T-SQL.
Prerequisites
To convert a database that is a part of a geo-replication relationship, either as the primary or as a secondary, to Hyperscale, you need to first terminate geo-replication between the primary and secondary replica. Databases in a failover group must be removed from the group first.
Once a database has been moved to Hyperscale, you can create a new Hyperscale geo-replica for that database or add the database to a failover group.
Direct conversion from the Basic service tier to Hyperscale is not supported. To perform this conversion, first change the database to any service tier other than Basic (for example, General Purpose), and then proceed with the conversion to Hyperscale.
Convert a database to Hyperscale
To convert an existing Azure SQL Database to Hyperscale, first identify your target service objective.
Review resource limits for single databases if you aren't sure which service objective is right for your database. In many cases, you can choose a service objective with the same number of vCores and the same hardware generation as the original database. If needed, you can change the service objective later with minimal downtime. Billing for Hyperscale begins only after cutover.
Select the tab for your preferred method to convert your database:
The Azure portal enables you to convert to Hyperscale by modifying the service tier for your database.
Navigate to the database you wish to convert in the Azure portal.
In the left navigation bar, select Compute + storage.
Select the Service tier dropdown list to expand the options for service tiers.
If you were using the Azure SQL Database free offer, select the button to remove the Free database offer. Then you'll see the Service tier dropdown list.
Select Hyperscale from the dropdown list.
Review the Compute tier and choose Provisioned or Serverless.
Review the Cutover mode, a choice specific to conversion to Hyperscale.
The cutover occurs after the database is prepared for conversion to Hyperscale. Cutover mode determines when connectivity to the existing Azure SQL Database will be momentarily disrupted for the conversion to Hyperscale:
Automatic cutover performs the cutover as soon as the Hyperscale database is ready.
Manual cutover prompts you to initiate the cutover at a time of your choice in the Azure portal. This option is most useful to time the cutover for minimal business disruption.
Review the Hardware Configuration listed. If desired, select Change configuration to select the appropriate hardware configuration for your workload.
Select the vCores slider if you wish to change the number of vCores available for your database under the Hyperscale service tier.
Select the High-Availability Secondary Replicas slider if you wish to change the number of replicas under the Hyperscale service tier.
Select Apply.
Monitor the conversion in the Azure portal.
Navigate to the database in the Azure portal.
In the left navigation bar, select Overview.
Review the Notifications section at the bottom of the right pane. If operations are ongoing, a notification box appears.
Select the notification box to view details.
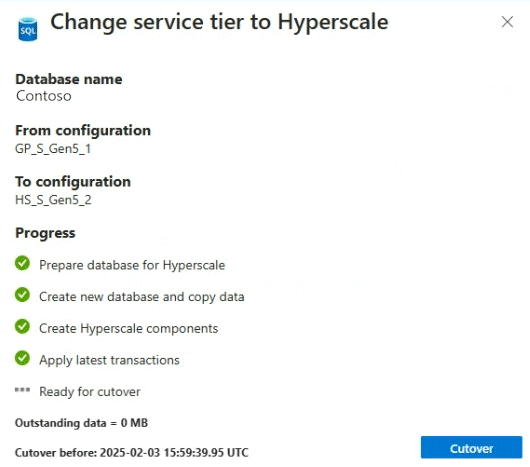
The Ongoing operations pane opens. Review the details of the ongoing operations.
If you selected Manual cutover, the Azure portal will present you a Cutover button when ready.
This code sample calls az sql db update to convert an existing Azure SQL Database to Hyperscale. You must specify both the edition and service objective. Replace resourceGroupName, serverName, databaseName, and serviceObjective with the appropriate values before running the following code sample:
resourceGroupName="myResourceGroup"
serverName="server01"
databaseName="mySampleDatabase"
serviceObjective="HS_Gen5_2"

az sql db update -g $resourceGroupName -s $serverName -n $databaseName \
    --edition Hyperscale --service-objective $serviceObjective
Use --manual-cutover to choose to manually initiate the cutover to Hyperscale at a time of your choice. This option is most useful to time the cutover for minimal business disruption. For example:
resourceGroupName="myResourceGroup"
serverName="server01"
databaseName="mySampleDatabase"
serviceObjective="HS_Gen5_2"

az sql db update -g $resourceGroupName -s $serverName -n $databaseName --edition Hyperscale --service-objective $serviceObjective --manual-cutover
Monitor the ongoing operation with az sql db op list, to return recent or ongoing operations for a database in Azure SQL Database.
resourceGroupName="myResourceGroup"
serverName="server01"
databaseName="mySampleDatabase"

az sql db op list -g $resourceGroupName -s $serverName -n $databaseName
Use --perform-cutover to initiate the cutover (within 3 days) once the Hyperscale database is ready:
az sql db update -g $resourceGroupName -s $serverName -n $databaseName --perform-cutover
The following example uses the Set-AzSqlDatabase cmdlet to convert an existing Azure SQL Database to Hyperscale. You must specify both the edition and service objective. Replace $resourceGroupName, $serverName, $databaseName, and $serviceObjective with the appropriate values before running this code sample:
Use -ManualCutover to manually initiate the cutover at a time of your choice. This option is most useful to time the cutover for minimal business disruption. For example:
Monitor the operation in progress with the Get-AzSqlDatabaseActivity cmdlet, which returns recent or ongoing operations for a database in Azure SQL Database. Set the $resourceGroupName, $serverName, and $databaseName parameters to the appropriate values for your database before running the sample code:
You must specify both the edition and service objective in the ALTER DATABASE statement.
This example statement converts a database named mySampleDatabase to Hyperscale with the HS_Gen5_2 service objective. Replace the database name with the appropriate value before executing the statement.
ALTER DATABASE [mySampleDatabase]
   MODIFY (EDITION = 'Hyperscale', SERVICE_OBJECTIVE = 'HS_Gen5_2');
GO
By default, the database will perform a cutover to the Hyperscale database to finish the conversion as soon as the Hyperscale database is available. Optionally, use the MANUAL_CUTOVER argument to instead start a conversion that will end with a manually initiated cutover, at a time of your choice. This option is most useful to time the cutover for minimal business disruption. For example:
ALTER DATABASE [mySampleDatabase]
   MODIFY (EDITION = 'Hyperscale', SERVICE_OBJECTIVE = 'HS_Gen5_2')
   WITH MANUAL_CUTOVER;
To monitor operations for a Hyperscale database, connect to the master database of your logical server and query sys.dm_operation_status. The sys.dm_operation_status makes reports the progress of database operations including the conversion to Hyperscale. If you chose MANUAL_CUTOVER, the sys.dm_operation_status view includes additional information.
SELECT *
FROM sys.dm_operation_status
WHERE major_resource_id = 'mySampleDatabase'
ORDER BY start_time DESC;
GO
When ready for manual cutover, the phase_desc will be WaitingForCutover. Use the PERFORM_CUTOVER argument to initiate the cutover:
ALTER DATABASE [mySampleDatabase] PERFORM_CUTOVER;