Create a computer group and group-managed service account for Azure Monitor SCOM Managed Instance
This article describes how to create a group-managed service account (gMSA) account, computer group, and domain user account in on-premises Active Directory.
Note
To learn about the Azure Monitor SCOM Managed Instance architecture, see Azure Monitor SCOM Managed Instance.
Active Directory prerequisites
To perform Active Directory operations, install the RSAT: Active Directory Domain Services and Lightweight Directory Tools feature. Then install the Active Directory Users and Computers tool. You can install this tool on any machine that has domain connectivity. You must sign in to this tool with admin permissions to perform all Active Directory operations.
Configure a domain account in Active Directory
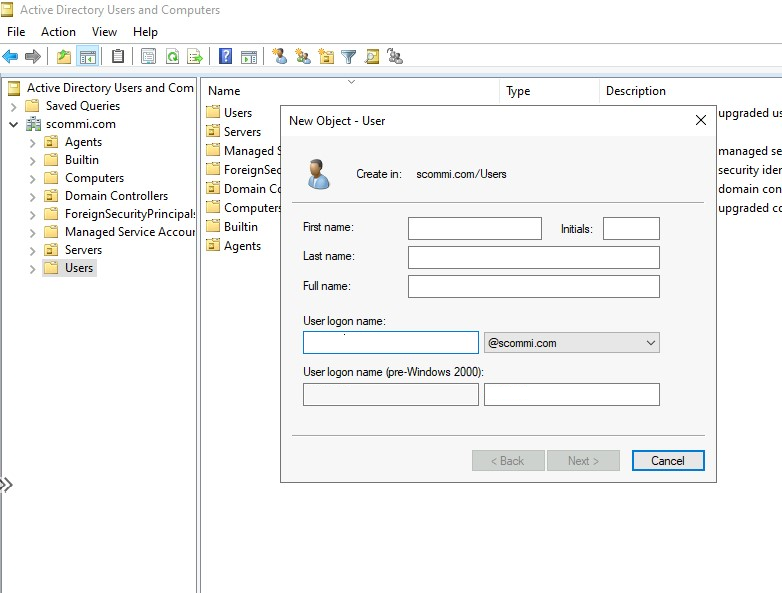
Create a domain account in your Active Directory instance. The domain account is a typical Active Directory account. (It can be a nonadmin account.) You use this account to add the System Center Operations Manager management servers to your existing domain.

Ensure that this account has the permissions to join other servers to your domain. You can use an existing domain account if it has these permissions.
You use the configured domain account in later steps to create an instance of SCOM Managed Instance and subsequent steps.
Create and configure a computer group
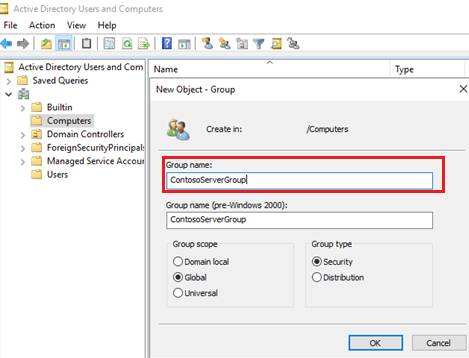
Create a computer group in your Active Directory instance. For more information, see Create a group account in Active Directory. All the management servers that you create will be a part of this group so that all the members of the group can retrieve gMSA credentials. (You create these credentials in later steps.) The group name can't contain spaces and must have alphabet characters only.

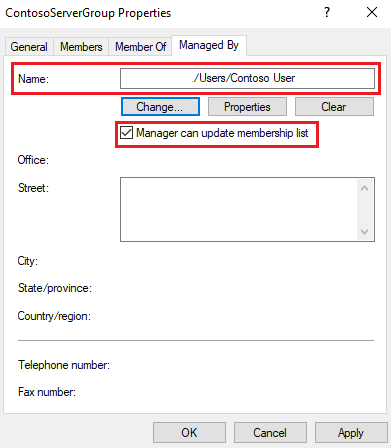
To manage this computer group, provide permissions to the domain account that you created.
Select the group properties, and then select Managed By.
For Name, enter the name of the domain account.
Select the Manager can update membership list checkbox.

Create and configure a gMSA account
Create a gMSA to run the management server services and to authenticate the services. Use the following PowerShell command to create a gMSA service account. The DNS host name can also be used to configure the static IP and associate the same DNS name to the static IP as in step 8.
New-ADServiceAccount ContosogMSA -DNSHostName "ContosoLB.aquiladom.com" -PrincipalsAllowedToRetrieveManagedPassword "ContosoServerGroup" -KerberosEncryptionType AES128, AES256 -ServicePrincipalNames MSOMHSvc/ContosoLB.aquiladom.com, MSOMHSvc/ContosoLB, MSOMSdkSvc/ContosoLB.aquiladom.com, MSOMSdkSvc/ContosoLB
In that command:
ContosogMSAis the gMSA name.ContosoLB.aquiladom.comis the DNS name for the load balancer. Use the same DNS name to create the static IP and associate the same DNS name to the static IP as in step 8.ContosoServerGroupis the computer group created in Active Directory (specified previously).MSOMHSvc/ContosoLB.aquiladom.com,SMSOMHSvc/ContosoLB,MSOMSdkSvc/ContosoLB.aquiladom.com, andMSOMSdkSvc/ContosoLBare service principal names.
Note
If the gMSA name is longer than 14 characters, ensure that you set SamAccountName at less than 15 characters, including the $ sign.
If the root key isn't effective, use the following command:
Add-KdsRootKey -EffectiveTime ((get-date).addhours(-10))
Ensure that the created gMSA account is a local admin account. If there are any Group Policy Object policies on the local admins at the Active Directory level, ensure that they have the gMSA account as the local admin.
Important
To minimize the need for extensive communication with both your Active Directory admin and the network admin, see Self-verification. The article outlines the procedures that the Active Directory admin and network admin use to validate their configuration changes and ensure their successful implementation. This process reduces unnecessary back-and-forth interactions from the Operations Manager admin to the Active Directory admin and the network admin. This configuration saves time for the admins.