Manage tables in a Log Analytics workspace
A Log Analytics workspace lets you collect log data from Azure and non-Azure resources into one space for analysis, use by other services, such as Sentinel, and to trigger alerts and actions, for example, using Azure Logic Apps. The Log Analytics workspace consists of tables, which you can configure to manage your data model, data access, and log-related costs. This article explains the table configuration options in Azure Monitor Logs and how to set table properties based on your data analysis and cost management needs.
Table properties
This diagram provides an overview of the table configuration options in Azure Monitor Logs:
Table type and schema
A table's schema is the set of columns that make up the table, into which Azure Monitor Logs collects log data from one or more data sources.
Your Log Analytics workspace can contain the following types of tables:
| Table type | Data source | Schema |
|---|---|---|
| Azure table | Logs from Azure resources or required by Azure services and solutions. | Azure Monitor Logs creates Azure tables automatically based on Azure services you use and diagnostic settings you configure for specific resources. Each Azure table has a predefined schema. You can add columns to an Azure table to store transformed log data or enrich data in the Azure table with data from another source. |
| Custom table | Non-Azure resources and any other data source, such as file-based logs. | You can define a custom table's schema based on how you want to store data you collect from a given data source. |
| Search results | All data stored in a Log Analytics workspace. | The schema of a search results table is based on the query you define when you run the search job. You can't edit the schema of existing search results tables. |
| Restored logs | Data stored in a specific table in a Log Analytics workspace. | A restored logs table has the same schema as the table from which you restore logs. You can't edit the schema of existing restored logs tables. |
Table plan
Configure a table's plan based on how often you access the data in the table:
- The Analytics plan is suited for continuous monitoring, real-time detection, and performance analytics. This plan makes log data available for interactive multi-table queries and use by features and services for 30 days to two years.
- The Basic plan is suited for troubleshooting and incident response. This plan offers discounted ingestion and optimized single-table queries for 30 days.
- The Auxiliary plan is suited for low-touch data, such as verbose logs, and data required for auditing and compliance. This plan offers low-cost ingestion and unoptimized single-table queries for 30 days.
For full details about Azure Monitor Logs table plans, see Azure Monitor Logs: Table plans.
Long-term retention
Long-term retention is a low-cost solution for keeping data that you don't use regularly in your workspace for compliance or occasional investigation. Use table-level retention settings to add or extend long-term retention.
To access data in long-term retention, run a search job.
Ingestion-time transformations
Reduce costs and analysis effort by using data collection rules to filter out and transform data before ingestion based on the schema you define for your custom table.
Note
Tables with the Auxiliary table plan do not currently support data transformation. For more details, see Auxiliary table plan public preview limitations.
View table properties
Note
The table name is case sensitive.
To view and set table properties in the Azure portal:
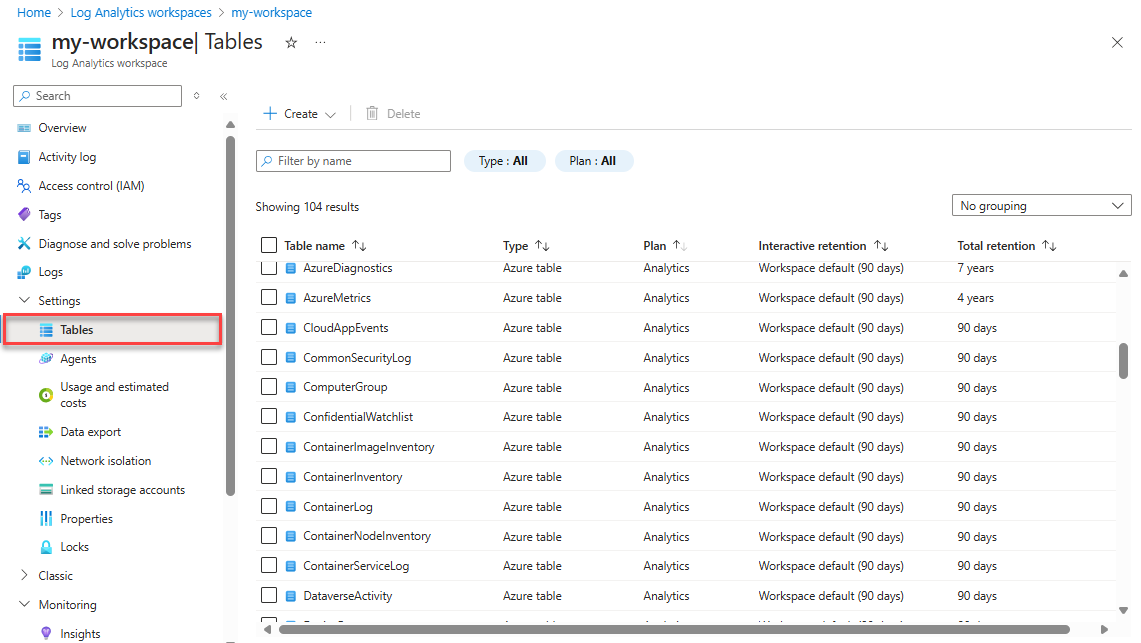
From your Log Analytics workspace, select Tables.
The Tables screen presents table configuration information for all tables in your Log Analytics workspace.
Select the ellipsis (...) to the right of a table to open the table management menu.
The available table management options vary based on the table type.
Select Manage table to edit the table properties.
Select Edit schema to view and edit the table schema.
Next steps
Learn how to:

