Single server scale-out for your Azure Stack HCI
Applies to: Azure Stack HCI, version 22H2
Important
Azure Stack HCI is now part of Azure Local. However, older versions of Azure Stack HCI, for example 22H2 will continue to reference Azure Stack HCI and won't reflect the name change. Learn more.
Warning
The deployment instructions provided in this article apply to an older version, Azure Stack HCI, version 22H2. For new deployments, we recommend that you use the latest generally available version of Azure Local, see About Azure Local deployment.
Azure Stack HCI version 22H2 supports inline fault domain and resiliency changes for single-server cluster scale-out. This article describes how you can scale out your Azure Stack HCI cluster.
About single server cluster scale-out
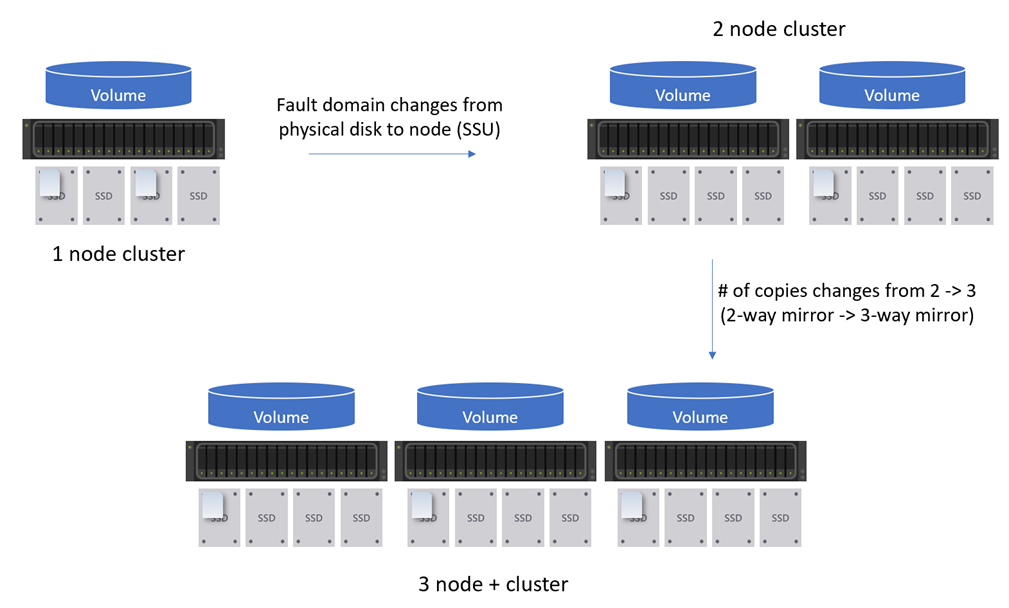
Azure Stack HCI version 22H2 provides easy scaling options to go from a single-server cluster to a two-node cluster, and from a two-node cluster to a three-node cluster. The following diagram shows how a single server can be scaled out to a multi-node cluster on your Azure Stack HCI.
Inline fault domain changes
When scaling up from a single-server cluster to a two-node cluster, the storage fault domain first needs to be changed from type PhysicalDisk to StorageScaleUnit. The change needs to be applied to all virtual disks and storage tiers. Extra nodes can be created and the data is evenly balanced across all nodes in the cluster.
Complete the following steps to correctly set fault domains after adding a node:
Run PowerShell as Administrator.
Change the fault domain type of the storage pool:
Get-StoragePool -FriendlyName <s2d*> | Set-StoragePool -FaultDomainAwarenessDefault StorageScaleUnitRemove the Cluster Performance History volume:
Remove-VirtualDisk -FriendlyName ClusterPerformanceHistoryGenerate new storage tiers and recreate the cluster performance history volume by running the following command:
Enable-ClusterStorageSpacesDirect -VerboseRemove storage tiers that are no longer applicable by running the following command. See the Storage tier summary table for more information.
Remove-StorageTier -FriendlyName <tier_name>Change the fault domain type of existing volumes:
For a non-tiered volume, run the following command:
Set-VirtualDisk –FriendlyName <name> -FaultDomainAwareness StorageScaleUnitTo check the progress of this change, run the following commands:
Get-VirtualDisk -FriendlyName <volume_name> | FL FaultDomainAwareness
Get-StorageJob
Here is sample output from the previous commands:
PS C:\> Get-VirtualDisk -FriendlyName DemoVol | FL FaultDomainAwareness

FaultDomainAwareness : StorageScaleUnit

PS C:\> Get-StorageJob

Name              IsBackgroundTask ElapsedTime JobState  PercentComplete BytesProcessed BytesTotal
----              ---------------- ----------- --------  --------------- -------------- ----------
S2DPool-Rebalance True             00:00:10    Running   0                          0 B     512 MB
For a tiered volume, run the following command:
Get-StorageTier -FriendlyName <volume_name*> | Set-StorageTier -FaultDomainAwareness StorageScaleUnitTo check the fault domain awareness of storage tiers, run the following command:
Get-StorageTier -FriendlyName <volume_name*> | FL FriendlyName, FaultDomainAwarenessNote
The prior commands don't work for changing from
StorageScaleUnittoPhysicalDisk, or fromStorageScaleUnittoNodeorChassistypes.
Inline resiliency changes
Once the inline fault domain changes are made, volume resiliency can be increased to handle node scale-out in the following scenarios.
Run the following command to check the progress of the resiliency changes. The repair operation should be observed for all volumes in the cluster.
Get-StorageJob
This command displays only ongoing jobs.
Single-server to two-node cluster
To remain as a two-way mirror, no action is required. To convert a two-way mirror to a nested two-way mirror, do the following:
For a non-tiered volume, run the following commands to first set the virtual disk:
Set-VirtualDisk -FriendlyName <name> -NumberOfDataCopies 4
For a tiered volume, run the following command:
Get-StorageTier -FriendlyName <volume_name*> | Set-StorageTier -NumberOfDataCopies 4
Then, move the volume to a different node to remount the volume. A remount is needed as ReFS only recognizes provisioning type at mount time.
Move-ClusterSharedVolume -Name <name> -Node <node>
Two-node to three-node+ cluster
To remain as a two-way mirror, no action is required. To convert a two-way mirror to a three-way or larger mirror, the following procedure is recommended.
Existing two-way mirror volumes can also take advantage of this using the following PowerShell commands. For example, for a single-server cluster or a three-node or larger cluster, you convert your two-way mirror volume into a three-way mirror volume.
The following scenarios are not supported:
- Scaling down, such as from a three-way mirror to a two-way mirror.
- Scaling to or from mirror-accelerated parity volumes.
- Scaling from nested two-way mirror or nested mirror-accelerated parity volumes.
For a non-tiered volume, run the following command:
Set-VirtualDisk -FriendlyName <name> -NumberOfDataCopies 3
For a tiered volume, run the following command:
Get-StorageTier -FriendlyName <volume_name*> | Set-StorageTier -NumberOfDataCopies 3
Then, move the volume to a different node to remount the volume. A remount is needed as ReFS only recognizes provisioning type at mount time.
Move-ClusterSharedVolume -Name <name> -Node <node>
Note
Volumes created in Windows Admin Center are configured as tiered volumes. To change the volume resiliency, use the StorageTier cmdlets, such as Get-StorageTier and Set-StorageTier.
Next steps
See ReFS for more information.
