Enable zone redundancy for Azure Cache for Redis
In this article, you learn how to configure a zone-redundant Azure Cache instance using the Azure portal.
Note
In regions that don't support zones, the option to enable zone redundancy is disabled. For a list of regions that support zones, see Azure Cache for Redis - zones supported regions.
Azure Cache for Redis Standard, Premium, and Enterprise tiers provide built-in redundancy by hosting each cache on two dedicated virtual machines (VMs). Even though these VMs are located in separate Azure fault and update domains and highly available, they're susceptible to data center-level failures. Azure Cache for Redis also supports zone redundancy in its Standard, Premium, and Enterprise tiers. A zone-redundant cache runs on VMs spread across multiple Availability Zones. It provides higher resilience and availability.
Prerequisites
- Azure subscription - create one for free
Create a cache
To create a cache, follow these steps:
Sign in to the Azure portal and select Create a resource.
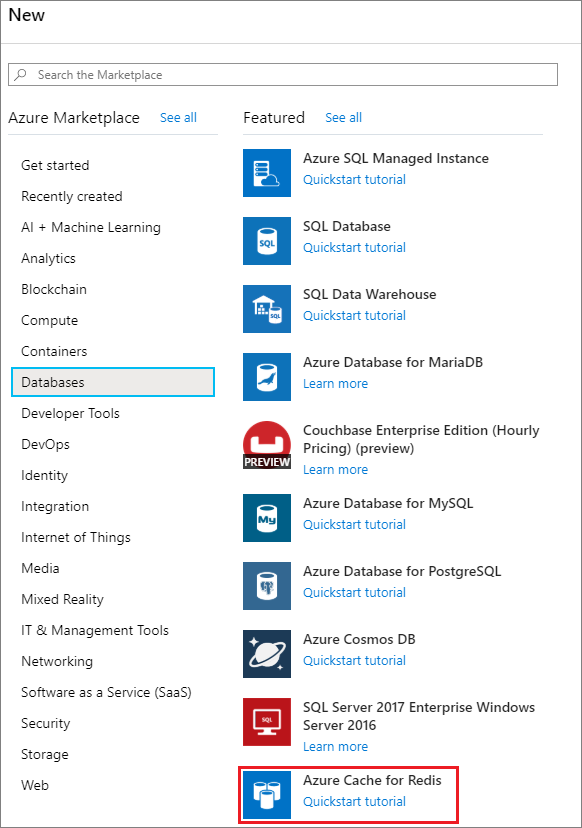
On the New page, select Databases and then select Azure Cache for Redis.
On the Basics page, configure the settings for your new cache.
Setting Suggested value Description Subscription Select your subscription. The subscription under which to create this new Azure Cache for Redis instance. Resource group Select a resource group, or select Create new and enter a new resource group name. Name for the resource group in which to create your cache and other resources. By putting all your app resources in one resource group, you can easily manage or delete them together. DNS name Enter a globally unique name. The cache name must be a string between 1 and 63 characters that contains only numbers, letters, or hyphens. The name must start and end with a number or letter, and can't contain consecutive hyphens. Your cache instance's host name will be <DNS name>.redis.cache.windows.net. Location Select a location. Select a region near other services that use your cache. Cache type Select a Premium or Enterprise tier cache. The pricing tier determines the size, performance, and features that are available for the cache. For more information, see Azure Cache for Redis Overview. Standard tier caches are always created as zone redundant using Automatic Zonal Allocation in the regions that support availability zones.
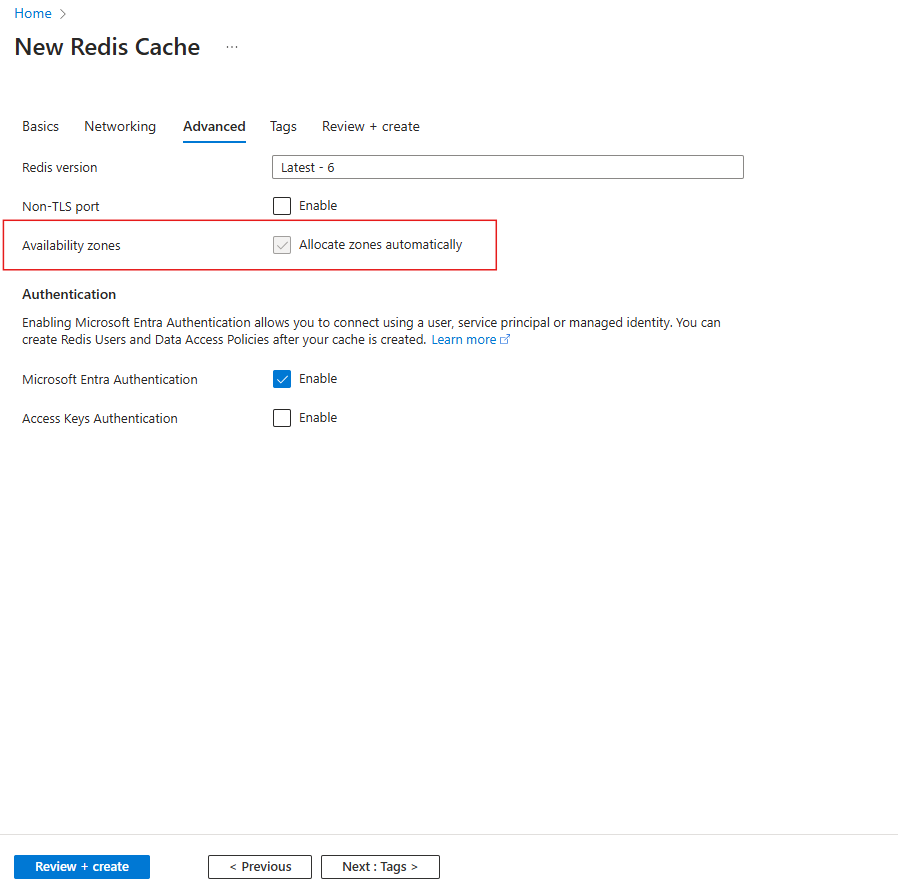
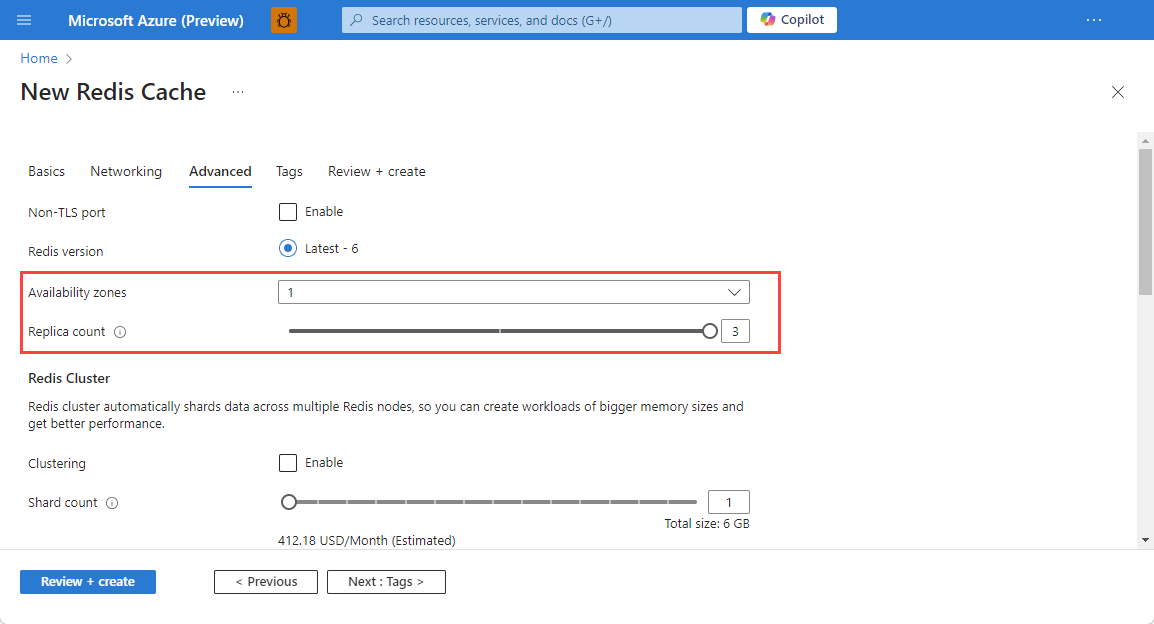
For Premium tier caches, select Advanced in the Resource menu. In regions that support zones, Zone redundancy for this tier can be enabled using couple of ways.
- Using Automatic Zonal Allocation:
- Allocate zones automatically is the default option selected for Availability Zones.
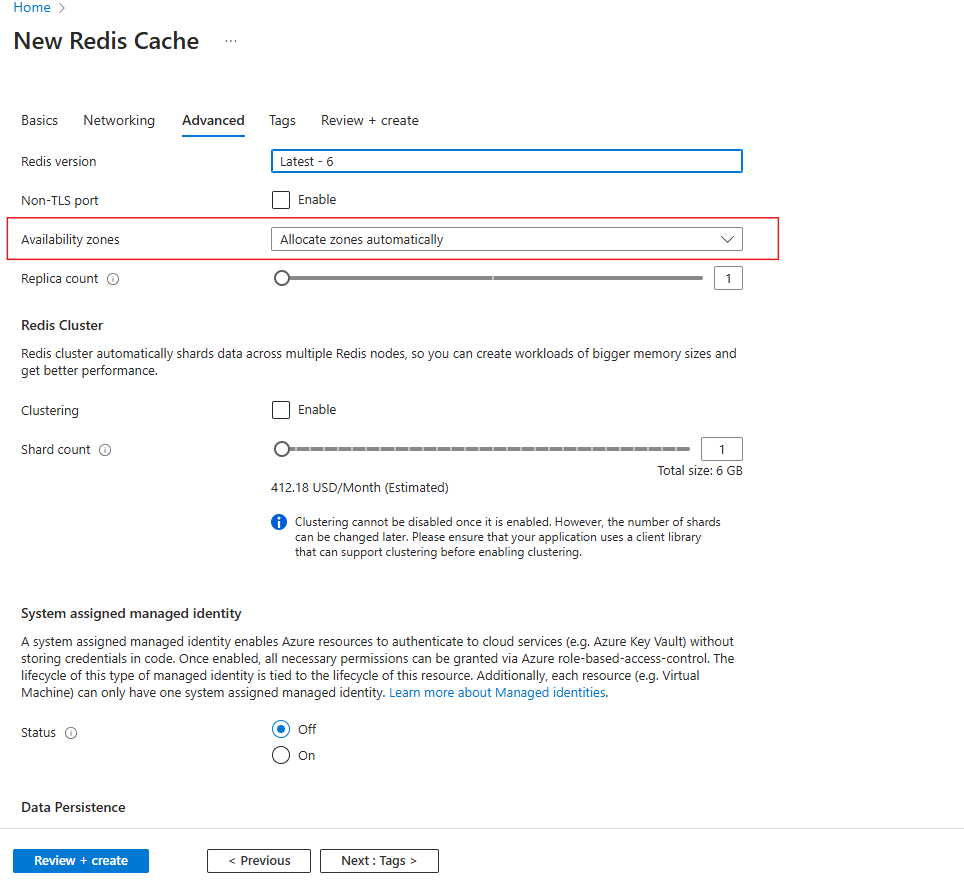
- Allocate zones automatically is the default option selected for Availability Zones.
- Using UserDefined Zonal Allocation:
- For Premium tier caches, Availability zones setting can be edited by the user, using which they can select non-zonal or manually select zones for the cache.
- Selecting NoZones:
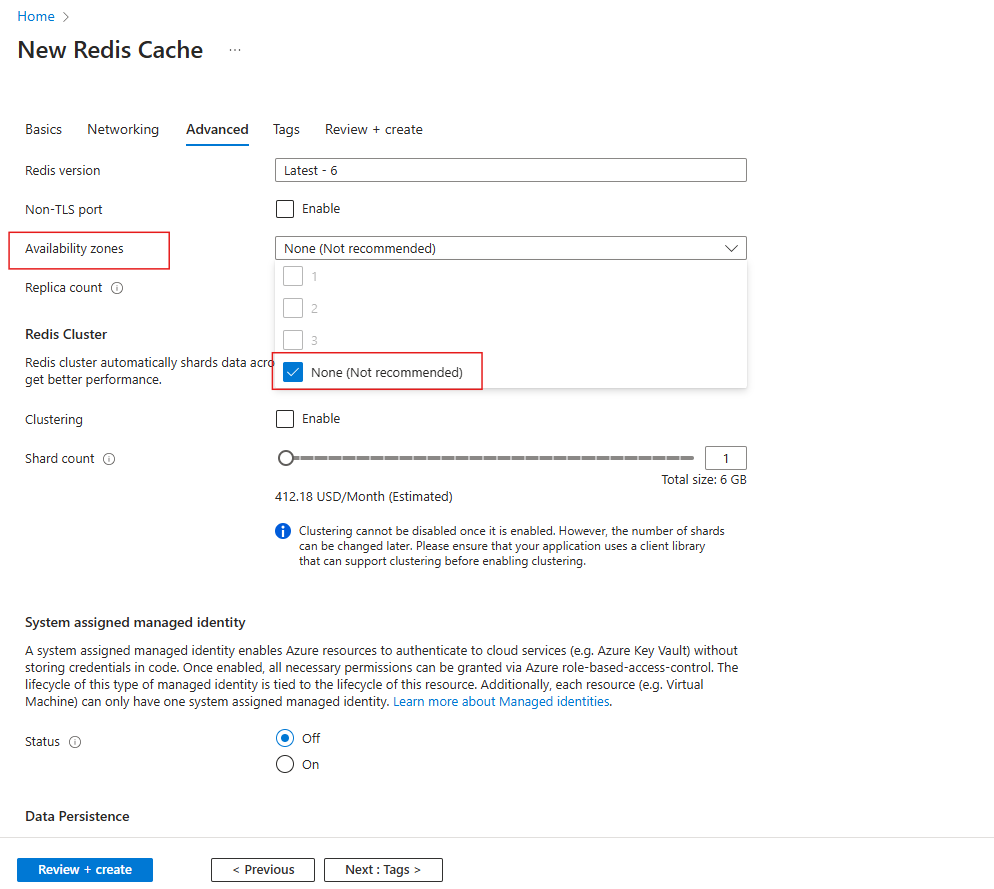
- When choosing zones manually, the number of availability zones must always be less than or equal to the total number of nodes for the cache:
- Using Automatic Zonal Allocation:
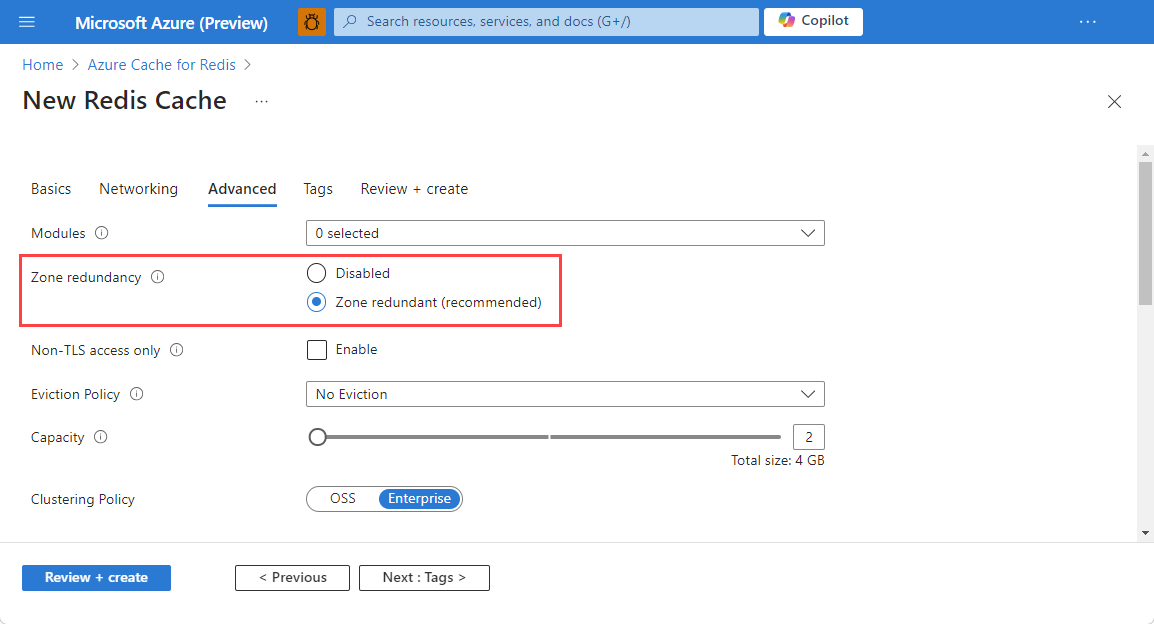
For an Enterprise tier cache, select Advanced in the Resource menu. For Zone redundancy, select Zone redundant (recommended).
Configure your settings for clustering and/or RDB persistence.
Note
Zone redundancy doesn't support Append-only File (AOF) persistence with multiple replicas (more than one replica).
Select Create.
It takes a while for the cache to be created. You can monitor progress on the Azure Cache for Redis Overview page. When Status shows as Running, the cache is ready to use.
Automatic Zonal Allocation
Azure Cache for Redis automatically allocates zones to the cache on behalf of the user based on the number of nodes per shard and region's zonal support such that the cache is spread across multiple zones for high availability.
With this type of allocation, users don't need to worry about choosing zones manually. The actual zones that are allocated to the cache are abstracted from the user. Azure ensures that the cache's primary and replica nodes are spread across different zones for high availability.
The REST API spec for different types of zonal allocation can be found at: Create - ZonalAllocationPolicy.
If the property ZonalAllocationPolicy is not passed in the request, Azure assigns its value for caches based on the region's zonal supportability and capacity.
The supported values for the property ZonalAllocationPolicy are:
- Automatic
This value can be passed to let Azure allocate zones automatically to the cache.
In the regions that support zones, it is selected as default option for caches starting with 2024-11-01 API version if ZonalAllocationPolicy isn't passed in the request.
- UserDefined
Users are allowed to pass this value only for Premium caches and can be passed in the request body while manually selecting the zones.
- NoZones
Users are allowed to pass this value only for Premium caches. This is the only value supported in the regions that don't support zones.
- This value can't be passed by user in the request for Standard caches, since they can't explicitly choose for non zonal standard caches.
It is selected as default option for caches if ZonalAllocationPolicy isn't passed in the request in cases:
- Regions that don't support zones (irrespective of API version used).
- All Regions (irrespective of zonal support) if API version used is less than 2024-11-01.
Important
Automatic Zonal Allocation can't be modified once enabled for a cache.
Important
- Starting with 2024-11-01 API version, Automatic Zonal Allocation is chosen as default option for Premium, Standard caches. In rare cases, when sufficient zonal capacity is unavailable to at-least allocate two zones, and user does not pass
ZonalAllocationPolicyin the request, Azure will create a non-zonal cache which user can verify by checking theZonalAllocationPolicyproperty in the response.- Hence, it is recommended not to pass
ZonalAllocationPolicyin the request body while creating the cache as it will enable Azure to choose the best option among Automatic, NoZones for the cache based on the region's zonal supportability and capacity. Otherwise, users can passZonalAllocationPolicyif they want to explicitly use a specific zonal allocation policy.
- Hence, it is recommended not to pass
Important
Users can update their existing non-zonal or cache with manually selected zones to use Automatic Zonal Allocation by updating the cache with ZonalAllocationPolicy set to Automatic. For more information regarding the update process, see Migrate an Azure Cache for Redis instance to availability zone support.
Zone Redundancy FAQ
- Why can't I enable zone redundancy when creating a Premium cache?
- Why can't I select all three zones during cache create?
- Can I update my existing Standard or Premium cache to use zone redundancy?
- How much does it cost to replicate my data across Azure Availability Zones?
Why can't I enable zone redundancy when creating a Premium cache?
Zone redundancy is available only in Azure regions that have Availability Zones. See Azure regions with Availability Zones for the latest list.
Why can't I select all three zones during cache create?
A Premium cache has one primary and one replica node by default. To configure zone redundancy for more than two Availability Zones, you need to add more replicas to the cache you're creating. The total number of availability zones must not exceed the combined count of nodes within the cache, including both the primary and replica nodes.
Can I update my existing Standard or Premium cache to use zone redundancy?
Yes, updating an existing Standard or Premium cache to use zone redundancy is supported in-place. Users can enable it by navigating to the Advanced settings on the Resource menu and selecting Allocate Zones automatically check-box followed by the save button. You can't disable zone redundancy once you enable it.
For more details, look into Migrate an Azure Cache for Redis instance to availability zone support
This can also be done by passing
ZonalAllocationPolicyasAutomaticin the request body while updating the cache. For more information regarding the update process using REST API, see Update - ZonalAllocationPolicy.- Updating
ZonalAllocationPolicyto any other value thanAutomaticisn't supported.
Important
Automatic Zonal Allocation can't be modified once enabled for a cache.
Important
Enabling Automatic Zonal Allocation for an existing cache (which is created with a different zonal allocation) is currently NOT supported for Geo Replicated caches or caches with VNet injection.
- Updating
How much does it cost to replicate my data across Azure Availability Zones?
When your cache uses zone redundancy configured with multiple Availability Zones, data is replicated from the primary cache node in one zone to the other nodes in another zone. The data transfer charge is the network egress cost of data moving across the selected Availability Zones. For more information, see Bandwidth Pricing Details.
Next Steps
Learn more about Azure Cache for Redis features.