Tutorial: Use variant feature flags in an ASP.NET Core application
In this tutorial, you use a variant feature flag to manage experiences for different user segments in an example application, Quote of the Day. You utilize the variant feature flag created in Use variant feature flags. Before proceeding, ensure you create the variant feature flag named Greeting in your App Configuration store.
Prerequisites
- Ensure the .NET CLI is installed on your machine.
- Follow the Use variant feature flags tutorial and create the variant feature flag named Greeting.
Create an ASP.NET Core web app
Run the following code in a command prompt. This command creates a new Razor Pages application in ASP.NET Core, using Individual account auth, and places it in an output folder named QuoteOfTheDay.
dotnet new razor --auth Individual -o QuoteOfTheDayNavigate to the QuoteOfTheDay directory and create a user secret for the application by running the following commands. Replace the
<your-App-Configuration-endpoint>placeholder with your App Configuration store's endpoint. You can find the endpoint in your App Configuration store's Overview blade in the Azure portal.dotnet user-secrets init dotnet user-secrets set Endpoints:AppConfiguration "<your-App-Configuration-endpoint>"Add the latest versions of the required packages.
dotnet add package Azure.Identity
dotnet add package Microsoft.Extensions.Configuration.AzureAppConfiguration
dotnet add package Microsoft.FeatureManagement.AspNetCore
Connect to App Configuration for feature management
Open Program.cs and add the following using statements.
using Azure.Identity;
using Microsoft.Extensions.Configuration.AzureAppConfiguration;
using Microsoft.FeatureManagement;
Add the following code to connect to your App Configuration store and call
UseFeatureFlagsto pull down all feature flags with no label.You use the
DefaultAzureCredentialto authenticate to your App Configuration store. Follow the instructions to assign your credential the App Configuration Data Reader role. Be sure to allow sufficient time for the permission to propagate before running your application.var builder = WebApplication.CreateBuilder(args); // Retrieve the endpoint string endpoint = builder.Configuration.GetValue<string>("Endpoints:AppConfiguration") ?? throw new InvalidOperationException("The setting `Endpoints:AppConfiguration` was not found."); // Load configuration and feature flags from Azure App Configuration builder.Configuration .AddAzureAppConfiguration(options => { options.Connect(new Uri(endpoint), new DefaultAzureCredential()) .UseFeatureFlags(); });Add Azure App Configuration and feature management services and enable targeting for feature management.
// Add Azure App Configuration and feature management services to the container.
builder.Services.AddAzureAppConfiguration()
    .AddFeatureManagement()
    .WithTargeting();
Under the line
var app = builder.Build();, add Azure App Configuration middleware for dynamic configuration refresh.// Use Azure App Configuration middleware for dynamic configuration refresh. app.UseAzureAppConfiguration();
Use the variant feature flag
Open QuoteOfTheDay > Pages > Index.cshtml.cs and replace the content with the following code.
using Microsoft.AspNetCore.Mvc;
using Microsoft.AspNetCore.Mvc.RazorPages;
using Microsoft.FeatureManagement;

namespace QuoteOfTheDay.Pages;

public class Quote
{
    public string Message { get; set; }

    public string Author { get; set; }
}

public class IndexModel(IVariantFeatureManagerSnapshot featureManager) : PageModel
{
    private readonly IVariantFeatureManagerSnapshot _featureManager = featureManager;

    private Quote[] _quotes = [
        new Quote()
        {
            Message = "You cannot change what you are, only what you do.",
            Author = "Philip Pullman"
        }];

    public Quote? Quote { get; set; }

    public string GreetingMessage { get; set; }

    public async void OnGet()
    {
        Quote = _quotes[new Random().Next(_quotes.Length)];

        Variant variant = await _featureManager.GetVariantAsync("Greeting", HttpContext.RequestAborted);

        if (variant != null)
        {
            GreetingMessage = variant.Configuration?.Get<string>() ?? "";
        }
        else
        {
            _logger.LogWarning("No variant given. Either the feature flag named 'Greeting' is not defined or the variants are not defined properly.");
        }
    }
}
You call
GetVariantAsyncto retrieve the variant of the Greeting feature flag for the current user and assign its value to theGreetingMessageproperty of the page model.In QuoteOfTheDay > Pages > Shared > _Layout.cshtml, under where
QuoteOfTheDay.styles.cssis added, add the following reference to the font-awesome CSS library.<link rel="stylesheet" href="https://cdnjs.cloudflare.com/ajax/libs/font-awesome/5.15.3/css/all.min.css">Open index.cshtml and replace its content with the following code.
@page
@model IndexModel
@{
    ViewData["Title"] = "Home page";
    ViewData["Username"] = User.Identity?.Name ?? string.Empty;
}

<style>
    body {
        font-family: Arial, sans-serif;
        background-color: #f4f4f4;
        color: #333;
    }

    .quote-container {
        background-color: #fff;
        margin: 2em auto;
        padding: 2em;
        border-radius: 8px;
        max-width: 750px;
        box-shadow: 0px 4px 8px rgba(0, 0, 0, 0.2);
        display: flex;
        justify-content: space-between;
        align-items: start;
        position: relative;
    }

    .vote-container {
        position: absolute;
        top: 10px;
        right: 10px;
        display: flex;
        gap: 0em;
    }

    .vote-container .btn {
        background-color: #ffffff; /* White background */
        border-color: #ffffff; /* Light blue border */
        color: #333
    }

    .vote-container .btn:focus {
        outline: none;
        box-shadow: none;
    }

    .vote-container .btn:hover {
        background-color: #F0F0F0; /* Light gray background */
    }

    .greeting-content {
        font-family: 'Georgia', serif; /* More artistic font */
    }

    .quote-content p.quote {
        font-size: 2em; /* Bigger font size */
        font-family: 'Georgia', serif; /* More artistic font */
        font-style: italic; /* Italic font */
        color: #4EC2F7; /* Medium-light blue color */
    }
</style>

<div class="quote-container">
    <div class="quote-content">
        <h3 class="greeting-content">@(Model.GreetingMessage)</h3>
        <br />
        <p class="quote">“@(Model.Quote?.Message ?? "< Quote not found >")”</p>
        <p>- <b>@(Model.Quote?.Author ?? "Unknown")</b></p>
    </div>

    <div class="vote-container">
        <button class="btn btn-primary" onclick="heartClicked(this)">
            <i class="far fa-heart"></i> <!-- Heart icon -->
        </button>
    </div>
</div>

<script>
    function heartClicked(button) {
        var icon = button.querySelector('i');
        icon.classList.toggle('far');
        icon.classList.toggle('fas');
    }
</script>
This code displays the UI of the Quote of the Day application and shows the
GreetingMessagefrom the page model. The JavaScript handlerheartClickedis triggered when the heart button is clicked.
Build and run the app
Build and run the application.
dotnet build
dotnet run
Once the application is loaded, select Register at the top right to register a new user.

Register a new user named usera@contoso.com.
Select the link Click here to validate email after entering user information.

Repeat the same steps to register a second user named userb@contoso.com.
Note
It's important for the purpose of this tutorial to use these names exactly. As long as the feature has been configured as expected, the two users should see different variants.
Select Login at the top right to sign in as usera@contoso.com.

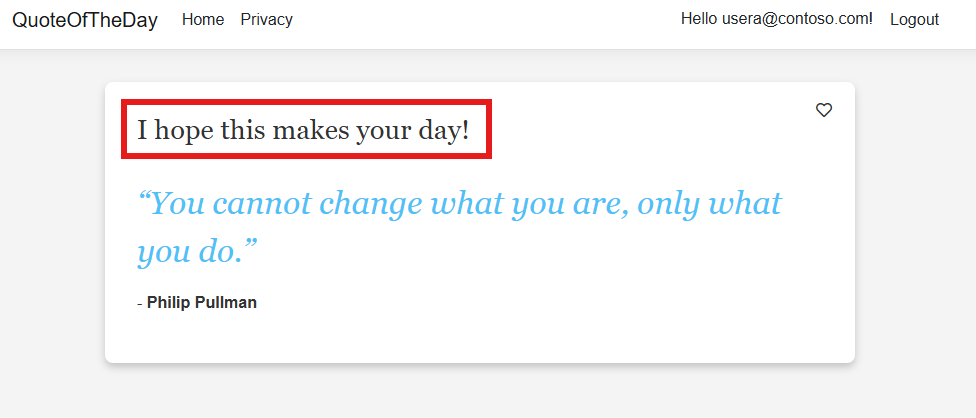
Once logged in, you see a long greeting message for usera@contoso.com

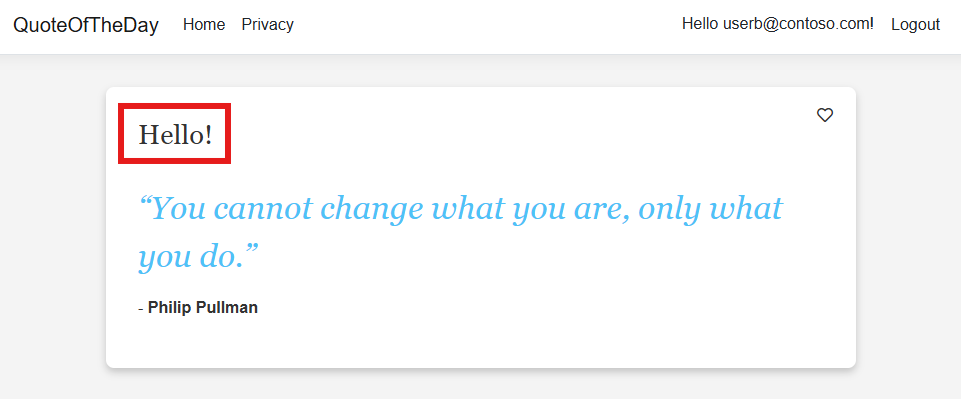
Click Logout and login as userb@contoso.com, you see the simple greeting message.

Next steps
For the full feature rundown of the .NET feature management library, refer to the following document.