Quickstart: Create a custom voice assistant
In this quickstart, you will use the Speech SDK to create a custom voice assistant application that connects to a bot that you have already authored and configured. If you need to create a bot, see the related tutorial for a more comprehensive guide.
After satisfying a few prerequisites, connecting your custom voice assistant takes only a few steps:
- Create a
BotFrameworkConfigobject from your subscription key and region. - Create a
DialogServiceConnectorobject using theBotFrameworkConfigobject from above. - Using the
DialogServiceConnectorobject, start the listening process for a single utterance. - Inspect the
ActivityReceivedEventArgsreturned.
Note
The Speech SDK for C++, JavaScript, Objective-C, Python, and Swift support custom voice assistants, but we haven't yet included a guide here.
You can view or download all Speech SDK C# Samples on GitHub.
Prerequisites
Before you get started, make sure to:
- Create a Speech resource
- Set up your development environment and create an empty project
- Create a bot connected to the Direct Line Speech channel
- Make sure that you have access to a microphone for audio capture
Note
Please refer to the list of supported regions for voice assistants and ensure your resources are deployed in one of those regions.
Open your project in Visual Studio
The first step is to make sure that you have your project open in Visual Studio.
Start with some boilerplate code
Let's add some code that works as a skeleton for our project.
In Solution Explorer, open
MainPage.xaml.In the designer's XAML view, replace the entire contents with the following snippet that defines a rudimentary user interface:
<Page
    x:Class="helloworld.MainPage"
    xmlns="http://schemas.microsoft.com/winfx/2006/xaml/presentation"
    xmlns:x="http://schemas.microsoft.com/winfx/2006/xaml"
    xmlns:local="using:helloworld"
    xmlns:d="http://schemas.microsoft.com/expression/blend/2008"
    xmlns:mc="http://schemas.openxmlformats.org/markup-compatibility/2006"
    mc:Ignorable="d"
    Background="{ThemeResource ApplicationPageBackgroundThemeBrush}">

    <Grid>
        <StackPanel Orientation="Vertical" HorizontalAlignment="Center"
                    Margin="20,50,0,0" VerticalAlignment="Center" Width="800">
            <Button x:Name="EnableMicrophoneButton" Content="Enable Microphone"
                    Margin="0,0,10,0" Click="EnableMicrophone_ButtonClicked"
                    Height="35"/>
            <Button x:Name="ListenButton" Content="Talk to your bot"
                    Margin="0,10,10,0" Click="ListenButton_ButtonClicked"
                    Height="35"/>
            <StackPanel x:Name="StatusPanel" Orientation="Vertical"
                        RelativePanel.AlignBottomWithPanel="True"
                        RelativePanel.AlignRightWithPanel="True"
                        RelativePanel.AlignLeftWithPanel="True">
                <TextBlock x:Name="StatusLabel" Margin="0,10,10,0"
                           TextWrapping="Wrap" Text="Status:" FontSize="20"/>
                <Border x:Name="StatusBorder" Margin="0,0,0,0">
                    <ScrollViewer VerticalScrollMode="Auto"
                                  VerticalScrollBarVisibility="Auto" MaxHeight="200">
                        <!-- Use LiveSetting to enable screen readers to announce
                             the status update. -->
                        <TextBlock
                            x:Name="StatusBlock" FontWeight="Bold"
                            AutomationProperties.LiveSetting="Assertive"
                            MaxWidth="{Binding ElementName=Splitter, Path=ActualWidth}"
                            Margin="10,10,10,20" TextWrapping="Wrap"  />
                    </ScrollViewer>
                </Border>
            </StackPanel>
        </StackPanel>
        <MediaElement x:Name="mediaElement"/>
    </Grid>
</Page>
The Design view is updated to show the application's user interface.
- In Solution Explorer, open the code-behind source file
MainPage.xaml.cs. (It's grouped underMainPage.xaml.) Replace the contents of this file with the below, which includes:
usingstatements for theSpeechandSpeech.DialognamespacesA simple implementation to ensure microphone access, wired to a button handler
Basic UI helpers to present messages and errors in the application
A landing point for the initialization code path that will be populated later
A helper to play back text to speech (without streaming support)
An empty button handler to start listening that will be populated later
using Microsoft.CognitiveServices.Speech;
using Microsoft.CognitiveServices.Speech.Audio;
using Microsoft.CognitiveServices.Speech.Dialog;
using System;
using System.Diagnostics;
using System.IO;
using System.Text;
using Windows.Foundation;
using Windows.Storage.Streams;
using Windows.UI.Xaml;
using Windows.UI.Xaml.Controls;
using Windows.UI.Xaml.Media;

namespace helloworld
{
    public sealed partial class MainPage : Page
    {
        private DialogServiceConnector connector;

        private enum NotifyType
        {
            StatusMessage,
            ErrorMessage
        };

        public MainPage()
        {
            this.InitializeComponent();
        }

        private async void EnableMicrophone_ButtonClicked(
            object sender, RoutedEventArgs e)
        {
            bool isMicAvailable = true;
            try
            {
                var mediaCapture = new Windows.Media.Capture.MediaCapture();
                var settings =
                    new Windows.Media.Capture.MediaCaptureInitializationSettings();
                settings.StreamingCaptureMode =
                    Windows.Media.Capture.StreamingCaptureMode.Audio;
                await mediaCapture.InitializeAsync(settings);
            }
            catch (Exception)
            {
                isMicAvailable = false;
            }
            if (!isMicAvailable)
            {
                await Windows.System.Launcher.LaunchUriAsync(
                    new Uri("ms-settings:privacy-microphone"));
            }
            else
            {
                NotifyUser("Microphone was enabled", NotifyType.StatusMessage);
            }
        }

        private void NotifyUser(
            string strMessage, NotifyType type = NotifyType.StatusMessage)
        {
            // If called from the UI thread, then update immediately.
            // Otherwise, schedule a task on the UI thread to perform the update.
            if (Dispatcher.HasThreadAccess)
            {
                UpdateStatus(strMessage, type);
            }
            else
            {
                var task = Dispatcher.RunAsync(
                    Windows.UI.Core.CoreDispatcherPriority.Normal,
                    () => UpdateStatus(strMessage, type));
            }
        }

        private void UpdateStatus(string strMessage, NotifyType type)
        {
            switch (type)
            {
                case NotifyType.StatusMessage:
                    StatusBorder.Background = new SolidColorBrush(
                        Windows.UI.Colors.Green);
                    break;
                case NotifyType.ErrorMessage:
                    StatusBorder.Background = new SolidColorBrush(
                        Windows.UI.Colors.Red);
                    break;
            }
            StatusBlock.Text += string.IsNullOrEmpty(StatusBlock.Text)
                ? strMessage : "\n" + strMessage;

            if (!string.IsNullOrEmpty(StatusBlock.Text))
            {
                StatusBorder.Visibility = Visibility.Visible;
                StatusPanel.Visibility = Visibility.Visible;
            }
            else
            {
                StatusBorder.Visibility = Visibility.Collapsed;
                StatusPanel.Visibility = Visibility.Collapsed;
            }
            // Raise an event if necessary to enable a screen reader
            // to announce the status update.
            var peer = Windows.UI.Xaml.Automation.Peers.FrameworkElementAutomationPeer.FromElement(StatusBlock);
            if (peer != null)
            {
                peer.RaiseAutomationEvent(
                    Windows.UI.Xaml.Automation.Peers.AutomationEvents.LiveRegionChanged);
            }
        }

        // Waits for and accumulates all audio associated with a given
        // PullAudioOutputStream and then plays it to the MediaElement. Long spoken
        // audio will create extra latency and a streaming playback solution
        // (that plays audio while it continues to be received) should be used --
        // see the samples for examples of this.
        private void SynchronouslyPlayActivityAudio(
            PullAudioOutputStream activityAudio)
        {
            var playbackStreamWithHeader = new MemoryStream();
            playbackStreamWithHeader.Write(Encoding.ASCII.GetBytes("RIFF"), 0, 4); // ChunkID
            playbackStreamWithHeader.Write(BitConverter.GetBytes(UInt32.MaxValue), 0, 4); // ChunkSize: max
            playbackStreamWithHeader.Write(Encoding.ASCII.GetBytes("WAVE"), 0, 4); // Format
            playbackStreamWithHeader.Write(Encoding.ASCII.GetBytes("fmt "), 0, 4); // Subchunk1ID
            playbackStreamWithHeader.Write(BitConverter.GetBytes(16), 0, 4); // Subchunk1Size: PCM
            playbackStreamWithHeader.Write(BitConverter.GetBytes(1), 0, 2); // AudioFormat: PCM
            playbackStreamWithHeader.Write(BitConverter.GetBytes(1), 0, 2); // NumChannels: mono
            playbackStreamWithHeader.Write(BitConverter.GetBytes(16000), 0, 4); // SampleRate: 16kHz
            playbackStreamWithHeader.Write(BitConverter.GetBytes(32000), 0, 4); // ByteRate
            playbackStreamWithHeader.Write(BitConverter.GetBytes(2), 0, 2); // BlockAlign
            playbackStreamWithHeader.Write(BitConverter.GetBytes(16), 0, 2); // BitsPerSample: 16-bit
            playbackStreamWithHeader.Write(Encoding.ASCII.GetBytes("data"), 0, 4); // Subchunk2ID
            playbackStreamWithHeader.Write(BitConverter.GetBytes(UInt32.MaxValue), 0, 4); // Subchunk2Size

            byte[] pullBuffer = new byte[2056];

            uint lastRead = 0;
            do
            {
                lastRead = activityAudio.Read(pullBuffer);
                playbackStreamWithHeader.Write(pullBuffer, 0, (int)lastRead);
            }
            while (lastRead == pullBuffer.Length);

            var task = Dispatcher.RunAsync(
                Windows.UI.Core.CoreDispatcherPriority.Normal, () =>
            {
                mediaElement.SetSource(
                    playbackStreamWithHeader.AsRandomAccessStream(), "audio/wav");
                mediaElement.Play();
            });
        }

        private void InitializeDialogServiceConnector()
        {
            // New code will go here
        }

        private async void ListenButton_ButtonClicked(
            object sender, RoutedEventArgs e)
        {
            // New code will go here
        }
    }
}
Add the following code snippet to the method body of
InitializeDialogServiceConnector. This code creates theDialogServiceConnectorwith your subscription information.// Create a BotFrameworkConfig by providing a Speech service subscription key // the botConfig.Language property is optional (default en-US) const string speechSubscriptionKey = "YourSpeechSubscriptionKey"; // Your subscription key const string region = "YourServiceRegion"; // Your subscription service region. var botConfig = BotFrameworkConfig.FromSubscription(speechSubscriptionKey, region); botConfig.Language = "en-US"; connector = new DialogServiceConnector(botConfig);Note
Please refer to the list of supported regions for voice assistants and ensure your resources are deployed in one of those regions.
Note
For information on configuring your bot, see the Bot Framework documentation for the Direct Line Speech channel.
Replace the strings
YourSpeechSubscriptionKeyandYourServiceRegionwith your own values for your speech subscription and region.Append the following code snippet to the end of the method body of
InitializeDialogServiceConnector. This code sets up handlers for events relied on byDialogServiceConnectorto communicate its bot activities, speech recognition results, and other information.// ActivityReceived is the main way your bot will communicate with the client // and uses bot framework activities connector.ActivityReceived += (sender, activityReceivedEventArgs) => { NotifyUser( $"Activity received, hasAudio={activityReceivedEventArgs.HasAudio} activity={activityReceivedEventArgs.Activity}"); if (activityReceivedEventArgs.HasAudio) { SynchronouslyPlayActivityAudio(activityReceivedEventArgs.Audio); } }; // Canceled will be signaled when a turn is aborted or experiences an error condition connector.Canceled += (sender, canceledEventArgs) => { NotifyUser($"Canceled, reason={canceledEventArgs.Reason}"); if (canceledEventArgs.Reason == CancellationReason.Error) { NotifyUser( $"Error: code={canceledEventArgs.ErrorCode}, details={canceledEventArgs.ErrorDetails}"); } }; // Recognizing (not 'Recognized') will provide the intermediate recognized text // while an audio stream is being processed connector.Recognizing += (sender, recognitionEventArgs) => { NotifyUser($"Recognizing! in-progress text={recognitionEventArgs.Result.Text}"); }; // Recognized (not 'Recognizing') will provide the final recognized text // once audio capture is completed connector.Recognized += (sender, recognitionEventArgs) => { NotifyUser($"Final speech to text result: '{recognitionEventArgs.Result.Text}'"); }; // SessionStarted will notify when audio begins flowing to the service for a turn connector.SessionStarted += (sender, sessionEventArgs) => { NotifyUser($"Now Listening! Session started, id={sessionEventArgs.SessionId}"); }; // SessionStopped will notify when a turn is complete and // it's safe to begin listening again connector.SessionStopped += (sender, sessionEventArgs) => { NotifyUser($"Listening complete. Session ended, id={sessionEventArgs.SessionId}"); };Add the following code snippet to the body of the
ListenButton_ButtonClickedmethod in theMainPageclass. This code sets upDialogServiceConnectorto listen, since you already established the configuration and registered the event handlers.if (connector == null) { InitializeDialogServiceConnector(); // Optional step to speed up first interaction: if not called, // connection happens automatically on first use var connectTask = connector.ConnectAsync(); } try { // Start sending audio to your speech-enabled bot var listenTask = connector.ListenOnceAsync(); // You can also send activities to your bot as JSON strings -- // Microsoft.Bot.Schema can simplify this string speakActivity = @"{""type"":""message"",""text"":""Greeting Message"", ""speak"":""Hello there!""}"; await connector.SendActivityAsync(speakActivity); } catch (Exception ex) { NotifyUser($"Exception: {ex.ToString()}", NotifyType.ErrorMessage); }
Build and run your app
Now you're ready to build your app and test your custom voice assistant using the Speech service.
From the menu bar, choose Build > Build Solution to build the application. The code should compile without errors now.
Choose Debug > Start Debugging (or press F5) to start the application. The helloworld window appears.
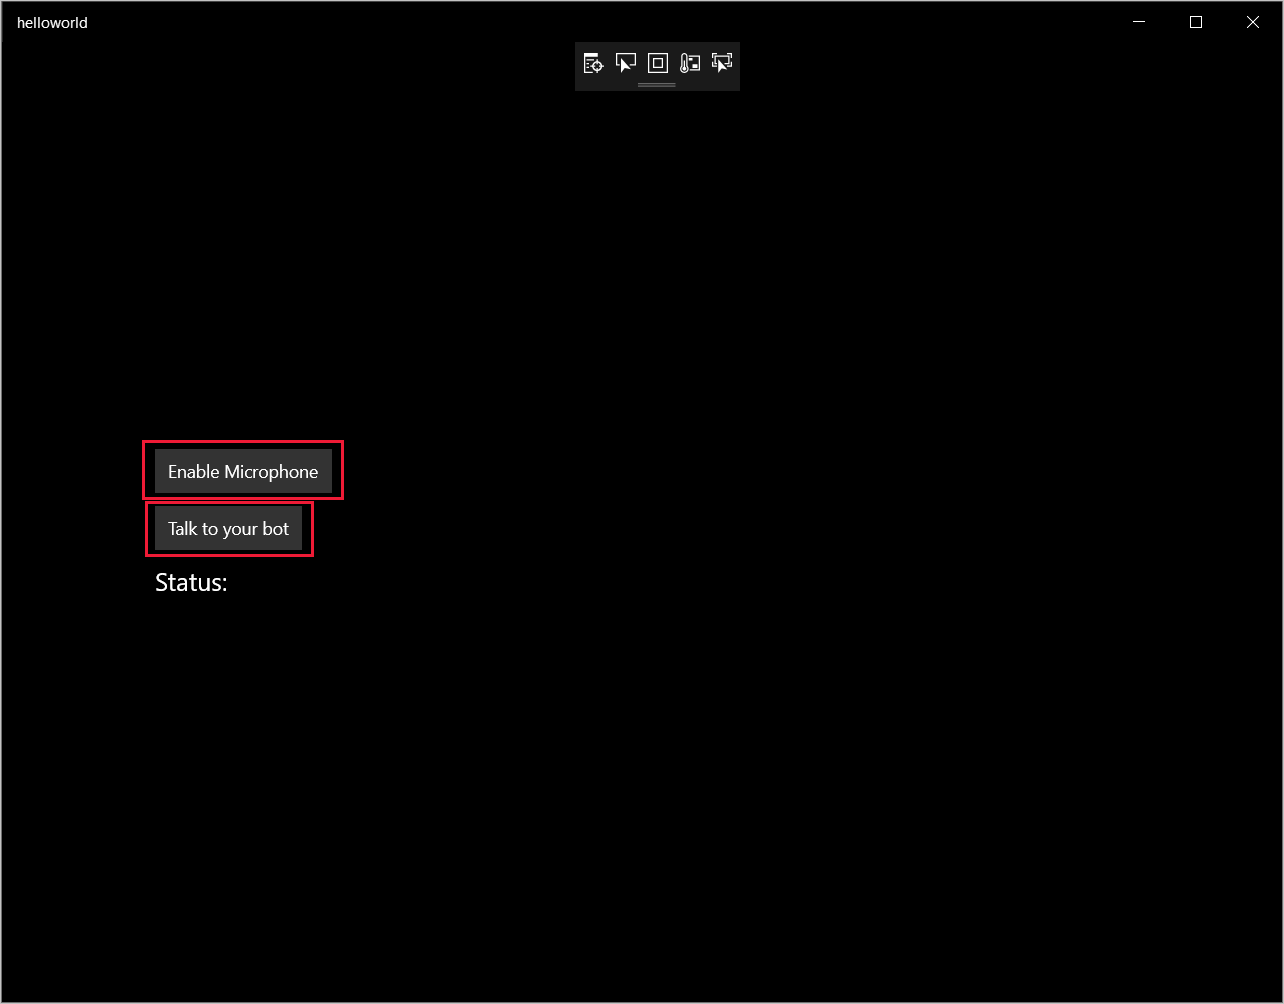
Select Enable Microphone, and when the access permission request pops up, select Yes.

Select Talk to your bot, and speak an English phrase or sentence into your device's microphone. Your speech is transmitted to the Direct Line Speech channel and transcribed to text, which appears in the window.
Next steps
You can view or download all Speech SDK Java Samples on GitHub.
Choose your target environment
Prerequisites
Before you get started, make sure to:
- Create a Speech resource
- Set up your development environment and create an empty project
- Create a bot connected to the Direct Line Speech channel
- Make sure that you have access to a microphone for audio capture
Note
Please refer to the list of supported regions for voice assistants and ensure your resources are deployed in one of those regions.
Create and configure project
Create an Eclipse project and install the Speech SDK.
Additionally, to enable logging, update the pom.xml file to include the following dependency:
 <dependency>
     <groupId>org.slf4j</groupId>
     <artifactId>slf4j-simple</artifactId>
     <version>1.7.5</version>
 </dependency>
Add sample code
To add a new empty class to your Java project, select File > New > Class.
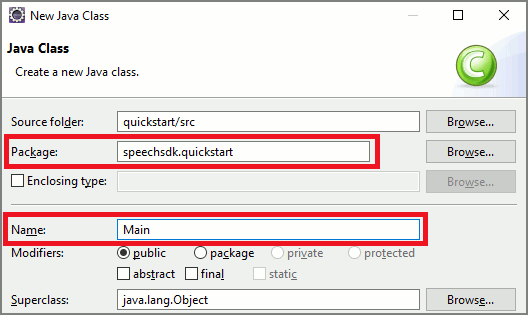
In the New Java Class window, enter speechsdk.quickstart in the Package field and Main in the Name field.
Open the newly created
Mainclass, and replace the contents of theMain.javafile with the following starting code:package speechsdk.quickstart; import com.microsoft.cognitiveservices.speech.audio.AudioConfig; import com.microsoft.cognitiveservices.speech.audio.PullAudioOutputStream; import com.microsoft.cognitiveservices.speech.dialog.BotFrameworkConfig; import com.microsoft.cognitiveservices.speech.dialog.DialogServiceConnector; import org.slf4j.Logger; import org.slf4j.LoggerFactory; import javax.sound.sampled.AudioFormat; import javax.sound.sampled.AudioSystem; import javax.sound.sampled.DataLine; import javax.sound.sampled.SourceDataLine; import java.io.InputStream; public class Main { final Logger log = LoggerFactory.getLogger(Main.class); public static void main(String[] args) { // New code will go here } private void playAudioStream(PullAudioOutputStream audio) { ActivityAudioStream stream = new ActivityAudioStream(audio); final ActivityAudioStream.ActivityAudioFormat audioFormat = stream.getActivityAudioFormat(); final AudioFormat format = new AudioFormat( AudioFormat.Encoding.PCM_SIGNED, audioFormat.getSamplesPerSecond(), audioFormat.getBitsPerSample(), audioFormat.getChannels(), audioFormat.getFrameSize(), audioFormat.getSamplesPerSecond(), false); try { int bufferSize = format.getFrameSize(); final byte[] data = new byte[bufferSize]; SourceDataLine.Info info = new DataLine.Info(SourceDataLine.class, format); SourceDataLine line = (SourceDataLine) AudioSystem.getLine(info); line.open(format); if (line != null) { line.start(); int nBytesRead = 0; while (nBytesRead != -1) { nBytesRead = stream.read(data); if (nBytesRead != -1) { line.write(data, 0, nBytesRead); } } line.drain(); line.stop(); line.close(); } stream.close(); } catch (Exception e) { e.printStackTrace(); } } }In the
mainmethod, you first configure yourDialogServiceConfigand use it to create aDialogServiceConnectorinstance. This instance connects to the Direct Line Speech channel to interact with your bot. AnAudioConfiginstance is also used to specify the source for audio input. In this example, the default microphone is used withAudioConfig.fromDefaultMicrophoneInput().- Replace the string
YourSubscriptionKeywith your Speech resource key, which you can get from the Azure portal. - Replace the string
YourServiceRegionwith the region associated with your Speech resource.
Note
Please refer to the list of supported regions for voice assistants and ensure your resources are deployed in one of those regions.
final String subscriptionKey = "YourSubscriptionKey"; // Your subscription key final String region = "YourServiceRegion"; // Your speech subscription service region final BotFrameworkConfig botConfig = BotFrameworkConfig.fromSubscription(subscriptionKey, region); // Configure audio input from a microphone. final AudioConfig audioConfig = AudioConfig.fromDefaultMicrophoneInput(); // Create a DialogServiceConnector instance. final DialogServiceConnector connector = new DialogServiceConnector(botConfig, audioConfig);- Replace the string
The connector
DialogServiceConnectorrelies on several events to communicate its bot activities, speech recognition results, and other information. Add these event listeners next.// Recognizing will provide the intermediate recognized text while an audio stream is being processed. connector.recognizing.addEventListener((o, speechRecognitionResultEventArgs) -> { log.info("Recognizing speech event text: {}", speechRecognitionResultEventArgs.getResult().getText()); }); // Recognized will provide the final recognized text once audio capture is completed. connector.recognized.addEventListener((o, speechRecognitionResultEventArgs) -> { log.info("Recognized speech event reason text: {}", speechRecognitionResultEventArgs.getResult().getText()); }); // SessionStarted will notify when audio begins flowing to the service for a turn. connector.sessionStarted.addEventListener((o, sessionEventArgs) -> { log.info("Session Started event id: {} ", sessionEventArgs.getSessionId()); }); // SessionStopped will notify when a turn is complete and it's safe to begin listening again. connector.sessionStopped.addEventListener((o, sessionEventArgs) -> { log.info("Session stopped event id: {}", sessionEventArgs.getSessionId()); }); // Canceled will be signaled when a turn is aborted or experiences an error condition. connector.canceled.addEventListener((o, canceledEventArgs) -> { log.info("Canceled event details: {}", canceledEventArgs.getErrorDetails()); connector.disconnectAsync(); }); // ActivityReceived is the main way your bot will communicate with the client and uses Bot Framework activities. connector.activityReceived.addEventListener((o, activityEventArgs) -> { final String act = activityEventArgs.getActivity().serialize(); log.info("Received activity {} audio", activityEventArgs.hasAudio() ? "with" : "without"); if (activityEventArgs.hasAudio()) { playAudioStream(activityEventArgs.getAudio()); } });Connect
DialogServiceConnectorto Direct Line Speech by invoking theconnectAsync()method. To test your bot, you can invoke thelistenOnceAsyncmethod to send audio input from your microphone. Additionally, you can also use thesendActivityAsyncmethod to send a custom activity as a serialized string. These custom activities can provide additional data that your bot uses in the conversation.connector.connectAsync(); // Start listening. System.out.println("Say something ..."); connector.listenOnceAsync(); // connector.sendActivityAsync(...)Save changes to the
Mainfile.To support response playback, add an additional class that transforms the PullAudioOutputStream object returned from the getAudio() API to a Java InputStream for ease of handling. This
ActivityAudioStreamis a specialized class that handles audio response from the Direct Line Speech channel. It provides accessors to fetch audio format information that's required for handling playback. For that, select File > New > Class.In the New Java Class window, enter speechsdk.quickstart in the Package field and ActivityAudioStream in the Name field.
Open the newly created
ActivityAudioStreamclass, and replace it with the following code:package com.speechsdk.quickstart; import com.microsoft.cognitiveservices.speech.audio.PullAudioOutputStream; import java.io.IOException; import java.io.InputStream; public final class ActivityAudioStream extends InputStream { /** * The number of samples played per second (16 kHz). */ public static final long SAMPLE_RATE = 16000; /** * The number of bits in each sample of a sound that has this format (16 bits). */ public static final int BITS_PER_SECOND = 16; /** * The number of audio channels in this format (1 for mono). */ public static final int CHANNELS = 1; /** * The number of bytes in each frame of a sound that has this format (2). */ public static final int FRAME_SIZE = 2; /** * Reads up to a specified maximum number of bytes of data from the audio * stream, putting them into the given byte array. * * @param b the buffer into which the data is read * @param off the offset, from the beginning of array <code>b</code>, at which * the data will be written * @param len the maximum number of bytes to read * @return the total number of bytes read into the buffer, or -1 if there * is no more data because the end of the stream has been reached */ @Override public int read(byte[] b, int off, int len) { byte[] tempBuffer = new byte[len]; int n = (int) this.pullStreamImpl.read(tempBuffer); for (int i = 0; i < n; i++) { if (off + i > b.length) { throw new ArrayIndexOutOfBoundsException(b.length); } b[off + i] = tempBuffer[i]; } if (n == 0) { return -1; } return n; } /** * Reads the next byte of data from the activity audio stream if available. * * @return the next byte of data, or -1 if the end of the stream is reached * @see #read(byte[], int, int) * @see #read(byte[]) * @see #available * <p> */ @Override public int read() { byte[] data = new byte[1]; int temp = read(data); if (temp <= 0) { // we have a weird situation if read(byte[]) returns 0! return -1; } return data[0] & 0xFF; } /** * Reads up to a specified maximum number of bytes of data from the activity audio stream, * putting them into the given byte array. * * @param b the buffer into which the data is read * @return the total number of bytes read into the buffer, or -1 if there * is no more data because the end of the stream has been reached */ @Override public int read(byte[] b) { int n = (int) pullStreamImpl.read(b); if (n == 0) { return -1; } return n; } /** * Skips over and discards a specified number of bytes from this * audio input stream. * * @param n the requested number of bytes to be skipped * @return the actual number of bytes skipped * @throws IOException if an input or output error occurs * @see #read * @see #available */ @Override public long skip(long n) { if (n <= 0) { return 0; } if (n <= Integer.MAX_VALUE) { byte[] tempBuffer = new byte[(int) n]; return read(tempBuffer); } long count = 0; for (long i = n; i > 0; i -= Integer.MAX_VALUE) { int size = (int) Math.min(Integer.MAX_VALUE, i); byte[] tempBuffer = new byte[size]; count += read(tempBuffer); } return count; } /** * Closes this audio input stream and releases any system resources associated * with the stream. */ @Override public void close() { this.pullStreamImpl.close(); } /** * Fetch the audio format for the ActivityAudioStream. The ActivityAudioFormat defines the sample rate, bits per sample, and the # channels. * * @return instance of the ActivityAudioFormat associated with the stream */ public ActivityAudioStream.ActivityAudioFormat getActivityAudioFormat() { return activityAudioFormat; } /** * Returns the maximum number of bytes that can be read (or skipped over) from this * audio input stream without blocking. * * @return the number of bytes that can be read from this audio input stream without blocking. * As this implementation does not buffer, this will be defaulted to 0 */ @Override public int available() { return 0; } public ActivityAudioStream(final PullAudioOutputStream stream) { pullStreamImpl = stream; this.activityAudioFormat = new ActivityAudioStream.ActivityAudioFormat(SAMPLE_RATE, BITS_PER_SECOND, CHANNELS, FRAME_SIZE, AudioEncoding.PCM_SIGNED); } private PullAudioOutputStream pullStreamImpl; private ActivityAudioFormat activityAudioFormat; /** * ActivityAudioFormat is an internal format which contains metadata regarding the type of arrangement of * audio bits in this activity audio stream. */ static class ActivityAudioFormat { private long samplesPerSecond; private int bitsPerSample; private int channels; private int frameSize; private AudioEncoding encoding; public ActivityAudioFormat(long samplesPerSecond, int bitsPerSample, int channels, int frameSize, AudioEncoding encoding) { this.samplesPerSecond = samplesPerSecond; this.bitsPerSample = bitsPerSample; this.channels = channels; this.encoding = encoding; this.frameSize = frameSize; } /** * Fetch the number of samples played per second for the associated audio stream format. * * @return the number of samples played per second */ public long getSamplesPerSecond() { return samplesPerSecond; } /** * Fetch the number of bits in each sample of a sound that has this audio stream format. * * @return the number of bits per sample */ public int getBitsPerSample() { return bitsPerSample; } /** * Fetch the number of audio channels used by this audio stream format. * * @return the number of channels */ public int getChannels() { return channels; } /** * Fetch the default number of bytes in a frame required by this audio stream format. * * @return the number of bytes */ public int getFrameSize() { return frameSize; } /** * Fetch the audio encoding type associated with this audio stream format. * * @return the encoding associated */ public AudioEncoding getEncoding() { return encoding; } } /** * Enum defining the types of audio encoding supported by this stream. */ public enum AudioEncoding { PCM_SIGNED("PCM_SIGNED"); String value; AudioEncoding(String value) { this.value = value; } } }Save changes to the
ActivityAudioStreamfile.
Build and run the app
Select F11, or select Run > Debug.
The console displays the message "Say something."
At this point, speak an English phrase or sentence that your bot can understand. Your speech is transmitted to your bot through the Direct Line Speech channel where it's recognized and processed by your bot. The response is returned as an activity. If your bot returns speech as a response, the audio is played back by using the AudioPlayer class.

Next steps
You can view or download all Speech SDK Go Samples on GitHub.
Prerequisites
Before you get started:
- Create a Speech resource
- Setup your development environment and create an empty project
- Create a bot connected to the Direct Line Speech channel
- Make sure that you have access to a microphone for audio capture
Note
Refer to the list of supported regions for voice assistants and ensure your resources are deployed in one of those regions.
Set up your environment
Update the go.mod file with the latest SDK version by adding this line
require (
    github.com/Microsoft/cognitive-services-speech-sdk-go v1.15.0
)
Start with some boilerplate code
Replace the contents of your source file (for example, quickstart.go) with the below, which includes:
- "main" package definition
- importing the necessary modules from the Speech SDK
- variables for storing the bot information that is replaced later in this quickstart
- a simple implementation using the microphone for audio input
- event handlers for various events that take place during a speech interaction
package main

import (
    "fmt"
    "time"

    "github.com/Microsoft/cognitive-services-speech-sdk-go/audio"
    "github.com/Microsoft/cognitive-services-speech-sdk-go/dialog"
    "github.com/Microsoft/cognitive-services-speech-sdk-go/speech"
)

func main() {
    subscription :=  "YOUR_SUBSCRIPTION_KEY"
    region := "YOUR_BOT_REGION"

    audioConfig, err := audio.NewAudioConfigFromDefaultMicrophoneInput()
    if err != nil {
        fmt.Println("Got an error: ", err)
        return
    }
    defer audioConfig.Close()
    config, err := dialog.NewBotFrameworkConfigFromSubscription(subscription, region)
    if err != nil {
        fmt.Println("Got an error: ", err)
        return
    }
    defer config.Close()
    connector, err := dialog.NewDialogServiceConnectorFromConfig(config, audioConfig)
    if err != nil {
        fmt.Println("Got an error: ", err)
        return
    }
    defer connector.Close()
    activityReceivedHandler := func(event dialog.ActivityReceivedEventArgs) {
        defer event.Close()
        fmt.Println("Received an activity.")
    }
    connector.ActivityReceived(activityReceivedHandler)
    recognizedHandle := func(event speech.SpeechRecognitionEventArgs) {
        defer event.Close()
        fmt.Println("Recognized ", event.Result.Text)
    }
    connector.Recognized(recognizedHandle)
    recognizingHandler := func(event speech.SpeechRecognitionEventArgs) {
        defer event.Close()
        fmt.Println("Recognizing ", event.Result.Text)
    }
    connector.Recognizing(recognizingHandler)
    connector.ListenOnceAsync()
    <-time.After(10 * time.Second)
}
Replace the YOUR_SUBSCRIPTION_KEY and YOUR_BOT_REGION values with actual values from the Speech resource.
Navigate to the Azure portal, and open your Speech resource
Under Keys and Endpoint on the left, there are two available subscription keys
- Use either one as the
YOUR_SUBSCRIPTION_KEYvalue replacement
- Use either one as the
Under the Overview on the left, note the region and map it to the region identifier
- Use the Region identifier as the
YOUR_BOT_REGIONvalue replacement, for example:"westus"for West US
Note
Refer to the list of supported regions for voice assistants and ensure your resources are deployed in one of those regions.
Note
For information on configuring your bot, see the Bot Framework documentation for the Direct Line Speech channel.
- Use the Region identifier as the
Code explanation
The Speech subscription key and region are required to create a speech configuration object. The configuration object is needed to instantiate a speech recognizer object.
The recognizer instance exposes multiple ways to recognize speech. In this example, speech is continuously recognized. This functionality lets the Speech service know that you're sending many phrases for recognition, and when the program terminates to stop recognizing speech. As results are yielded, the code writes them to the console.
Build and run
You're now set up to build your project and test your custom voice assistant using the Speech service.
- Build your project, for example "go build"
- Run the module and speak a phrase or sentence into your device's microphone. Your speech is transmitted to the Direct Line Speech channel and transcribed to text, which appears as output.
Note
The Speech SDK defaults to recognizing using en-us for the language, see How to recognize speech for information on choosing the source language.
Next steps
Additional language and platform support
If you've clicked this tab, you probably didn't see a quickstart in your favorite programming language. Don't worry, we have additional quickstart materials and code samples available on GitHub. Use the table to find the right sample for your programming language and platform/OS combination.
| Language | Code samples |
|---|---|
| C# | .NET Framework, .NET Core, UWP, Unity |
| C++ | Windows, Linux, macOS |
| Java | Android, JRE |
| JavaScript | Browser, Node.js |
| Objective-C | iOS, macOS |
| Python | Windows, Linux, macOS |
| Swift | iOS, macOS |
