GPT-4o Realtime API for speech and audio (Preview)
Note
This feature is currently in public preview. This preview is provided without a service-level agreement, and we don't recommend it for production workloads. Certain features might not be supported or might have constrained capabilities. For more information, see Supplemental Terms of Use for Microsoft Azure Previews.
Azure OpenAI GPT-4o Realtime API for speech and audio is part of the GPT-4o model family that supports low-latency, "speech in, speech out" conversational interactions. The GPT-4o audio realtime API is designed to handle real-time, low-latency conversational interactions, making it a great fit for use cases involving live interactions between a user and a model, such as customer support agents, voice assistants, and real-time translators.
Most users of the Realtime API need to deliver and receive audio from an end-user in real time, including applications that use WebRTC or a telephony system. The Realtime API isn't designed to connect directly to end user devices and relies on client integrations to terminate end user audio streams.
Supported models
The GPT 4o real-time models are available for global deployments.
gpt-4o-realtime-preview(version2024-12-17)gpt-4o-mini-realtime-preview(version2024-12-17)gpt-4o-realtime-preview(version2024-10-01)
See the models and versions documentation for more information.
API support
Support for the Realtime API was first added in API version 2024-10-01-preview. Use version 2024-10-01-preview to access the Realtime API.
Deploy a model for real-time audio
To deploy the gpt-4o-mini-realtime-preview model in the Azure AI Foundry portal:
- Go to the Azure OpenAI Service page in Azure AI Foundry portal. Make sure you're signed in with the Azure subscription that has your Azure OpenAI Service resource (with or without model deployments.)
- Select the Real-time audio playground from under Playgrounds in the left pane.
- Select + Create new deployment > From base models to open the deployment window.
- Search for and select the
gpt-4o-mini-realtime-previewmodel and then select Deploy to selected resource. - In the deployment wizard, select the
2024-12-17model version. - Follow the wizard to finish deploying the model.
Now that you have a deployment of the gpt-4o-mini-realtime-preview model, you can interact with it in real time in the Azure AI Foundry portal Real-time audio playground or Realtime API.
Use the GPT-4o real-time audio
To chat with your deployed gpt-4o-mini-realtime-preview model in the Azure AI Foundry Real-time audio playground, follow these steps:
Go to the Azure OpenAI Service page in Azure AI Foundry portal. Make sure you're signed in with the Azure subscription that has your Azure OpenAI Service resource and the deployed
gpt-4o-mini-realtime-previewmodel.Select the Real-time audio playground from under Playgrounds in the left pane.
Select your deployed
gpt-4o-mini-realtime-previewmodel from the Deployment dropdown.Select Enable microphone to allow the browser to access your microphone. If you already granted permission, you can skip this step.
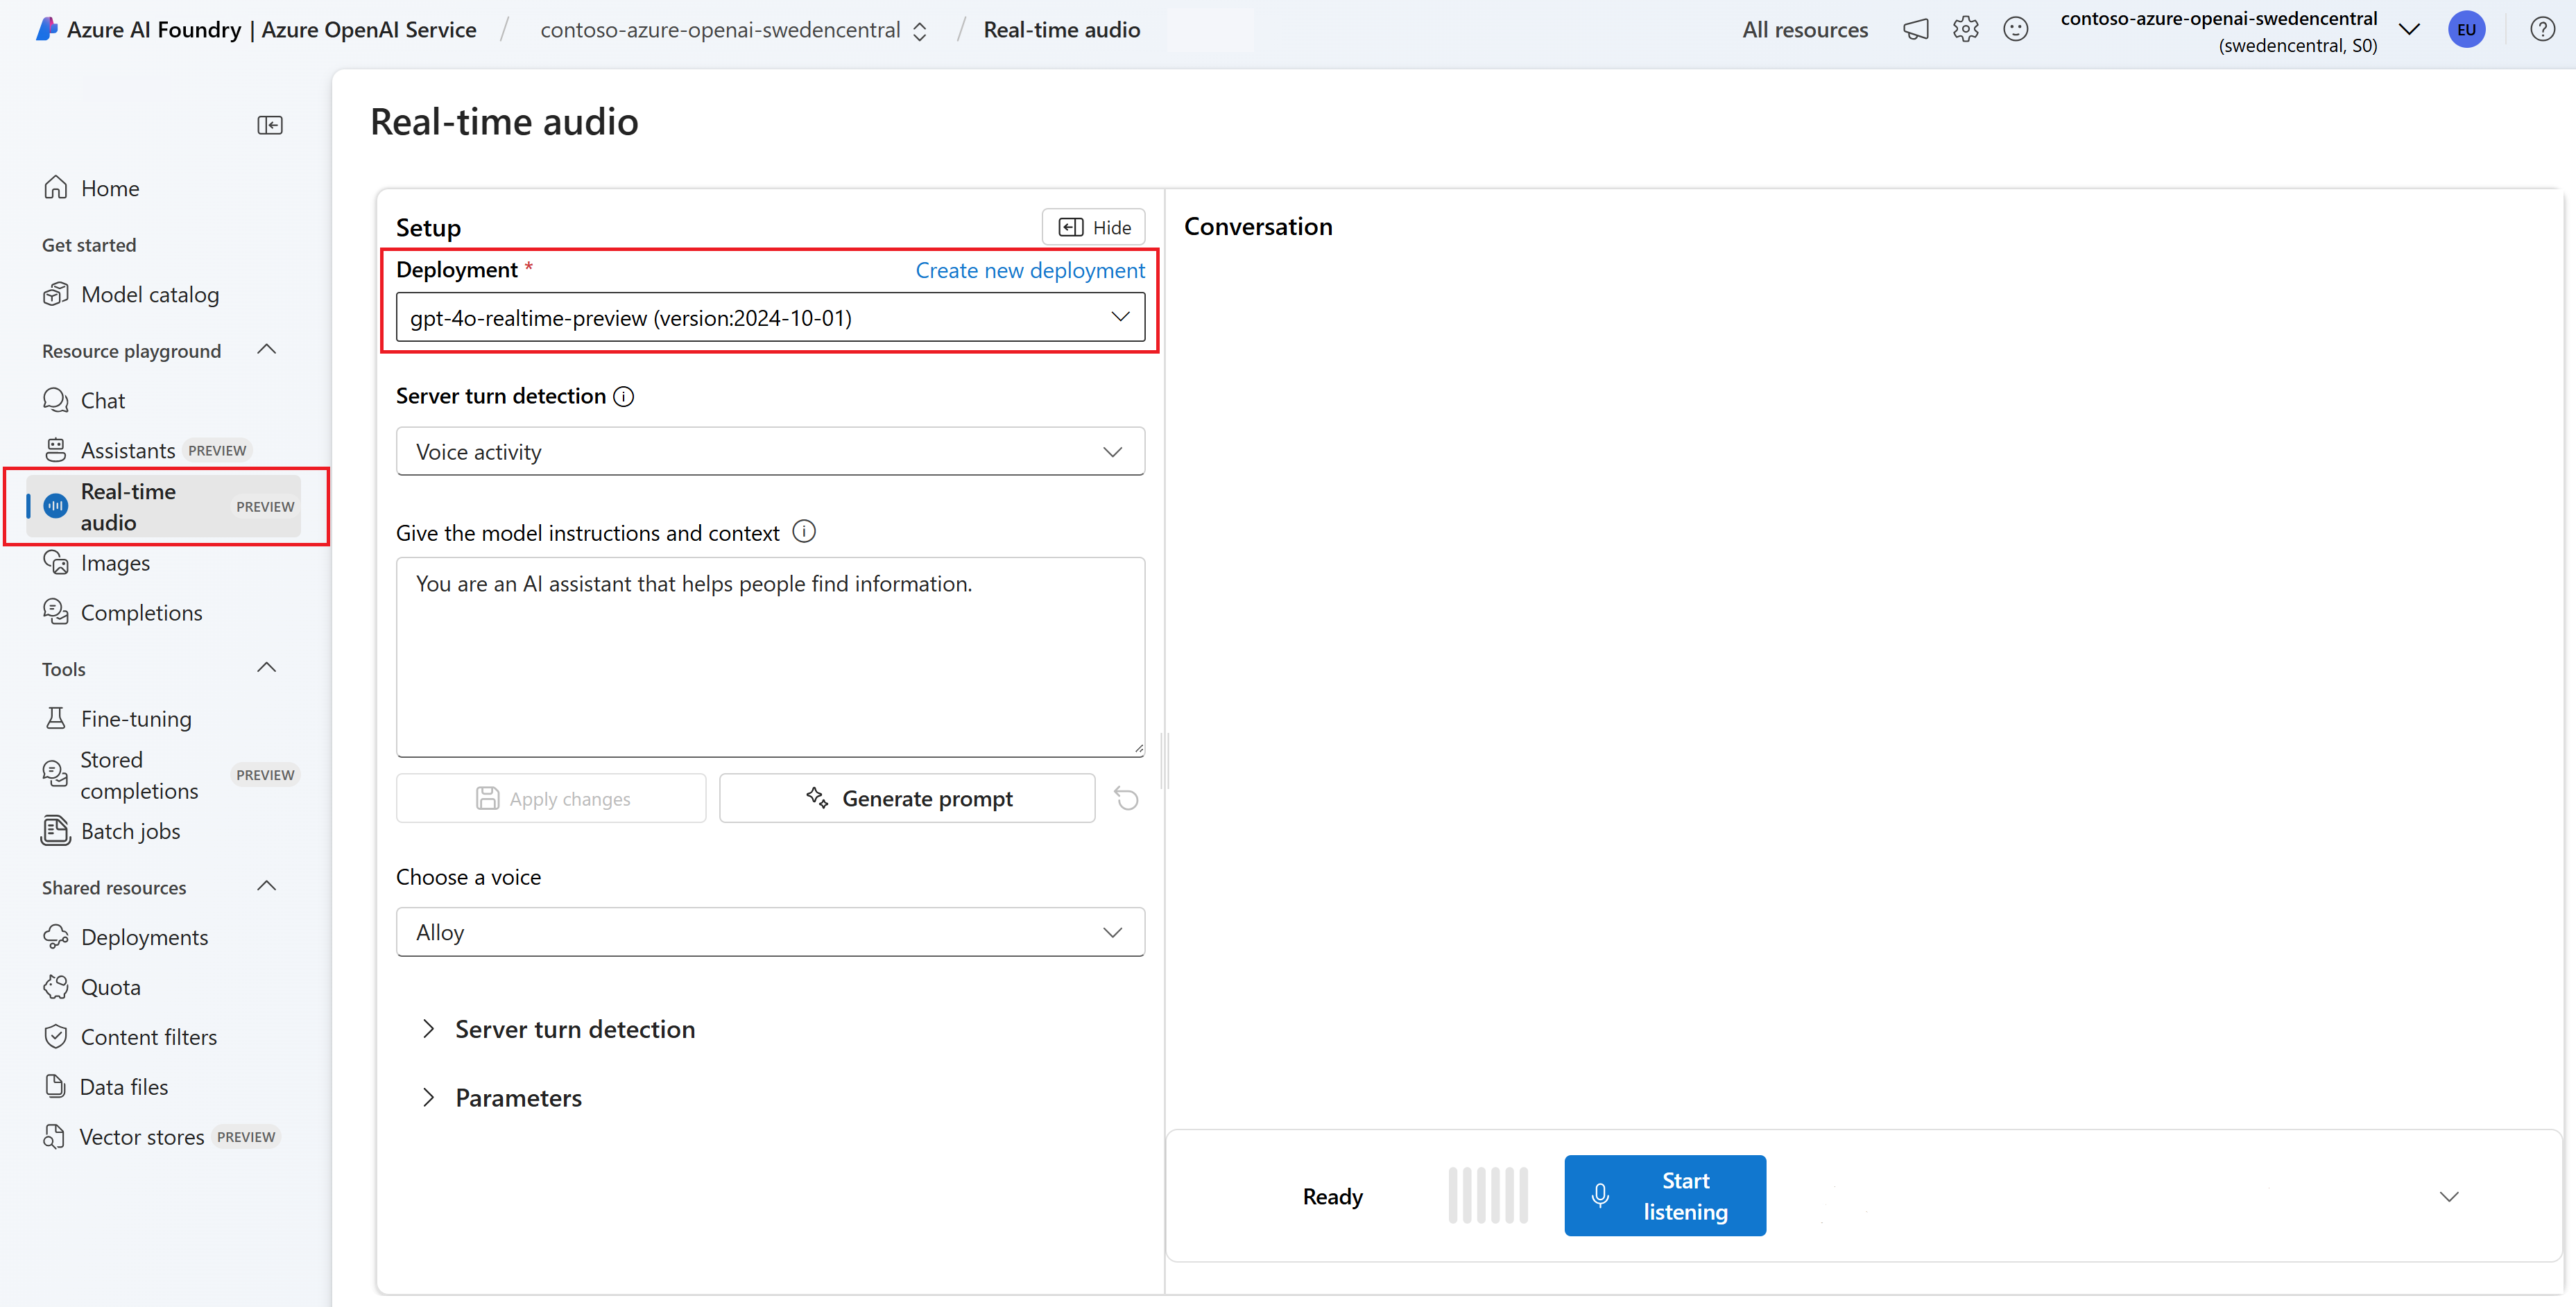
Optionally, you can edit contents in the Give the model instructions and context text box. Give the model instructions about how it should behave and any context it should reference when generating a response. You can describe the assistant's personality, tell it what it should and shouldn't answer, and tell it how to format responses.
Optionally, change settings such as threshold, prefix padding, and silence duration.
Select Start listening to start the session. You can speak into the microphone to start a chat.
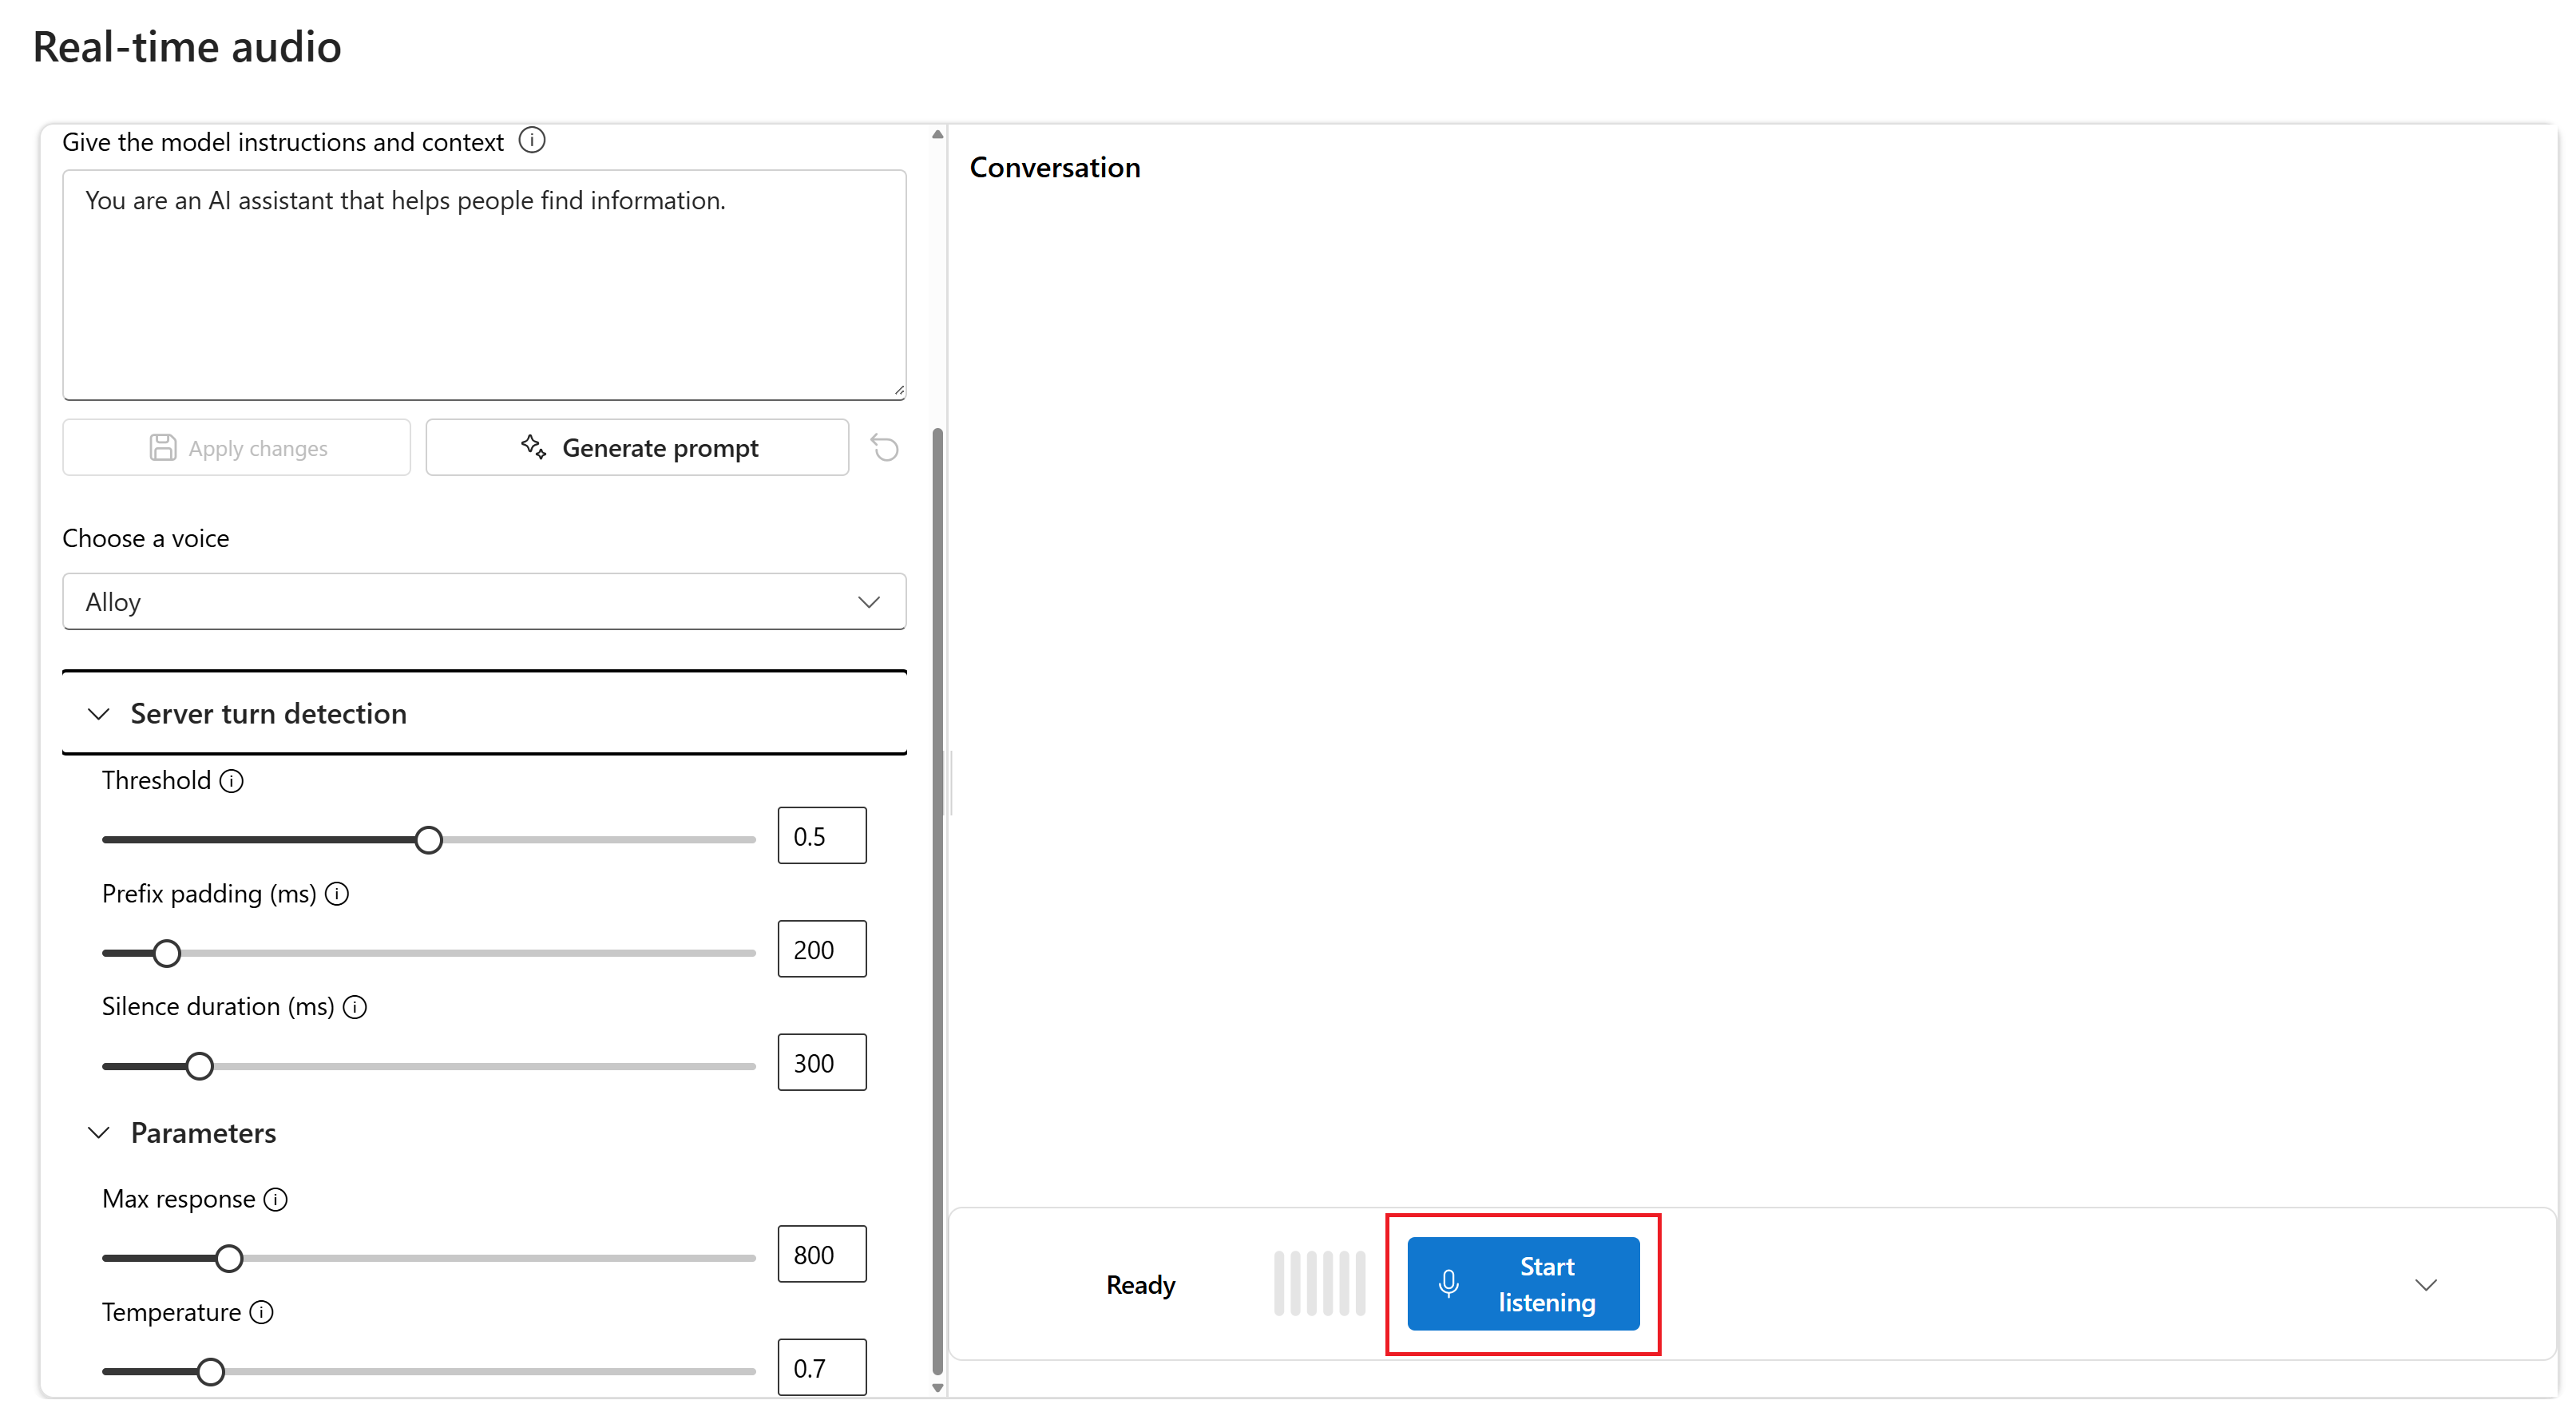
You can interrupt the chat at any time by speaking. You can end the chat by selecting the Stop listening button.


Prerequisites
- An Azure subscription - Create one for free
- Node.js LTS or ESM support.
- An Azure OpenAI resource created in one of the supported regions. For more information about region availability, see the models and versions documentation.
- Then, you need to deploy a
gpt-4o-mini-realtime-previewmodel with your Azure OpenAI resource. For more information, see Create a resource and deploy a model with Azure OpenAI.
Microsoft Entra ID prerequisites
For the recommended keyless authentication with Microsoft Entra ID, you need to:
- Install the Azure CLI used for keyless authentication with Microsoft Entra ID.
- Assign the
Cognitive Services Userrole to your user account. You can assign roles in the Azure portal under Access control (IAM) > Add role assignment.
Deploy a model for real-time audio
To deploy the gpt-4o-mini-realtime-preview model in the Azure AI Foundry portal:
- Go to the Azure OpenAI Service page in Azure AI Foundry portal. Make sure you're signed in with the Azure subscription that has your Azure OpenAI Service resource (with or without model deployments.)
- Select the Real-time audio playground from under Playgrounds in the left pane.
- Select + Create new deployment > From base models to open the deployment window.
- Search for and select the
gpt-4o-mini-realtime-previewmodel and then select Deploy to selected resource. - In the deployment wizard, select the
2024-12-17model version. - Follow the wizard to finish deploying the model.
Now that you have a deployment of the gpt-4o-mini-realtime-preview model, you can interact with it in real time in the Azure AI Foundry portal Real-time audio playground or Realtime API.
Set up
Create a new folder
realtime-audio-quickstartto contain the application and open Visual Studio Code in that folder with the following command:mkdir realtime-audio-quickstart && cd realtime-audio-quickstartCreate the
package.jsonwith the following command:npm init -yInstall the OpenAI client library for JavaScript with:
npm install openaiFor the recommended keyless authentication with Microsoft Entra ID, install the
@azure/identitypackage with:npm install @azure/identity
Retrieve resource information
You need to retrieve the following information to authenticate your application with your Azure OpenAI resource:
| Variable name | Value |
|---|---|
AZURE_OPENAI_ENDPOINT |
This value can be found in the Keys and Endpoint section when examining your resource from the Azure portal. |
AZURE_OPENAI_DEPLOYMENT_NAME |
This value will correspond to the custom name you chose for your deployment when you deployed a model. This value can be found under Resource Management > Model Deployments in the Azure portal. |
OPENAI_API_VERSION |
Learn more about API Versions. You can change the version in code or use an environment variable. |
Learn more about keyless authentication and setting environment variables.
Caution
To use the recommended keyless authentication with the SDK, make sure that the AZURE_OPENAI_API_KEY environment variable isn't set.
Text in audio out
Create the
index.jsfile with the following code:import { OpenAIRealtimeWS } from "openai/beta/realtime/ws"; import { AzureOpenAI } from "openai"; import { DefaultAzureCredential, getBearerTokenProvider } from "@azure/identity"; async function main() { // You will need to set these environment variables or edit the following values const endpoint = process.env.AZURE_OPENAI_ENDPOINT || "AZURE_OPENAI_ENDPOINT"; // Required Azure OpenAI deployment name and API version const deploymentName = process.env.AZURE_OPENAI_DEPLOYMENT_NAME || "gpt-4o-mini-realtime-preview"; const apiVersion = process.env.OPENAI_API_VERSION || "2024-10-01-preview"; // Keyless authentication const credential = new DefaultAzureCredential(); const scope = "https://cognitiveservices.azure.com/.default"; const azureADTokenProvider = getBearerTokenProvider(credential, scope); const azureOpenAIClient = new AzureOpenAI({ azureADTokenProvider, apiVersion: apiVersion, deployment: deploymentName, endpoint: endpoint, }); const realtimeClient = await OpenAIRealtimeWS.azure(azureOpenAIClient); realtimeClient.socket.on("open", () => { console.log("Connection opened!"); realtimeClient.send({ type: "session.update", session: { modalities: ["text", "audio"], model: "gpt-4o-mini-realtime-preview", }, }); realtimeClient.send({ type: "conversation.item.create", item: { type: "message", role: "user", content: [{ type: "input_text", text: "Please assist the user" }], }, }); realtimeClient.send({ type: "response.create" }); }); realtimeClient.on("error", (err) => { // Instead of throwing the error, you can log it // and continue processing events. throw err; }); realtimeClient.on("session.created", (event) => { console.log("session created!", event.session); console.log(); }); realtimeClient.on("response.text.delta", (event) => process.stdout.write(event.delta)); realtimeClient.on("response.audio.delta", (event) => { const buffer = Buffer.from(event.delta, "base64"); console.log(`Received ${buffer.length} bytes of audio data.`); }); realtimeClient.on("response.audio_transcript.delta", (event) => { console.log(`Received text delta:${event.delta}.`); }); realtimeClient.on("response.text.done", () => console.log()); realtimeClient.on("response.done", () => realtimeClient.close()); realtimeClient.socket.on("close", () => console.log("\nConnection closed!")); } main().catch((err) => { console.error("The sample encountered an error:", err); }); export { main };Sign in to Azure with the following command:
az loginRun the JavaScript file.
node index.js
Wait a few moments to get the response.
Output
The script gets a response from the model and prints the transcript and audio data received.
The output will look similar to the following:
Received text delta:Of.
Received text delta: course.
Received text delta:!.
Received text delta: How.
Received text delta: can.
Received 4800 bytes of audio data.
Received 7200 bytes of audio data.
Received text delta: I.
Received 12000 bytes of audio data.
Received text delta: help.
Received text delta: you.
Received text delta: today.
Received text delta:?.
Received 12000 bytes of audio data.
Received 12000 bytes of audio data.
Received 12000 bytes of audio data.
Received 26400 bytes of audio data.

Connection closed!
Web application sample
Our JavaScript web sample on GitHub demonstrates how to use the GPT-4o Realtime API to interact with the model in real time. The sample code includes a simple web interface that captures audio from the user's microphone and sends it to the model for processing. The model responds with text and audio, which the sample code renders in the web interface.
You can run the sample code locally on your machine by following these steps. Refer to the repository on GitHub for the most up-to-date instructions.
If you don't have Node.js installed, download and install the LTS version of Node.js.
Clone the repository to your local machine:
git clone https://github.com/Azure-Samples/aoai-realtime-audio-sdk.gitGo to the
javascript/samples/webfolder in your preferred code editor.cd ./javascript/samplesRun
download-pkg.ps1ordownload-pkg.shto download the required packages.Go to the
webfolder from the./javascript/samplesfolder.cd ./webRun
npm installto install package dependencies.Run
npm run devto start the web server, navigating any firewall permissions prompts as needed.Go to any of the provided URIs from the console output (such as
http://localhost:5173/) in a browser.Enter the following information in the web interface:
- Endpoint: The resource endpoint of an Azure OpenAI resource. You don't need to append the
/realtimepath. An example structure might behttps://my-azure-openai-resource-from-portal.openai.azure.com. - API Key: A corresponding API key for the Azure OpenAI resource.
- Deployment: The name of the
gpt-4o-mini-realtime-previewmodel that you deployed in the previous section. - System Message: Optionally, you can provide a system message such as "You always talk like a friendly pirate."
- Temperature: Optionally, you can provide a custom temperature.
- Voice: Optionally, you can select a voice.
- Endpoint: The resource endpoint of an Azure OpenAI resource. You don't need to append the
Select the Record button to start the session. Accept permissions to use your microphone if prompted.
You should see a
<< Session Started >>message in the main output. Then you can speak into the microphone to start a chat.You can interrupt the chat at any time by speaking. You can end the chat by selecting the Stop button.
Prerequisites
- An Azure subscription. Create one for free.
- Python 3.8 or later version. We recommend using Python 3.10 or later, but having at least Python 3.8 is required. If you don't have a suitable version of Python installed, you can follow the instructions in the VS Code Python Tutorial for the easiest way of installing Python on your operating system.
- An Azure OpenAI resource created in one of the supported regions. For more information about region availability, see the models and versions documentation.
- Then, you need to deploy a
gpt-4o-mini-realtime-previewmodel with your Azure OpenAI resource. For more information, see Create a resource and deploy a model with Azure OpenAI.
Microsoft Entra ID prerequisites
For the recommended keyless authentication with Microsoft Entra ID, you need to:
- Install the Azure CLI used for keyless authentication with Microsoft Entra ID.
- Assign the
Cognitive Services Userrole to your user account. You can assign roles in the Azure portal under Access control (IAM) > Add role assignment.
Deploy a model for real-time audio
To deploy the gpt-4o-mini-realtime-preview model in the Azure AI Foundry portal:
- Go to the Azure OpenAI Service page in Azure AI Foundry portal. Make sure you're signed in with the Azure subscription that has your Azure OpenAI Service resource (with or without model deployments.)
- Select the Real-time audio playground from under Playgrounds in the left pane.
- Select + Create new deployment > From base models to open the deployment window.
- Search for and select the
gpt-4o-mini-realtime-previewmodel and then select Deploy to selected resource. - In the deployment wizard, select the
2024-12-17model version. - Follow the wizard to finish deploying the model.
Now that you have a deployment of the gpt-4o-mini-realtime-preview model, you can interact with it in real time in the Azure AI Foundry portal Real-time audio playground or Realtime API.
Set up
Create a new folder
realtime-audio-quickstartto contain the application and open Visual Studio Code in that folder with the following command:mkdir realtime-audio-quickstart && cd realtime-audio-quickstartCreate a virtual environment. If you already have Python 3.10 or higher installed, you can create a virtual environment using the following commands:
Activating the Python environment means that when you run
pythonorpipfrom the command line, you then use the Python interpreter contained in the.venvfolder of your application. You can use thedeactivatecommand to exit the python virtual environment, and can later reactivate it when needed.Tip
We recommend that you create and activate a new Python environment to use to install the packages you need for this tutorial. Don't install packages into your global python installation. You should always use a virtual or conda environment when installing python packages, otherwise you can break your global installation of Python.
Install the OpenAI Python client library with:
pip install openai[realtime]Note
This library is maintained by OpenAI. Refer to the release history to track the latest updates to the library.
For the recommended keyless authentication with Microsoft Entra ID, install the
azure-identitypackage with:pip install azure-identity
Retrieve resource information
You need to retrieve the following information to authenticate your application with your Azure OpenAI resource:
| Variable name | Value |
|---|---|
AZURE_OPENAI_ENDPOINT |
This value can be found in the Keys and Endpoint section when examining your resource from the Azure portal. |
AZURE_OPENAI_DEPLOYMENT_NAME |
This value will correspond to the custom name you chose for your deployment when you deployed a model. This value can be found under Resource Management > Model Deployments in the Azure portal. |
OPENAI_API_VERSION |
Learn more about API Versions. You can change the version in code or use an environment variable. |
Learn more about keyless authentication and setting environment variables.
Caution
To use the recommended keyless authentication with the SDK, make sure that the AZURE_OPENAI_API_KEY environment variable isn't set.
Text in audio out
Create the
text-in-audio-out.pyfile with the following code:import os import base64 import asyncio from openai import AsyncAzureOpenAI from azure.identity.aio import DefaultAzureCredential, get_bearer_token_provider async def main() -> None: """ When prompted for user input, type a message and hit enter to send it to the model. Enter "q" to quit the conversation. """ credential = DefaultAzureCredential() token_provider=get_bearer_token_provider(credential, "https://cognitiveservices.azure.com/.default") client = AsyncAzureOpenAI( azure_endpoint=os.environ["AZURE_OPENAI_ENDPOINT"], azure_ad_token_provider=token_provider, api_version="2024-10-01-preview", ) async with client.beta.realtime.connect( model="gpt-4o-realtime-preview", # name of your deployment ) as connection: await connection.session.update(session={"modalities": ["text", "audio"]}) while True: user_input = input("Enter a message: ") if user_input == "q": break await connection.conversation.item.create( item={ "type": "message", "role": "user", "content": [{"type": "input_text", "text": user_input}], } ) await connection.response.create() async for event in connection: if event.type == "response.text.delta": print(event.delta, flush=True, end="") elif event.type == "response.audio.delta": audio_data = base64.b64decode(event.delta) print(f"Received {len(audio_data)} bytes of audio data.") elif event.type == "response.audio_transcript.delta": print(f"Received text delta: {event.delta}") elif event.type == "response.text.done": print() elif event.type == "response.done": break await credential.close() asyncio.run(main())Sign in to Azure with the following command:
az loginRun the Python file.
python text-in-audio-out.pyWhen prompted for user input, type a message and hit enter to send it to the model. Enter "q" to quit the conversation.
Wait a few moments to get the response.
Output
The script gets a response from the model and prints the transcript and audio data received.
The output looks similar to the following:
Enter a message: Please assist the user
Received text delta: Of
Received text delta:  course
Received text delta: !
Received text delta:  How
Received 4800 bytes of audio data.
Received 7200 bytes of audio data.
Received 12000 bytes of audio data.
Received text delta:  can
Received text delta:  I
Received text delta:  assist
Received 12000 bytes of audio data.
Received 12000 bytes of audio data.
Received text delta:  you
Received text delta:  today
Received text delta: ?
Received 12000 bytes of audio data.
Received 24000 bytes of audio data.
Received 36000 bytes of audio data.
Enter a message: q
Prerequisites
- An Azure subscription - Create one for free
- Node.js LTS or ESM support.
- TypeScript installed globally.
- An Azure OpenAI resource created in one of the supported regions. For more information about region availability, see the models and versions documentation.
- Then, you need to deploy a
gpt-4o-mini-realtime-previewmodel with your Azure OpenAI resource. For more information, see Create a resource and deploy a model with Azure OpenAI.
Microsoft Entra ID prerequisites
For the recommended keyless authentication with Microsoft Entra ID, you need to:
- Install the Azure CLI used for keyless authentication with Microsoft Entra ID.
- Assign the
Cognitive Services Userrole to your user account. You can assign roles in the Azure portal under Access control (IAM) > Add role assignment.
Deploy a model for real-time audio
To deploy the gpt-4o-mini-realtime-preview model in the Azure AI Foundry portal:
- Go to the Azure OpenAI Service page in Azure AI Foundry portal. Make sure you're signed in with the Azure subscription that has your Azure OpenAI Service resource (with or without model deployments.)
- Select the Real-time audio playground from under Playgrounds in the left pane.
- Select + Create new deployment > From base models to open the deployment window.
- Search for and select the
gpt-4o-mini-realtime-previewmodel and then select Deploy to selected resource. - In the deployment wizard, select the
2024-12-17model version. - Follow the wizard to finish deploying the model.
Now that you have a deployment of the gpt-4o-mini-realtime-preview model, you can interact with it in real time in the Azure AI Foundry portal Real-time audio playground or Realtime API.
Set up
Create a new folder
realtime-audio-quickstartto contain the application and open Visual Studio Code in that folder with the following command:mkdir realtime-audio-quickstart && cd realtime-audio-quickstartCreate the
package.jsonwith the following command:npm init -yUpdate the
package.jsonto ECMAScript with the following command:npm pkg set type=moduleInstall the OpenAI client library for JavaScript with:
npm install openaiFor the recommended keyless authentication with Microsoft Entra ID, install the
@azure/identitypackage with:npm install @azure/identity
Retrieve resource information
You need to retrieve the following information to authenticate your application with your Azure OpenAI resource:
| Variable name | Value |
|---|---|
AZURE_OPENAI_ENDPOINT |
This value can be found in the Keys and Endpoint section when examining your resource from the Azure portal. |
AZURE_OPENAI_DEPLOYMENT_NAME |
This value will correspond to the custom name you chose for your deployment when you deployed a model. This value can be found under Resource Management > Model Deployments in the Azure portal. |
OPENAI_API_VERSION |
Learn more about API Versions. You can change the version in code or use an environment variable. |
Learn more about keyless authentication and setting environment variables.
Caution
To use the recommended keyless authentication with the SDK, make sure that the AZURE_OPENAI_API_KEY environment variable isn't set.
Text in audio out
Create the
index.tsfile with the following code:import { OpenAIRealtimeWS } from "openai/beta/realtime/ws"; import { AzureOpenAI } from "openai"; import { DefaultAzureCredential, getBearerTokenProvider } from "@azure/identity"; async function main(): Promise<void> { // You will need to set these environment variables or edit the following values const endpoint = process.env.AZURE_OPENAI_ENDPOINT || "AZURE_OPENAI_ENDPOINT"; // Required Azure OpenAI deployment name and API version const deploymentName = process.env.AZURE_OPENAI_DEPLOYMENT_NAME || "gpt-4o-mini-realtime-preview"; const apiVersion = process.env.OPENAI_API_VERSION || "2024-10-01-preview"; // Keyless authentication const credential = new DefaultAzureCredential(); const scope = "https://cognitiveservices.azure.com/.default"; const azureADTokenProvider = getBearerTokenProvider(credential, scope); const azureOpenAIClient = new AzureOpenAI({ azureADTokenProvider, apiVersion: apiVersion, deployment: deploymentName, endpoint: endpoint, }); const realtimeClient = await OpenAIRealtimeWS.azure(azureOpenAIClient); realtimeClient.socket.on("open", () => { console.log("Connection opened!"); realtimeClient.send({ type: "session.update", session: { modalities: ["text", "audio"], model: "gpt-4o-mini-realtime-preview", }, }); realtimeClient.send({ type: "conversation.item.create", item: { type: "message", role: "user", content: [{ type: "input_text", text: "Please assist the user" }], }, }); realtimeClient.send({ type: "response.create" }); }); realtimeClient.on("error", (err) => { // Instead of throwing the error, you can log it // and continue processing events. throw err; }); realtimeClient.on("session.created", (event) => { console.log("session created!", event.session); console.log(); }); realtimeClient.on("response.text.delta", (event) => process.stdout.write(event.delta)); realtimeClient.on("response.audio.delta", (event) => { const buffer = Buffer.from(event.delta, "base64"); console.log(`Received ${buffer.length} bytes of audio data.`); }); realtimeClient.on("response.audio_transcript.delta", (event) => { console.log(`Received text delta:${event.delta}.`); }); realtimeClient.on("response.text.done", () => console.log()); realtimeClient.on("response.done", () => realtimeClient.close()); realtimeClient.socket.on("close", () => console.log("\nConnection closed!")); } main().catch((err) => { console.error("The sample encountered an error:", err); }); export { main };Create the
tsconfig.jsonfile to transpile the TypeScript code and copy the following code for ECMAScript.{ "compilerOptions": { "module": "NodeNext", "target": "ES2022", // Supports top-level await "moduleResolution": "NodeNext", "skipLibCheck": true, // Avoid type errors from node_modules "strict": true // Enable strict type-checking options }, "include": ["*.ts"] }Transpile from TypeScript to JavaScript.
tscSign in to Azure with the following command:
az loginRun the code with the following command:
node index.js
Wait a few moments to get the response.
Output
The script gets a response from the model and prints the transcript and audio data received.
The output will look similar to the following:
Received text delta:Of.
Received text delta: course.
Received text delta:!.
Received text delta: How.
Received text delta: can.
Received 4800 bytes of audio data.
Received 7200 bytes of audio data.
Received text delta: I.
Received 12000 bytes of audio data.
Received text delta: help.
Received text delta: you.
Received text delta: today.
Received text delta:?.
Received 12000 bytes of audio data.
Received 12000 bytes of audio data.
Received 12000 bytes of audio data.
Received 26400 bytes of audio data.

Connection closed!
Related content
- Learn more about How to use the Realtime API
- See the Realtime API reference
- Learn more about Azure OpenAI quotas and limits