Tutorial: Create user flows and custom policies in Azure Active Directory B2C
Before you begin, use the Choose a policy type selector at the top of this page to choose the type of policy you’re setting up. Azure Active Directory B2C offers two methods to define how users interact with your applications: through predefined user flows or through fully configurable custom policies. The steps required in this article are different for each method.
In your applications you may have user flows that enable users to sign up, sign in, or manage their profile. You can create multiple user flows of different types in your Azure Active Directory B2C (Azure AD B2C) tenant and use them in your applications as needed. User flows can be reused across applications.
A user flow lets you determine how users interact with your application when they do things like sign-in, sign-up, edit a profile, or reset a password. In this article, you learn how to:
Custom policies are configuration files that define the behavior of your Azure Active Directory B2C (Azure AD B2C) tenant. In this article, you learn how to:
- Create a sign-up and sign-in user flow
- Enable self-service password reset
- Create a profile editing user flow
Important
We've changed the way we reference user flow versions. Previously, we offered V1 (production-ready) versions, and V1.1 and V2 (preview) versions. Now, we've consolidated user flows into two versions: Recommended user flows with the latest features, and Standard (Legacy) user flows. All legacy preview user flows (V1.1 and V2) are deprecated. For details, see User flow versions in Azure AD B2C. These changes apply to the Azure public cloud only. Other environments will continue to use legacy user flow versioning.
Prerequisites
- If you don't have one already, create an Azure AD B2C tenant that is linked to your Azure subscription.
- Register a web application, and enable ID token implicit grant.
- If you don't have one already, create an Azure AD B2C tenant that is linked to your Azure subscription.
- Register a web application, and enable ID token implicit grant.
Create a sign-up and sign-in user flow
The sign-up and sign-in user flow handles both experiences with a single configuration. Users of your application are led down the right path depending on the context. To create a sign-up and sign-in user flow:
Sign in to the Azure portal.
If you have access to multiple tenants, select the Settings icon in the top menu to switch to your Azure AD B2C tenant from the Directories + subscriptions menu.
In the Azure portal, search for and select Azure AD B2C.
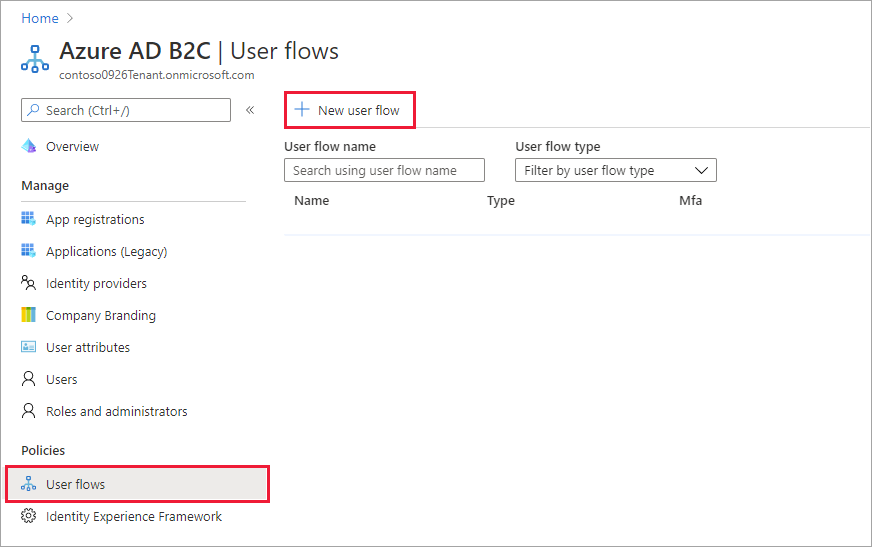
Under Policies, select User flows, and then select New user flow.
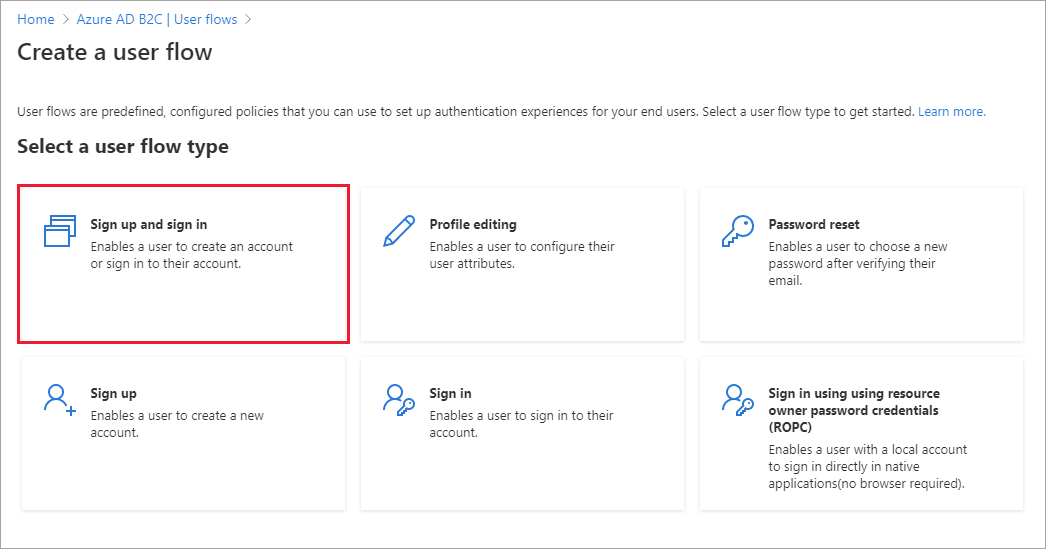
On the Create a user flow page, select the Sign up and sign in user flow.
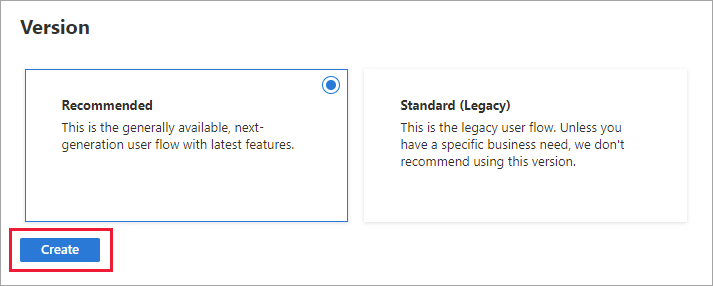
Under Select a version, select Recommended, and then select Create. (Learn more about user flow versions.)
Enter a Name for the user flow. For example, signupsignin1.
For Identity providers, select Email signup.
For User attributes and token claims, choose the claims and attributes that you want to collect and send from the user during sign-up. For example, select Show more, and then choose attributes and claims for Country/Region, Display Name, and Postal Code. Select OK.
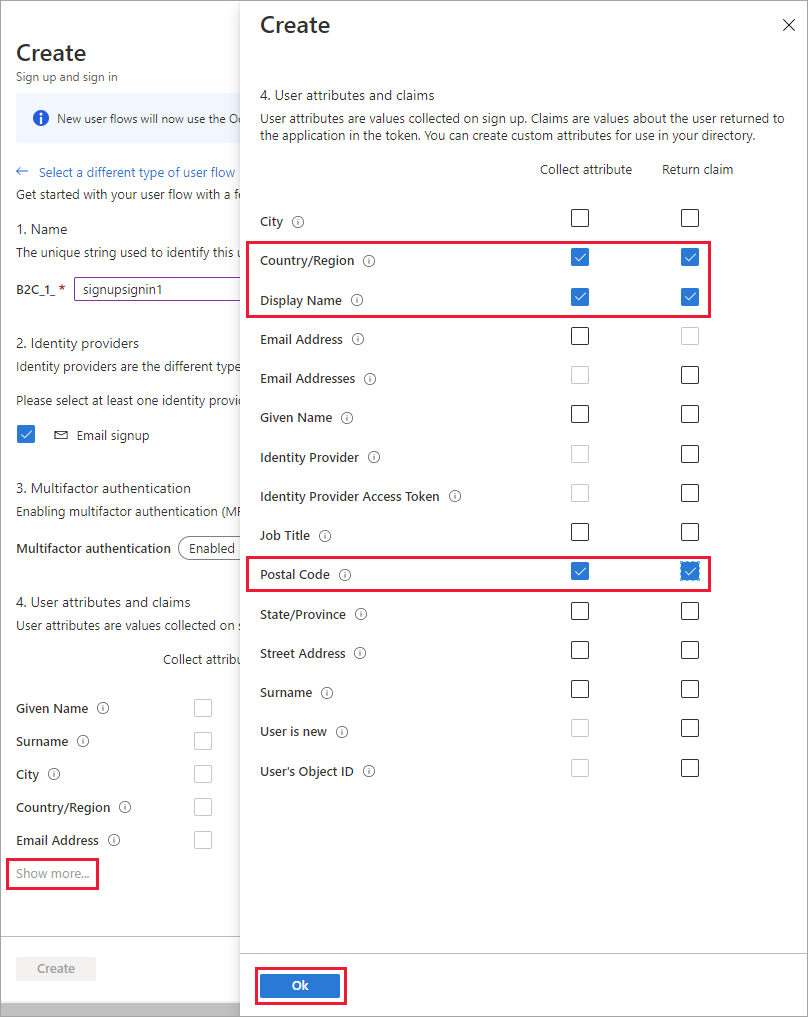
Select Create to add the user flow. A prefix of B2C_1_ is automatically prepended to the name you entered earlier. For example, B2C_1_signupsignin1.
Test the user flow
From the User flows page, select the user flow you just created to open its overview page.
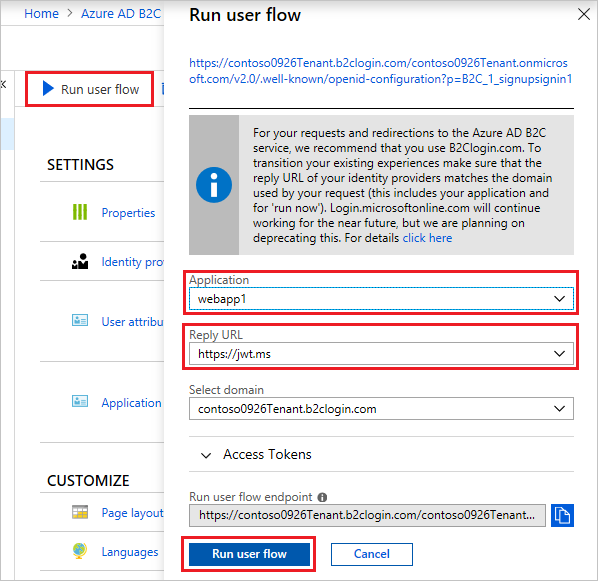
At the top of the user flow overview page, select Run user flow. A pane will open at the right side of the page.
For Application, select the web application you wish to test, such as the one named webapp1. The Reply URL should show
https://jwt.ms.Select Run user flow, and then select Sign up now.
Enter a valid email address, select Send verification code, enter the verification code that you receive, then select Verify code.
Enter a new password and confirm the password.
Select your country and region, enter the name that you want displayed, enter a postal code, and then select Create. The token is returned to
https://jwt.msand should be displayed to you in your browser.You can now run the user flow again and you should be able to sign in with the account that you just created. The returned token includes the claims that you selected of country/region, name, and postal code.
Note
The "Run user flow" experience is not currently compatible with the SPA reply URL type using authorization code flow. To use the "Run user flow" experience with these kinds of apps, register a reply URL of type "Web" and enable the implicit flow..
Enable self-service password reset
To enable self-service password reset for the sign-up or sign-in user flow:
- From the User flows page, select the sign-up or sign-in user flow you just created.
- Under Settings in the left menu, select Properties.
- Under Password configuration, select Self-service password reset.
- Select Save.
Test the user flow
- From the User flows page, select the user flow you just created to open its overview page, then select Run user flow.
- For Application, select the web application you wish to test, such as the one named webapp1. The Reply URL should show
https://jwt.ms. - Select Run user flow.
- From the sign-up or sign-in page, select Forgot your password?.
- Verify the email address of the account that you previously created, and then select Continue.
- You now have the opportunity to change the password for the user. Change the password and select Continue. The token is returned to
https://jwt.msand should be displayed in your browser.
Create a profile editing user flow
If you want to enable users to edit their profile in your application, you use a profile editing user flow.
- In the menu of the Azure AD B2C tenant overview page, select User flows, and then select New user flow.
- On the Create a user flow page, select the Profile editing user flow.
- Under Select a version, select Recommended, and then select Create.
- Enter a Name for the user flow. For example, profileediting1.
- For Identity providers, under Local accounts, select Email signup.
- For User attributes, choose the attributes that you want the customer to be able to edit in their profile. For example, select Show more, and then choose both attributes and claims for Display name and Job title. Select OK.
- Select Create to add the user flow. A prefix of B2C_1_ is automatically appended to the name.
Test the user flow
- Select the user flow you created to open its overview page.
- At the top of the user flow overview page, select Run user flow. A pane will open at the right side of the page.
- For Application, select the web application you wish to test, such as the one named webapp1. The Reply URL should show
https://jwt.ms. - Select Run user flow, and then sign in with the account that you previously created.
- You now have the opportunity to change the display name and job title for the user. Select Continue. The token is returned to
https://jwt.msand should be displayed in your browser.
Tip
This article explains how to set up your tenant manually. You can automate the entire process from this article. Automating will deploy the Azure AD B2C SocialAndLocalAccountsWithMFA starter pack, which will provide Sign Up and Sign In, Password Reset and Profile Edit journeys. To automate the walkthrough below, visit the IEF Setup App and follow the instructions.
Add signing and encryption keys for Identity Experience Framework applications
- Sign in to the Azure portal.
- If you have access to multiple tenants, select the Settings icon in the top menu to switch to your Azure AD B2C tenant from the Directories + subscriptions menu.
- In the Azure portal, search for and select Azure AD B2C.
- On the overview page, under Policies, select Identity Experience Framework.
Create the signing key
- Select Policy Keys and then select Add.
- For Options, choose
Generate. - In Name, enter
TokenSigningKeyContainer. The prefixB2C_1A_might be added automatically. - For Key type, select RSA.
- For Key usage, select Signature.
- Select Create.
Create the encryption key
- Select Policy Keys and then select Add.
- For Options, choose
Generate. - In Name, enter
TokenEncryptionKeyContainer. The prefixB2C_1A_ might be added automatically. - For Key type, select RSA.
- For Key usage, select Encryption.
- Select Create.
Register Identity Experience Framework applications
Azure AD B2C requires you to register two applications that it uses to sign up and sign in users with local accounts: IdentityExperienceFramework, a web API, and ProxyIdentityExperienceFramework, a native app with delegated permission to the IdentityExperienceFramework app. Your users can sign up with an email address or username and a password to access applications registered to your tenant, which creates a "local account." Local accounts exist only in your Azure AD B2C tenant.
You will need to register these two applications in your Azure AD B2C tenant only once.
Register the IdentityExperienceFramework application
To register an application in your Azure AD B2C tenant, you can use the App registrations experience.
- Select App registrations, and then select New registration.
- For Name, enter
IdentityExperienceFramework. - Under Supported account types, select Accounts in this organizational directory only.
- Under Redirect URI, select Web, and then enter
https://your-tenant-name.b2clogin.com/your-tenant-name.onmicrosoft.com, whereyour-tenant-nameis your Azure AD B2C tenant domain name. - Under Permissions, select the Grant admin consent to openid and offline_access permissions check box.
- Select Register.
- Record the Application (client) ID for use in a later step.
Next, expose the API by adding a scope:
- In the left menu, under Manage, select Expose an API.
- Select Add a scope, then select Save and continue to accept the default application ID URI.
- Enter the following values to create a scope that allows custom policy execution in your Azure AD B2C tenant:
- Scope name:
user_impersonation - Admin consent display name:
Access IdentityExperienceFramework - Admin consent description:
Allow the application to access IdentityExperienceFramework on behalf of the signed-in user.
- Scope name:
- Select Add scope
Register the ProxyIdentityExperienceFramework application
- Select App registrations, and then select New registration.
- For Name, enter
ProxyIdentityExperienceFramework. - Under Supported account types, select Accounts in this organizational directory only.
- Under Redirect URI, use the drop-down to select Public client/native (mobile & desktop).
- For Redirect URI, enter
myapp://auth. - Under Permissions, select the Grant admin consent to openid and offline_access permissions check box.
- Select Register.
- Record the Application (client) ID for use in a later step.
Next, specify that the application should be treated as a public client:
- In the left menu, under Manage, select Authentication.
- Under Advanced settings, in the Allow public client flows section, set Enable the following mobile and desktop flows to Yes.
- Select Save.
- Ensure that "isFallbackPublicClient": true is set in the application manifest:
- In the left menu, under Manage, select Manifest to open application manifest.
- Switch from the Microsoft Graph App Manifest (New) tab to the AAD Graph App Manifest (Deprecating Soon) tab.
- Find allowPublicClient key and ensure its value is set to true.
Now, grant permissions to the API scope you exposed earlier in the IdentityExperienceFramework registration:
- In the left menu, under Manage, select API permissions.
- Under Configured permissions, select Add a permission.
- Select the APIs my organization uses tab, then select the IdentityExperienceFramework application.
- Under Permission, select the user_impersonation scope that you defined earlier.
- Select Add permissions. As directed, wait a few minutes before proceeding to the next step.
- Select Grant admin consent for <your tenant name>.
- Select Yes.
- Select Refresh, and then verify that "Granted for ..." appears under Status for the scope.
Custom policy starter pack
Custom policies are a set of XML files you upload to your Azure AD B2C tenant to define technical profiles and user journeys. We provide starter packs with several pre-built policies to get you going quickly. Each of these starter packs contains the smallest number of technical profiles and user journeys needed to achieve the scenarios described. For a more in-depth guide to Azure AD B2C custom policies, follow our custom policies how-to guide series.
- LocalAccounts - Enables the use of local accounts only.
- SocialAccounts - Enables the use of social (or federated) accounts only.
- SocialAndLocalAccounts - Enables the use of both local and social accounts.
- SocialAndLocalAccountsWithMFA - Enables social, local, and multifactor authentication options.
Each starter pack contains:
- Base file - Few modifications are required to the base. Example: TrustFrameworkBase.xml
- Localization file - This file is where localization changes are made. Example: TrustFrameworkLocalization.xml
- Extension file - This file is where most configuration changes are made. Example: TrustFrameworkExtensions.xml
- Relying party files - Task-specific files called by your application. Examples: SignUpOrSignin.xml, ProfileEdit.xml, PasswordReset.xml
In this article, you edit the XML custom policy files in the SocialAndLocalAccounts starter pack. If you need an XML editor, try Visual Studio Code, a lightweight cross-platform editor.
Get the starter pack
Get the custom policy starter packs from GitHub, then update the XML files in the SocialAndLocalAccounts starter pack with your Azure AD B2C tenant name.
Download the .zip file or clone the repository:
git clone https://github.com/Azure-Samples/active-directory-b2c-custom-policy-starterpackIn all of the files in the SocialAndLocalAccounts directory, replace the string
yourtenantwith the name of your Azure AD B2C tenant.For example, if the name of your B2C tenant is contosotenant, all instances of
yourtenant.onmicrosoft.combecomecontosotenant.onmicrosoft.com.
Add application IDs to the custom policy
Add the application IDs to the extensions file TrustFrameworkExtensions.xml.
- Open
SocialAndLocalAccounts/TrustFrameworkExtensions.xmland find the element<TechnicalProfile Id="login-NonInteractive">. - Replace both instances of
IdentityExperienceFrameworkAppIdwith the application ID of the IdentityExperienceFramework application that you created earlier. - Replace both instances of
ProxyIdentityExperienceFrameworkAppIdwith the application ID of the ProxyIdentityExperienceFramework application that you created earlier. - Save the file.
Add Facebook as an identity provider
The SocialAndLocalAccounts starter pack includes Facebook social sign in. Facebook isn't required for using custom policies, but we use it here to demonstrate how you can enable federated social login in a custom policy. If you don't need to enable federated social login, use the LocalAccounts starter pack instead, and skip to the Upload the policies section.
Create Facebook application
Use the steps outlined in Create a Facebook application to obtain Facebook App ID and App Secret. Skip the prerequisites and the rest of the steps in the Set up sign up and sign in with a Facebook account article.
Create the Facebook key
Add your Facebook application's App Secret as a policy key. You can use the App Secret of the application you created as part of this article's prerequisites.
- Sign in to the Azure portal.
- If you have access to multiple tenants, select the Settings icon in the top menu to switch to your Azure AD B2C tenant from the Directories + subscriptions menu.
- In the Azure portal, search for and select Azure AD B2C.
- On the overview page, under Policies, select Identity Experience Framework.
- Select Policy Keys and then select Add.
- For Options, choose
Manual. - For Name, enter
FacebookSecret. The prefixB2C_1A_might be added automatically. - In Secret, enter your Facebook application's App Secret from developers.facebook.com. This value is the secret, not the application ID.
- For Key usage, select Signature.
- Select Create.
Update TrustFrameworkExtensions.xml in custom policy starter pack
In the SocialAndLocalAccounts/TrustFrameworkExtensions.xml file, replace the value of client_id with the Facebook application ID and save changes.
<TechnicalProfile Id="Facebook-OAUTH">
  <Metadata>
  <!--Replace the value of client_id in this technical profile with the Facebook app ID"-->
    <Item Key="client_id">00000000000000</Item>
Upload the policies
- Select the Identity Experience Framework menu item in your B2C tenant in the Azure portal.
- Select Upload custom policy.
- In this order, upload the policy files:
- TrustFrameworkBase.xml
- TrustFrameworkLocalization.xml
- TrustFrameworkExtensions.xml
- SignUpOrSignin.xml
- ProfileEdit.xml
- PasswordReset.xml
As you upload the files, Azure adds the prefix B2C_1A_ to each.
Tip
If your XML editor supports validation, validate the files against the TrustFrameworkPolicy_0.3.0.0.xsd XML schema that is located in the root directory of the starter pack. XML schema validation identifies errors before uploading.
Test the custom policy
- Under Custom policies, select B2C_1A_signup_signin.
- For Select application on the overview page of the custom policy, select the web application you wish to test, such as the one named webapp1.
- Make sure that the Reply URL is
https://jwt.ms. - Select Run now.
- Sign up using an email address.
- Select Run now again.
- Sign in with the same account to confirm that you have the correct configuration.
- Select Run now again, and select Facebook to sign in with Facebook and test the custom policy.
Next steps
In this article, you learned how to:
- Create a sign-up and sign in user flow
- Create a profile editing user flow
- Create a password reset user flow
Next, learn how to use Azure AD B2C to sign in and sign up users in an application. Follow the sample apps linked below:
- Configure a sample ASP.NET Core web app
- Configure a sample ASP.NET Core web app that calls a web API
- Configure authentication in a sample Python web application
- Configure a sample Single-page application (SPA)
- Configure a sample Angular single-page app
- Configure a sample Android mobile app
- Configure a sample iOS mobile app
- Configure authentication in a sample WPF desktop application
- Enable authentication in your web API
- Configure a SAML application
You can also learn more in the Azure AD B2C Architecture Deep Dive Series.