WPF Data Binding: How to Bind DataSet to WPF Designer
WPF Data Binding: How to Bind DataSet to WPF Designer
In our previous posts, we mostly used the Entity Data Model as the ORM (Object-relational mapping) layer for the WPF Data Binding scenarios.
Meanwhile, since DataSet is used broadly, we also provide the DataSet as a supported DataSource in the Data Binding stories. Following is a step-by-step example using C#. The example is based on Visual Studio 2010 Beta2 version.
Bind DataSet to WPF designer:
1. Open Visual Studio. From the main menu: File->New Project, choose WPF Application to create a new C# application. Here, we assume the project name to the default one: WpfApplication1.
2. From the main menu: Data->Add New Data Source…->DataBase->Dataset to trigger Data Source Wizard.
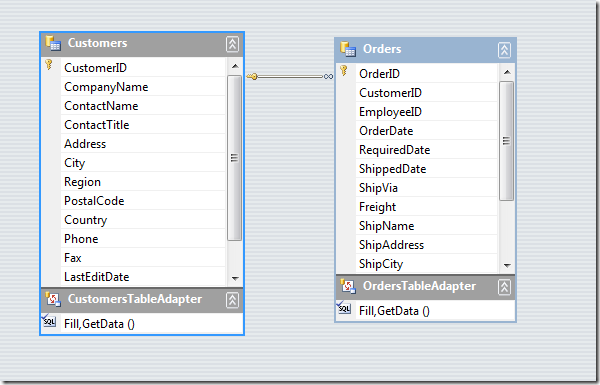
3. Follow the Wizard to connect to a Northwind SQL Server database, and choose tables: Customers, Orders. Following is what the Dataset designer looks like after this step finished:
4. From the main menu: Data->Show Data Sources to show the Data Sources Tool Window, and make sure that MainWindow.xaml is the active window:
5. Switch back to DataSources Tool Window, you can click on Customers node and click the drop-down menu. On the context menu, choose “Customize…” to popup the “Customize Control Binding” dialog. Select the ComboBox for the [List] Data type:
6. Bind the Customers to the “Combobox” control. After above steps, following is the snapshot before the drag&drop operation. From its icon, you can see the Customers is bound to Combobox now.
7. Drag&drop the Customers table to the top-left corner. Then, drag&drop the Customers.Orders to the center of the WPF designer. To layout the controls as follow:
With these steps, a simple DataSet Master-Details application is created. Press “Ctrl + F5” to run the application and see the data.
Behind the Scenes:
In step 5, there are two parts of code generated: One is the xaml markup code and the other is the C# code behind. The generated code is for demonstration purpose. Here, I will explain their corresponding meanings to provide guideline for modifying the code.
Regarding the xaml code, besides the markups for the controls/data-binding, which are the same when using the EDM as the ORM layer, it also generates resources section for the Window:
<Window.Resources>
<my:NorthwindDataSet x:Key="NorthwindDataSet" />
<CollectionViewSource x:Key="customersViewSource" Source="{Binding Path=Customers, Source={StaticResource NorthwindDataSet}}" />
<CollectionViewSource x:Key="customersOrdersViewSource" Source="{Binding Path=FK_Orders_Customers, Source={StaticResource customersViewSource}}" />
</Window.Resources>
The first line defines an object resource of the NorthwindDataSet instance, which is specific to DataSet. So when a Window is initialized, there will be a DataSet instance created. The 2nd and 3rd lines of code are doing master-details data-binding leveraging CollectionViewSource.
The generated C# code behind is:
private void Window_Loaded(object sender, RoutedEventArgs e)
{
WpfApplication1.NorthwindDataSet NorthwindDataSet = ((WpfApplication1.NorthwindDataSet)(this.FindResource("NorthwindDataSet")));
// Load data into the table Customers. You can modify this code as needed.
WpfApplication1.NorthwindDataSetTableAdapters.CustomersTableAdapter northwindDataSetCustomersTableAdapter = new WpfApplication1.NorthwindDataSetTableAdapters.CustomersTableAdapter();
northwindDataSetCustomersTableAdapter.Fill(NorthwindDataSet.Customers);
System.Windows.Data.CollectionViewSource customersViewSource = ((System.Windows.Data.CollectionViewSource)(this.FindResource("customersViewSource")));
customersViewSource.View.MoveCurrentToFirst();
// Load data into the table Orders. You can modify this code as needed.
WpfApplication1.NorthwindDataSetTableAdapters.OrdersTableAdapter northwindDataSetOrdersTableAdapter = new WpfApplication1.NorthwindDataSetTableAdapters.OrdersTableAdapter();
northwindDataSetOrdersTableAdapter.Fill(NorthwindDataSet.Orders);
System.Windows.Data.CollectionViewSource customersOrdersViewSource = ((System.Windows.Data.CollectionViewSource)(this.FindResource("customersOrdersViewSource")));
customersOrdersViewSource.View.MoveCurrentToFirst();
}
Again, the 1st line is getting the DataSet object instance from the WPF designer resource dictionary. The 2nd line is loading the Customers data into the table. You can replace it with other DataSet object instance as you prefer. The 3rd and 4th lines are initializing the CollectionViewSource. The lines 5~7, which are for the table Customers.Orders, are similar to lines 2~4.
You may notice that the data is loaded when the application starts. If you prefer to load it on demand, you can move this code to some other event handler such as a button click or something like that.
Hope this helps.
Comments
Anonymous
June 18, 2010
Nice wizard screen. Usually I do this by hand :)Anonymous
August 24, 2010
Thanks, easy implementation for a beginner like me.Anonymous
January 20, 2011
Thanks..good one, but did you think a decoupling way, I meant a DAL where all DataSet will be there and BLL [Bisiness Logig layer] and View where WPF controls will be filled by BLL helper methods. I did same thing in winform but need to do in WPF. any clue?


