Office 365-Configure Hybrid Search with Directory Synchronization –Password Sync
WATCH the Video Here
One of the key features in SharePoint 2013 release is to provide our customers a way to move to the cloud on their own terms. A key requirement of today’s IT industry is cloud and on-premise solutions must co-exist. This is where hybrid scenarios come into existence. A hybrid environment allows organizations to retain the on-premise SharePoint Server environment they have and plan a phased transition of some workloads to the cloud. The new features in SharePoint 2013 make it possible to connect some services running in both on-premise SharePoint as well as SharePoint Online in order to create an application that spans across cloud and on-premise.
A hybrid SharePoint environment is composed of SharePoint Server, deployed on-premise and Microsoft Office 365 – SharePoint Online. With Hybrid infrastructure in place you can then configure any of the workloads like Search, Duet, Business Connectivity services. Hybrid Search allows SharePoint Search to include search results from a Remote SharePoint Server. SharePoint Server 2013 On-Premise can display search results from SharePoint Online and vice versa. Hybrid Search does not return results by crawling remote SharePoint but by the new feature called Result sources and Query rules in SharePoint 2013.
There are lot of content available on why we need Hybrid, on authentication flow, and how components interact with each other and below are some references that you can take a look.
Hybrid for SharePoint Server 2013
Architecture Design Recommendation for SharePoint 2013 Hybrid Search Features
This blog post series will focus on how to configure Hybrid search environment and take a phased approach of achieving a two way Hybrid setup. In my recent tests I have validated that we should be able to set up Hybrid Search with Password Sync option available with the recent release of DirSync and eventually take a call on whether you would need to deploy ADFS 2.0 for single sign on. This will be a three part post:-
Part 1: How to configure One Way Hybrid search with Password Sync.
Part 2: How to Configure Two Way Hybrid search with Password Sync.
Part 3: How to configure two way hybrid search with Single Sign on.
Part 4: Configure On-Premises Users to leverage Office 365 for their Mysite-OneDrive
Let’s first take a quick look at what is Hybrid and why would we even need it.
Before even we dive in to the actual configuration let’s talk about an organization that is planning to embrace Office365 who already has a SharePoint Onpremise. As I mentioned above cloud and on-premise solutions will always co-exist. As IT department will start migrating some of the workloads to cloud a key challenge that people will face during the migration phase with SharePoint is to know where the content lives . That’s exactly when people will start implementing Hybrid to ensure that users will be able to search for content despite of the where the content lives .i.e. on-premise or online.
At the time of writing this post below are the supported Hybrid scenarios. For updated list of supported scenarios it’s recommended to visit SharePoint Online Service descriptions.
Scenario
Works Out of Box
SharePoint: Search
Yes
SharePoint: BCS
Yes
SharePoint: Duet
Yes
SharePoint 2013 –eDiscovery
Not Supported
SharePoint site Mailbox
Not Supported
SharePoint 2013 Social
Not Supported
Hybrid Search Deployment Options
Below are the possible combinations that customer can deploy Hybrid
Outbound Search (most common)
Outbound from customers network i.e. SharePoint On-premises to SharePoint Online. User that is in the customers network, on corpnet, searches from On-premises. There is an outbound request to SharePoint Online to return results. Results from both are shown
Inbound Search
Inbound from SharePoint Online to customer’s network i.e. SharePoint On-premises. User that is not on customers network, but signed into SPO, searches. There is an inbound request to customers network i.e. SharePoint On-premises to return results. Results from both are shown
Two-way Search
Search is setup both inbound and outbound as described above. Both scenarios are supported in that case – whether user is On-premises on corpnet, or only signed in to SharePoint Online.
Tip: Start small with outbound search first. Then as needed, add inbound search
Components That Are Required To Deploy Hybrid
Below is a pictorial representation of the components required in a two way Hybrid.
- On-Premise SharePoint 2013 Farm-Install or Upgrade
- Office 365 Enterprise, E1 (Search only),E3 or E4 plans
- Directory Synchronization with or without password sync
- Single Sign On
- Server To Server Authentication
- Reverse Proxy
So let’s first look at how IT team will implement authentication and authorization for its employees as they deploy Hybrid . One of the key requirements for Hybrid search to work is the unique user identity of the person trying to get results across Onpremise and SharePoint Online . Core requirement of the organization as it uses an on-premises directory service, is to integrate it with Windows Azure AD tenant in Office 365 and synchronize the users to cloud. Directory synchronization tool a 64 bit FIM based utility is used to synchronize on-premises directory objects (users, groups, contacts) to the cloud .Directory synchronization is also termed as directory sync or DirSync. You can read more about Directory Sync and its features here. DirSync with its recent release of Password Synchronization has a significant role in user sign in experience. If an organization wants to enable users to log into Office 365 Sharepoint Online using the same username and password as they use to log in to corporate network DirSync with Password Sync can be implemented. The primary benefit for users is that they do not need to remember two sets of credentials which they would need without this feature implemented. But this has a greater role to play in the world of Hybrid and users seeing search results. When a user types a keyword in sharepoint Onpremise and the results are intended to be returned from Online, SharePoint Online needs to rehydrate the users identity for it to return search results . A quick overview on what happens. User A submits a query On-premise .The query gets sent over to SharePoint Online and along with it some attributes of user A is also sent that helps identify user A as user A in the remote farm. The attributes are UPN, SMTP address, SIP address, and name identifier. The user attributes from SharePoint On-Premise are synchronized to SharePoint Online Directory services using DirSync. Rehydration process for users will include any group memberships we find in the UPA. It does not matter on how a user would authenticate, it is all based on
· What identifying claim is sent to SharePoint and,
· What profile is found in the UPA that matches that identifying claim because we will grab any group memberships based on that profile.
To rehydrate a user’s identity, SharePoint takes the claims from the incoming access token and resolves it to a specific SharePoint user. SharePoint 2013 expects only one entry in the User Profile service application for a given lookup query that is based on one or more of these four attributes. Otherwise, it returns an error condition that multiple user profiles were found. When SharePoint Online farm receives the request, it looks up the online profile store to match those attributes of user A and those are then passed along to display security trimmed results. This entire process is termed as rehydration of users. This has been described in great details in Steve Peschka's blog post here.
Implementing Outbound Search (most common scenario)
The walkthrough below is in my test environment where I will refer the below Urn’s and domain names.
SharePoint On-premise intranet URL : https://spweb
SharePoint Extranet URL : https://spweb.mbspoincloud.com
SharePoint Online URL : https://mbspoincloud.sharepoint.com
On-premise domain: mbspoincloud.com
Test User: manas@mbspoincloud.com
SharePoint Onpremise
For this post we are going to look at a user manas in the mbspoincloud domain (manas@mbspoincloud.com ) who should be able to search for results both from SharePoint On-premise and SharePoint Online. To configure Hybrid Search you will need a SharePoint 2013 single server or a farm Standard or Enterprise CAL with the below services enabled . For this post we will consider the SharePoint On-premises URL is accessible with https://spweb . Following services must be enabled and configured in the on-premise SharePoint farm to support hybrid functionality:
· User Profile Service
· App Management Service
· Subscription Settings Service
· Search Service Application
It is critical that your On-premise farm has User Profile Service up and running. It is also required that it is populated with current data from Active Directory. UPA on the local farm is used to determine what rights a user has, what claims they have, what groups they belong to, etc. Subscription Settings Service and App Management Service Application Apps are dependent on App Management and Subscription Settings service applications. These are a prerequisite for SharePoint Online to be a registered as a high-trust app in SharePoint Server 2013.
Add On-premise Domain to Office365
One of the key requirement for Hybrid Search to work and return results from both SharePoint Online and SharePoint On-premise is to ensure the user identity can be matched in both of this verticals as I have explained above . The first steps would be to add your On-premise domain as a vanity domain in your Office 365 subscription, validate that you are the owner of the Domain and then synchronize the users to Windows Azure Active Directory. As mentioned above the On-premise domain for this post is mbspoincloud.com. You need to follow the steps below to ensure you can add the domain to your Office 365 subscription.
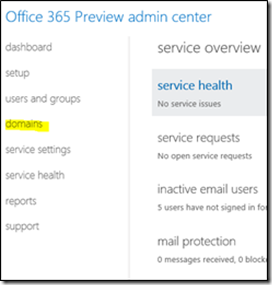
Log in to your Office 365 subscription with a Global admin account .From admin center, click domains.
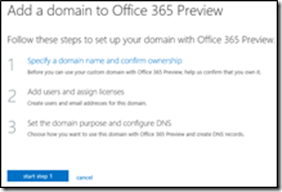
Click Add a domain.
Click Specify a domain name and confirm the ownership or start step 1.
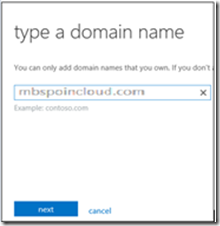
Enter the domain name of your On-premise domain . Note only publically registered and publically routable domains can be added . In case you are testing this in your labs where you have a .local domain you can use the concept of alternate UPN suffix and use a publically routable domain. For this post we will add our domain mbspoincloud.com and click Next
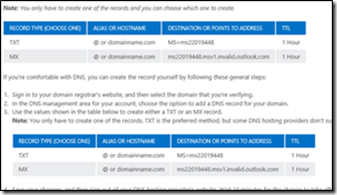
For verification, (Office 365 wants to ensure you own the specified domain), a DNS record (either TXT or MX) has to be created according to displayed information. This step has to be done in the DNS configuration of the DNS registrar where the domain is registered. On the page, you need to select General instructions from the drop-down list and get the unique TXT record for your domain. You would then need to update this TXT record in the DNS where your domain has been registered. Office 365 provides you with step by step instructions on how to update the records for a couple of DNS providers listed on the same page.
After adding the DNS record, it can take up to several hours until the DNS was updated on the Internet. Wait at least 15 minutes before you click Done, verify now. Once you get a confirmation and click Next, you should be in a page identical to the following screenshot.
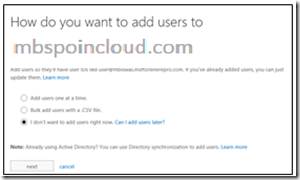
Click Start Step2, select the I don't want to add users right now optionand then click Next. This is because our goal is to synchronize On-Premise users to cloud.
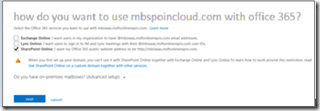
On the next screen, select SharePoint Online as your Domain Indent. You set a domain Indent or purpose for your domain when you are adding it to Office 365. This is a selection of services that you plan to use with your domain. Later, Office 365 uses this to show you the list of just the DNS records (such as an MX record) that you will need to create or update at your DNS hosting provider website, so that Office 365 services will work. By knowing the purpose, Office 365 can show you only the DNS records that apply to you, keeping the list shorter and less confusing.
Click Next. This will take you to the Design your new public website in office 365 page. Since designing public website is beyond the course of this post, continue to click Next till you reach the page identical to the following screenshot. On the next page, click Finish.
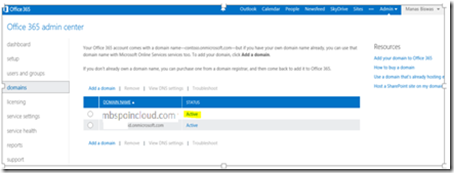
You should be redirected to the Domain Management page on your Office365 Admin Centre and your domain should show as Active.
Activate and configure DirSync
Next step would be to activate, install and configure DirSync to synchronize on-premise Active Directory users to Cloud directory services. You can’t install DirSync on a Domain Controller , hence you would need to install it on a member server . As I have mentioned above Directory synchronization is the synchronization of directory objects from your on-premises Active Directory to Windows Azure Active Directory for your Office 365 subscription. You can read more about Directory Synchronization in the article below
Plan for directory synchronization for Office 365
The very first step would be to Activate Active Directory Synchronization for your Office 365 environment. To do so follow the steps below
- Browse to Office 365 Admin center https://portal.microsoftonline.com.
- On the Microsoft Online Services page, in the Windows Live ID field, provide an account name that has Global admin rights on your Office 365 subscription
- On the Home page, click Admin.
- On the Admin page, select Users, which is under the Management section on the left side.
- Select the Set up option next to Active Directory Synchronization and click on Activate .
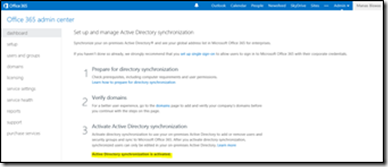
- Activation may take a couple of hours and once completed you should see "Active Directory synchronization is activated".
Next step is to install Active Directory Synchronization Tool. This needs to be installed in a member server on your On-premise environment. You cannot install DirSync tool on a domain controller .Once you have validated that Active Directory Synchronization shows as activated you can download DirSync version 6382.0000 or greater from within the Portal itself . You would need a dedicated member sever in your On-premise domain to install DirSync.
On the same page where you validated Active Directory Synchronization is set to yes you will see an option in Step 4 to install and configure Directory sync tool
Note : It’s recommended to go through the list of best practices listed here before you configure Dirsync on your domain.
Click on Download and save the file locally to your desktop and once downloaded start installing the same. The installation is quite simple and does not require any specific user input except for the install location.
Next step would be to synchronize Active Directory
- Log on to the machine that you installed DirSync.
- Click Start, click All Programs, click Microsoft Online Services, click Directory Synchronization, and then click Directory Sync Configuration.
- On the Welcome page, click Next.
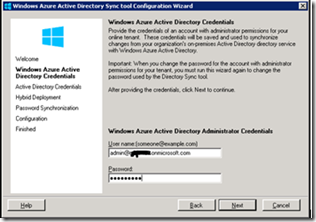
- On the Microsoft Online Services Credentials page, in the User name field, type the details of an account that has Global Admin rights on your Office 365 subscription.
On the Active Directory Credentials page, in the User name field, type an account with administrator permissions on your organization’s Active Directory service. These credentials will be used to set the permissions for Directory Sync tool on your On-premise Active Directory.
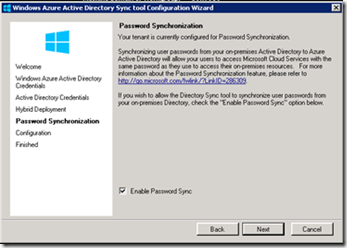
Click Next on the Hybrid Deployment option. If this is grayed out do not worry , this means that your Onpremise environment does not have Exchange installed and the AD schema has not been extended with Exchange attributes .This is to enable write back options for Exchange. The most important step to enable password sync is on the next screen.
On the Password Synchronization page, ensure Enable Password Sync is checked.
On the Configuration page, click Next.
On the Finished page, verify that the Synchronize directories now check box is selected and then click Finish.
Verify DirSync
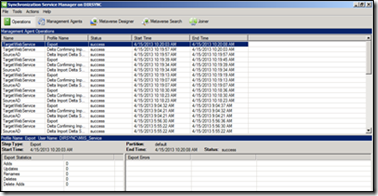
As I mentioned earlier DirSync is a FIM based tool so you should be able to use your favorite MIIS client to validate errors and look what what is being synchronized. To check if the DirSync is working correctly, go to C:\Program Files\Microsoft Online Directory Sync\SYNCBUS\Synchronization Service\UIShell\miisclient.exe and check accounts getting synchronized.
Alternatively you can verify DirSync from your Office365 Dashboard itself from the Users and Groups section. This is a mandatory step as the users that are synchronized needs to be Activated and licenses needs to be assigned. To do so follow the steps below.
Launch your browser and in the Address field, type https://portal.microsoftonline.com and then press Enter.
When asked to authenticate, log on with your Office365 Global Admin account. In the left navigation pane, under User Management, click Users. If the synchronized users do not appear, refresh the browser window.
On the users’ page you should see a list of users that has been synchronized from within your On-premises Active Directory and will show up as “Synched with Active Directory” under the status section.
Select the list of users you want to activate example manas@mbspoincloud.com and click Activate Synced Users.
You would need to select a location and license option, click Next, and then click Activate. A successful activation should take you to a screen similar to the following screenshot.
The next step is to add the user manas@mbspoincloud.com onto your Sharepoint Online site. Browse to your SharePoint Online site collection that you would want to configure to be able to return search results when searched from SharePoint Onpremise . Click on gear icon and click on Site settings and add the user that you have synchronized from your Onpremise Active Directory. You can choose to add the user manas@mbspoincloud.com to any group but I would go with Visitors group.
The next step would be to login to with the account that you have synchronized from your On-premise Active Directory . Browse to SharePoint Online URL example https://mbspoincloud.sharepoint.com and when prompted for credentials type in manas@mbspoincloud.com and the password the user uses to sign in to on-premise. You should be able to sign and access SharePoint Online site collection. This confirms that your On-premise user has been successfully synched to Azure Active directory , has the correct set of licenses and also should be in your profile database of SharePoint online via the Profile import that automatically picks up the users from Online active directory.
At this stage I would also recommend to upload a few documents to your SharePoint online site collection so that the continuous crawl crawls the document. Ensure that you are able to search for the document as well with the logged in user in SharePoint online . This is just to ensure that the an on-premise user can successfully log in with his same credentials to SharePoint online and search for contents .
So lets look at the bigger picture what we have achieved till now . User Manas who is a user in domain mbspoincloud.com can log in to his corporate network and access his corporate portalhttps://spwebwith his username manas@mbspoincloud.comand his password . The company has a corporate portal in Office 365 Sharepoint Onlinehttps://spoincloud.sharepoint.com .Since his IT department has installed and configured DirSync with password sync he is now able to access the corporate portal with same credentials as On-premise .He is very happythat he does not need to remember two set of credentials but he still has a challenge . He does not get unified search experience between these two environments . So he at this stage still needs to remember where a document resides i.e Online or On-premise in order to find it . This is where Hybrid comes into play . Lets now take a look at the next set of configurations.
Establish Server-to-Server Trust with Windows Azure ACS
To configure server-to-server authentication for hybrid environments, you have to establish trust with ACS, the trust broker for both the on-premises and online SharePoint servers. In order to establish Server-to-Server trust with the Windows Azure ACS, the certificate of the Security Token Service (STS) of the SharePoint Server 2013 has to be replaced. By default, SharePoint uses a self-signed certificate for its Security token services communication but the same certificate cannot be used by ACS which will act as a trust for server to server authentication. Its recommended to use self signed certificate for this purpose . Next set of steps will help you to generate a self signed certificate and then upload to SharePoint online. Note : My SharePoint on-premise is a single server , else you need to replace the STS certificate across all SharePoint servers in your SharePoint farm.
Navigate to C drive and create a folder called cert. This folder would be used to store the certificates that would be required throughout the setup.
The first step would be to create a self-signed certificate. There are several ways to create a self-signed certificate, one possibility is to use the Internet Service Manager of IIS 7 or higher.
- Launch Internet Information Services (IIS) Manager.
- In the MMC console tree, click the server name.
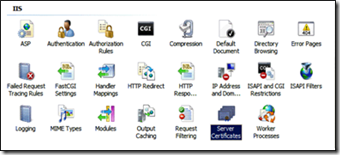
- In the Details pane, double-click Server Certificates in the IIS group.
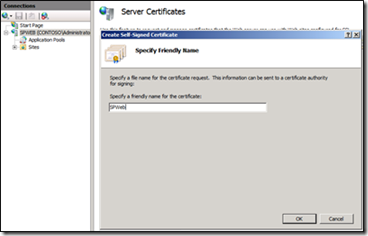
In the Actions pane, click Create Self-Signed Certificate.
On the Specify Friendly Name page, type a name for the certificate, and then click OK (the name is free of choice).
In order to replace the STS certificate, the certificate is needed in Personal Information Exchange (PFX) format including the private key. In order to set up a trust with Office 365 and Windows Azure ACS, the certificate is needed in CER Base64 format. This means, for our scenario, the certificate is needed in both formats PFX and CER.
To export the self-signed certificate in PFX format:
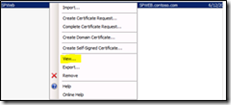
· In the Details pane, right-click the new certificate and then click Export.
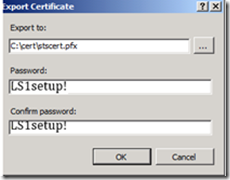
· In Export Certificate, specify a path and name to store the .pfx file for the certificate in the Export to field.
· Type a password for the certificate file in the Password and Confirm password fields. This creates the certificate in PFX format containing the private key. For our lab, the parameters for step 4 and step 5 should be specified as following:
-
- Path: C:\cert folder
- File Name: stscert.pfx
- Password: LS1setup!
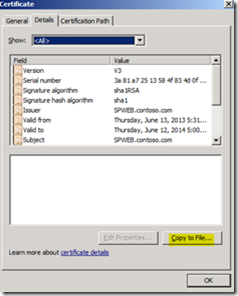
The next step would be to export the self-signed certificate in CER Base64 format.In the Details pane, right-click the new certificate, and then click View.
Click the Details tab and then click Copy to File.
On the Welcome to the Certificate Export Wizard page, click Next.On the Export Private Key page, click Next.
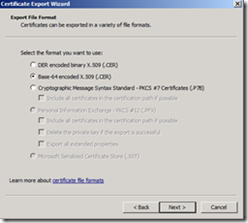
On the Export File Format page, click Base-64 encoded X.509 (.CER) , and then click Next.
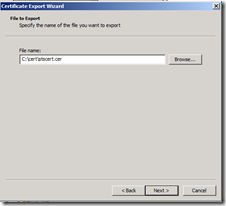
On the File to Export page, type a path and file name for the .cer file, and then click Next. For our lab, the parameters for step 4 and step 5 should be specified as following:
-
- Path: C:\cert folder
- File Name: stscert.cer
On the Completing the Certificate Export Wizard page, click Finish, click OK, and then click OK again. This creates the certificate in CER Base64 format.
On successful completion of the above steps, the C:\cert folder should have the following two types of certificates:
· Stscert.pfx: In order to replace the STS certificate, the certificate is needed in Personal Information Exchange (PFX) format including the private key.
· Stscert.cer: In order to set up a trust with Office 365 and Windows Azure ACS, the certificate is needed in CER Base64 format
Replacing the STS certificate and establishing a trust with the Windows Azure ACS has to happen through Windows PowerShell.
Note: |
Before following the steps to establish a Trust with the ACS and the SharePoint On-Premise farm, two set of modules need to be loaded for Windows PowerShell: 1. SharePoint 2013 Management Shell 2. Microsoft Online Services Module for Windows PowerShell (Extended) [This requires also the Sign In Assistant to be installed first] |
Download SharePoint Online Management Shell
1. Browse to https://technet.microsoft.com/library/jj151815.aspx.
2. Download Windows Azure Active Directory Module for Windows PowerShell (64-bit version).
The installation does not require any additional inputs. Follow the instructions on the screen to complete the installation process.Replacing the STS certificate and establishing a trust with the Windows Azure ACS would be the next step we need to follow. We recommend to execute all the Windows PowerShell cmdlets on a server acting as SharePoint Server 2013 Front-End (WFE). Therefore, the Microsoft Online Services module for Windows PowerShell has to be installed on the SharePoint Server. If this option is not available, the cmdlets can be executed on separate servers as well.
Note: The following script will only work if executed from a SharePoint Server 2013 Front-End (WFE) where Microsoft Online Services Module for Windows PowerShell has been installed.
In the following script, we assume the STS certificate is exported in the local folder C:\cert with a name of stscert.pfx and stscert.cer .Variables to be updated before using the script are:
· $stscertpfx: The certificate as PFX file (including Private Key)
· $stscertcer: The certificate as CER file
· $stscertpassword: The password of the PFX certificate
· $spcn: The CN the certificate was issued to
· $spsite: SharePoint On-Premise Site Collection
· $spoappid: This is always "00000003-0000-0ff1-ce00-000000000000"
Launch SharePoint 2013 Management Shell. The first step would be to define the variables as shown below.
#Variables
$stscertpfx="c:\cert\stscert.pfx"
$stscertcer="c:\cert\stscert.cer"
$stscertpassword="LS1setup!"
$spcn="*.yourdomainname.com" # replace yourdomainname with your onpremise domain that you added to Office 365
$spsite="https://spweb"
$spoappid="00000003-0000-0ff1-ce00-000000000000"
#Update the Certificate on the STS
$pfxCertificate=New-Object System.Security.Cryptography.X509Certificates.X509Certificate2 $stscertpfx, $stscertpassword, 20
Set-SPSecurityTokenServiceConfig -ImportSigningCertificate $pfxCertificate
# Type Yes when prompted with the following message.
You are about to change the signing certificate for the Security Token Service. Changing the certificate to an invalid, inaccessible or non-existent certificate will cause your SharePoint installation to stop functioning. Refer to the following article for instructions on how to change this certificate: https://go.microsoft.com/fwlink/?LinkID=178475. Are you sure, you want to continue?
#Restart IIS so STS Picks up the New Certificate
& iisreset
& net stop SPTimerV4
& net start SPTimerV4
#To Validate Certificate Replacement
To validate that the above commands has run successfully, you can run any of the following cmdlets.
$pfxCertificate
(Get-SPSecurityTokenServiceConfig).LocalLoginProvider.SigningCertificate
Compare the outputs of the above command to match the thumbprint, which confirms that the STS certificate has been successfully. Alternatively, you can follow the following step as well.
Get-SPServiceApplication
$stsSA=Get-SPServiceApplication | ? {$_.id -eq "5837da73-b393-444f-ae2c-ac057877df08"} (replace with the ID of the security certificate above)
$stsSa.SigningCertificate
Now, you should be able to match the value with the thumbprint of the self-signed certificate you replaced with.
#Do Some Conversions With the Certificates to Base64
$pfxCertificate = New-Object System.Security.Cryptography.X509Certificates.X509Certificate2 -ArgumentList $stscertpfx,$stscertpassword
$pfxCertificateBin = $pfxCertificate.GetRawCertData()
$cerCertificate = New-Object System.Security.Cryptography.X509Certificates.X509Certificate2
$cerCertificate.Import($stscertcer)
$cerCertificateBin = $cerCertificate.GetRawCertData()
$credValue = [System.Convert]::ToBase64String($cerCertificateBin)
#Establish Remote Windows PowerShell Connection with Office 365
enable-psremoting
#When prompted with Are you sure you want to perform this action? type Yes for all of the actions.
new-pssession
Import-Module MSOnline -force –verbose
Import-Module MSOnlineExtended -force –verbose
#Log on as a Global Administrator for Office 365
Connect-MsolService
When prompted, provide the Global Admin account for your Office 365 tenant. This would have been sent to your corporate e-mail address when you signed up for the tenant.
#Register the On-Premise STS as Service Principal in Office 365
New-MsolServicePrincipalCredential -AppPrincipalId $spoappid -Type asymmetric -Usage Verify -Value $credValue
$SharePoint = Get-MsolServicePrincipal -AppPrincipalId $spoappid
$spns = $SharePoint.ServicePrincipalNames
$spns.Add("$spoappid/$spcn")
Set-MsolServicePrincipal -AppPrincipalId $spoappid -ServicePrincipalNames $spns
$spocontextID = (Get-MsolCompanyInformation).ObjectID
$spoappprincipalID = (Get-MsolServicePrincipal -ServicePrincipalName $spoappid).ObjectID
$sponameidentifier = "$spoappprincipalID@$spocontextID"
#Finally Establish in the On-Premise Farm a Trust with the ACS
$site=Get-Spsite "$spsite"
$appPrincipal = Register-SPAppPrincipal -site $site.rootweb -nameIdentifier $sponameidentifier -displayName "SharePoint Online"
Set-SPAuthenticationRealm -realm $spocontextID
New-SPAzureAccessControlServiceApplicationProxy -Name "ACS" -MetadataServiceEndpointUri "https://accounts.accesscontrol.windows.net/metadata/json/1/" -DefaultProxyGroup
New-SPTrustedSecurityTokenIssuer -MetadataEndpoint "https://accounts.accesscontrol.windows.net/metadata/json/1/" -IsTrustBroker -Name "ACS"
Displaying Results from SharePoint Online
After the trust is established in order for SharePoint Online results showing up on SharePoint Server 2013, additional configuration is needed on SharePoint Server 2013 On-Premise environment. As a rule of thumb, the configuration always needs to happen on the tier that should display the results from the other tier.
Two steps are needed to configure Hybrid Search:
1. Create a result source.
2. Create a query rule.
Our focus for this post is to look at configuration steps. You can read more about Result Source and Query rule here.
New Result Source
On the SharePoint box (SPWEB), browse to on-premise SharePoint site collection: https://spweb . Result Source configuration can happen on different levels: Global in the Search Service Application, Local per Site Collection or per Site Level.
For this post, we will go with result source at site collection level.
1. Browse to On-premise site collection https://spweb.
2. In Site Settings, under Site Collection Administration, click Search Result Sources.
3. On the Manage Result Sources page, click New Result Source.
4. On the Search Result Sources page, do the following:
a. In the Name text box, type a name for the new result source (for eg., SharePoint Online RS).
b. For the Protocol, select Remote SharePoint.
c. For the Remote Service URL, type the address of the root site collection of the Office 365 SharePoint Online environment whose results should be included (for example, https://mytenant.sharepoint.com).
d. For the Type, select SharePoint Search Results.
e. Leave Query Transform as default which is {searchTerms} .
f. Leave Credentials Information as default which is Default Authentication.
g. Click OK to save the new result source.
Note: |
If you edit the result source, you should see the settings identical to the ones shown below. |
The next step would be to create a new query rule.
New Query Rule
1. Open Internet Explorer and browse to https://spweb .
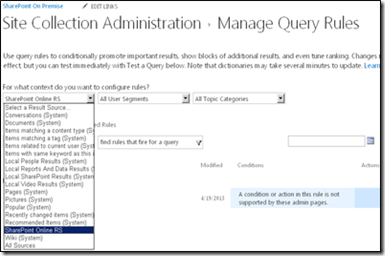
2. In Site Settings, under Site Collection Administration, click Search Query Rules.
3. In the Select a Result Source drop-down list, select the result source you created before (for example, SharePoint Online RS).
4. Click New Query Rule.
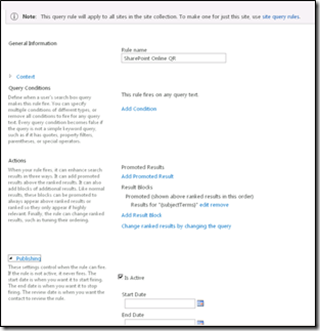
5. In the General Information section, in the Rule Name box, type a name for the new query rule (for example, SharePoint Online QR).
6. Click the Context link to expand the options.
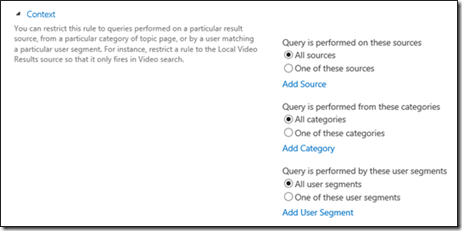
7. In the Context section, do the following:
a. Under the Query is performed on these sources option, either select All Sources or One of these sources. If you select One of these sources, make sure to select the result source created before (here, it is SharePoint Online RS).
b. Leave the default selection for the Query is performed from these categories and Query is performed by these user segments options.
8. In the Query Conditions section, click Remove Condition so the rule will fire for every query.
9. In the Actions section, under Result Blocks, click Add Result Block.
10. In the Edit Result Block dialog box, do the following:
a. Leave the default for the Query Variables and Block Title sections.
b. In the Query section, in the Search this Source drop-down list box, select the name of the result source that you created before (here, it is SharePoint Online RS). In the Items drop-down list, specify the number of items to show up as maximum (default is 2).
c. Click the Settings hyperlink.
d. In the Settings section, make sure the This block is always shown above core results option is selected.
e. Skip the Routing section and click OK to add the result block.
11. Back at the Add Query Rule page, click the Publishing hyperlink.
12. In the Publishing section, make sure the Is Active check box is selected.
13. Click Save.
Note: |
Once you view the Query rule, it should look identical to the following screenshot. |
Validating Your Search Configuration
You can validate your search configuration and see the troubleshooting information with the following procedure:
1. Open Internet Explorer and browse to https://spweb.
2. In the Site Settings section, under Site Collection Administration, click Search Result Sources.
3. In the Manage Result Sources page, click the result source you created in the previous procedure (for example, SharePoint Online RS).
4. In the Edit Result Source page, click Launch Query Builder.
5. In the Build Your Query page, select the Test tab.
6. Click the Show more hyperlink.
7. Type a search term of your choice in the textbox next to {subject terms} and click Test Query (Hint: “*” is also a valid search term).
Relevant search results will be displayed in the Search Result Preview window if your configuration is valid. If there are problems with your configuration, troubleshooting information will be displayed. We will talk about some common error message during the troubleshooting section of this content.
Validate Search Results
The next step would be to validate if the user is able to retrieve search results from the other SharePoint Online.
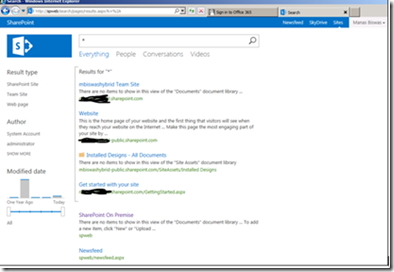
Browse to https://spweb. Change the search box to select Everything.
Within the search text box, type * . The search result should be displayed from both verticals (online, on-premise) identical to figure below. Click one of the document from SharePoint Online and you should be redirected to the sign in page for SharePoint Online. Enter the username as and password for the user that you have earlier synched using Drsync (example manas@mbspoincloud.com ) .User should be signed in and should be able to access the document.
Note this experience will change when we deploy a ADFS server on-premise and establish a trust and thus have a IdP (Identity Provider) and RP (Relying Party) to provide end user with Single Sign on experience. We will install ADFS and take a look at SSO experience in the part3 of this post.
Please watch this Space for Part 2 of this series which would be coming soon!!!!
POST BY : MANAS BISWAS [MSFT]
Comments
Anonymous
October 21, 2013
Perfect timing, I'm working on getting step in lab right now... Any plans to support hybrid model for SharePoint 2013 eDiscovery in the future? Specifically SP 2013 on-premise eDiscovery working with primary mailbox on-premise (works today) with Exchange online archive (not possible today). Thanks, MohsinAnonymous
November 04, 2013
finally instruction that work. thank you.Anonymous
November 04, 2013
Worked great for Single Server NTLM testing environment but I cannot get this to work with Kerberos enabled 3-Tier environment. No matter how I setup the remote connection via PowerShell I'm unable to get around the Kerberos authentication error. I have a Kerberos environment setup correct, working, tested, and operating but unable to avoid the credentials from being passes as Anonymous. Any help would be great on this issue. Tried workaround -- blogs.msdn.com/.../sharepoint-2010-with-windows-powershell-remoting-step-by-step.aspx PowerShell Solution -- social.technet.microsoft.com/.../enterpssession-winrm-cannot-process-the-request-kerberos-authentication-error-0x80090322 (Not sure how his is a solution when applying it to a SharePoint environment dependent upon user SPNs)Anonymous
November 18, 2013
Question by Patrick
I read the article and I am trying to implement the process for the one-way search as described in this article. By the way, glad you wrote it as it definitely helped me understand the setup process. You mentioned that "Note this experience will change when we deploy a ADFS server on-premise..." and i was wondering if you could briefly explain how. I currently just want to get the one-way search from on-premise to cloud working as a proof of concept. I'm not ready to mess with the Reverse Proxy and such for the end result that I'll need to complete at some point in the near future. We have an ADFS 2.0 server running, it is registered in our SharePoint farm and i was wondering how the ADFS server fits in to easing the setup process of your initial article. I also wanted to know if that removed the need to replace the STS Cert for the SharePoint farm with the Windows Azure ACS for the server to server trust relationship. I think that part is what's confusing me as we don't have an onsite domain authority to issue the cert and the I'm not sure of the implications for a self signed server cert from Windows Azure ACS. I was hoping there was a way to avoid replacing the STS Cert but maybe there isn't, even if you have an ADFS server. Any ways, if you could answer those questions or guide me to the right place I would be most appreciated. Thank you for your time. -Patrick
Anonymous
November 18, 2013
The comment has been removedAnonymous
December 18, 2013
I am not sure if anyone came across this error but when I have applied the last powershell command, New-SPTrustedSecurityTokenIssuer -MetadataEndpoint "accounts.accesscontrol.windows.net/.../" -IsTrustBroker -Name "ACS" I got system.augmentexception error. It underlines the value after metadataendpoint. Any ideas?Anonymous
August 28, 2014
Brilliant series.. This is one of kind. Very well done and thank you for that. Are there any plans to re-write this hybrid series for Windows Server 2012 R2, ADFS 3.0, and Web Application Proxy? love to know your idea.. Just for completeness, I would add Yammer integration as well.. Good stuff!!!Anonymous
February 13, 2015
The comment has been removedAnonymous
February 16, 2015
I am able to fix the issue. The only thing which I did was to set up the Search Center. Not exactly sure why without creating a search center it did not work. Would look into it. But as of now I am able to fetch results from both the environments.Anonymous
June 17, 2015
The comment has been removedAnonymous
August 25, 2015
Apologies Brian,missed your comment. Did you already resolve the issue? If you could share some repro steps we can test and get back to you with an update. Thanks, Neil & ManasAnonymous
March 18, 2016
Hi manas -- thanks for the article. The steps works great in single server farm (DEV) but does not work when tried in our test farm. (1 wfe and 7 application servers). do we need to create self-signed certificate from the crawler server? we have also tried with ootb sts certificate, but same issue. Please help. thanks.
