Creating a team diagram with PowerShell and Visio
Some time ago we had this big EMEA wide team meeting. Every team manager had to present his team, so a few days in advance we all got this email saying that we should send some pictures over so we make a good impression. We all have some pictures setup in AD, and they nicely integrate with Outlook and maybe SharePoint. Trying to get those pictures for all 20 guys in your team on the other hand is not that easy.. lots of clicking... lots of searching... lots of saving. I immediately started wondering if we can do this programmatically... and of course what nicer way of doing this than using PowerShell. Challenge accepted!
Step 1 - Download the pictures locally
One easy way to access user data from the AD is to use the AD management plug-in for Windows Server / 7. The only problem with that: I cannot imagine many managers (except ours) doing this. Managers are mostly not that computer savy. We need something that is already there on every Windows 7 machine. Thus... I used LDAP queries
$objDomain = New-Object System.DirectoryServices.DirectoryEntry
$objSearcher = New-Object System.DirectoryServices.DirectorySearcher
$objSearcher.SearchRoot = $objDomain
$objSearcher.PageSize = 1000
Second step was to build an LDAP filter that would get all the data I need, in our case all the direct reports of any given manager:
$filter = "(&(objectClass=user)(objectCategory=person)(manager=CN=Razvan Opris,OU=UserAccounts,DC=europe,DC=corp,DC=microsoft,DC=com))"
$objSearcher.Filter = $filter
And now we can actually run the query and save the needed results to jpg files:
$colResults = $objSearcher.FindAll()
foreach($result in $colResults)
{
$name = $result.Properties["cn"]
$filename = $name[0] + ".jpg"
$result.Properties["thumbnailphoto"] | Set-Content $filename -Encoding byte
}
At this point we have a picture of all the team members saved on disk. For more advanced diagrams we can import them one by one into Visio and build our diagram, but lets consider that we want to automate also this part of the process.
Step 2 – Create the diagram in Visio
We can start Vision and create a new document by calling:
$application = New-Object -ComObject Visio.Application
$documents = $application.Documents
$document = $documents.Add("Basic Diagram.vst")
$pages = $application.ActiveDocument.Pages
$page = $pages.Item(1)$stencil = $application.Documents.OpenEx($application.GetBuiltInStencilFile(2,1),64)
$container = $stencil.Masters.ItemFromID(2)
For the purpose of this exercise we will also a specific master / stencil. You can pick the one that best suites your needs freely.
I then used some trial&error approach to get some start values for my positions:
$x = 1.15
$y = 10.5
$rownumber = 0
And the we can start populating the grid:
foreach($user in $colResults)
{$name = $user.Properties["cn"]
$box = $page.Drop($container, $x ,$y)
$image = $page.Import("C:\Users\siegklo\Desktop\diagram\" + $name[0] + ".jpg")
$application.ActiveWindow.Selection.Move($x - 4.2, $y - 6)
$application.ActiveWindow.Selection.AddToContainers()$box.Text = $name
$x= $x + 3
$rownumber++if($rownumber -eq 4)
{
$y = $y - 3
$x = 1.15
$rownumber = 0
}
}
A few notes on the code above:
1. I had to use the full path to the location where I first saved the files.
2. The positioning of the images was done more or less manually, the values are guessed and deducted by trial and error so that they match the containers. I tried using some programmatic tricks but I failed and got bored.
3. One of the pictures was imported in a really small size and I manually resized it.
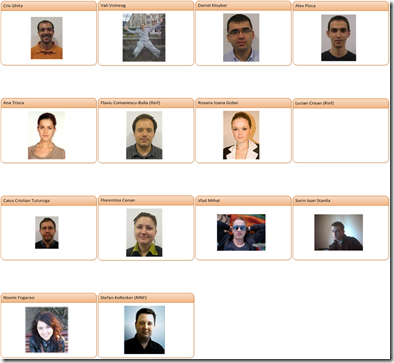
The end result was looking like this:
