Introducing Telemetry Log in Office 2013
This post is written by David Matsumoto, a Program Manager with the Office Solutions Management team
In our recent blog posts, we’ve been talking about the Office Telemetry features that are new for Office 2013. You may have read a few blog posts that discussed Telemetry Dashboard in greater detail, and hopefully you’ve had a chance to start using it.
In this blog post, we’re going to discuss Telemetry Log for Office 2013, which is installed alongside Telemetry Dashboard. We’ll discuss what the Telemetry Log’s purpose is, and how to get the most out of using it. Let’s get started!
Why use Telemetry Log?
Telemetry Log helps end users uncover compatibility issues that occur within select Office 2013 applications* on their local client computer. Whereas Telemetry Dashboard is intended for the Enterprise IT Pro to collect usage and telemetry information across the organization and roll that up into a single view, Telemetry Log displays the same kind of information per user on the user's computer.
After Telemetry Logging is enabled, every time the user opens or closes a file or solution in Office 2013, an event is logged into a local data store on the client computer. If errors are encountered, even those that may not be obvious, those errors get logged to the local data store, along with the user and computer information. When possible, errors get mapped to known compatibility issues that can be displayed in the Telemetry Log.
*For a list of Office files and solutions tracked in Telemetry Log, see Table 1 in How the Telemetry Log works.
How to get started?
If you’ve installed Office 2013 on Windows 8, simply swipe up to display the AppBar, choose All Apps, and then choose Telemetry Log for Office 2013. (For Windows 7 installs, choose All Programs. Then, in the list of programs, expand Microsoft Office 2013, expand Office 2013 Tools, and then choose Telemetry Log for Office 2013.)
When you launch Telemetry Log, a new workbook in Excel 2013 opens. The workbook has three worksheets titled Events, System info, and Guide.
Click the Guide worksheet, and then click the green button to enable logging:
Now you’re all set! Whenever you open a document or solution in Office 2013, it will get immediately tracked in the Telemetry Log. Go ahead and try to open and close a document or load a solution. Then navigate back to the Events worksheet, and click the Refresh button  at the top right of the Header pane. You will see one or more rows that correspond to all the events that occurred when you opened and closed that document or solution. You can verify this by checking several columns in the Events worksheet. (See Figure 1 example below.)
For example, in the Events worksheet, you can see the following:
- The date and time when the file was loaded
- The file name
- The application (e.g., Word, Excel, PowerPoint, etc.) that was launched
- The location that the file was loaded from
Figure 1: Telemetry Log (Events View)
You can also verify that Telemetry Logging is enabled on your computer by clicking the System info worksheet, and seeing that Telemetry Logging is enabled.
Note: If you have a client computer running in a managed environment, then your IT Admin may already have provisioned your computer to enable Telemetry Logging so that data can be uploaded to the database and reported in Telemetry Dashboard.
How to get the most out of using Telemetry Log?
Telemetry Log is especially helpful for experienced users and testers who want to investigate issues with documents or solutions and discover the appropriate remediation steps.
Consider the following example, using Telemetry Log to troubleshoot document issues (also applicable to solution troubleshooting):
1. A tester has loaded a couple documents (e.g., CalendarControl_report.xls, ConfidentialityAgreement_template.docx) and attempted to run the controls (or macros, etc.) that are having issues. (Note that the controls actually need to be run to trigger any issues so that they can be recorded in Telemetry Log.)
2. A tester launches Telemetry Log and looks in the Events worksheet to locate the documents that are being used. The tester sees that there is an error and warning generated for those files, and a corresponding explanation for what may be causing the problem. (See example highlighted below in Figure 2.)
Figure 2: Telemetry Log – Example Events View with document error/warning and explanation
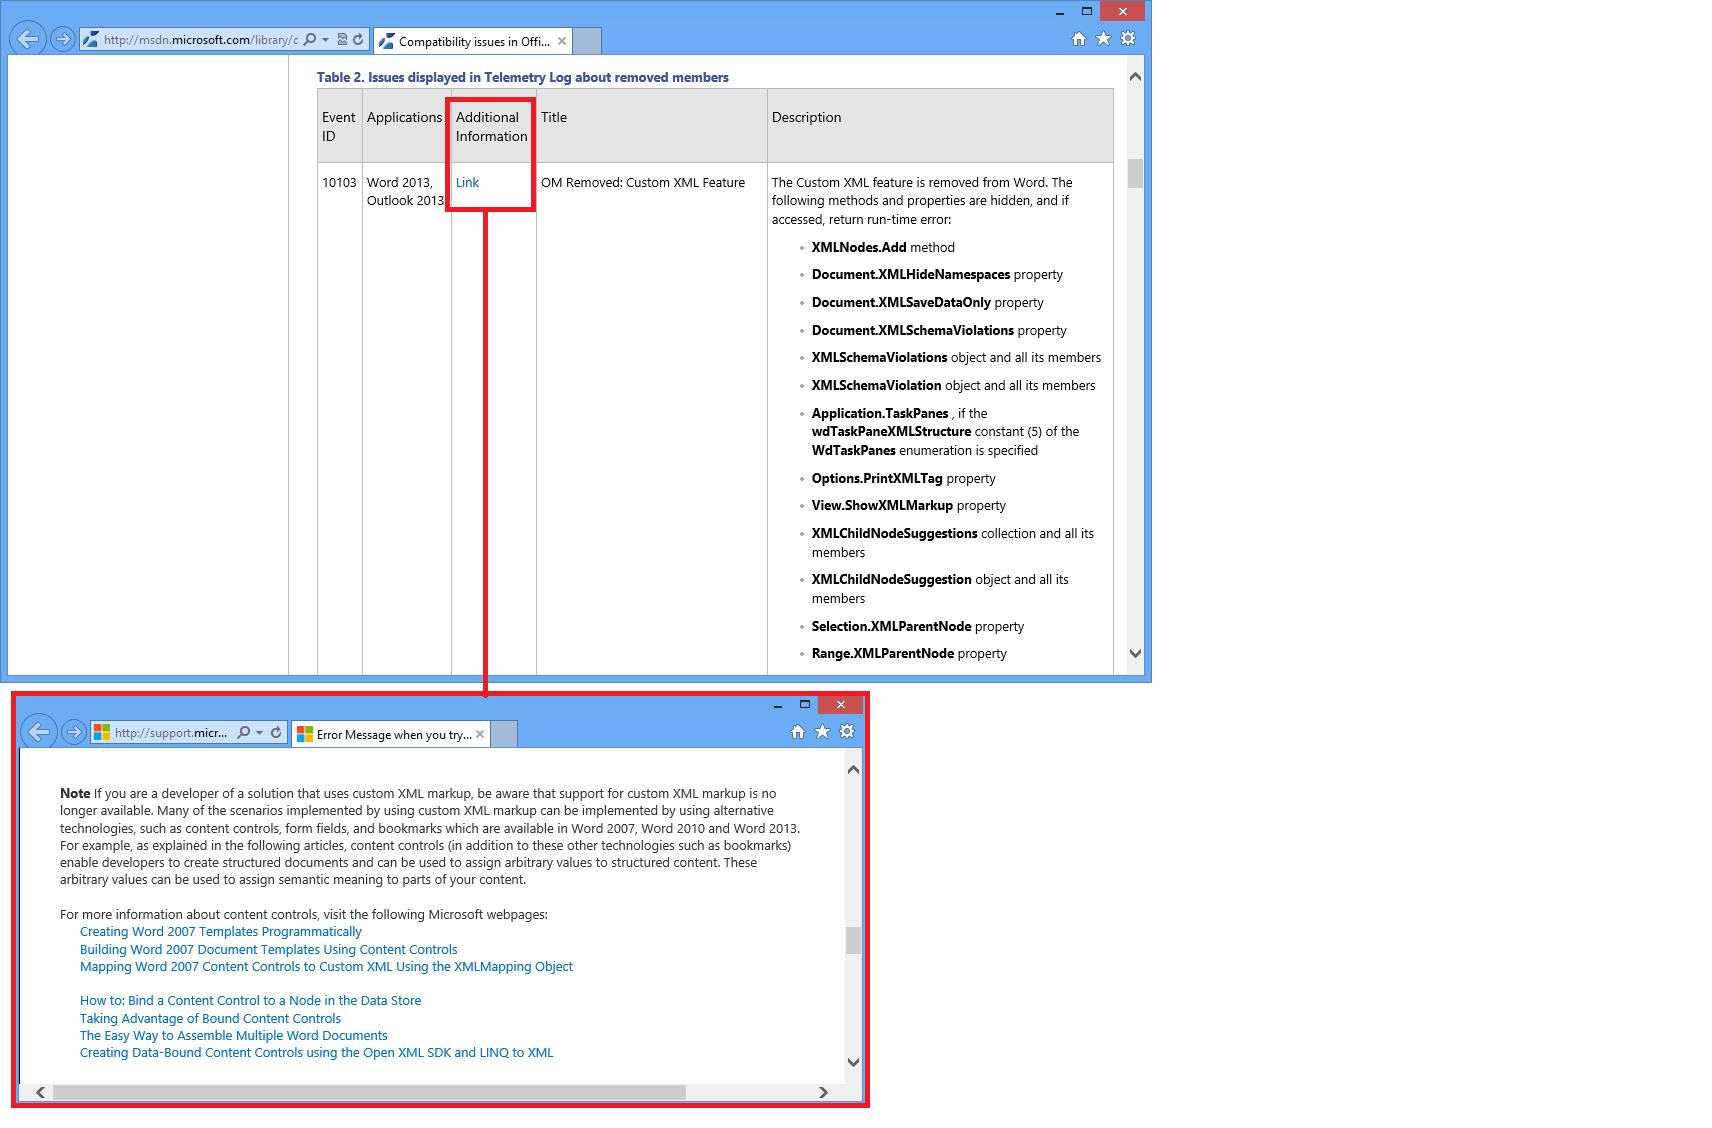
3. He clicks on the link under More Info column, which corresponds to the issue he’s investigating (in this case, the ConfidentialityAgreement_template.docx document). He sees more detailed information available on MSDN, which he can further drill down and find information useful for his developer to remediate the problem. (See example highlighted below in Figure 3. )
Figure 3: Drilldown to MSDN for More Information
4. After a developer fixes the issue, the tester opens an updated copy of the file and sees that there are no new issues recorded in Telemetry Log.
Summary
In this blog post, we’ve discussed the purpose for Telemetry Log and how to get started using it. We’ve also discussed how end users, especially developers and testers, can get the most value from Telemetry Log.
Additional Resources
Office Developer Center
Reference Guide for using Telemetry Log
Compatibility Issues in Office 2013
Comments
- Anonymous
March 03, 2015
Simplified explanation of Telemetry...thank you! Great tool!


