Tip o' the Week 395 – Resizing pictures in Windows 10
This is especially the case if you’re sharing pictures with others – though it does rather depend on how. Email programs usually have ways to reduce the size of images, varying in method but increasingly very integrated to the sending process, and often with little real control of what’s going on. This doesn’t make the image smaller in the number of bytes it takes up, however – so you might think you’ve made your massive picture a nice thumbnail, only to find it’s still actually 7MB in size. In order to make the image data size get smaller in Outlook, select it by left-clicking, then from the Picture Tools | Format menu, you’ll find a Compress Pictures com mand that lets you make this image (or every other one in the mail) , smaller.
The same thing happens in PowerPoints as well – tiny little watermarks on the background of a presentation making the file too big to ever email to anyone. A similar process can radically reduce the size of your presentations by compressing the size of images before saving. Files If you have pictures in the file system, there used to be a variety of ways for Windows to offer resize capabilities – one of which was to install the now-defunct Windows Live Photo Gallery, which had a nice wizard to resize images to standard sizes. Now, in Windows 10, there’s no easy, out-of-the-box way of doing it, as the Photos app doesn’t offer resizing and nothing shows up in the desktop / file system mode. If you have a habit of uploading photos you’ve taken to online forums and the like, some of them will deal with resizing for you (as does Facebook, Yammer etc too), but if they don’t, you may find you’ll need to radically reduce the dimensions of your pic before you can share it.
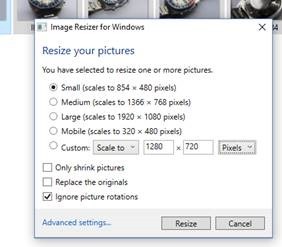
Afterwards, right-click within Windows Explorer on your chosen image – or select several and do the same – and resize the image(s) to a given set of dimensions in a trice. Then you’re ready to upload the resulting new pics to your online forum of choice.
|


