Reducing Windows Deployment time using Power Management
The following post was contributed by Benjamin Rampe a Senior PFE working for Microsoft.
While studying up on Windows 10, I came across a technique that has been shown to reduce the time it takes to apply an OS WIM to disk by 20 – 50%*. That’s a fairly significant savings in time and the implementation of this technique is relatively easy and does not require you to change how you deploy Windows. Believe it or not, the savings come from adjusting the OS power management settings during a deployment. While there are multiple ways to implement these power management settings, below I’ve outlined what I consider the most non-intrusive to existing deployment methods.
Steps:
1. Copy PowerCfg.exe binaries to MDT Files package’s Scripts subfolder
- By default, WinPE runs with the power management scheme set to “Balanced”
- ConfigMgr 2012 R2’s boot images use WinPE v5.0 which is based on the Windows 8.1 OS
- PowerCfg.exe is necessary for changing the power management scheme
- PowerCfg.exe is not included in WinPE
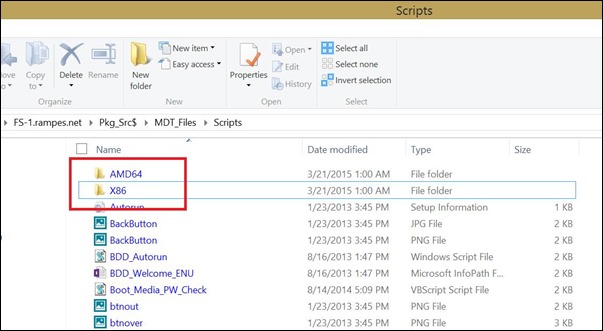
- Create subfolders in the MDT Files package’s Scripts subfolder for each architecture, as shown below:
- From a system running Windows 8.1 (or Server 2012 R2) copy %WINDIR%\System32\PowerCfg.exe to the AMD64 folder in the MDT Files package Scripts folder
- From a system running Windows 8.1 (or Server 2012 R2) copy %WINDIR%\SysWOW64\PowerCfg.exe to the x86 folder in the MDT Files package Scripts folder
- Update distribution points for the MDT Files package (Note: SysWOW64 contains 32 bit files hence we use this folder.)
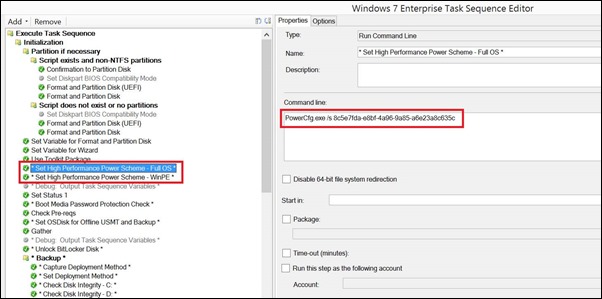
2. Insert a step early in the task sequence to set the power management scheme to “High performance”
- The GUID for the High performance scheme is “8c5e7fda-e8bf-4a96-9a85-a6e23a8c635c”
- The GUIDs for the default power management schemes in Windows are consistent between Windows versions (Vista and later)
- The first instance of this action is for setting the power scheme during a REFRESH scenario (which starts in the full/old Windows OS). In this scenario, we want to execute the PowerCfg.exe native binary included in the OS (not the version in the MDT Files package). The Command line for this instance should be: “PowerCfg.exe /s 8c5e7fda-e8bf-4a96-9a85-a6e23a8c635c”. To ensure this action only runs during a REFRESH scenario, the condition on this step should be “_SMSTSInWinPE not equals TRUE”
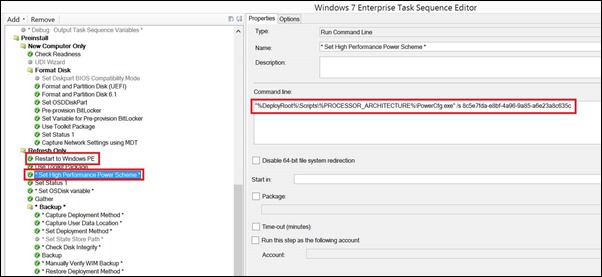
- The second instance of this action is for setting the power scheme during a NEW COMPUTER scenario (which starts in WinPE). In this scenario, we want to execute the PowerCfg.exe binary included in the MDT Files package. The Command line for this instance should be: “"%DeployRoot%\Scripts\%PROCESSOR_ARCHITECTURE%\PowerCfg.exe" /s 8c5e7fda-e8bf-4a96-9a85-a6e23a8c635c”. To ensure this action only runs during a NEW COMPUTER scenario, the condition on this step should be “_SMSTSInWinPE equals TRUE”
- The example below leverages the MDT-specific variable %DeployRoot% which gets instantiated only after a “Use Toolkit Package”, so be sure to insert the step to change the power scheme after the first “Use Toolkit Package” as shown below:
3. After every “Restart Computer” step within the Preinstall, Install, and Post Installphases, insert another action to reset the power management scheme to “High performance” using the PowerCfg.exe from the MDT Files package. These 3 phases all run under WinPE which does not persist the power scheme between reboots. For example:
4. After the first “Restart Computer” step within the State Restorephase, insert another action to reset the power management scheme to “High performance” using PowerCfg.exe from the native (full) Windows OS as shown below. (NOTE: Perhaps a better alternative to implementing this step would be to set the power scheme to High performance prior to image capture which would provide the added benefit of using the High performance scheme during PnP enumeration, driver installation, etc.):
5. Finally, set the power management scheme to the scheme you wish for the system to use after the deployment. In the example below, the GUID for the Balanced power scheme is set. GUIDs for the built-in power schemes in Windows can be found here. To set the GUID for any custom scheme, use “PowerCfg.exe –L” to obtain the scheme’s GUID and paste into the Command line for the action:
Early results are very promising using this technique, we would love to hear if this improved the speed of your deployment via the comments.
*From Windows 10 for PCs and 2 in 1s Manufacturing End-to-End Overview – https://channel9.msdn.com/Events/WinHEC/2015/WDI201
Disclaimer: The information on this site is provided "AS IS" with no warranties, confers no rights, and is not supported by the authors or Microsoft Corporation. Use of included script samples are subject to the terms specified in the Terms of Use .
Comments
- Anonymous
January 01, 2003
OK. Thanks for the quick response. - Anonymous
January 01, 2003
Hi Preenesh,
The System32 and SysWOW64 folders are correct. Here is a nice blog showing why - https://www.sepago.com/blog/2008/04/20/windows-x64-all-the-same-yet-very-different-part-7-file-system-and-registry.
Ben. - Anonymous
January 01, 2003
I'd have to say it depends on the hyper-visor perhaps. I know the 'balanced' power plan for Windows 7 in VMware for instance is a big no-no. - Anonymous
January 01, 2003
You could just as easily inject powercfg.exe into the boot Wim using the Extra files setting in the Deployment Console. - Anonymous
January 01, 2003
Great post. Have you tested whether this has any effect on virtual machines? This approach is useful for the hypervisor host to get more performance out of it, but what about making a difference inside a VM? - Anonymous
January 01, 2003
Aaron.Parker on a side note a common mistake I see with Hyper-V hosts being used to make images often have their power settings not set for maximum performance. - Anonymous
March 26, 2015
Great question. You are not likely to see much savings when deploying to VMs. Many virtualization platforms turn off power management settings altogether. - Anonymous
March 26, 2015
Great article. Am I right in assuming that this will not work for windows 7 family deployment? - Anonymous
March 26, 2015
Thx for sharing , nice article.. Now I know what to do this saturday nite ;) - Anonymous
March 26, 2015
Can we use the same for Windows 7 deployment as well running on WinPE 4.0 and SCCM 2007? - Anonymous
March 27, 2015
Is this working on Windows 7 deployment aswell? - Anonymous
March 27, 2015
Is likely to affect the build time of a Windows 7 machine? - Anonymous
March 27, 2015
Can this same principle be applied to SCCM 2007 with MDT 2010 Update 1? Unfortunately we are still working on getting our 2012 environment stood up. - Anonymous
March 27, 2015
Great post. I assume this is limited to Windows 10 and won't improve the performance of deploying Windows 7 and 8.1 images? - Anonymous
March 27, 2015
This technique should work with all versions of Windows 7 and newer (including Windows Server versions). - Anonymous
March 27, 2015
This should work with versions of WinPE v3.0 and later. Keep in mind that you'll want to use the version of PowerCfg.exe that is specific to the version of Windows that the version of WinPE is based. See here for information about WinPE versions:http://en.wikipedia.org/wiki/Windows_Preinstallation_Environment - Anonymous
March 27, 2015
This is what I use during deployment to put comuter ( laptops in our case ) into balanced and never go to sleep
@echo off
powercfg -setactive 381b4222-f694-41f0-9685-ff5bb260df2e
powercfg -SETACVALUEINDEX 381b4222-f694-41f0-9685-ff5bb260df2e 238c9fa8-0aad-41ed-83f4-97be242c8f20 29f6c1db-86da-48c5-9fdb-f2b67b1f44da 000
powercfg -SETACVALUEINDEX 381b4222-f694-41f0-9685-ff5bb260df2e 4f971e89-eebd-4455-a8de-9e59040e7347 5ca83367-6e45-459f-a27b-476b1d01c936 000 - Anonymous
March 27, 2015
The comment has been removed - Anonymous
March 27, 2015
The comment has been removed - Anonymous
March 28, 2015
Have a doubt on the below.. Should it not be the other way round.. System32 to x86 and SysWOW64 to AMD64
From a system running Windows 8.1 (or Server 2012 R2) copy %WINDIR%System32PowerCfg.exe to the AMD64 folder in the MDT Files package Scripts folder
From a system running Windows 8.1 (or Server 2012 R2) copy %WINDIR%SysWOW64PowerCfg.exe to the x86 folder in the MDT Files package Scripts folder - Anonymous
March 28, 2015
Dean: Thanks for your feedback. Were these tests with done with physical or virtual machines? I don't expect much gain, if any, on virtual systems. Further, the gains will vary depending on various hardware and deployment factors. - Anonymous
March 28, 2015
(This comment has been deleted per user request) - Anonymous
March 30, 2015
Ben
This is great, I look forward to trying this in the very near future. - Anonymous
March 30, 2015
As another person mentioned, the architecture folder copy should be reversed. As written you will be greeted with a subsystem missing error due to the wrong architecture instructions. ;-) BTW - I tested this in Hyper-V and saw no improvement (was actually 2 min longer build time) so hoping physical hardware testing will prove better. - Anonymous
March 30, 2015
(This comment has been deleted per user request) - Anonymous
March 31, 2015
Just ran a test for myself as well, and there was little to no improvement in the deployment times. It was a physical machine, Win 7 x86, Dell Optiplex 755 SFF. I'll keep testing, but I was slightly disappointed in the results. If anyone wants to know anything more, or has any other ideas, please let me know. - Anonymous
March 31, 2015
I think it's best to keep in mind that hardware is going to be a very large factor here, as well as network speed. If you're connected via a 10/100 vs a gig switch you'll see a considerable difference in deployment times obviously. Whether it's 5 minutes or 50 minutes in the end, any little tweak us engineers can give to our deployment teams in a positive gain is a plus. Well done Ben! - Anonymous
April 01, 2015
I have been giving this a go in my free time this week. We have a set of eight HP workstations on an IP KVM that we use to test our build. We use MDT Lite Touch (MDT 2013/ADK 8.1) to deploy Windows 7 and testing both 32-bit and 64-bit I am consistently seeing 10-15% decrease in overall build time.
I plan to continue testing, of course, but so far so good! Even if we only reduce build time by a five minutes in some cases it's such a simple no risk change.
Thanks Ben! - Anonymous
April 02, 2015
I implemented it and are seeing 10-15 minute reduction in time in our SCCM2012R2 OSD TS. Times have dropped from ~80-85 minutes to ~65-70 minutes (depending on hardware).
I also tried to use custom unattend.xml to apply power profile as early as possible at first boot but PreferedPlan option just seems to not work (Google seems to agree). If this worked, we could shave off a few additional minutes (first boot, driver configuration, SCCM agent installation). - Anonymous
April 07, 2015
Do you have any metrics or before/after listings of performance? - Anonymous
April 07, 2015
Hello there, I can confirm that the WinPE v5.0 will work with Windows 7 deployment. I have built many Windows 7 of all flavours using WinPE v5.0 :-) - Anonymous
April 08, 2015
Win7 via MDT with this technique - 1st test approx 10 min savings. - Anonymous
April 08, 2015
Great post!
MDT Build and Capture Went from 9 hour to 6 hours, so its like a 33% faster capture process.
SCCM deploy went from 55 minutes to 35 minutes so it's like a 35% increase.
It will be interesting to test when there are more patches and when we deploy machines with the full Adobe suite. They normaly take 2-3 hours to finish so it should give even more. - Anonymous
April 12, 2015
Saves us around 10-15mins. I don't think theres any performance increase once in Windows. - Anonymous
April 20, 2015
Tried Implementing this in My SCCM2012R2 with MDT2013 environment and when I run the TaskSequence I receive a Task Sequence Failed Error message (0x80070057). I looked in the SMSTSLog and I do not see any errors when this task is being performed. When I run the command manually within WinPE it works with no issues but the Automated running of it through the Task Sequence Fails. Anyone else have this issue? - Anonymous
June 05, 2015
Implemented with SCCM 2012 R2 for Windows 8.1 tablet PC deployment. Installation goes approximately 20% faster. - Anonymous
June 08, 2015
Reduce your apply OS task sequence by up to 50% - Anonymous
June 10, 2015
The comment has been removed - Anonymous
July 21, 2015
Reduce your apply OS task sequence by up to 50% - Anonymous
August 07, 2015
The comment has been removed - Anonymous
August 10, 2015
Is this possible without SCCM, and just using MDT? - Anonymous
August 27, 2015
The comment has been removed - Anonymous
October 20, 2015
Hello @all,
i changed a bit in lag of also missing "Use Toolkit Package" in my Task Sequence.
I found several entries "Copy Scripts" i changed path "%DeployRoot%Scripts%PROCESSOR_ARCHITECTURE%PowerCfg.exe" to "%Scriptroot%%PROCESSOR_ARCHITECTURE%PowerCfg.exe" and added power state Change after that entries. That works and CPU running now permanently in Turbo mode.
Cut Installation time from 27 minutes on an i7 CPU, 8GB with SSD to nearlly 20 minutes.
Used with MDT 2013 Update 1 with MDT for Windows 7 x64 rollout.
Big "thank you" Ben!
Best regards Marcus - Anonymous
January 02, 2016
The comment has been removed - Anonymous
January 20, 2016
The comment has been removed - Anonymous
January 22, 2016
The comment has been removed - Anonymous
May 23, 2016
Power B app for windows 10 mobile.Power B windows 10 app for disktops.


