Avskärmade virtuella datorer – Värdtjänstleverantören konfigurerar Windows Azure Pack
Det här avsnittet beskriver hur en värdtjänstleverantör kan konfigurera Windows Azure Pack så att klienter kan använda det för att distribuera avskärmade virtuella datorer. Windows Azure Pack är en webbportal som utökar funktionerna i System Center Virtual Machine Manager så att klientorganisationer kan distribuera och hantera sina egna virtuella datorer via ett enkelt webbgränssnitt. Windows Azure Pack har fullt stöd för skärmade virtuella datorer och gör det ännu enklare för dina klienter att skapa och hantera sina avskärmningsdatafiler.
Information om hur det här avsnittet passar i den övergripande processen för att distribuera avskärmade virtuella datorer finns i Konfigurationssteg för värdtjänstprovider för skyddade värdar och avskärmade virtuella datorer.
Konfigurera Windows Azure Pack
Du utför följande uppgifter för att konfigurera Windows Azure Pack i din miljö:
Fullständig konfiguration av System Center 2016 – Virtual Machine Manager (VMM) för din värdinfrastruktur. Detta omfattar konfiguration av VM-mallar och ett VM-moln, som kommer att exponeras via Windows Azure Pack:
Scenario – Distribuera skyddade värdar och avskärmade virtuella datorer i VMM-
Installera och konfigurera System Center 2016 – Service Provider Foundation (SPF). Med den här programvaran kan Windows Azure Pack kommunicera med dina VMM-servrar:
Installera Windows Azure Pack och konfigurera det så att det kommunicerar med SPF:
- Installera Windows Azure Pack (i det här avsnittet)
- Konfigurera Windows Azure Pack- (i det här avsnittet)
Skapa en eller flera värdplaner i Windows Azure Pack för att tillåta klientorganisationer åtkomst till dina VM-moln:
Skapa en plan i Windows Azure Pack (i det här avsnittet)
Installera Windows Azure Pack
Installera och konfigurera Windows Azure Pack (WAP) på den dator där du vill vara värd för webbportalen för dina klienter. Den här datorn måste kunna nå SPF-servern och kunna nås av dina klienter.
Granska WAP-systemkrav och installera nödvändig programvara.
Ladda ned och installera Web Platform Installer. Om datorn inte är ansluten till Internet följer du installationsanvisningarna för offline.
Öppna installationsprogrammet för webbplattformen och leta reda på Windows Azure Pack: Portal och API Express under fliken Produkter. Klicka på Lägg tilloch installera längst ned i fönstret.
Fortsätt genom installationen. När installationen är klar öppnas konfigurationsplatsen (https://<wapserver>:30101/) i webbläsaren. På den här webbplatsen anger du information om DIN SQL-server och slutför konfigurationen av WAP.
Mer information om hur du konfigurerar Windows Azure Pack finns i Installera en expressdistribution av Windows Azure Pack.
Anmärkning
Om du redan kör Windows Azure Pack i din miljö kan du använda din befintliga installation. För att kunna arbeta med de senaste skärmade VM-funktionerna måste du dock uppgradera din installation till minst Samlad uppdatering 10.
Konfigurera Windows Azure Pack
Innan du använder Windows Azure Pack bör du redan ha det installerat och konfigurerat för din infrastruktur.
Gå till administratörsportalen för Windows Azure Pack på https://<wapserver>:30091och logga sedan in med dina administratörsautentiseringsuppgifter.
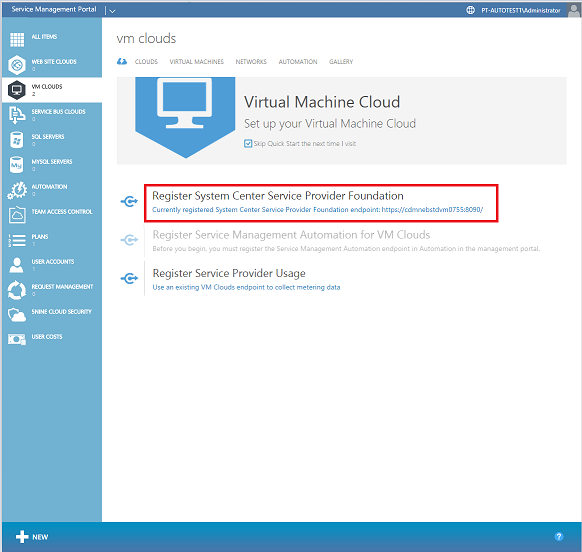
I den vänstra rutan klickar du på VM-moln.
Anslut Windows Azure Pack till Service Provider Foundation-instansen genom att klicka på Registrera System Center Service Provider Foundation. Du måste ange URL:en för Service Provider Foundation samt ett användarnamn och lösenord.

När du är klar bör du kunna se vm-molnen som har konfigurerats i VMM-miljön. Se till att du har minst ett VM-moln som stöder avskärmade virtuella datorer som är tillgängliga för WAP innan du fortsätter.
Skapa en plan i Windows Azure Pack
För att tillåta hyresgäster att skapa virtuella datorer i WAP måste du först skapa en hostingsplan som hyresgäster kan prenumerera på. Planer definierar tillåtna VM-moln, mallar, nätverk och faktureringsentiteter för dina klientorganisationer.
I den nedre rutan i portalen klickar du på +NEW>PLAN>CREATE PLAN.
I det första steget i guiden väljer du ett namn för din plan. Det här är namnet som dina klienter ser när de prenumererar.
I det andra steget väljer du VIRTUAL MACHINE CLOUDS som en av tjänsterna som ska erbjudas i planen.
Hoppa över steget om att välja tillägg för planen.
Klicka på OK (bockmarkering) för att skapa planen. Även om detta skapar planen är den ännu inte i ett konfigurerat tillstånd.

Börja konfigurera planen genom att klicka på dess namn.
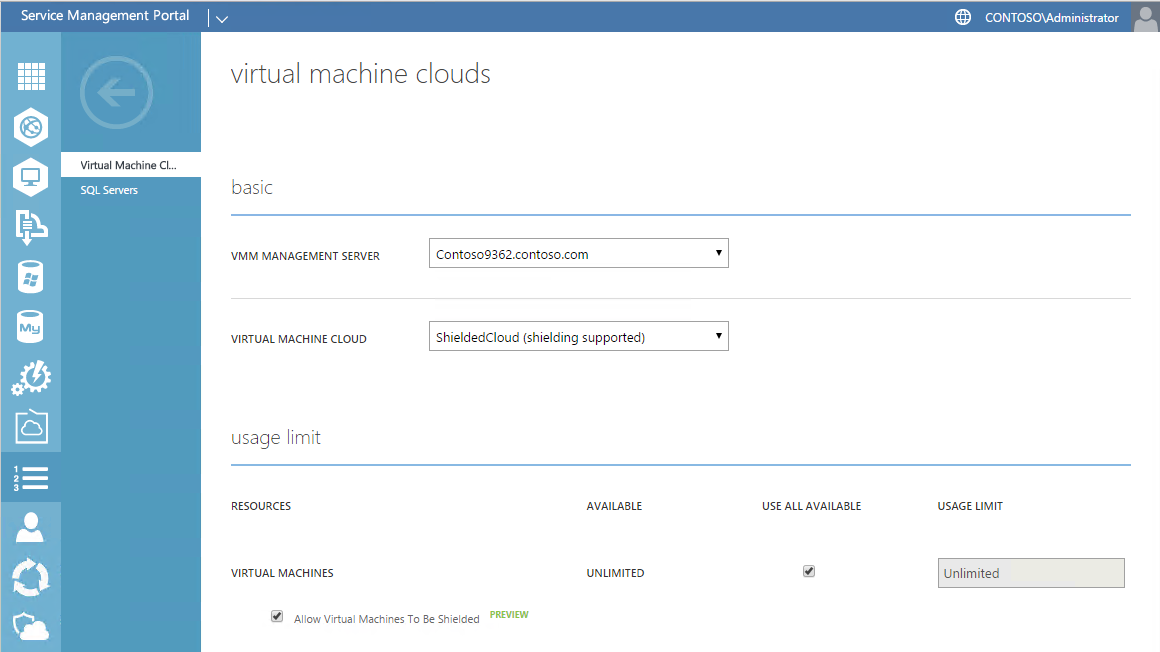
På nästa sida under planeringstjänsterklickar du på Virtual Machine Clouds. Då öppnas sidan där du kan konfigurera kvoter för den här planen.
Under grundläggandeväljer du den VMM-hanteringsserver och det virtuella datormoln som du vill erbjuda dina klienter. Moln som kan erbjuda skärmade virtuella datorer visas med (skärmning stöds) bredvid deras namn.
Välj de kvoter som du vill använda i den här planen. (Till exempel begränsningar för CPU-kärnor och RAM-användning). Se till att kryssrutan Tillåt att virtuella datorer skyddas är markerad.

Rulla ned till avsnittet mallaroch välj sedan en eller flera mallar som ska erbjudas dina klienter. Du kan erbjuda både avskärmade och oskärmade mallar till hyresgäster, men en avskärmad mall måste erbjudas för att ge hyresgäster fullständiga garantier om integriteten för den virtuella datorn och deras hemligheter.
I avsnittet nätverk lägger du till ett eller flera nätverk för dina klienter.
När du har angett andra inställningar eller kvoter för planen klickar du på Spara längst ned.
Längst upp till vänster på skärmen klickar du på pilen för att ta dig tillbaka till sidan Plan.
Längst ned på skärmen ändrar du planen från att vara privat till offentlig så att hyresgäster kan prenumerera på planen.

Nu är Windows Azure Pack konfigurerat och klientorganisationer kommer att kunna prenumerera på den plan som du nyss skapade och distribuera avskärmade virtuella datorer. Ytterligare steg som hyresgäster behöver utföra finns i avskärmade virtuella datorer för hyresorganisationer – Distribuera en avskärmad virtuell dator genom att använda Windows Azure Pack.