Publish agents and analyze performance
After your agent content has been created, it needs to be published so that customers can engage with it. Published agents can be made available across multiple platforms and channels. Before an agent can be added to channels, interacted with, or used by team members, it needs to be published at least once. For example, an agent can be deployed to organizational websites, mobile applications, and messaging platforms such as Microsoft Teams or Facebook.
Publishing agents as you make changes also ensure that customers are engaging with the latest agent content. For example, if your organization's store hours change, after you have edited the Store Hours topic to reflect the changes, you need to publish it again from within the Microsoft Copilot Studio portal. After the agent has been published again, the updated content is used by all channels that the agent is configured on.
Security
Before you publish your agent, you need to configure security and authentication settings. This ensures not only that users are able to access the data in the agent, but that it can be deployed to the necessary channels later. Security settings are available by selecting Settings > Security. There are three options for configuring Authentication in your agent.
No authentication – No authentication is required; the agent is able to be used publicly on any channel.
Authenticate with Microsoft – Uses Microsoft Entra ID authentication in Microsoft Teams, Power Apps, or Microsoft 365 Copilot to authenticate users. The agent is available in Teams and Power Apps channels. This is the default setting.
Authenticate manually – Configure either Azure Active Directory or OAuth 2 authentication. The agent is available on any channel.
Enterprise-level security
Microsoft Copilot Studio also provides robust security measures for tenant administrators, giving them greater control over agents within their tenants without hindering maker adoption. For example, agents require user authentication by default, and their conversation transcripts are not accessible to agent makers.
Tenant admins can also see a comprehensive list of Microsoft Copilot Studio audit logs, including tenant-wide usage, inventory (including API support), and tenant hygiene (DLP violations and inactive agents) reports in Microsoft Purview.
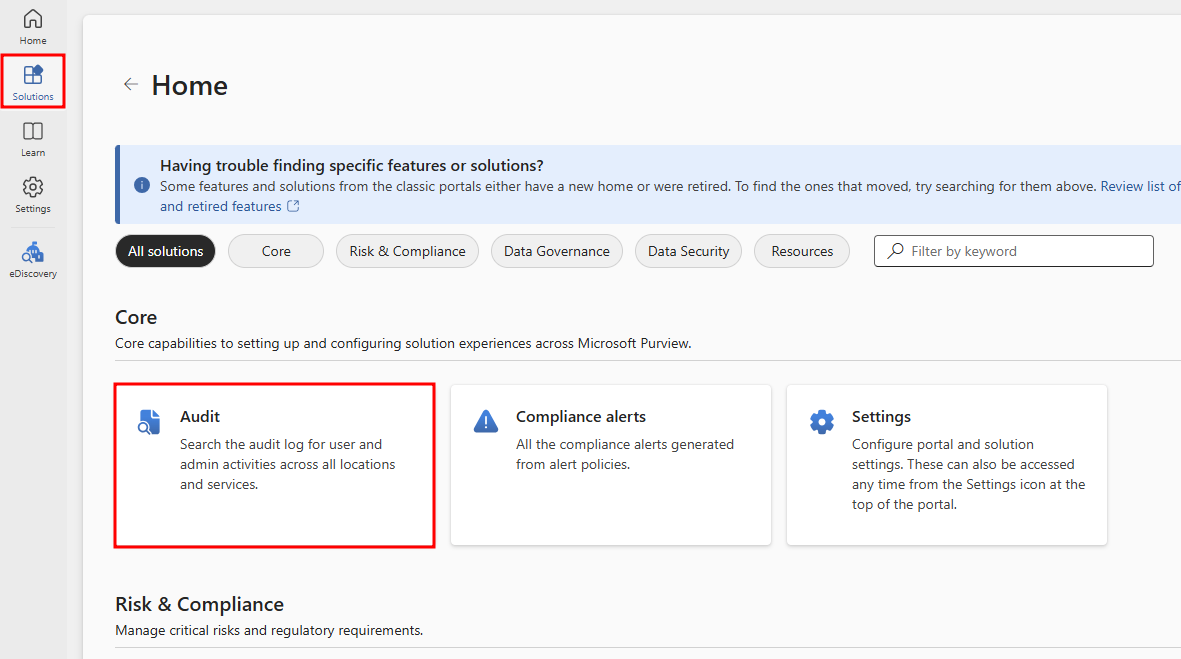
To view these logs, admins need to log in to the Microsoft Purview compliance portal. From the left menu, select Solutions and choose Explore all. From the Solutions Home page, select Audit under Core.
Note
For more information on the type of information logged and understanding audited fields, visit the View Copilot Studio audit logs documentation.
Billing and usage in the admin center
System and agent admins are able to review billing and usage details in the Power Platform admin center. Using this data, they can identify and report on how teams within their organization are using Microsoft Copilot Studio.
To view Copilot Studio usage and billing information, log in to the Power Platform admin center and navigate to the Licensing tab from the left navigation menu. From the Licensing pane that opens to the left, select Copilot Studio.
In the first section of the Summary tab for Copilot Studio, you'll see links for:
- Purchasing capacity licenses - Navigates you to the admin portal for license requests.
- Managing billing plans - Navigates you to the Pay-as-you-go plans management tab.
- Managing messages - Opens a side-panel that displays a selected environment's status, allocated capacity, and messages consumed.
- Managing sessions - Opens a side-panel that displays a selected environment's status, allocated capacity, and sessions consumed.
- Summary report downloads - Downloads a report on the tenant's consumed Copilot Studio messages.
Next, you'll see recommendations for billing plans, which are required when using agents in a production setting and for tracking usage. This is followed by a capacity summary displaying both pay-as-you-go message counts and prepaid capacity. Below that, you'll find message and session capacity graphs that highlight consumption trends and usage by product. Finally, at the bottom of the page, you'll see the message usage by environment section, which shows total prepaid and pay-as-you-go usage across individual and all environments.
Navigating to the Environments tab lets you select a specific environment to manage. Once selected, the environment's region and type are displayed at the top of the page. Clicking the Manage billing plans link takes you to the pay-as-you-go plans management tab. In the center of the page, you'll find the environment’s message capacity and consumption data by product, as well as message consumption by resource. Selecting the sessions capacity tab displays the assigned sessions capacity and its consumption.
Publish an agent
When you're ready to publish your agent, select the Publish button from the top navigation pane. During the publishing process, the agent is checked for errors. Agent publishing typically takes a few minutes. When the publish is successful, the top of the page displays a green banner indicating that everything worked correctly. If errors are detected, you're notified through a message that is displayed in the application.
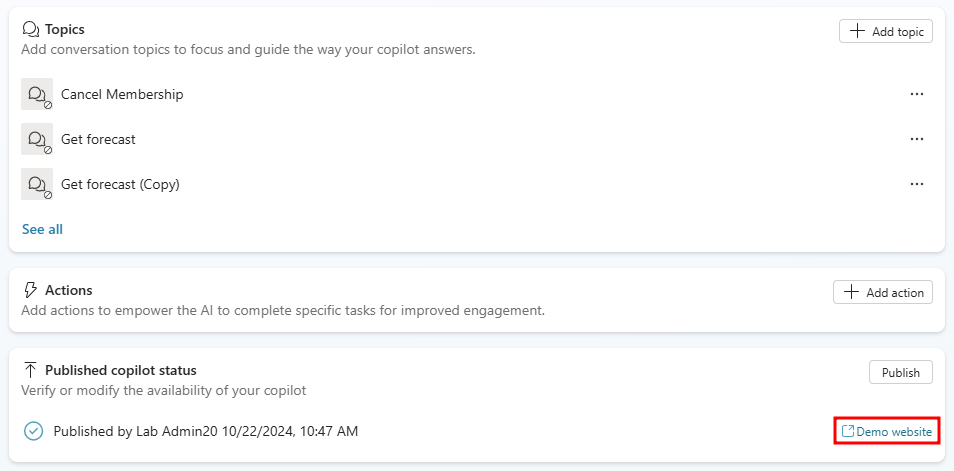
Before the agent is deployed to the different channels that use it, you might want to gain feedback from other team members. When an agent is first published, it can be made available to the demo website. You can provide the demo website's URL to team members or stakeholders to try it out. The advantage of using the demo website is that the experience is different than testing the agent during the design process. The test agent experience is only intended to allow agent authors to test it. So the demo website link increases the pool of users that can test and provide feedback that is related to the overall experience of the agent.
To add an agent to the demo website, select the demo website link under Share your agent. This webpage demonstrates what your agent looks like to a user who comes to your webpage. The agent canvas is at the bottom. You can interact with it by entering text in the window or by selecting a starter phrase from the provided options.
Note
In order to add the agent to a demo website, the agent's Authentication setting needs to be set to No authentication.
Now that the agent is published, you can begin to deploy it to other channels. Channels that your agent can be published to include Telephony channels, Websites, Facebook, Slack, Line, GroupMe, and more.
For more information, see publishing your agent to other channels.
Analyze the performance of your agent
After an agent is deployed and customers are interacting with it, statistics that are related to the agent will become available. You can access this information through the Analytics tab in the side navigation pane. This pane provides key performance indicators (KPIs) that show:
The volume of sessions that your agent has handled
How effectively your agent was able to engage users and resolve issues
Escalation rates to agent makers
And abandonment rates during conversations.
You can also find customer satisfaction information at the KPI level and in the Customer Satisfaction tab.


