Personalize the Role Center
The Role Center page is the starting point for users in Business Central. This page is therefore tailored towards the role of a person in the organization. Users can easily personalize the role center page to align it even more with their individual needs.
Bookmark a page or report on your Role Center
Using the bookmark icon, you can add a page or report to the navigation menu of your Role Center. This feature allows you to personalize the navigation menu from your Role Center page. You can find the bookmark icon at the top-right side of a page.
The screenshot below shows a Role Center page where the menu provides actions to open the Customers, Vendors, Items, Bank Accounts, Chart of Accounts, and Chart of Accounts Overview list pages.
You can also bookmark a list page directly from the search result without opening the page.
Once you've clicked the Bookmark icon, the action to open the page will be added to the Role Center page.
The Role Center page now includes the Jobs page on the menu.
Personalize the Role Center page
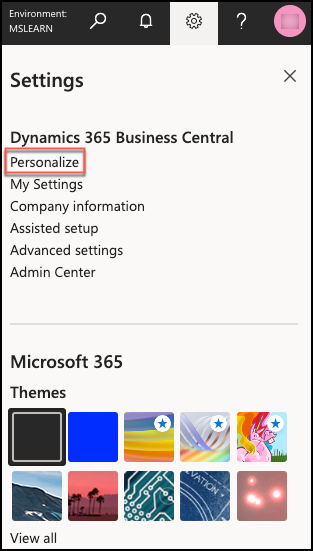
The following personalization actions can only be executed by first activating the Personalizing banner. To activate this banner, click Settings, and then Personalize.
The Personalize banner will now appear.
Groups or actions will now be highlighted when you focus on them. This allows you to move, hide or drag each menu group or action on your Role Center. Let’s assume that your active Role Center is the Business Manager Role Center. You want to move the Chart of Accounts menu. You can use your mouse to click and drag it to where you want it.
If you want to undo the personalization, use the Clear personalization action. You can clear all your personalizations or choose to only clear actions, fields, columns, or parts from personalizations.
Watch the following video to discover how to personalize or change your assigned Role Center.
Configure cues and lists
The cues and lists on your Role Center can be configured to display information like you want it. This means that you design them towards your own needs by setup and configuration. This isn't personalization as described in this module, but it's also a way of personalizing the information displayed on your Role Center.
To configure cues, go to the Activities section on your Role Center page, click on the drill-down icon and click Set Up Cues.
This will open a matrix with all available cues. You can configure three different styles for each cue based on the values in two thresholds.
So, you can configure the style for values under a threshold, between the two thresholds and above the last threshold. These styles are none, unfavorable, favorable, ambiguous, and subordinate. You can also determine the values for the thresholds.
To configure a list on your Role Center, click the drill-down icon on the list and click Manage List. You can then populate the list with records that you want to see and follow up.


