Generative Answers
With Microsoft Copilot Studio's generative answers feature, your agent can retrieve and present information from various internal or external sources without the need for creating specific topics. These answers can serve as the primary source of information for your agent or as a fallback when preauthored topics can't address a user's inquiry. This allows for the quick creation and deployment of a functional agent without the need for manually authoring multiple topics that might not meet your customer's needs.
What is especially important, and why this is being introduced before anything else, is to help makers start considering what data sources are available, which could be used to summarize answers to possible customer or employee questions. Depending on those data sources and if you can utilize them within Copilot Studio could mean that based on your use case, you might be able to focus on a smaller set of topics to author using the authoring canvas and deliver value to your customers or employees quicker.
In this unit, you add knowledge to an agent.
Add knowledge to an agent
Understanding Generative Answers in Copilot Studio
The generative answers feature serves two main functions:
Specific Knowledge Sources: Generating answers based on internal/external knowledge sources.
General Knowledge: Using general knowledge that is universally accessible to all agents.
It's important to understand which of these apply to your use case.
By enabling General Knowledge, your agent attempts to answer questions even if it hasn't been explicitly provided with the necessary information. If your use case requires the agent to only answer questions based on the information you've supplied, you should disable the General Knowledge feature.
For this exercise, you focus on the knowledge sources you explicitly want the agent to use. Therefore, you start by disabling the General Knowledge feature.
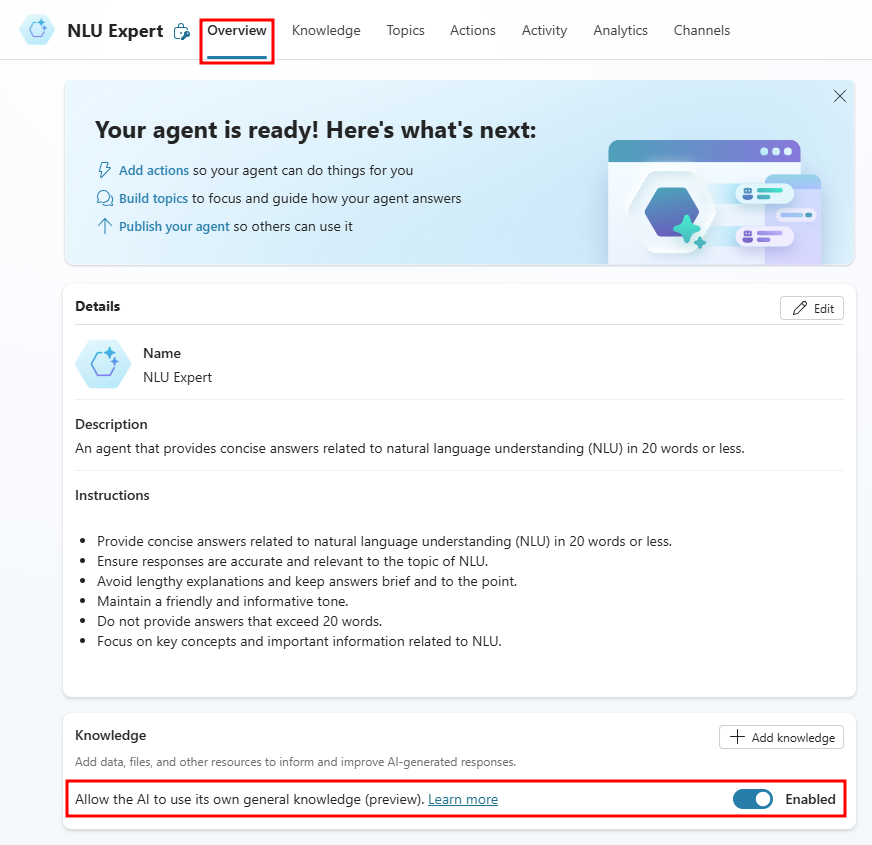
With your agent open in Microsoft Copilot Studio, select the Overview tab.
Below Details in the Knowledge section of the Overview page, select the Allow the AI to use its own general knowledge flag to disable general knowledge.
- In the Disabling the default AI knowledge window select Continue.
Add a public website to knowledge
Navigate to the Knowledge tab then select + Add knowledge.
Select the Public websites tile.
Enter
https://learn.microsoft.com/microsoft-copilot-studio/in the Public website link field and select Add.Select Add (at the bottom of the window) to confirm the addition of this public website.
After selecting Add, you are redirected back to the Knowledge tab with the public website displayed and marked with a status of Ready.
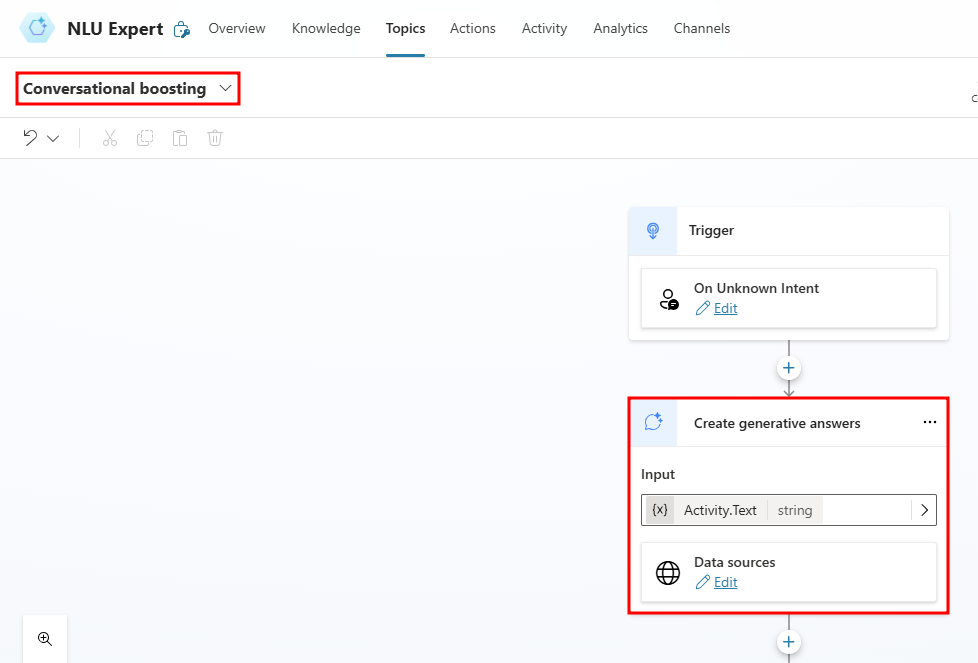
Next, select the Topics tab, choose All, and open the Conversational boosting topic.
- The generative answers node is included in the Conversational boosting topic.
Note
The Conversational boosting topic is triggered on unknown intent, meaning no other topic has triggers that handle the user's exact query.
Select the Edit pencil icon at the bottom of the Create generative answers node to browse the node's properties.
Under the Create generative answers properties menu, you're able to fine-tune how answers are generated by specifying which knowledge sources are used, customizing Content moderation levels, and more advanced options like saving the response as a variable.
Leave the default settings for now and close out of the properties pane.
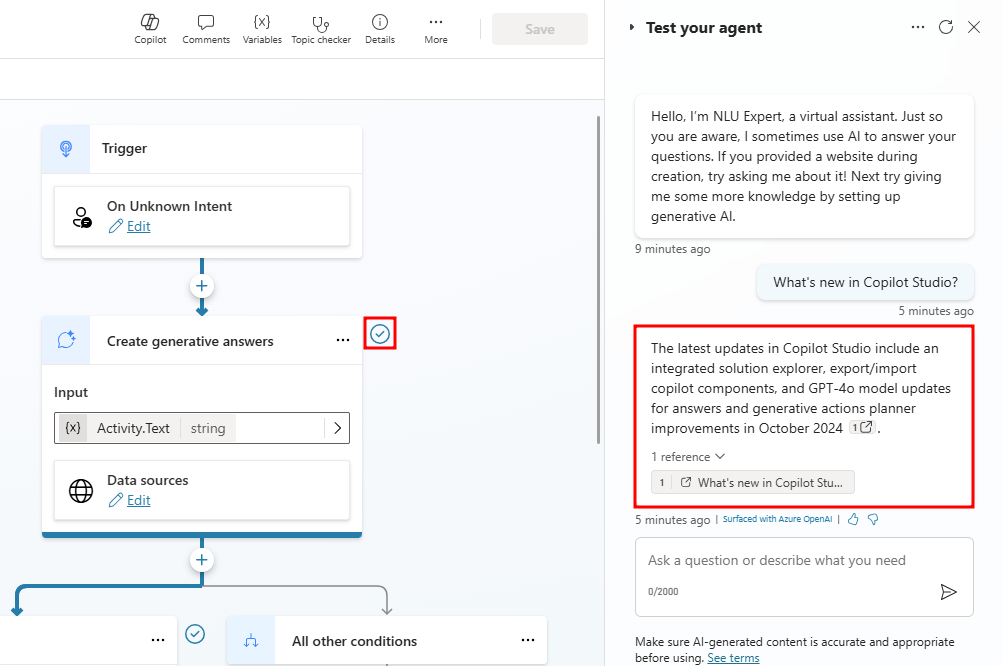
Now pay attention to the test panel in Microsoft Copilot Studio, which can be found in the right side of the screen, as shown below.
In the test panel, ask the question
What's new in Copilot Studio?.You should get a generated response based on the data available from the Microsoft Learn documentation website. Notice the Create generative answers node highlights from this query, indicating your question triggered the Conversational boosting topic due to the intent being unknown.
- You can ask more questions in the test panel and monitor what type of response you get.
Generative Answers feature in Copilot Studio, which allows your agent to find and present information from multiple sources, internal or external, without having to manually author a topic. This functionality can be used as the primary behavior for your agent or as a fallback when authored topics are unable to address the user's question.
This fundamentally changes the way conversational experiences are created. This unit goes through considerations on what use cases you're considering from your business that could be addressed with an agentic experience. To understand the fundamentals of Generative Answers, you should begin to think about your data sources that hold key information, and if those could be useful within your agent.
For example, your workflow might now look like this:
You create an agent and enable the Generative Answers feature, then test it thoroughly
After testing, you publish your agent to provide instant answers, assistance, and guidance to your customers or agent users
You create individual topics for the most important or frequently asked questions from your customers, based on analytics from previous agents or existing support issues
This workflow might require some time and specialized knowledge, but with generative answers enabled, your agent is up and running from day one.
To learn more about this specific feature, see the Microsoft Documentation on Generative Answers:
In the next section, you go over how you can add a database file to your agent.
Add a knowledge document
When building an agent in Copilot Studio, you might need the agent to access nonpublic data. With the Knowledge function of Copilot Studio, you can provide this grounding data in various ways: by uploading files, connecting to SharePoint or OneDrive, adding Dataverse tables, and more.
Providing a knowledge document helps the agent understand and relate the data to user queries. In this section, you add a PDF file containing details of a workshop on Copilot Studio.
The knowledge file you use is located here. Select the download icon to copy the file to your local machine.
Start by navigating to the Knowledge tab of your agent's homepage.
Select + Add knowledge.
In the Add knowledge window that opens, select the click to browse link under Upload files.
Locate and select the provided Microsoft Copilot Studio - Workshop.pdf file and select Open.
Select Add.
After a few minutes, the file should appear as Ready in the Knowledge section of the agent's homepage.
In the test panel, ask the question
What are rich responses in Copilot Studio?.You should get a generated response based on the contents of the file with a citation. An example of a generated answer is in the screenshot below:
Generative Actions and Orchestration
You can configure an agent to use either of the following types of orchestration. With classic orchestration, an agent responds to users by triggering the topic whose trigger phrases match most closely the user's query. With generative orchestration enabled your agent can choose the best actions, knowledge, and topics to answer user queries, or respond to event triggers regardless of their defined topic triggers.
For this task, you walk through the steps required to enable generative orchestration and browse the key differences you may notice when this feature is enabled.
Start by opening your agent from the Agents panel, then navigating to the Overview page of your agent.
Under the Details section, there's a toggle for Orchestration. Flip this toggle to Enabled.
Note
An alternative approach to enabling Generative Orchestration is through the Generative AI section of the agent's Settings page.
With Generative Orchestration enabled, all topics the agent has access to are now triggered by their trigger node's description, as opposed to the typical trigger phrases used in Classical Orchestration.
Navigate to the Topics tab of your agent and open the Greeting topic under Custom.
You notice the usual trigger nodes and trigger phrases used in Classical Orchestration are replaced with a Triggered by agent node.
The Triggered by agent node triggers topics based on a topic's description, so instead of a static list of trigger phrases the agent needs to match to trigger the topic, the agent is able to understand the purpose of individual topics and follow conversation paths that align with the user's query.
When converting an agent from Classical to Generative Orchestration, the trigger phrases are automatically modified to accompany the difference in trigger nodes.
Another feature of Generative Orchestration is the use of Generative Actions, or actions the agent can automatically call without modifying existing topic conversation paths.
To use Generative Actions, you first need to add actions to your agent.
Start by navigating to the Actions tab from your agent's top navigation menu.
Initially, the actions list is blank, but there are a number of preconfigured actions you can provide to your agent.
To add an action, select the + Add an action button in the middle of the Actions screen.
Select the Get forecast for today MSN Weather action under the Popular in your org section.
When adding an action, there are many low-level settings that can be adjusted. In this demo, you keep the default settings as-is.
After selecting the Get forecast for today action, select Next in the Choose an action window.
Select Next again in the Review inputs and outputs window.
Review the action's overall details in the Review and finish window and select Finish to add the action to your agent.
The action you added is a weather forecast action that takes the user's location as an input and outputs the weather forecast for that area.
To test the capabilities of the action you added, open the Test your agent pane on the right and input the following prompt:
What's the weather like today?The agent then respond with a question asking for the user's location, and if you have the conversation map enabled in your chat, you see the authoring canvas navigate to the action you added to the agent.
Type
New York City, New York(or any location you want) in the test pane to see the action return a weather forecast for that area.Due to using the default settings for the Get forecast for today action, the agent needs to gather the preferred temperature measurement system from the user. If your company is typically located in a specific locale, you're able to apply this in the action's settings, which gives you increased control when implementing generative actions.
Type your preferred measurement system in the test window.
Depending on your agent's authentication settings, you may need to approve the action's connection to the agent. If an Additional permissions are required... message appears, select Connect in the chat bubble.
A new browser tab opens to the Manage your connections page. Select Connect under Status, next to where it says Not Connected.
The Create or pick a connection window opens, so you can confirm the action's connection. If there's a checkmark next to MSN Weather, select Submit.
After creating the connection, navigate back to the browser tab with your test agent and select Retry in the chat bubble.
You notice the agent continues the conversation and returns the weather data for that area in the measurement system you declared.
If you browse the connector's details in the activity map, you see all the parameters available. These parameters and the resulting output can be modified in the action's settings in the Actions tab.


