Exchange Users integration pack
Integration packs are add-ons for Orchestrator, a component of System Center. Integration packs optimize IT operations across various environments. They enable you to design runbooks in Orchestrator that use activities performed by other System Center components, other Microsoft products, and third-party products.
The Integration Pack for Exchange Users facilitates the automation of user-centric tasks, such as actions to read and send email messages, create appointments, or update tasks and contacts. The operation is carried over HTTP and the connection can be authenticated by the methods enabled on the Exchange Server. Consult with your tenant administrator about the available methods on your on-premises Exchange Server.
This integration pack can be used to connect to both on-premises or Online Exchange servers using their respective Exchange Web Services (EWS) endpoint.
Note
Azure Active Directory or Azure AD or AAD mentioned in Integration packs refers to Microsoft Entra ID. Learn more.
This integration pack operates in the methods shown below:
| Server kind | Supported auth mode | Default |
|---|---|---|
| Exchange Server (on-premises) | Basic Auth | Basic Auth |
| Exchange Online | OAuth | OAuth |
| Office 365 Exchange | OAuth | OAuth |
Microsoft is committed to protect your privacy while delivering software that brings you the performance, power, and convenience you want. For more information about Orchestrator-related privacy, see the System Center Orchestrator Privacy Statement.
System requirements
Prior to implementing the Exchange Users Integration Pack, you must install and configure the following listed software. For more information on how to install and configure Orchestrator and the Exchange Users Integration Pack, see the respective product documentation.
- System Center 2016 integration packs require System Center 2016 - Orchestrator
- Microsoft .NET Framework 3.5
- Microsoft Exchange 2010 Service Pack 1 or Microsoft Exchange 2013 or Microsoft Exchange Online/Microsoft 365
- System Center 2019 integration packs require System Center 2019 - Orchestrator
- System Center 2022 integration packs require System Center 2022 - Orchestrator
- Microsoft .NET Framework 4.7
- Exchange accounts on,
- (On-premises Exchange Server) Microsoft Exchange 2010 Service Pack 1 or Microsoft Exchange 2013 or
- (Exchange Online) Microsoft Exchange Online/Microsoft Office 365 Exchange.
Important
Exchange User Integration Pack (v10.19.25.0 or above) targets .NET Framework 4.7. Ensure that .NET Framework Runtime v4.7 or later is installed on Runbook Designer and Runbook Server machines. We recommend installing the latest available .NET framework version.
Create the following files with (identical) contents as shown below to update
supportedRuntimeVersionto v4:%systemdrive%/Program Files (x86)/Microsoft System Center/Orchestrator/Runbook Designer/RunbookDesigner.exe.config%systemdrive%/Program Files (x86)/Microsoft System Center/Orchestrator/Runbook Designer/RunbookTester.exe.config%systemdrive%/Program Files (x86)/Microsoft System Center/Orchestrator/Runbook Server/PolicyModule.exe.config
Contents:
<?xml version="1.0" encoding="utf-8"?>
<configuration>
  <startup useLegacyV2RuntimeActivationPolicy="true">
    <supportedRuntime version="v4.0.30319"/>
  </startup>
  <system.xml.serialization>
    <xmlSerializer tempFilesLocation="C:\ProgramData\Microsoft System Center 2012\Orchestrator\Activities\XmlSerializers\"/>
  </system.xml.serialization>
</configuration>
Download the integration pack
To download the Exchange Users Integration Pack for Orchestrator 2016, go to the Download Center space for 2016.
To download the Exchange Users Integration Pack for Orchestrator 2019, go to the Download Center space for 2019.
- To download the Exchange Users Integration Pack for Orchestrator 2022, go to the Download Center space for 2022.
Exchange Users Integration Pack for Orchestrator 2022 continues to work with Orchestrator 2025.
Download the Exchange Users Integration Pack here.
Register and deploy the integration pack
Download the integration pack file and register it with the Orchestrator management server using the Deployment Manager. You may then deploy it to runbook servers and Runbook Designers. For procedures on installing integration packs, see How to Install an Integration Pack.
Configure OAuth
Microsoft Azure Active Directory (Azure AD) implements the OAuth protocol for secure authentication of its users and applications.
What is an Azure AD client application?
The integration pack requires a Public Client Application on Azure AD that will operate in delegated authentication mode (that is, impersonating the user).
Here's how the connection will be established when the activity runs:
- User credentials will be obtained from the IP configuration.
- The credentials will be used to authenticate with Azure AD using OAuth.
- After authentication, an OAuth token will be received from Azure AD.
- Activity will perform operations on the EWS endpoint using the OAuth token.
Note
The alternative of delegated permissions is app-only authentication where app secrets (credential or secret certificate) are used instead of a user's credentials. The IP doesn't support these kinds of Azure AD applications.
Register an Azure AD client application in your tenant
Open a browser and navigate to the Azure Active Directory admin center.
On the Azure Active Directory admin center dashboard, select Azure Active Directory blade, and the Overview page opens.
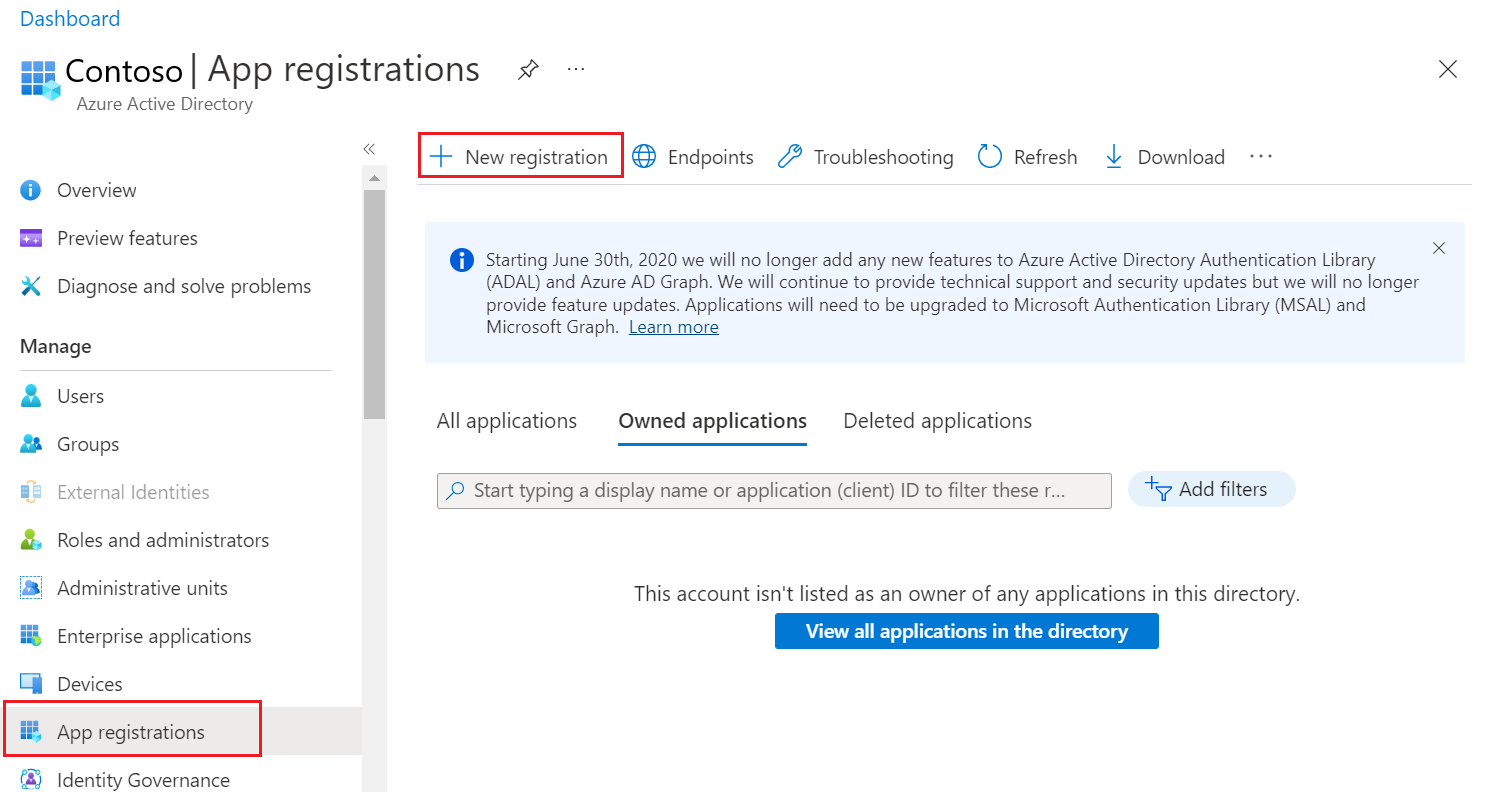
Under Manage, select App registrations. The App registrations page opens.

Select + New registration, and the Register an application page opens.
Set the values as below and select Register.
Name: Enter a friendly name for your app.
Supported account types: Select the Supported account types based on your scenario.
Redirect URI (optional): From the Select a platform dropdown, select Public client/native (mobile & desktop), and set the URI to
https://login.microsoftonline.com/common/oauth2/nativeclient.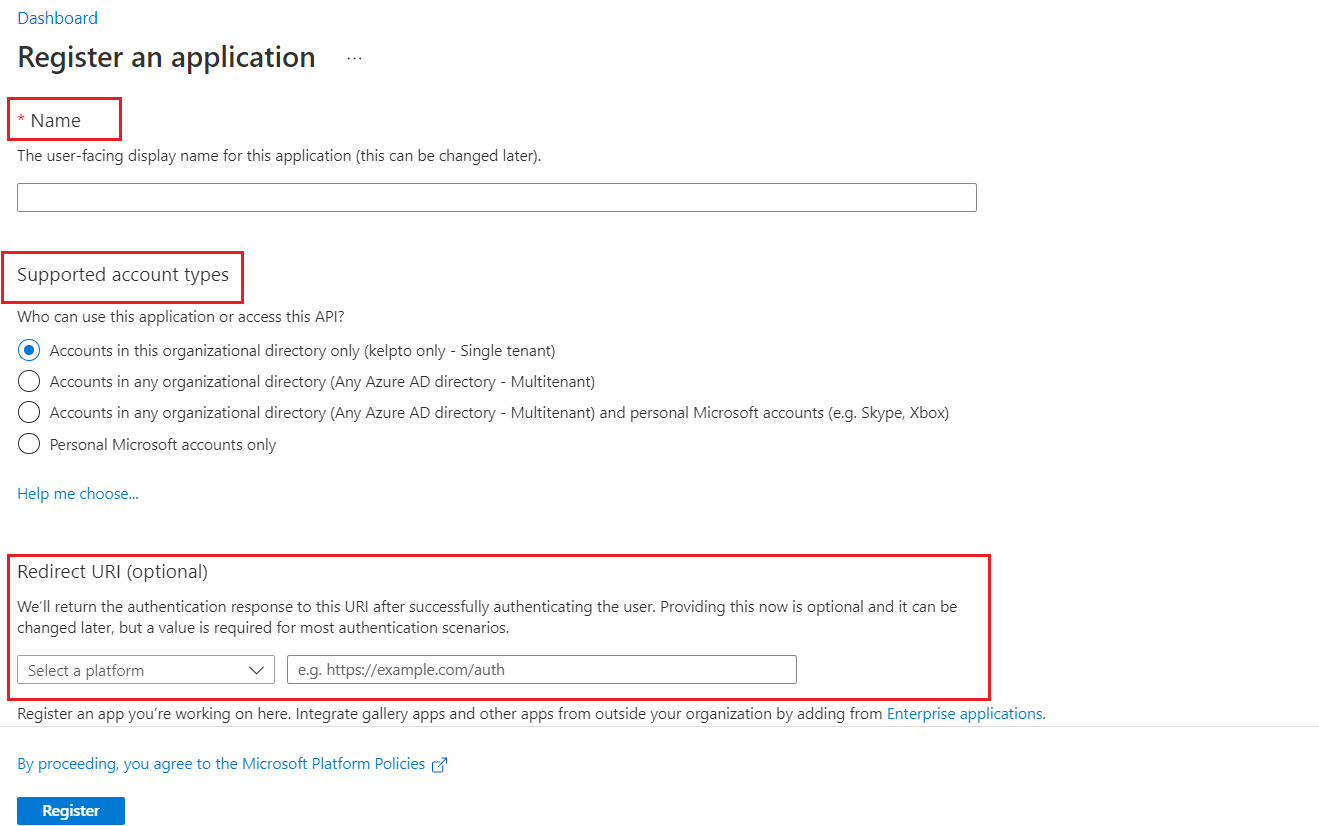
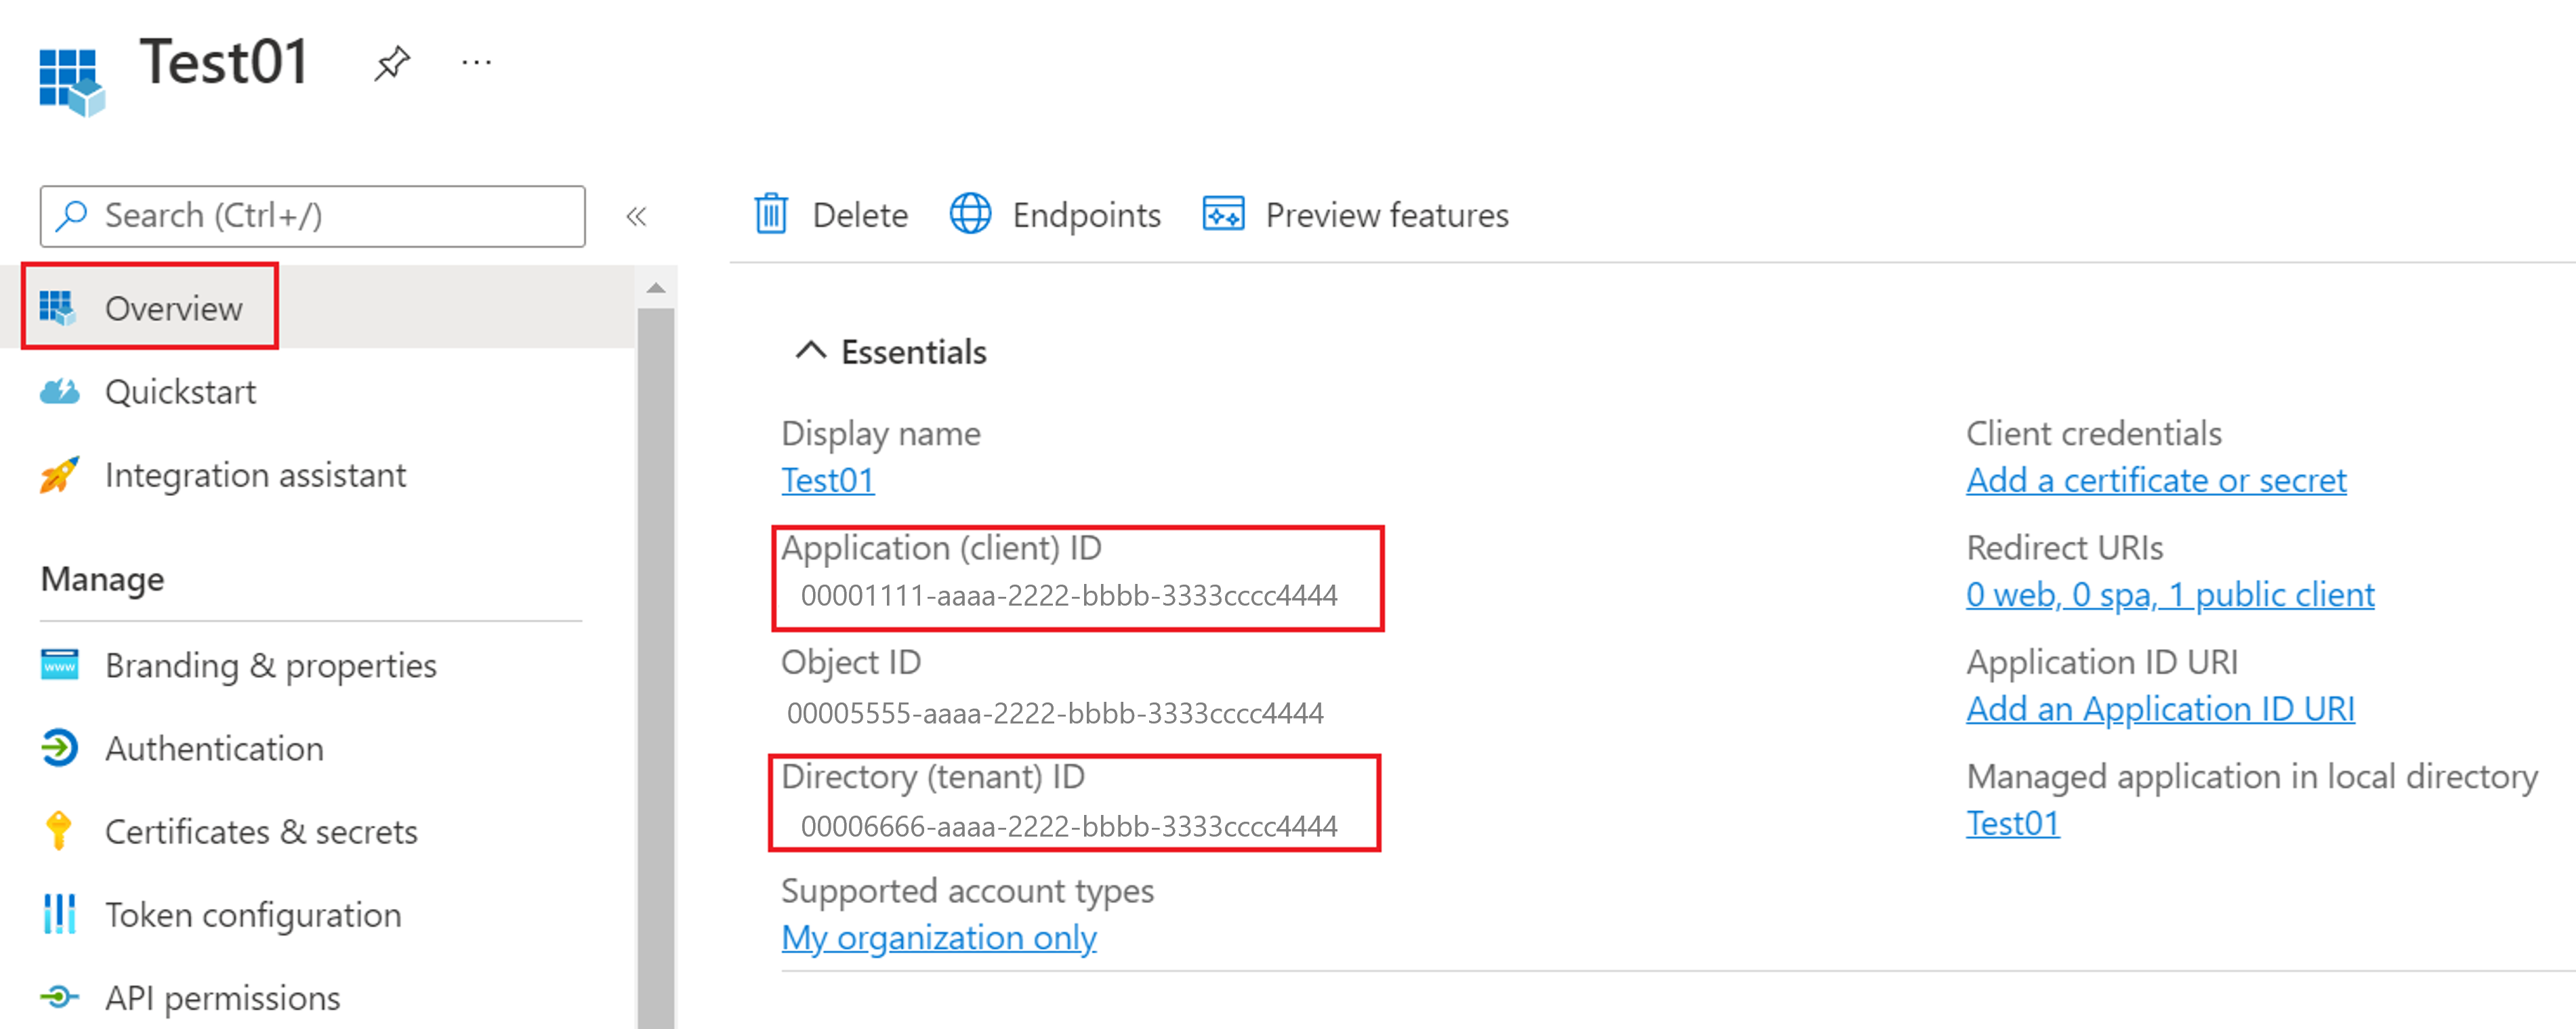
In Application overview page, under Overview > Essentials, copy the Application (client) ID and Directory (tenant) ID.
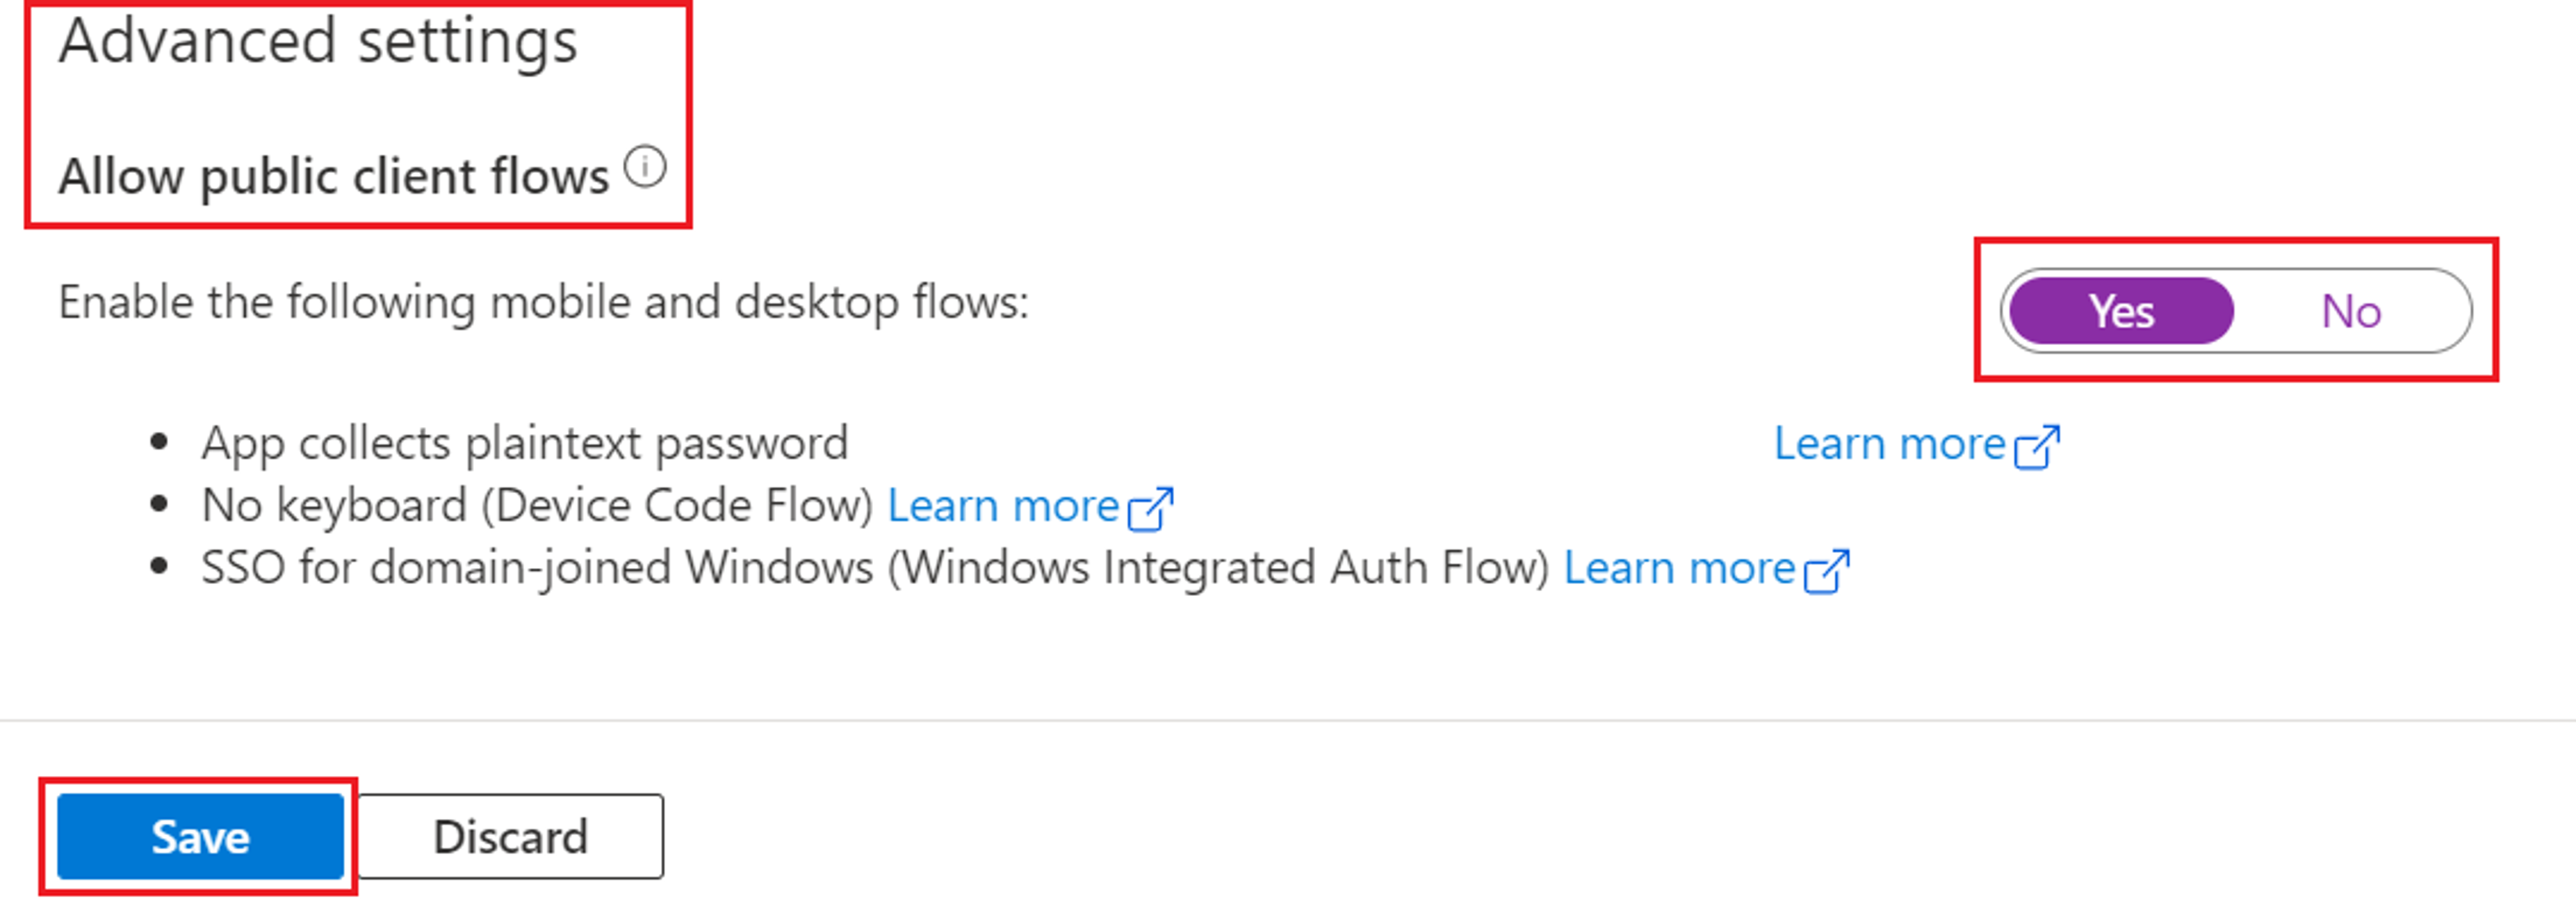
Select Authentication, do the following, and select Save.
Ensure that the Platform configurations is set to Mobile and desktop applications with at least
https://login.microsoftonline.com/common/oauth2/nativeclientas one of the Redirect URI.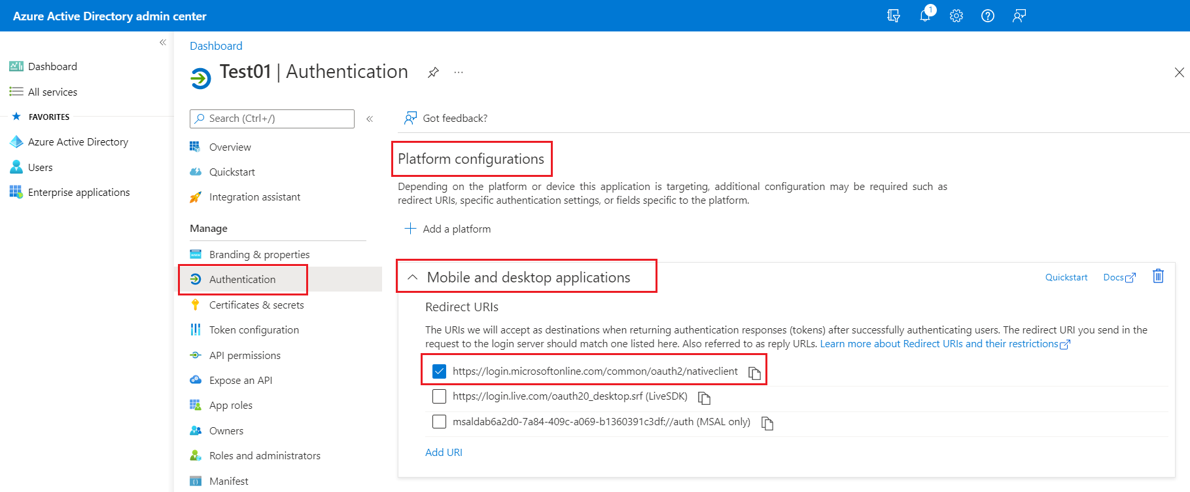
Under Advanced settings, ensure Allow public client flows is set to Yes.

Grant EWS permissions
Generally, Public Client Apps that operate in delegated authentication mode require explicit consent from the user who wants to use the application. The explicit consent is granted interactively through an embedded browser window.
However, the IP doesn't support the consent grant flow; instead the tenant admin must grant consent on behalf of all users in the tenant.
Add the permissions to the app by editing the app Manifest.
On the Microsoft Entra admin center, select the Azure AD application.
Follow the steps to grant EWS permissions by editing the app Manifest.
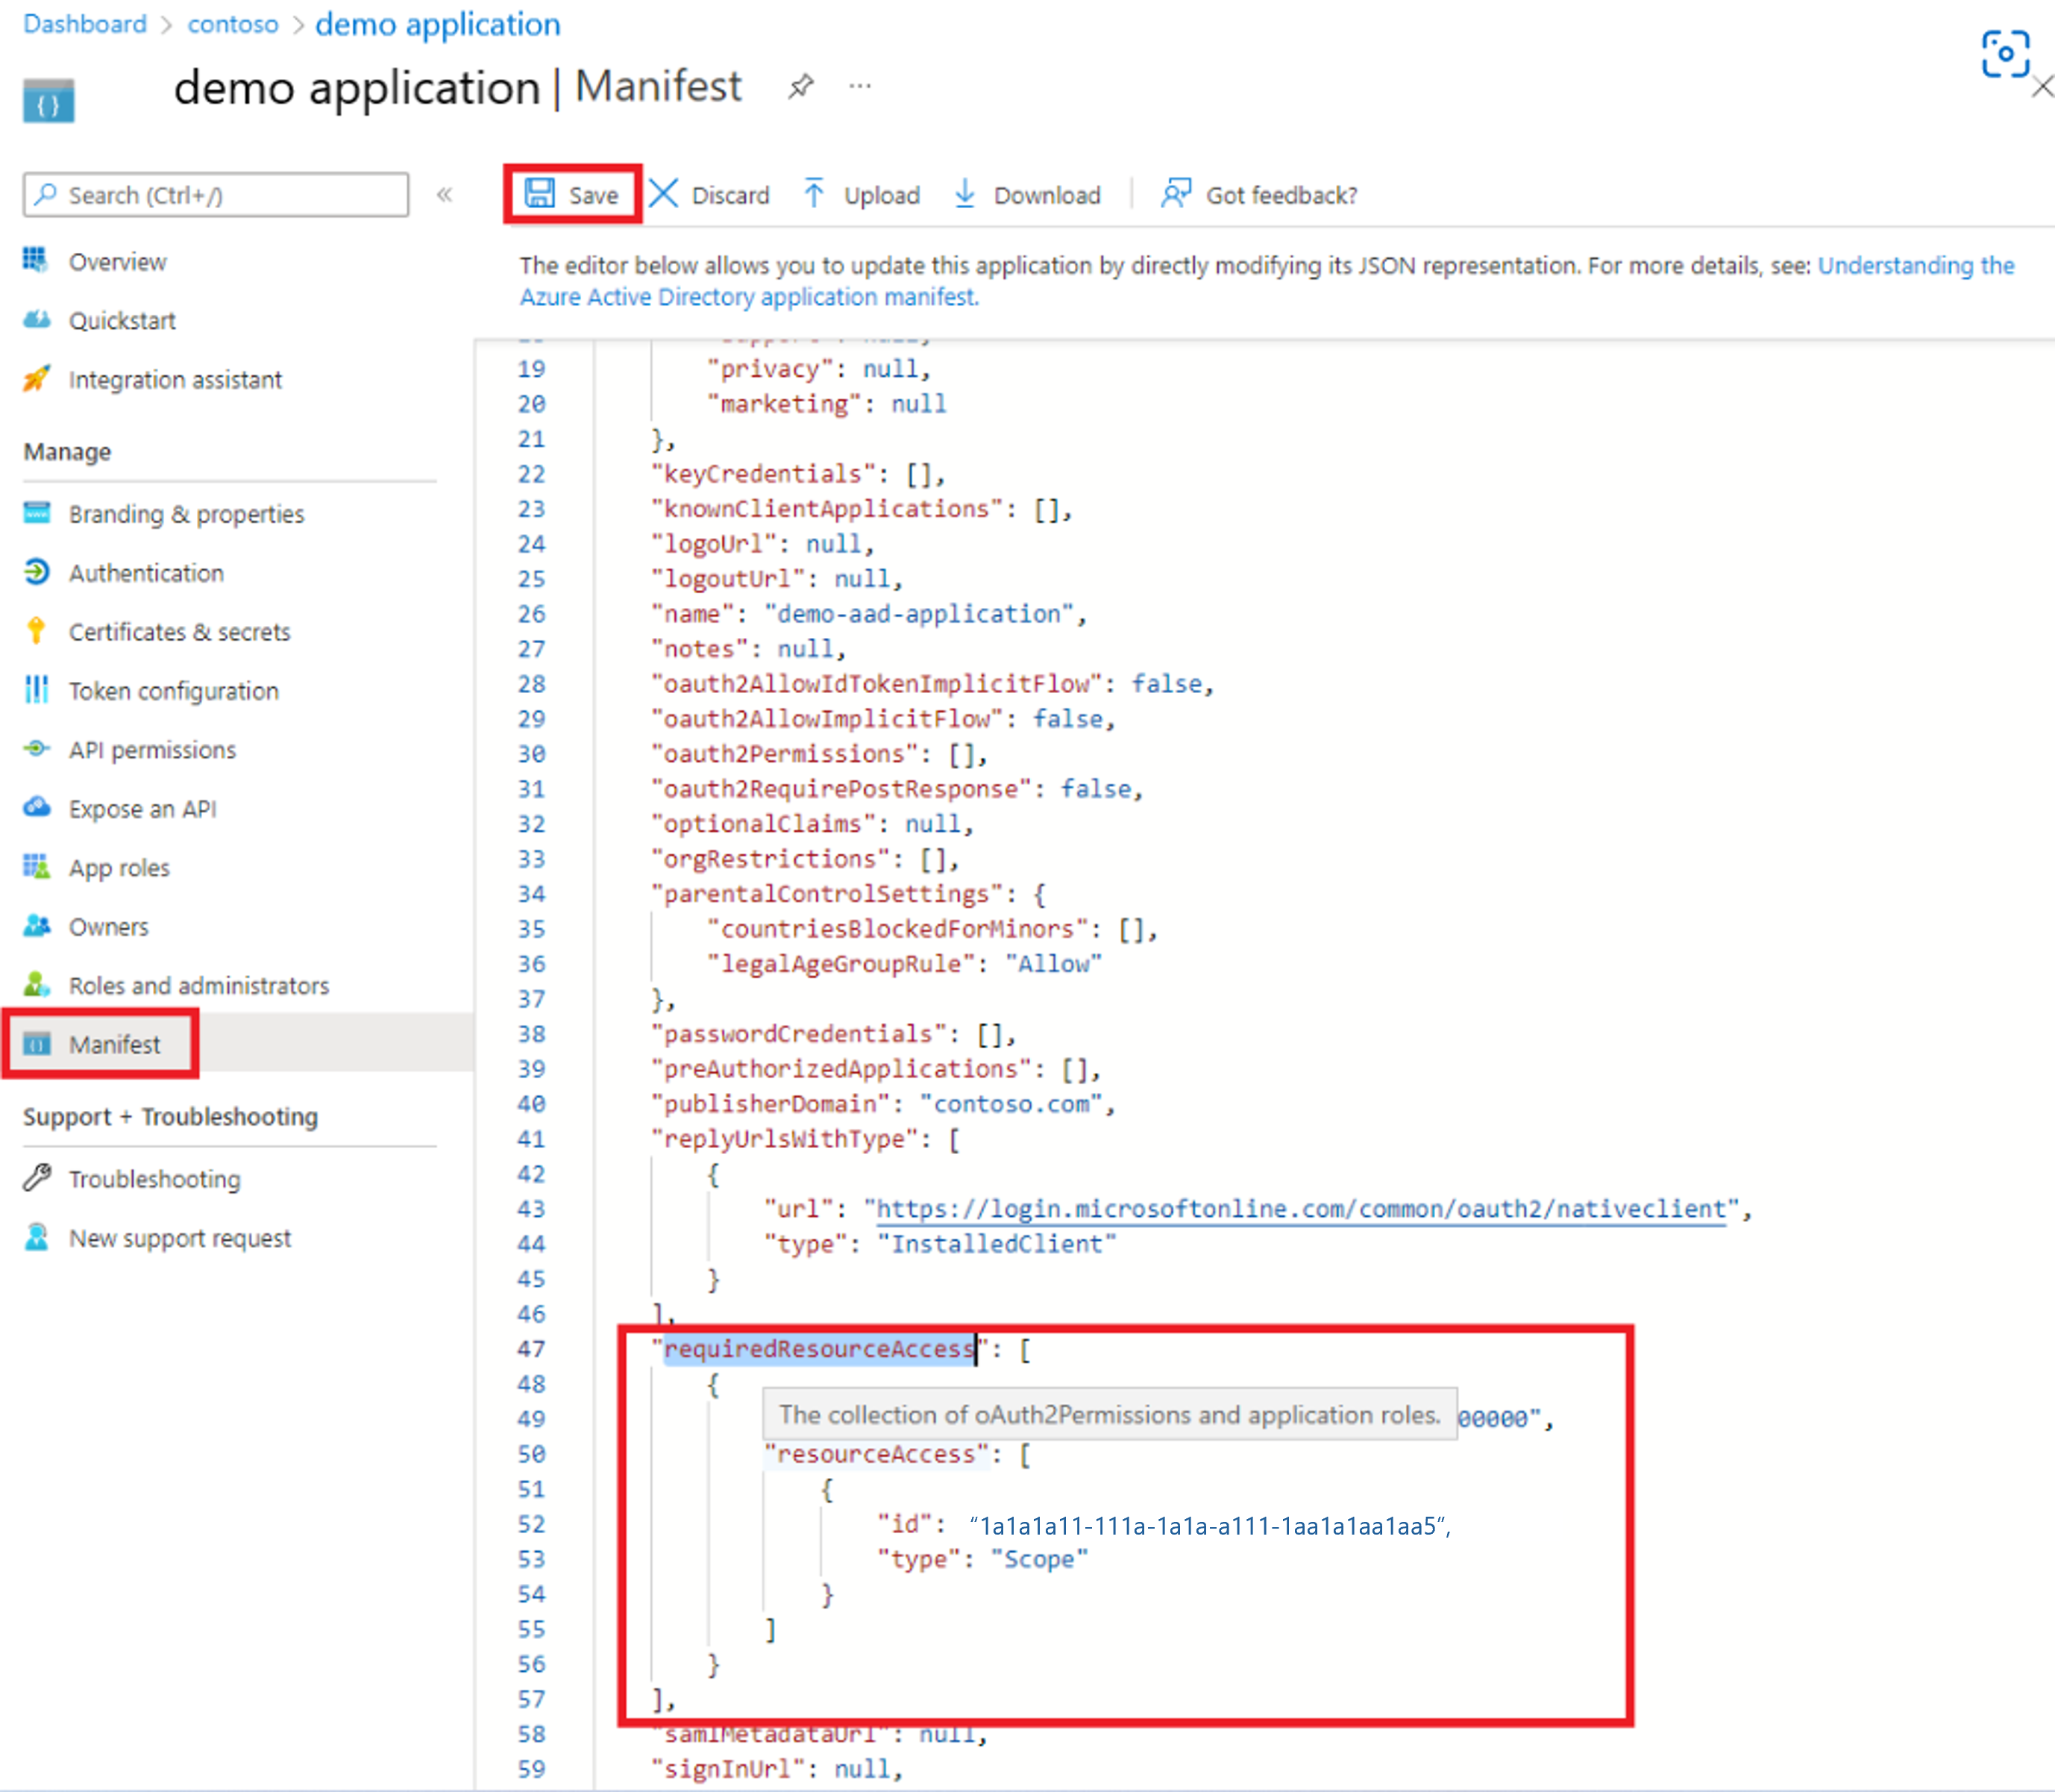
Request your tenant admin to grant "Admin consent" (on the API permissions tab) to this application for
EWS.AccessAsUser.Allpermission.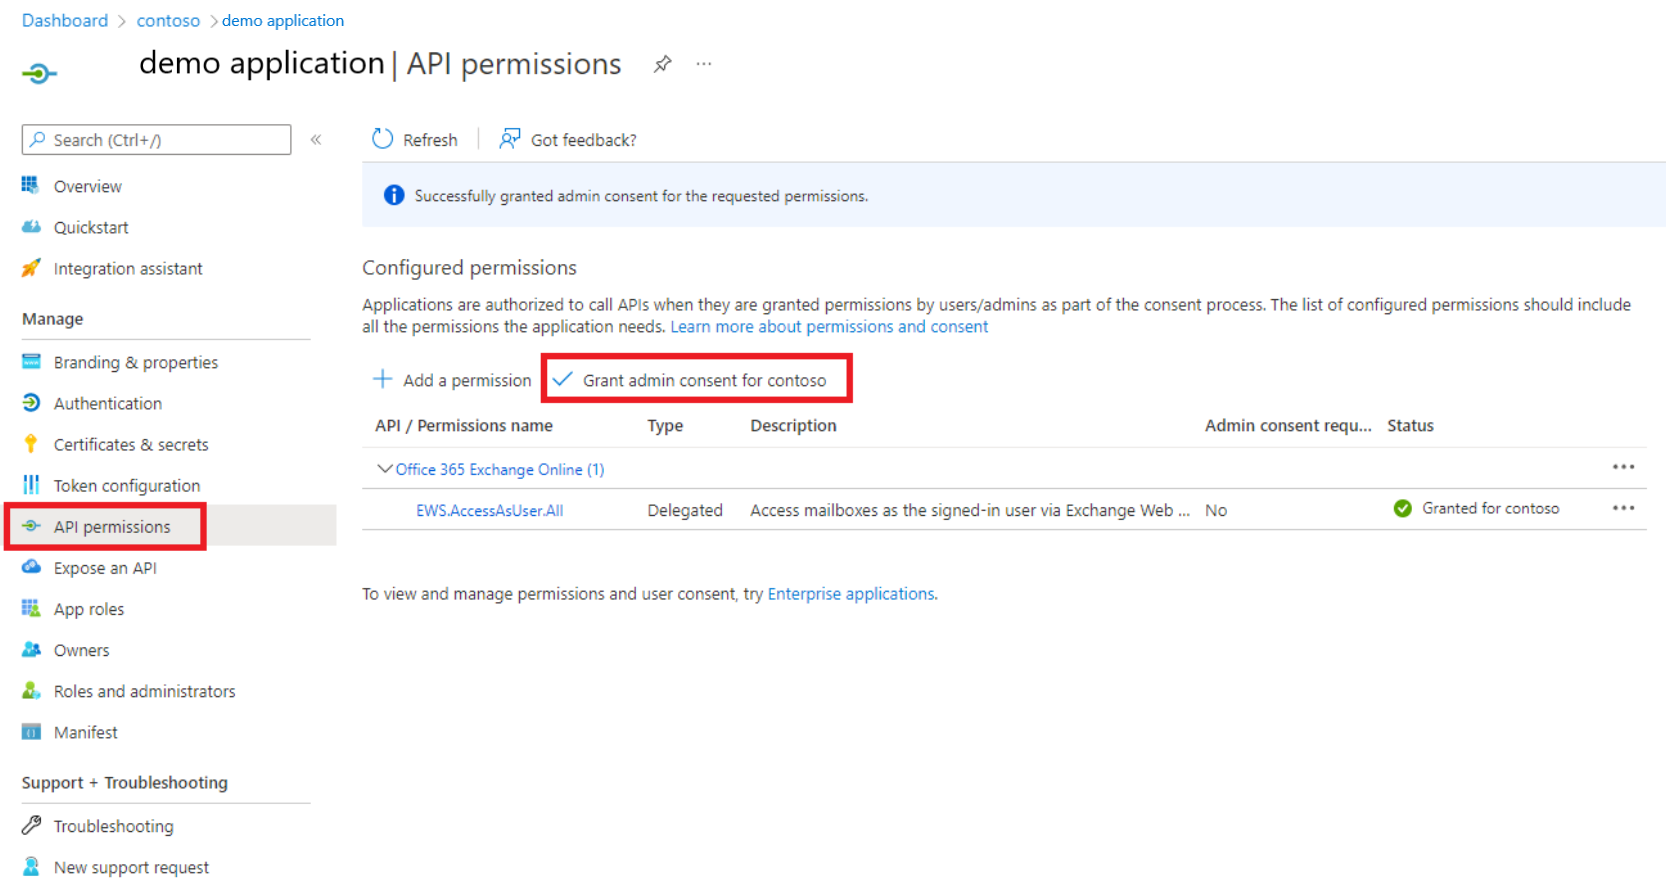


In practice, Admin consent implies that any user in the tenant can configure the IP with their credentials and execute Exchange activities under their account.
Configure the Exchange Users integration pack connections
A connection describes the recipe to make HTTP requests from Orchestrator to an Exchange server. You can specify as many connections as necessary to create links to multiple servers using different accounts or options. You can also create multiple connections to the same server to allow for differences in security permissions for different user accounts.
The integration pack supports two types of Exchange configurations:
- Basic Exchange Configuration connection
- Exchange Configuration (Item) configuration
The basic Exchange Configuration contains connection information that is used by activities where the item type is either implicit or not required:
- Create and Send E-Mail
- Reply to E-Mail
- Send E-Mail
- Delete Item
- Find Appointments
The Exchange Configuration (Item) configuration is used for the remaining activities that operate on a single Exchange Item (an Appointment, Task, Email, or Contact).
Set up a basic Exchange Configuration connection
In the Orchestrator Runbook Designer, select Options, and then select Exchange User. The Exchange User dialog appears.
On the Configurations tab, select Add to begin the connection setup. The Add Configuration dialog appears.
In the Name box, enter a friendly display name for the connection.
In the Type box, select Exchange Configuration.
In the Exchange Server Address box, enter the name or IP address of the Exchange server. If you're using the computer name, you can enter the NetBIOS name or the fully qualified domain name (FQDN). You may leave the Exchange Server Address box empty if you enable the Use [Autodiscover](/exchange/client-developer/exchange-web-services/autodiscover-for-exchange) option.
Note
Usually this is of the form
https://<your-domain-name.com>/EWS/Exchange.asmx.In the Username and Password boxes, enter the credentials that Orchestrator will use to connect to the Exchange server.
In the Domain box, enter the name of the (tenant) domain that will authorize access.
Note
If your email account is of the form
johndoe@contoso.onmicrosoft.com, then your domain is contoso.onmicrosoft.com
Set Server is Exchange Online or Office365 to
Trueif you're connecting to a managed Exchange Online or Office 365 Exchange instance. If so, follow these further steps (ignore otherwise):In Azure AD application (client) ID, specify the Azure AD client app ID created for this purpose.
In Azure AD Tenant (directory) ID, specify your Azure AD Tenant ID seen on the AD portal.
In Azure AD Cloud Instance URL, enter the URL of your Active directory instance or use the default value. Refer Azure AD Authority to confirm the authentication endpoint.
Set Log OAuth request/response to
Trueif you wish to inspect authentication failures in detail. The logs will be generated on the path%windir%\Temp\sc-orchestrator\exchange_user\{date-time-stamp}.msal.txt. One file will be generated for each execution of an Exchange User activity.
Set Trace EWS request/response to
Trueif you wish to inspect EWS failures in detail. The logs will be generated on the path%windir%\Temp\sc-orchestrator\exchange_user\{date-time-stamp}.ews-trace.xml.log. One file will be generated for each execution of an Exchange User activity. We recommend that you use SOAPe to visually inspect the traces.In the Timeout box, enter a timeout value or leave the default.
Select OK.
Add any more connections if needed, and then select Finish.
- In the Timeout box, enter a timeout value or leave the default.
- Select OK.
- Add any more connections if needed, and then select Finish.
Set up an Exchange Configuration (Item) connection
In the Orchestrator Runbook Designer, select Options, and then select Exchange User. The Exchange User dialog appears.
On the Configurations tab, select Add to begin the connection setup. The Add Configuration dialog appears.
In the Name box, enter a friendly display name for the connection.
In the Type box, select Exchange Configuration (Item Activity).
In the Exchange Server Address box, enter the name or IP address of the Exchange server. If you're using the computer name, you can enter the NetBIOS name or the fully qualified domain name (FQDN). You may leave the Exchange Server Address box empty if you enable the Use Autodiscover option.
In the Username and Password boxes, enter the credentials that Orchestrator will use to connect to the Exchange server.
In the Domain box, enter the name of the domain that will authorize access.
In the Timeout box, enter a timeout value or leave the default.
In the Item Type box, enter a valid Exchange Item Type.
Add any more connections if applicable, and then select Finish.
Set up an Exchange Configuration (Item) connection
In the Orchestrator Runbook Designer, select Options, and then select Exchange User. The Exchange User dialog appears.
On the Configurations tab, select Add to begin the connection setup. The Add Configuration dialog appears.
In the Name box, enter a friendly display name for the connection.
In the Type box, select Exchange Configuration (Item Activity).
In the Item Type, enter a valid Exchange Item Type.
For the remaining parameters, follow the same guidance mentioned above for basic Exchange Configuration.