Step 1: Set up Migration Manager agents
When migrating file shares with Migration Manager, you first need to set up one or more migration agents. This is done by running a setup file on each computer or VM you choose to configure. You can also group agents by assigning particular migrations to a specific set of agents or separating out agents in groups based on geographical location to optimize performance.
When you run the setup file, you are prompted for two sets of credentials. You need SharePoint Administrator credentials, depending on your destination, and Windows credentials with read access to the source. These Windows credentials must have read access to all file shares you plan to migrate. This pair of credentials creates a trust with Migration Manager. Migration Manager now sees it as an available "agent" to which it can automatically distribute migration tasks.
After an agent is configured, anyone with permission to access the SharePoint admin center can create tasks. The tasks are automatically distributed to one of the available configured agents.
Important
Make sure to download the latest version of the agent setup file. Passwords are not stored in the installer.
Planning checklist
| Category | Guidance |
|---|---|
| Determine how many agents you need | How many agents to create |
| Have the right credentials to use | SharePoint or OneDrive admin for migration destination and an on-premises account for source that has access to ALL network file shares you plan to migrate. Confirm that you have SharePoint or OneDrive Admin credentials to access the "destination" of where you are migrating your content. Verify the on-premises credentials you plan on using to configure the agent has access to all the network file shares you plan to migrate. |
| Virtual machines or computers to use: | Determine how many VMs or computers you plan on using for your migration project. List the computers or VMs before you start. |
| Verify prerequisites | Make sure your computer meets the requirements. |
| Check required endpoints | Verify that you have the required endpoints configured. |
| Multi-geo tenant | If you have a multi-geo tenant, be sure to understand where the agent will be installed. |
| Pre-provision OneDrive accounts | If you are migrating to OneDrive accounts, make sure the accounts are pre-provisioned before you migrate. Pre-provisioning can be done by using a script as described here: Pre-provision OneDrive for users in your organization. |
| Government Cloud | If your tenant resides in a government cloud, you might have extra steps to perform before using Migration Manager. |
Tip
Create a service account with administrative rights for your agent to run on the server or VM. This account should have read access to the sources you plan to migrate, as well as SharePoint or OneDrive administrator access to the destination specifically for your migration project. Log into each VM or computer with this account before running the setup file to ensure that the agent installs as a service.
Note
Third-party multi-factor authentication is not supported at this time.
Agents and performance considerations
One factor to achieving the best performance in your migration is using the fewest number of agents needed to complete the migration within your time frame. Using more agents than needed can increase the throttling rate when reports are uploaded.
Example: If your migration can be done within the desired time slot using 10 agents and at an acceptable speed, don't use 20 agents. Using more agents means higher traffic and a higher API request rate.
Determine how many agents you need
To calculate the minimum required number of agents to use for your migration:
- Run a test migration with 20 to 30 tasks using one agent to test the throughput per agent. Record the time.
- Estimate the number of tasks for your entire migration. Take the length of time it took one test agent to process, and calculate the number of agents for the migration. Factor in the overall length of time you have to complete your migration project.
- If you have already created more agents than you need, they can be disabled by selecting the agent within Migration Manager.
Set up an agent
- Sign in to the computer or VM you choose to set up an agent with credentials that have read access to all file shares you plan to migrate.
- From the SharePoint admin center, select Migration center. You need to sign in with an account that has SharePoint Administrator permissions for your organization.
- Under "For file shares", select Get started.
- Select the Agents tab, and then select Add.
- Select Download agent setup file. (To get the latest bug fixes, feature improvements or new features, please find the latest public preview download link in 'What’s New')
- Open the setup file. On the Welcome page, select Next.
- Enter the SharePoint admin username and password of the environment where you are migrating your content. Select Next.
- Enter the password of the Windows account that provides access to all the file shares that contain the content you want to migrate. Select Install.
- Test agent access (optional) or select Close. After the setup is completed, the new agent will be added to the available agents that can be assigned tasks.
Note
Multiple agents: If you have a large migration project and need to set up multiple agents, we recommend that you download the agent setup file to a shared location. That way, you can easily download the setup file on each computer or VM. Multiple agents allow you to batch certain migration jobs to particular groups depending on your needs. For example, you can group agents by datacenter to achieve better performance based on geographical location.
Example: You are migrating 10,000 users from on-premises shares in two datacenters to OneDrive. 2,000 users have data stored in a California datacenter, and 8,000 users have data stored in a Vermont datacenter. You installed two agents at the California datacenter and six agents at the Vermont datacenter. By grouping the agents geographically, you could batch migrations where the source data is in California to the California agent group and for Vermont data to the Vermont agent group. Geographical grouping provides performance benefits. Without geographical grouping, all datacenters would be in a default group, and you wouldn't have control over which agents are used. This could cause the California agents to migrate Vermont data and Vermont agents to migrate California data. While this technically migrates files, performance could be affected.
Working folder
A working folder named %appdata%\Microsoft\SPMigration is created for each agent. This folder is where logs, reports, and any temporary folders are saved. Make sure that your working folder has a minimum of 150 GB of free space. It could require more depending on the size of the data you plan to migrate.
Multi-geo agent setup
If you have a Multi-Geo SharePoint tenant, the agent is installed in Geo locations set in the SharePoint admin center. Before installing the agent, make sure the desired geo-location is the one set in the admin center. To change an agent's geo-location, delete and reinstall the agent.
Learn more: Multi-Geo Capabilities in OneDrive and SharePoint Online
To install an agent to a different Geo location:
Download the agent setup file.
Launch the setup file and remain on the Welcome page.
Open this file: %temp%\SPMigrationAgentSetup\SPMigrationAgentSetup\Microsoft.SharePoint.Migration.ClientShared.dll.config
Under appSettings, add an entry as shown in the following example for the desired country/region or data center. (Note: this is an example for Canada.)
<add key="GeoLocation" value="CAN" />The country or regional GEO code can be found here Microsoft 365 Multi-Geo availability.
Important
Migration to Teams: If you are migrating to Teams, the destination Teams site must be in the same GEO as your tenant admin. If they are different, the Teams channel won't load when you select destination.
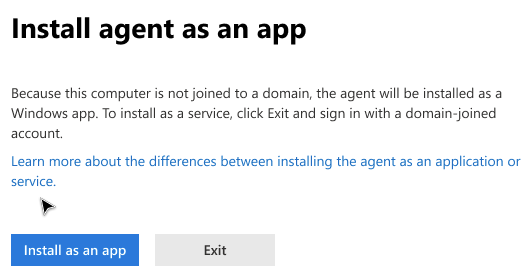
Installing the agent as an app
If the system detects you aren't joined to a domain when installing the agent, you can install the agent as a Windows app. If you still wish to install it as a service, exit and sign in with a domain-joined account.
Important
If you install the agent as an app, it will not run if the computer is asleep, effectively pausing your migration.
Select Install as an app.

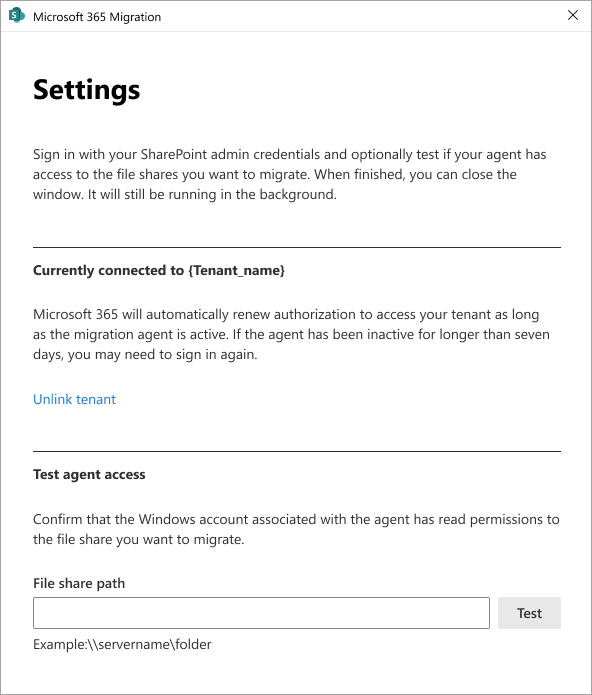
After the agent installs, sign in with your SharePoint Admin credentials.
Test if your agent has access to the file shares you want to migrate (optional).

The settings screen displays if and to what tenant you are connected. Select unlink tenant if you wish to sign in to a different tenant.
Microsoft 365 automatically renews authorization to access your tenant as long as the migration agent is active. If the agent has been inactive for longer than seven days, you might need to sign in again.
Agent task assignment
Migration Manager automatically assigns tasks to an available agent. You can't manually assign a task to a specific agent. Each agent can have up to 10 tasks in its queue. You can, however, assign tasks to agent groups.
Pausing a task doesn't release the agent to another task. An agent remains unavailable to accept a new task until the task is resumed and completed, or if the task is deleted.
How long does the connection stay active?
The connection between the agent (as a service) and Migration Manager stays active as long as the computer is still running and the SharePoint admin credentials that were used to sign into the agent are still valid.
If the agent does becomes disconnected, it still holds the token to the Migration Manager for up to seven days. After that time, the agent will need to be reinstalled.