Get started creating SharePoint-hosted SharePoint Add-ins
Important
The SharePoint Add-In model in SharePoint Online has been deprecated as of November 27th 2023, checkout the full retirement announcement to learn more.
Deprecation means that the feature will not get any new investments, but it's still supported. SharePoint add-in model is retired fully on April 2nd, 2026 and is no longer available after that time. Primary replacement technology for the SharePoint add-in model is SharePoint Framework (SPFx) which continues to be supported also in future.
SharePoint-hosted add-ins are one of the two major types of SharePoint Add-ins. For an overview of SharePoint Add-ins and the two different types, see SharePoint Add-ins. Here's a summary of SharePoint-hosted add-ins:
- They contain SharePoint lists, web parts, workflows, custom pages, and other components, all of which are installed on a subweb, called the add-in web, of the SharePoint website where the add-in is installed.
- The only code they have is JavaScript on custom SharePoint pages.
In this article, you'll complete the following steps:
- Set up your dev environment
- Create the add-in project
- Code your add-in
- Run the add-in and test the list
Set up your dev environment
There are many ways to set up a development environment for SharePoint Add-ins. This section explains the simplest way.
Get the tools
If you don't already have Visual Studio 2013 or later installed, install it by using the instructions at Install Visual Studio. We recommend using the latest version from the Microsoft Download Center.
Visual Studio includes the Microsoft Office Developer Tools for Visual Studio. Sometimes a version of the tools is released between updates of Visual Studio. To be sure that you have the latest version of the tools, run the installer for Office Developer Tools for Visual Studio 2013, or the installer for Office Developer Tools for Visual Studio 2015.
For Visual Studio 2017, installing the Microsoft Office Developer Tools should be done through the Visual Studio 2017 Installer, which can be accessed from the New Project window.
Reference earlier versions of Visual Studio or other Visual Studio documentation.
Sign up for an Office 365 developer subscription
Note
You might already have access to an Office 365 developer subscription:
- Are you a Visual Studio (MSDN) subscriber? Visual Studio Ultimate and Visual Studio Premium with MSDN subscribers receive an Office 365 developer subscription as a benefit. Redeem your benefit today.
- Do you have one of the following Office 365 subscription plans? If so, see Create a developer site on an existing Office 365 subscription.
To get an Office 365 plan:
Sign up for an Office 365 developer subscription through the Office 365 Developer Program.
See the Office 365 Developer Program documentation for step-by-step instructions about how to join the Office 365 Developer Program and sign up and configure your subscription.
Open your developer site
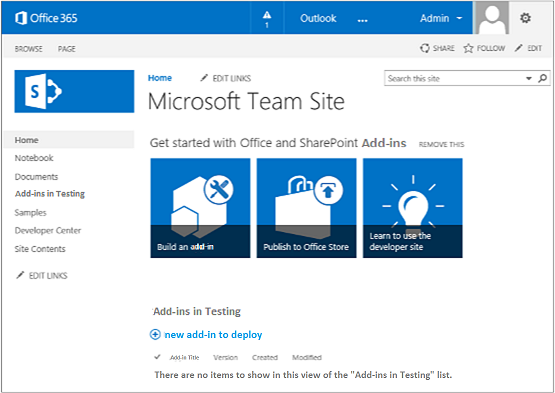
In a browser, navigate to the SharePoint site collection you created when you setup your Office 365 developer subscription. (If you don't have a site, follow the instructions here). You should see a site that looks like the one in the following figure. The Apps / Add-ins in Testing list on the page confirms that the website was made with the SharePoint Developer Site template. If you see a regular team site instead, wait a few minutes and then restart your site.
Note
Make a note of the site's URL; it's used when you create SharePoint Add-in projects in Visual Studio.
Your developer site home page with the Apps / Add-ins in Testing list

Create the add-in project
Start Visual Studio by using the Run as administrator option.
In Visual Studio, select File > New > New Project.
In the New Project dialog box, expand the Visual C# node, expand the Office/SharePoint node, and then select Add-ins > Add-in for SharePoint.
Name the project EmployeeOrientation, and then select OK.
In the Specify the Add-in for SharePoint Settings dialog box, provide the full URL of the SharePoint site that you want to use to debug your add-in. This is the URL of the developer site. (Use HTTPS, not HTTP in the URL.) Under How do you want to host your SharePoint Add-in, select SharePoint-hosted, and then select Finish.
You may be prompted to sign in to your developer site. If so, use your subscription administrator's credentials.
After the project is created, open the file /Pages/Default.aspx from the root of the project. Among other things, this generated file loads one or both of two scripts that are hosted on SharePoint: sp.runtime.js and sp.js. The markup for loading these files is in the Content control near the top of the file that has the ID PlaceHolderAdditionalPageHead. The markup varies depending on the version of Microsoft Office Developer Tools for Visual Studio that you are using. This series of tutorials requires that both files be loaded and that they be loaded with ordinary HTML <script> tags, not <SharePoint:ScriptLink> tags.
Ensure that the following lines are in the PlaceHolderAdditionalPageHead control, just above the line
<meta name="WebPartPageExpansion" content="full" />:<script type="text/javascript" src="/_layouts/15/sp.runtime.js"></script> <script type="text/javascript" src="/_layouts/15/sp.js"></script>Search the file for any other markup that also loads one or the other of these files and remove the redundant markup. Save and close the file.
Code your add-in
For your first SharePoint-hosted SharePoint Add-in, we'll include the classic SharePoint extension: a custom list and list instance.
In Solution Explorer, open the AppManifest.xml file.
When the manifest designer opens, add a space between the words in the Title field so that it reads Employee Orientation. (Do not change the Name field.)
Save and close the file.
Right-click the project in Solution Explorer and select Add > New Folder. Name the folder Lists.
Right-click the new folder and select Add > New Item. The Add New Item dialog opens to the Office/SharePoint node.
Select List. Give it the name NewEmployeeOrientation, and then select Add.
On the Choose List Settings page of the SharePoint Customization Wizard, leave the list display name at the default NewEmployeeOrientation, select the Create a customizable list template and a list instance of it option button, select Default (Custom List) on the drop-down list, and then select Finish.
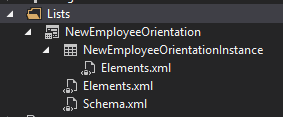
The wizard creates a NewEmployeeOrientation list template with a child list instance named NewEmployeeOrientationInstance. A list designer may open. It is used in a later step.
Expand the NewEmployeeOrientationInstance node in Solution Explorer, if it isn't already, so that you can clearly distinguish the elements.xml file that is a child of the list instance from the elements.xml file that is a child of the list template.

Open the elements.xml child of the NewEmployeeOrientation list template.
Add spaces to the DisplayName attribute (not the Name attribute) to make it friendlier: "New Employee Orientation."
Set the Description attribute to "Orientation information about new employees."
Leave all other attributes at their default, save the file, and close it.
If the list designer is not open, select the NewEmployeeOrientation node in Solution Explorer.
Open the List tab of the designer. This tab is used to set certain values for the list instance, not the list template, but it has some default values that it inherited from the template.
Change the values on the List tab to the following:
- Title: New Employees in Seattle
- List URL: Lists/NewEmployeesInSeattle
- Description: The new employees in Seattle
Leave the check boxes at their default status, save the file, and then close the designer.
The list instance may have its old name in Solution Explorer. If so, open the shortcut menu for NewEmployeeOrientationInstance, select Rename, and change the name to NewEmployeesInSeattle.
Open the schema.xml file.
In the View element whose BaseViewID value is "0", replace the existing ViewFields element with the following markup (use exactly this GUID for the FieldRef named
Title). Line breaks may come at odd places in this autogenerated schema.xml file. Be sure you have found the matching begin and end tags for the ViewFields element. Add line breaks to improve readability.<ViewFields> <FieldRef Name="Title" ID="{fa564e0f-0c70-4ab9-b863-0177e6ddd247}" DisplayName="Employee" /> </ViewFields>Still in the schema.xml file, in the View element whose BaseViewID value is "1", replace the existing ViewFields element with the following markup (use exactly this GUID for the FieldRef named
LinkTitle).<ViewFields> <FieldRef Name="LinkTitle" ID="{82642ec8-ef9b-478f-acf9-31f7d45fbc31}" DisplayName="Employee" /> </ViewFields>Save and close the schema.xml file.
Open the elements.xml file that is a child of the list instance NewEmployeesInSeattle (not the elements.xml that is a child of the list template NewEmployeeOrientation).
In this file, populate the list with some initial data. You do this by adding the following Data element markup as a child element of the ListInstance element.
<Data>
  <Rows>
    <Row>
      <Field Name="Title">Tom Higginbotham</Field>
    </Row>
    <Row>
      <Field Name="Title">Satomi Hayakawa</Field>
    </Row>
    <Row>
      <Field Name="Title">Cassi Hicks</Field>
    </Row>
    <Row>
      <Field Name="Title">Lertchai Treetawatchaiwong</Field>
    </Row>
  </Rows>
</Data>
Save and close the file.
In Solution Explorer, double-click Feature1 to open the Feature designer. In the designer, set the Title to New Employee Orientation Components and set the Description to Lists and other components for getting employees oriented to the company. Save the file, and then close the designer.
If the Feature1 in Solution Explorer has not been automatically renamed, open its shortcut menu, select Rename, and rename it to NewEmployeeOrientationComponents.
Open the Default.aspx file.
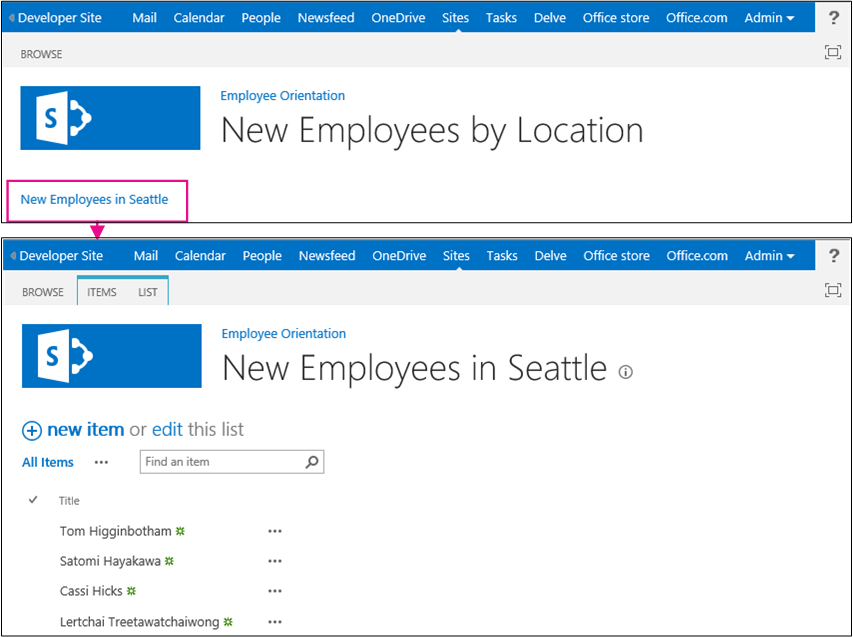
Find the ASP.NET Content element with the ID PlaceHolderPageTitleInTitleArea. Replace the default string Page Title with New Employees by Location.
Find the ASP.NET Content element with the ID PlaceHolderMain. Replace its contents with the following markup. The
_spPageContextInfois a JavaScript object that SharePoint automatically includes on the page. It'swebAbsoluteUrlproperty returns the URL of the add-in web.<p><asp:HyperLink runat="server" NavigateUrl="JavaScript:window.location = _spPageContextInfo.webAbsoluteUrl + '/Lists/NewEmployeesInSeattle/AllItems.aspx';" Text="New Employees in Seattle" /></p>Use the F5 key to deploy and run your add-in. Visual Studio makes a temporary installation of the add-in on your test SharePoint site and immediately runs the add-in. (To find out how end users run an installed SharePoint Add-in, see Next steps.)
When the add-in's default page opens, select the New Employees in Seattle link to open the custom list instance.

Add and delete items from the list.
To end the debugging session, close the browser window or stop debugging in Visual Studio. Each time that you press F5, Visual Studio will retract the previous version of the add-in and install the latest one.
You will work with this add-in and Visual Studio solution in other articles, and it's a good practice to retract the add-in one last time when you are finished working with it for a while. Right-click the project in Solution Explorer, and select Retract.
Next steps
To create your add-ins, walk through the following steps in this order:
- Deploy and install a SharePoint-hosted SharePoint Add-in
- Add custom columns to a SharePoint-hosted SharePoint Add-in
- Add a custom content type to a SharePoint-hosted SharePoint Add-in
- Add a web part to a page in a SharePoint-hosted SharePoint Add-in
- Add a workflow to a SharePoint-hosted SharePoint Add-in
- Add a custom page and style to a SharePoint-hosted SharePoint Add-in
- Add custom client-side rendering to a SharePoint-hosted SharePoint Add-in
- Create a custom ribbon button in the host web of a SharePoint Add-in
- Use the SharePoint JavaScript APIs to work with SharePoint data
- Work with host web data from JavaScript in the add-in web