Troubleshoot your scans and connections in the Microsoft Purview Data Map
This article describes how to troubleshoot connection errors while setting up scans on data sources in Microsoft Purview, or errors that could occur with your scans.
Permission the credential on the data source
If you're using a managed identity or service principal as a method of authentication for scans, you'll have to allow these identities to have access to your data source.
There are specific instructions for each source type.
Important
Verify that you have followed all prerequisite and authentication steps for the source you are connecting to. You can find all available sources listed in the Microsoft Purview supported sources article.
Verifying Azure Role-based Access Control to enumerate Azure resources in the Microsoft Purview governance portal
Registering single Azure data source
To register a single data source in Microsoft Purview, such as an Azure Blob Storage or an Azure SQL Database, you must be granted at least Reader role on the resource or inherited from higher scope such as resource group or subscription. Some Azure RBAC roles, such as Security Admin, don't have read access to view Azure resources in control plane.
Verify this by following the steps below:
- From the Azure portal, navigate to the resource that you're trying to register in Microsoft Purview. If you can view the resource, it's likely, that you already have at least reader role on the resource.
- Select Access control (IAM) > Role Assignments.
- Search by name or email address of the user who is trying to register data sources in Microsoft Purview.
- Verify if any role assignments, such as Reader, exist in the list or add a new role assignment if needed.
Scanning multiple Azure data sources
- From the Azure portal, navigate to the subscription or the resource group.
- Select Access Control (IAM) from the left menu.
- Select +Add.
- In the Select input box, select the Reader role and enter your Microsoft Purview account name (which represents its MSI name).
- Select Save to finish the role assignment.
- Repeat the steps above to add the identity of the user who is trying to create a new scan for multiple data sources in Microsoft Purview.
Scanning data sources using Private Link
If public endpoint is restricted on your data sources, to scan Azure data sources using Private Link, you need to set up a Self-hosted integration runtime and create a credential.
Important
Scanning multiple data sources which contain databases as Azure SQL database with Deny public network access, would fail. To scan these data sources using private Endpoint, instead use registering single data source option.
For more information about setting up a self-hosted integration runtime, see the article about ingestion private endpoints and scanning sources.
For more information how to create a new credential in Microsoft Purview, see the article about credentials for source authentication in Microsoft Purview.
Storing your credential in your key vault and using the right secret name and version
You must also store your credential in your Azure Key Vault instance and use the right secret name and version.
Verify this by following the steps below:
- Navigate to your Key Vault.
- Select Settings > Secrets.
- Select the secret you're using to authenticate against your data source for scans.
- Select the version that you intend to use and verify that the password or account key is correct by selecting Show Secret Value.
Verify permissions for the Microsoft Purview managed identity on your Azure Key Vault
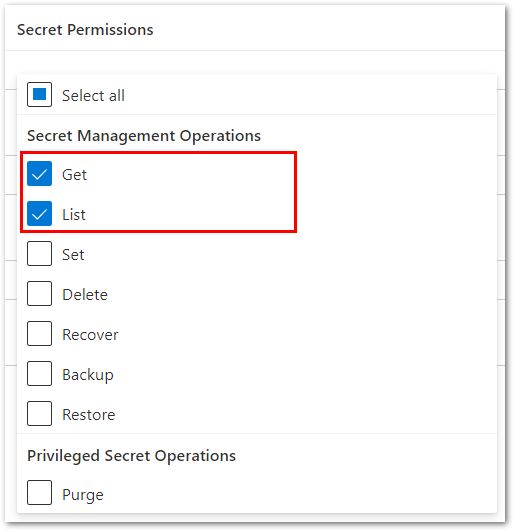
Verify that the correct permissions have been configured for the Microsoft Purview managed identity to access your Azure Key Vault.
To verify this, do the following steps:
Navigate to your key vault and to the Access policies section
Verify that your Microsoft Purview managed identity shows under the Current access policies section with at least Get and List permissions on Secrets

If you don't see your Microsoft Purview managed identity listed, then follow the steps in Create and manage credentials for scans to add it.
Scans no longer run
If your Microsoft Purview scan used to successfully run, but are now failing, check these things:
- Have credentials to your resource changed or been rotated? If so, you'll need to update your scan to have the correct credentials.
- Is an Azure Policy preventing updates to Storage accounts? If so follow the Microsoft Purview exception tag guide to create an exception for Microsoft Purview accounts.
- Are you using a self-hosted integration runtime? Check that it's up to date with the latest software and that it's connected to your network.
Test connection passes but scan fails with connection error
Are you using private endpoints or virtual networks? Confirm your network settings, paying attention to your Network Security Group (NSG) rules.
Receive JDK error when using a self-hosted integration runtime
Many sources that require a self-hosted integration runtime also require a certain version of Java to be installed on the machine where the self-hosted integration runtime is hosted. If you receive a JDK error, check the prerequisites on your specific data source's page and install the recommended JDK version.